User Guide
Page 9
For lamp-specific disposal information, check www.lamprecycle.org. Emergency calls Warning: You cannot make an emergency call system. Sparks in such areas could cause an explosion or ...
For lamp-specific disposal information, check www.lamprecycle.org. Emergency calls Warning: You cannot make an emergency call system. Sparks in such areas could cause an explosion or ...

User Guide
Page 18
...(USB) 18 Installing memory 19 BIOS utility 20 Boot sequence 20 Enable disk-to RF fields (RSS-102) 36 LCD panel ergonomic specifications 36 Low-power license-exempt radio communication devices (RSS-210) 36 Exposure of humans to -disk recovery 20 Password 20 Using software ...21 Playing DVD movies 21 Power management 22 eMachines Recovery Management 23 Burn backup discs 24 Restore 25 Restore Windows from backup discs 26 Troubleshooting 29 Troubleshooting tips 29 Error messages 29...
...(USB) 18 Installing memory 19 BIOS utility 20 Boot sequence 20 Enable disk-to RF fields (RSS-102) 36 LCD panel ergonomic specifications 36 Low-power license-exempt radio communication devices (RSS-210) 36 Exposure of humans to -disk recovery 20 Password 20 Using software ...21 Playing DVD movies 21 Power management 22 eMachines Recovery Management 23 Burn backup discs 24 Restore 25 Restore Windows from backup discs 26 Troubleshooting 29 Troubleshooting tips 29 Error messages 29...
User Guide
Page 21
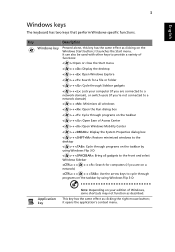
... a variety of Windows, some shortcuts may not function as clicking the right mouse button; English 3 Windows keys The keyboard has two keys that perform Windows-specific functions.
... a variety of Windows, some shortcuts may not function as clicking the right mouse button; English 3 Windows keys The keyboard has two keys that perform Windows-specific functions.
User Guide
Page 33
... with you Bring the following items with you: • AC adapter • Power cords that the local AC voltage and the AC adapter power cord specifications are traveling in. If not, purchase a power cord that is compatible with the telecommunications system of purchase, in another country, check that are appropriate for...
... with you Bring the following items with you: • AC adapter • Power cords that the local AC voltage and the AC adapter power cord specifications are traveling in. If not, purchase a power cord that is compatible with the telecommunications system of purchase, in another country, check that are appropriate for...
User Guide
Page 41
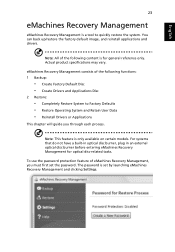
...System and Retain User Data • Reinstall Drivers or Applications This chapter will guide you must first set by launching eMachines Recovery Management and clicking Settings. English 23 eMachines Recovery Management eMachines Recovery Management is set the password. Note: This feature is for optical disc-related tasks. You can back up/...quickly restore the system. For systems that do not have a built-in optical disc burner, plug in an external optical disc burner before entering eMachines Recovery Management for general reference only. Actual product specifications may vary.
...System and Retain User Data • Reinstall Drivers or Applications This chapter will guide you must first set by launching eMachines Recovery Management and clicking Settings. English 23 eMachines Recovery Management eMachines Recovery Management is set the password. Note: This feature is for optical disc-related tasks. You can back up/...quickly restore the system. For systems that do not have a built-in optical disc burner, plug in an external optical disc burner before entering eMachines Recovery Management for general reference only. Actual product specifications may vary.
User Guide
Page 44
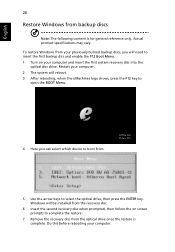
.... 5 Use the arrow keys to select the optical drive, then press the ENTER key. Restart your computer. 2 The system will reboot. 3 After rebooting, when the eMachines logo shows, press the F12 key to open the BOOT Menu. 4 Here you will be installed from the recovery disc. 6 Insert the second recovery disc... and enable the F12 Boot Menu. 1 Turn on your computer. English 26 Restore Windows from backup discs Note: The following content is complete. Actual product specifications may vary.
.... 5 Use the arrow keys to select the optical drive, then press the ENTER key. Restart your computer. 2 The system will reboot. 3 After rebooting, when the eMachines logo shows, press the F12 key to open the BOOT Menu. 4 Here you will be installed from the recovery disc. 6 Insert the second recovery disc... and enable the F12 Boot Menu. 1 Turn on your computer. English 26 Restore Windows from backup discs Note: The following content is complete. Actual product specifications may vary.
User Guide
Page 45
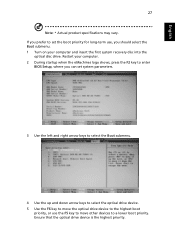
If you should select the Boot submenu. 1 Turn on your computer. 2 During startup when the eMachines logo shows, press the F2 key to enter BIOS Setup, where you can set the boot priority for long-term use the F5 key to ... F6 key to move other devices to a lower boot priority. Ensure that the optical drive device is the highest priority. English 27 Note: * Actual product specifications may vary. Restart your computer and insert the first system recovery disc into the optical disc drive.
If you should select the Boot submenu. 1 Turn on your computer. 2 During startup when the eMachines logo shows, press the F2 key to enter BIOS Setup, where you can set the boot priority for long-term use the F5 key to ... F6 key to move other devices to a lower boot priority. Ensure that the optical drive device is the highest priority. English 27 Note: * Actual product specifications may vary. Restart your computer and insert the first system recovery disc into the optical disc drive.

User Guide
Page 46
English 28 6 Press the ESC key to enter the Exit submenu, press the ENTER key to select Yes. Note: * Actual product specifications may vary. Press the ENTER key again to Exit Saving Changes. Do this before rebooting your computer. The system will reboot. 7 When you reboot, Windows will be installed from the recovery disc. 8 Insert the second recovery disc when prompted, then follow the onscreen prompts to complete the restore. 9 Remove the recovery disc from the optical drive once the restore is complete.
English 28 6 Press the ESC key to enter the Exit submenu, press the ENTER key to select Yes. Note: * Actual product specifications may vary. Press the ENTER key again to Exit Saving Changes. Do this before rebooting your computer. The system will reboot. 7 When you reboot, Windows will be installed from the recovery disc. 8 Insert the second recovery disc when prompted, then follow the onscreen prompts to complete the restore. 9 Remove the recovery disc from the optical drive once the restore is complete.

User Guide
Page 51
In the event of warranty. In order to operate within the limits for compliance with Telecom's specifications, the associated equipment shall be set to operate within any 30 minute period for any item will accept no responsibility should contact your equipment... differences between the end of one call attempt. 4 Some parameters required for which it imply that there is designed. Notice for compliance with Telecom's Specifications: a There shall be set to ensure that automatic calls to its network. English 33 TBR 21 This equipment has been approved [Council Decision 98/...
In the event of warranty. In order to operate within the limits for compliance with Telecom's specifications, the associated equipment shall be set to operate within any 30 minute period for any item will accept no responsibility should contact your equipment... differences between the end of one call attempt. 4 Some parameters required for which it imply that there is designed. Notice for compliance with Telecom's Specifications: a There shall be set to ensure that automatic calls to its network. English 33 TBR 21 This equipment has been approved [Council Decision 98/...

User Guide
Page 54
...) The notebook PC series employs low gain integral antennas that do not emit RF field in the 5.15 to 5.85 GHz bands. LCD panel ergonomic specifications Design viewing distance Design inclination angle Design azimuth angle Viewing direction range class Screen tilt angle Design screen illuminance Reflection class of LCD panel (positive...
...) The notebook PC series employs low gain integral antennas that do not emit RF field in the 5.15 to 5.85 GHz bands. LCD panel ergonomic specifications Design viewing distance Design inclination angle Design azimuth angle Viewing direction range class Screen tilt angle Design screen illuminance Reflection class of LCD panel (positive...