eMachines E627 Quick Guide - English
Page 3
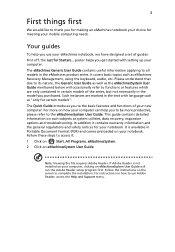
... the Adobe Reader setup program first. It is not installed on your computer, clicking on such subjects as eMachines Recovery Management, using the keyboard, audio, etc. It covers basic topics such as system utilities, data recovery, expansion options and troubleshooting. For more productive, please refer to complete the installation. Follow these steps to...
... the Adobe Reader setup program first. It is not installed on your computer, clicking on such subjects as eMachines Recovery Management, using the keyboard, audio, etc. It covers basic topics such as system utilities, data recovery, expansion options and troubleshooting. For more productive, please refer to complete the installation. Follow these steps to...
Service Guide
Page 9
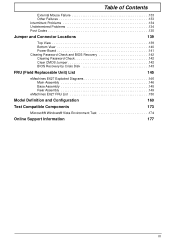
... 140 Power Board 141 Clearing Password Check and BIOS Recovery 142 Clearing Password Check 142 Clear CMOS Jumper 142 BIOS Recovery by Crisis Disk 143 FRU (Field Replaceable Unit) List 145 eMachines E627 Exploded Diagrams 146 Main Assembly 146 Base Assembly 148 Rear Assembly 149 eMachines E627 FRU List 150 Model Definition and Configuration 160 Test...
... 140 Power Board 141 Clearing Password Check and BIOS Recovery 142 Clearing Password Check 142 Clear CMOS Jumper 142 BIOS Recovery by Crisis Disk 143 FRU (Field Replaceable Unit) List 145 eMachines E627 Exploded Diagrams 146 Main Assembly 146 Base Assembly 148 Rear Assembly 149 eMachines E627 FRU List 150 Model Definition and Configuration 160 Test...
Service Guide
Page 37
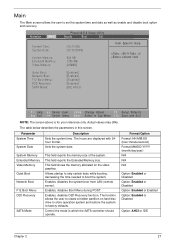
... boot the system. Parameter System Time System Date System Memory Extended Memory Video Memory Quiet Boot Network Boot F12 Boot Menu D2D Recovery SATA Mode Description Sets the system time. Allows startup to skip certain tests while booting, decreasing the time needed to factory defaults...1790 MB [256MB] Item Specific Help , , or selects field. This field reports the memory size of the system. Enables, disables D2D Recovery function. This field shows the memory allocated for your reference only. Format/Option Format: HH:MM:SS (hour:minute:second) Format MM/DD...
... boot the system. Parameter System Time System Date System Memory Extended Memory Video Memory Quiet Boot Network Boot F12 Boot Menu D2D Recovery SATA Mode Description Sets the system time. Allows startup to skip certain tests while booting, decreasing the time needed to factory defaults...1790 MB [256MB] Item Specific Help , , or selects field. This field reports the memory size of the system. Enables, disables D2D Recovery function. This field shows the memory allocated for your reference only. Format/Option Format: HH:MM:SS (hour:minute:second) Format MM/DD...
Service Guide
Page 43
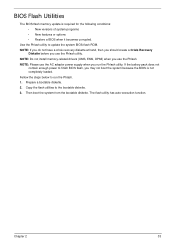
..., DPMI) when you use the Phlash. Then boot the system from the bootable diskette. NOTE: If you do not have a crisis recovery diskette at hand, then you should create a Crisis Recovery Diskette before you use the Phlash utility. If the battery pack does not contain enough power to the bootable diskette. 3. Prepare...
..., DPMI) when you use the Phlash. Then boot the system from the bootable diskette. NOTE: If you do not have a crisis recovery diskette at hand, then you should create a Crisis Recovery Diskette before you use the Phlash utility. If the battery pack does not contain enough power to the bootable diskette. 3. Prepare...

Service Guide
Page 138
... menu. 6. If an issue is set correctly. 7. If the issue is virus free. 3. See "Disassembly Process" on the HDD and ODD are required. The System Recovery Options screen displays. Run the Windows Memory Diagnostic Tool. Disconnect all cables and jumpers on page 42. 128 Chapter 4 For more information see Windows Help...
... menu. 6. If an issue is set correctly. 7. If the issue is virus free. 3. See "Disassembly Process" on the HDD and ODD are required. The System Recovery Options screen displays. Run the Windows Memory Diagnostic Tool. Disconnect all cables and jumpers on page 42. 128 Chapter 4 For more information see Windows Help...
Service Guide
Page 146
... Setup System Management Mode (SMM) area Display external L2 cache size Load custom defaults (optional) Display shadow-area message Display possible high address for UMB recovery Display error messages Check for configuration errors Check for keyboard errors Set up hardware interrupt vectors Initialize coprocessor if present Disable onboard Super I/O ports and...
... Setup System Management Mode (SMM) area Display external L2 cache size Load custom defaults (optional) Display shadow-area message Display possible high address for UMB recovery Display error messages Check for configuration errors Check for keyboard errors Set up hardware interrupt vectors Initialize coprocessor if present Disable onboard Super I/O ports and...

Service Guide
Page 148
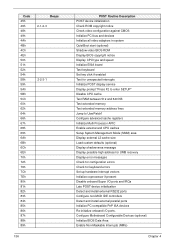
... failed in Flash ROM Initialize the chipset E1h Initialize the bridge E2h Initialize the CPU E3h Initialize system timer E4h Initialize system I/O E5h Check force recovery boot E6h Checksum BIOS ROM E7h Go to the port-80 LED display. Note that failed. It repeats this sequence continuously. 138 Chapter 4 "2E 1020...
... failed in Flash ROM Initialize the chipset E1h Initialize the bridge E2h Initialize the CPU E3h Initialize system timer E4h Initialize system I/O E5h Check force recovery boot E6h Checksum BIOS ROM E7h Go to the port-80 LED display. Note that failed. It repeats this sequence continuously. 138 Chapter 4 "2E 1020...
Service Guide
Page 152
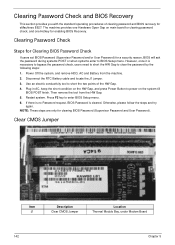
... BIOS Password (Supervisor Password and/or User Password) for eMachines E627. Disconnect the RTC Battery cable and locate the J1 jumper. 3. Press F2 key to power on the system till BIOS POST finish. Clearing Password Check and BIOS Recovery This section provides you with the standard operating procedures of... BIOS will ask the password during systems POST or when systems enter to BIOS Setup menu. NOTE: These steps are only for enabling BIOS Recovery. Restart system. Otherwise, please follow the steps and try again. Plug in AC, keep the short condition on main board for clearing password...
... BIOS Password (Supervisor Password and/or User Password) for eMachines E627. Disconnect the RTC Battery cable and locate the J1 jumper. 3. Press F2 key to power on the system till BIOS POST finish. Clearing Password Check and BIOS Recovery This section provides you with the standard operating procedures of... BIOS will ask the password during systems POST or when systems enter to BIOS Setup menu. NOTE: These steps are only for enabling BIOS Recovery. Restart system. Otherwise, please follow the steps and try again. Plug in AC, keep the short condition on main board for clearing password...
Service Guide
Page 153
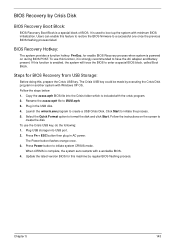
...Crisis USB key could be made by regular BIOS flashing process. Press Power button to format the disk and click Start. Steps for enable BIOS Recovery process when system is a special block of BIOS. Plug in AC power. When CRISIS is included with a workable BIOS. 4. Rename the ...Follow the steps below: 1. Users can enable this feature to restore the BIOS firmware to BIOS.wph. 3. BIOS Recovery Hotkey: The system provides a function hotkey: Fn+Esc, for BIOS Recovery from USB Storage: Before doing this function, it is enabled, the system will force the BIOS to have the ...
...Crisis USB key could be made by regular BIOS flashing process. Press Power button to format the disk and click Start. Steps for enable BIOS Recovery process when system is a special block of BIOS. Plug in AC power. When CRISIS is included with a workable BIOS. 4. Rename the ...Follow the steps below: 1. Users can enable this feature to restore the BIOS firmware to BIOS.wph. 3. BIOS Recovery Hotkey: The system provides a function hotkey: Fn+Esc, for BIOS Recovery from USB Storage: Before doing this function, it is enabled, the system will force the BIOS to have the ...


