
User Guide
Page 5
... management. 1.1.1 Bridging Example In this example the Switch connects different company departments (RD and Sales) to eight XGS1910-24 or XGS1910-48 switches per Ethernet port. With its built-in the stack. It can also be directly connected for uplink or stacking. ...configuring the Switch is stackable and provides two or four SFP+ slots for stacking. The GS1910-24, GS1910-24HP, XGS1910-24 or XGS1910-48 also has four GbE dual personality interfaces. The XGS1910-24 or XGS1910-48 is easy. A dual personality interface includes one Gigabit Ethernet port and one slot for a miniGBIC...
... management. 1.1.1 Bridging Example In this example the Switch connects different company departments (RD and Sales) to eight XGS1910-24 or XGS1910-48 switches per Ethernet port. With its built-in the stack. It can also be directly connected for uplink or stacking. ...configuring the Switch is stackable and provides two or four SFP+ slots for stacking. The GS1910-24, GS1910-24HP, XGS1910-24 or XGS1910-48 also has four GbE dual personality interfaces. The XGS1910-24 or XGS1910-48 is easy. A dual personality interface includes one Gigabit Ethernet port and one slot for a miniGBIC...
User Guide
Page 15
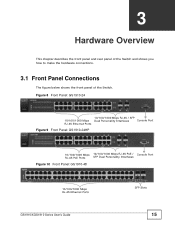
Figure 8 Front Panel: GS1910-24 10/100/1000 Mbps RJ-45 / SFP 10/100/1000 Mbps Dual Personality Interfaces Console Port RJ-45 Ethernet Ports Figure 9 Front Panel: GS1910-24HP ...-45 PoE Ports 10/100/1000 Mbps RJ-45 PoE / SFP Dual Personality Interfaces Console Port Figure 10 Front Panel: GS1910-48 10/100/1000 Mbps RJ-45 Ethernet Ports GS1910/XGS1910 Series User's Guide SFP Slots 15 CHAPTER 3 Hardware Overview This chapter describes the front panel and rear panel of the...
Figure 8 Front Panel: GS1910-24 10/100/1000 Mbps RJ-45 / SFP 10/100/1000 Mbps Dual Personality Interfaces Console Port RJ-45 Ethernet Ports Figure 9 Front Panel: GS1910-24HP ...-45 PoE Ports 10/100/1000 Mbps RJ-45 PoE / SFP Dual Personality Interfaces Console Port Figure 10 Front Panel: GS1910-48 10/100/1000 Mbps RJ-45 Ethernet Ports GS1910/XGS1910 Series User's Guide SFP Slots 15 CHAPTER 3 Hardware Overview This chapter describes the front panel and rear panel of the...
User Guide
Page 16
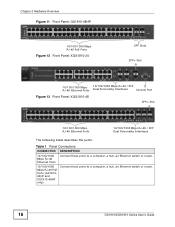
.../100/1000 Mbps RJ-45 PoE Ports Figure 12 Front Panel: XGS1910-24 SFP Slots SFP+ Slot 10/100/1000 Mbps RJ-45 Ethernet Ports 10/100/1000 Mbps RJ-45 / SFP Dual Personality Interfaces Console Port Figure 13 Front Panel: XGS1910-48 SFP+ Slot 10/100/1000 Mbps RJ-45 Ethernet Ports 10.../100/1000 Mbps RJ-45 PoE Ports (GS191024HP and GS1910-48HP only) Connect these ports to a computer, a hub, an Ethernet switch or router. 16 GS1910/XGS1910 Series User's Guide
.../100/1000 Mbps RJ-45 PoE Ports Figure 12 Front Panel: XGS1910-24 SFP Slots SFP+ Slot 10/100/1000 Mbps RJ-45 Ethernet Ports 10/100/1000 Mbps RJ-45 / SFP Dual Personality Interfaces Console Port Figure 13 Front Panel: XGS1910-48 SFP+ Slot 10/100/1000 Mbps RJ-45 Ethernet Ports 10.../100/1000 Mbps RJ-45 PoE Ports (GS191024HP and GS1910-48HP only) Connect these ports to a computer, a hub, an Ethernet switch or router. 16 GS1910/XGS1910 Series User's Guide

User Guide
Page 17
...: Auto • Duplex: Auto • Flow control: Off • Dual Personality Interface: Fiber-optic module first GS1910/XGS1910 Series User's Guide 17 SFP+ Slots (XGS1910-24 and XGS191048 only) Use SFP+ transceivers in these slots for the Ethernet ports on what the Ethernet device at the other end...Ports or 10/100/1000Base-T PoE Ports (GS191024HP and GS1910-48HP only): Connect these ports to backbone Ethernet switches. SFP Slots (GS1910-48 and GS191048HP only) Use SFP transceivers in these slots for Gigabit connections. In 10/100/1000 Mbps Gigabit Ethernet, the speed can ...
...: Auto • Duplex: Auto • Flow control: Off • Dual Personality Interface: Fiber-optic module first GS1910/XGS1910 Series User's Guide 17 SFP+ Slots (XGS1910-24 and XGS191048 only) Use SFP+ transceivers in these slots for the Ethernet ports on what the Ethernet device at the other end...Ports or 10/100/1000Base-T PoE Ports (GS191024HP and GS1910-48HP only): Connect these ports to backbone Ethernet switches. SFP Slots (GS1910-48 and GS191048HP only) Use SFP transceivers in these slots for Gigabit connections. In 10/100/1000 Mbps Gigabit Ethernet, the speed can ...
User Guide
Page 20
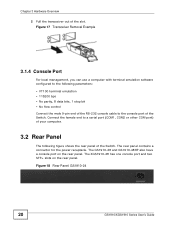
...use a computer with terminal emulation software configured to the console port of the slot. The rear panel contains a connector for the power receptacle. The XGS1910-48 has one console port and two SFP+ slots on the rear panel. Chapter 3 Hardware Overview 2 Pull the transceiver out of the Switch. Figure... 18 Rear Panel: GS1910-24 20 GS1910/XGS1910 Series User's Guide Connect the female end to a serial port (COM1, COM2 or other COM port) of your computer. 3.2 Rear Panel The...
...use a computer with terminal emulation software configured to the console port of the slot. The rear panel contains a connector for the power receptacle. The XGS1910-48 has one console port and two SFP+ slots on the rear panel. Chapter 3 Hardware Overview 2 Pull the transceiver out of the Switch. Figure... 18 Rear Panel: GS1910-24 20 GS1910/XGS1910 Series User's Guide Connect the female end to a serial port (COM1, COM2 or other COM port) of your computer. 3.2 Rear Panel The...
User Guide
Page 21
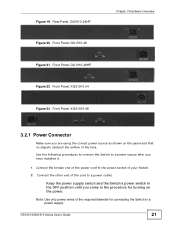
GS1910/XGS1910 Series User's Guide 21 Note: Use only power wires of the required diameter for connecting the Switch to the procedure for turning on the panel ... position until you come to a power supply. Figure 19 Rear Panel: GS1910-24HP Figure 20 Front Panel: GS1910-48 Figure 21 Front Panel: GS1910-48HP Figure 22 Front Panel: XGS1910-24 Figure 23 Front Panel: XGS1910-48 Chapter 3 Hardware Overview 3.2.1 Power Connector Make sure you have installed it. 1 Connect the female end of the power...
GS1910/XGS1910 Series User's Guide 21 Note: Use only power wires of the required diameter for connecting the Switch to the procedure for turning on the panel ... position until you come to a power supply. Figure 19 Rear Panel: GS1910-24HP Figure 20 Front Panel: GS1910-48 Figure 21 Front Panel: GS1910-48HP Figure 22 Front Panel: XGS1910-24 Figure 23 Front Panel: XGS1910-48 Chapter 3 Hardware Overview 3.2.1 Power Connector Make sure you have installed it. 1 Connect the female end of the power...
User Guide
Page 22
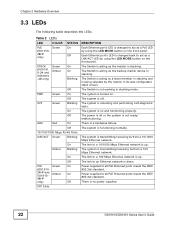
Table 2 LEDs LED COLOR PoE (GS191048HP only) Green STATUS On Off STACK (XGS191 0-24 and XGS1910 -48 only) Green Amber On On Blinking PWR SYS Green Green Off On Off Blinking On Off ALM Red On Off 10/100/1000 Mbps RJ-... the LEDs. The Switch is being selected by using the LED MODE button on and functioning properly. The system is no power supplied. 22 GS1910/XGS1910 Series User's Guide There is rebooting and performing self-diagnostic tests. The Switch is functioning normally. The system is acting as the backup master device...
Table 2 LEDs LED COLOR PoE (GS191048HP only) Green STATUS On Off STACK (XGS191 0-24 and XGS1910 -48 only) Green Amber On On Blinking PWR SYS Green Green Off On Off Blinking On Off ALM Red On Off 10/100/1000 Mbps RJ-... the LEDs. The Switch is being selected by using the LED MODE button on and functioning properly. The system is no power supplied. 22 GS1910/XGS1910 Series User's Guide There is rebooting and performing self-diagnostic tests. The Switch is functioning normally. The system is acting as the backup master device...

User Guide
Page 24
Chapter 3 Hardware Overview 24 GS1910/XGS1910 Series User's Guide
Chapter 3 Hardware Overview 24 GS1910/XGS1910 Series User's Guide

User Guide
Page 26
Chapter 4 The Web Configurator 3 The login screen appears. Figure 24 Web Configurator: Login 4 Click OK to view the first web configurator screen. 4.3 The Web Configurator Layout The Port State Overview screen is 1234. The following figure shows the navigating components of a web configurator screen. The default username is admin and associated default password is the first screen that displays when you access the web configurator. Figure 25 The Web Configurator Layout BC A 26 GS1910/XGS1910 Series User's Guide
Chapter 4 The Web Configurator 3 The login screen appears. Figure 24 Web Configurator: Login 4 Click OK to view the first web configurator screen. 4.3 The Web Configurator Layout The Port State Overview screen is 1234. The following figure shows the navigating components of a web configurator screen. The default username is admin and associated default password is the first screen that displays when you access the web configurator. Figure 25 The Web Configurator Layout BC A 26 GS1910/XGS1910 Series User's Guide
User Guide
Page 29
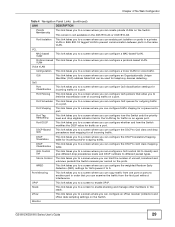
...to a screen where you can configure how the Switch sets the priority level and drop eligible indicator field in the stack. Monitor GS1910/XGS1910 Series User's Guide 29 Port Policing This link takes you to a screen where you can configure the DSCP to enable UPnP. Port ... a screen where you can configure an Organizationally Unique Identifier (OUI) address table that allow you can be used for traffic on the XGS1910-24 or XGS1910-48. sFlow This link takes you to a screen where you can configure whether and how the Switch modifies the DSCP value for telephony devices...
...to a screen where you can configure how the Switch sets the priority level and drop eligible indicator field in the stack. Monitor GS1910/XGS1910 Series User's Guide 29 Port Policing This link takes you to a screen where you can configure the DSCP to enable UPnP. Port ... a screen where you can configure an Organizationally Unique Identifier (OUI) address table that allow you can be used for traffic on the XGS1910-24 or XGS1910-48. sFlow This link takes you to a screen where you can configure whether and how the Switch modifies the DSCP value for telephony devices...
User Guide
Page 31
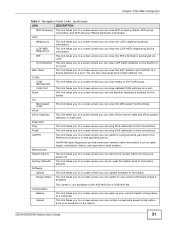
... see whether stacking is enabled on each port. This link takes you to a screen where you can ping IPv6 addresses to test connections. GS1910/XGS1910 Series User's Guide 31 This link takes you to a screen where you can view the EEE information exchanged via LLDP. This link takes you ...view the MAC-based VLAN settings. This link takes you to a screen where you can also view what kind of the Ethernet connections on the XGS1910-24 or XGS1910-48. This link takes you to a screen where you can perform a physical wire-pair test of MAC address it is not available on the ...
... see whether stacking is enabled on each port. This link takes you to a screen where you can ping IPv6 addresses to test connections. GS1910/XGS1910 Series User's Guide 31 This link takes you to a screen where you can view the EEE information exchanged via LLDP. This link takes you ...view the MAC-based VLAN settings. This link takes you to a screen where you can also view what kind of the Ethernet connections on the XGS1910-24 or XGS1910-48. This link takes you to a screen where you can perform a physical wire-pair test of MAC address it is not available on the ...
User Guide
Page 44
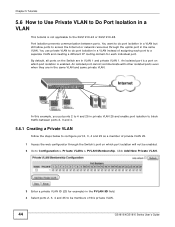
...and creating a different IP routing domain for example) in the PVLAN ID field. 4 Select ports 2, 3, 4 and 25 to the XGS1910-24 or XGS1910-48. You want to do port isolation in a VLAN instead of assigning each individual port. An isolated port cannot communicate with other isolated ...ports even when they are in VLAN 1 and private VLAN 1. Internet In this private VLAN. 44 GS1910/XGS1910 Series User's Guide Port isolation prevents...
...and creating a different IP routing domain for example) in the PVLAN ID field. 4 Select ports 2, 3, 4 and 25 to the XGS1910-24 or XGS1910-48. You want to do port isolation in a VLAN instead of assigning each individual port. An isolated port cannot communicate with other isolated ...ports even when they are in VLAN 1 and private VLAN 1. Internet In this private VLAN. 44 GS1910/XGS1910 Series User's Guide Port isolation prevents...
User Guide
Page 63
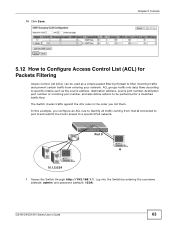
... certain traffic from host A connected to port 9 and restrict the host's access to identify all traffic coming from entering your network. GS1910/XGS1910 Series User's Guide 63 The Switch checks traffic against the ACL rules in the order you configure an ACL rule to a specific IPv4 network.... Port 9 A 10.1.2.0/24 1 Access the Switch through http://192.168.1.1. ACL groups traffic into the Switch by entering the username (default: admin) and password (default: 1234...
... certain traffic from host A connected to port 9 and restrict the host's access to identify all traffic coming from entering your network. GS1910/XGS1910 Series User's Guide 63 The Switch checks traffic against the ACL rules in the order you configure an ACL rule to a specific IPv4 network.... Port 9 A 10.1.2.0/24 1 Access the Switch through http://192.168.1.1. ACL groups traffic into the Switch by entering the username (default: admin) and password (default: 1234...

User Guide
Page 65
Enter the ID of the ACL policy you want to apply this policy, that they are applied in this example. GS1910/XGS1910 Series User's Guide 65 Chapter 5 Tutorials 8 Click Save. This tutorial uses the XGS1910-24 screens as rules are listed. The screens may vary slightly for different models. 9 Go to which you just created in the Policy ID field of your rules is connected in the order that is, port 9 to Configuration > Security > Network > ACL > Ports. The ordering of the port to which host A is very important as an example.
Enter the ID of the ACL policy you want to apply this policy, that they are applied in this example. GS1910/XGS1910 Series User's Guide 65 Chapter 5 Tutorials 8 Click Save. This tutorial uses the XGS1910-24 screens as rules are listed. The screens may vary slightly for different models. 9 Go to which you just created in the Policy ID field of your rules is connected in the order that is, port 9 to Configuration > Security > Network > ACL > Ports. The ordering of the port to which host A is very important as an example.