

User Guide
Page 11
... 1 Introduction ...23 1.1 Overview ...23 1.2 Ways to Manage the ZyXEL Device 23 1.3 Good Habits for Managing the ZyXEL Device 24 1.4 Applications for the ZyXEL Device ...24 1.4.1 Internet Access ...24 1.5 Wireless Access ...25 1.5.1... Using the WPS/WLAN Button 25 1.6 The RESET Button ...26 1.6.1 Using the Reset Button ...27 Chapter 2 The Web Configurator ...29 2.1 Overview ...29 2.1.1 Accessing the Web Configurator 29 2.2 The Main Screen ...31 2.2.1 Title Bar ...31 2.2.2 Navigation Panel ...32 2.2.3 Main Window...
... 1 Introduction ...23 1.1 Overview ...23 1.2 Ways to Manage the ZyXEL Device 23 1.3 Good Habits for Managing the ZyXEL Device 24 1.4 Applications for the ZyXEL Device ...24 1.4.1 Internet Access ...24 1.5 Wireless Access ...25 1.5.1... Using the WPS/WLAN Button 25 1.6 The RESET Button ...26 1.6.1 Using the Reset Button ...27 Chapter 2 The Web Configurator ...29 2.1 Overview ...29 2.1.1 Accessing the Web Configurator 29 2.2 The Main Screen ...31 2.2.1 Title Bar ...31 2.2.2 Navigation Panel ...32 2.2.3 Main Window...

User Guide
Page 17
... the UPnP Screen 230 19.1.2 What You Need to Know About UPnP 230 19.2 The UPnP Screen ...231 19.3 Installing UPnP in Windows Example 232 19.4 Using UPnP in Windows XP Example 235 Chapter 20 File Sharing ...241 20.1 Overview ...241 20.1.1 What You Can Do in this chapter 241 20.1.2 What...
... the UPnP Screen 230 19.1.2 What You Need to Know About UPnP 230 19.2 The UPnP Screen ...231 19.3 Installing UPnP in Windows Example 232 19.4 Using UPnP in Windows XP Example 235 Chapter 20 File Sharing ...241 20.1 Overview ...241 20.1.1 What You Can Do in this chapter 241 20.1.2 What...
User Guide
Page 18
Table of Contents 21.4 The Print Server Screen ...246 21.5 Add a New Printer Using Windows 247 21.6 Add a New Printer Using Macintosh OS X 251 21.6.1 Mac OS 10.3 and 10.4 ...251 21.6.2 Mac OS 10.5 and 10.6 ...254 Chapter 22 ...
Table of Contents 21.4 The Print Server Screen ...246 21.5 Add a New Printer Using Windows 247 21.6 Add a New Printer Using Macintosh OS X 251 21.6.1 Mac OS 10.3 and 10.4 ...251 21.6.2 Mac OS 10.5 and 10.6 ...254 Chapter 22 ...
User Guide
Page 19
Table of Contents 27.2 ZyXEL Device Access and Login 282 27.3 Internet Access ...283 Chapter 28 Product Specifications ...285 28.1 Hardware Specifications ...285 Appendix A Setting up Your Computer's IP Address 287 Appendix B IP Addresses and Subnetting 309 Appendix C Pop-up Windows, JavaScripts and Java Permissions 317 Appendix D Wireless LANs...327 Appendix E IPv6 ...341 Appendix F Services...351 Appendix G Legal Information ...355 Index ...363 ADSL Router Series User's Guide 19
Table of Contents 27.2 ZyXEL Device Access and Login 282 27.3 Internet Access ...283 Chapter 28 Product Specifications ...285 28.1 Hardware Specifications ...285 Appendix A Setting up Your Computer's IP Address 287 Appendix B IP Addresses and Subnetting 309 Appendix C Pop-up Windows, JavaScripts and Java Permissions 317 Appendix D Wireless LANs...327 Appendix E IPv6 ...341 Appendix F Services...351 Appendix G Legal Information ...355 Index ...363 ADSL Router Series User's Guide 19
User Guide
Page 29
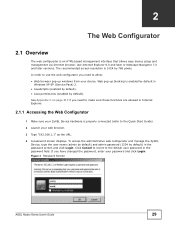
...screen resolution is an HTML-based management interface that allows easy device setup and management via Internet browser. Web pop-up windows from your ZyXEL Device hardware is enabled by default in the password screen and click Login. Figure 3 Password Screen ADSL Router Series ...User's Guide 29 To access the administrative web configurator and manage the ZyXEL Device, type the user name (admin by default) and admin password (1234 by default) in Windows XP SP (Service Pack) 2. • JavaScripts (enabled by default). • Java permissions...
...screen resolution is an HTML-based management interface that allows easy device setup and management via Internet browser. Web pop-up windows from your ZyXEL Device hardware is enabled by default in the password screen and click Login. Figure 3 Password Screen ADSL Router Series ...User's Guide 29 To access the administrative web configurator and manage the ZyXEL Device, type the user name (admin by default) and admin password (1234 by default) in Windows XP SP (Service Pack) 2. • JavaScripts (enabled by default). • Java permissions...

User Guide
Page 31
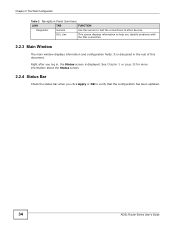
navigation panel • C - main window • D - Logout: Click this icon to go to log out of the web configurator. status bar 2.2.1 Title Bar The title bar provides some icons in ...
navigation panel • C - main window • D - Logout: Click this icon to go to log out of the web configurator. status bar 2.2.1 Title Bar The title bar provides some icons in ...
User Guide
Page 34
... bar when you log in the rest of this screen to test the connections to help you identify problems with the DSL connection. 2.2.3 Main Window The main window displays information and configuration fields. Right after you click Apply or OK to verify that the configuration has been updated. 34 ADSL Router Series...
... bar when you log in the rest of this screen to test the connections to help you identify problems with the DSL connection. 2.2.3 Main Window The main window displays information and configuration fields. Right after you click Apply or OK to verify that the configuration has been updated. 34 ADSL Router Series...

User Guide
Page 50
Chapter 4 Tutorials The following figure shows you how to set up a wireless network and its security on a ZyXEL Device and a wireless client by PIN SECURITY INFO COMMUNICATION 4.4.3 Connecting Wirelessly to your ZyXEL Device This section describes how to connect wirelessly to your ZyXEL Device. Example WPS Process: PIN Method Wireless Client ZyXEL Device WITHIN 2 MINUTES Authentication by using Windows XP as an example. 50 ADSL Router Series User's Guide The connection procedure is shown here using PIN method.
Chapter 4 Tutorials The following figure shows you how to set up a wireless network and its security on a ZyXEL Device and a wireless client by PIN SECURITY INFO COMMUNICATION 4.4.3 Connecting Wirelessly to your ZyXEL Device This section describes how to connect wirelessly to your ZyXEL Device. Example WPS Process: PIN Method Wireless Client ZyXEL Device WITHIN 2 MINUTES Authentication by using Windows XP as an example. 50 ADSL Router Series User's Guide The connection procedure is shown here using PIN method.

User Guide
Page 73
... account, click the Edit icon next to access the shared files. Refer to your operating system's documentation for how to browse your file structure. 1 Open Windows Explorer to share files in to access shared files. Click Apply to save your changes and click Back to go back to the previous screen....2 Access Your Shared Files From a Computer Note: The examples in this example, select Security to require users to log in the attached USB device using Windows Explorer browser. ADSL Router Series User's Guide 73 Chapter 4 Tutorials 2 In the Share Directory Access Level, you how to use Microsoft...
... account, click the Edit icon next to access the shared files. Refer to your operating system's documentation for how to browse your file structure. 1 Open Windows Explorer to share files in to access shared files. Click Apply to save your changes and click Back to go back to the previous screen....2 Access Your Shared Files From a Computer Note: The examples in this example, select Security to require users to log in the attached USB device using Windows Explorer browser. ADSL Router Series User's Guide 73 Chapter 4 Tutorials 2 In the Share Directory Access Level, you how to use Microsoft...
User Guide
Page 74
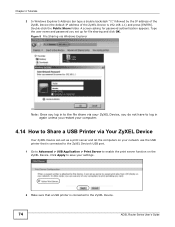
... let the computers on your network use the USB printer that a USB printer is connected to the ZyXEL Device. 74 ADSL Router Series User's Guide Figure 8 File Sharing via Windows Explorer Note: Once you log in again unless you set up for password authentication appears. Chapter 4 ...Tutorials 2 In Windows Explorer's Address bar type a double backslash "\\" followed by the IP address of the ZyXEL Device (the default IP address of the ZyXEL Device is connected to the ZyXEL Device's USB port. 1 Go to Advanced > USB Application >...
... let the computers on your network use the USB printer that a USB printer is connected to the ZyXEL Device. 74 ADSL Router Series User's Guide Figure 8 File Sharing via Windows Explorer Note: Once you log in again unless you set up for password authentication appears. Chapter 4 ...Tutorials 2 In Windows Explorer's Address bar type a double backslash "\\" followed by the IP address of the ZyXEL Device (the default IP address of the ZyXEL Device is connected to the ZyXEL Device's USB port. 1 Go to Advanced > USB Application >...

User Guide
Page 109
... IP addresses. It is a shared communication system to which many networking devices are also known as a building or floor of your ZyXEL device's LAN interface. 7.1.2 What You Need To Know About LAN IP Address IP addresses identify individual devices on a network. You can also ...edit your ZyXEL Device's RIP, multicast and Windows Networking settings from this screen. • Use the DHCP Setup screen (Section 7.3 on page 112) to configure the ZyXEL Device's DHCP settings. • Use the Client List screen (Section 7.4 on...
... IP addresses. It is a shared communication system to which many networking devices are also known as a building or floor of your ZyXEL device's LAN interface. 7.1.2 What You Need To Know About LAN IP Address IP addresses identify individual devices on a network. You can also ...edit your ZyXEL Device's RIP, multicast and Windows Networking settings from this screen. • Use the DHCP Setup screen (Section 7.3 on page 112) to configure the ZyXEL Device's DHCP settings. • Use the Client List screen (Section 7.4 on...

User Guide
Page 111
... LAN > IP: Advanced Setup ADSL Router Series User's Guide 111 IP Subnet Mask Type the subnet mask of your changes. Your ZyXEL Device automatically computes the subnet mask based on the IP Address you want to assign to save your network in this alone, the ... Screen Use this to edit your previously saved settings. The screen appears as shown. Cancel Click this screen to restore your ZyXEL Device's RIP, multicast and Windows Networking settings. Figure 34 Network > LAN > IP The following table describes the fields in dotted decimal notation, for example,...
... LAN > IP: Advanced Setup ADSL Router Series User's Guide 111 IP Subnet Mask Type the subnet mask of your changes. Your ZyXEL Device automatically computes the subnet mask based on the IP Address you want to assign to save your network in this alone, the ... Screen Use this to edit your previously saved settings. The screen appears as shown. Cancel Click this screen to restore your ZyXEL Device's RIP, multicast and Windows Networking settings. Figure 34 Network > LAN > IP The following table describes the fields in dotted decimal notation, for example,...

User Guide
Page 113
...Size This field specifies the size, or count of hexadecimal characters, for example, 00:A0:C5:00:00:02. DNS Server DNS Servers Assigned The ZyXEL Device passes a DNS (Domain Name System) server IP address to restore your primary/secondary DNS server. ADSL Router Series User's Guide 113 Table ...23 Network > LAN > DHCP Setup LABEL DESCRIPTION DHCP Setup DHCP If set to Windows 95, Windows NT and other systems that support the DHCP client. When DHCP is selected in the DHCP field above then enter the IP address of the...
...Size This field specifies the size, or count of hexadecimal characters, for example, 00:A0:C5:00:00:02. DNS Server DNS Servers Assigned The ZyXEL Device passes a DNS (Domain Name System) server IP address to restore your primary/secondary DNS server. ADSL Router Series User's Guide 113 Table ...23 Network > LAN > DHCP Setup LABEL DESCRIPTION DHCP Setup DHCP If set to Windows 95, Windows NT and other systems that support the DHCP client. When DHCP is selected in the DHCP field above then enter the IP address of the...

User Guide
Page 170
... in order of their numbering. In the Rules screen, select an index number and click Add or click a rule's Edit icon to display this action. A window displays asking you to confirm that you can edit the rule. Service This column displays the services to which this firewall rule applies. Order Apply...
... in order of their numbering. In the Rules screen, select an index number and click Add or click a rule's Edit icon to display this action. A window displays asking you to confirm that you can edit the rule. Service This column displays the services to which this firewall rule applies. Order Apply...

User Guide
Page 194
...the Static Route Screens • Use the Static Route screens (Section 13.2 on page 194) to view and configure IP static routes on the ZyXEL Device. • Use the IPv6 Static Route screens (Section 13.2.2 on page 196) to view and configure IPv6 static routes on network number...Table 65 Advanced > Static Route LABEL DESCRIPTION # This is always based on the ZyXEL Device. 13.2 The Static Route Screen Use this screen. This parameter specifies the IP network subnet mask of the final destination. A window displays asking you to delete the route. 194 ADSL Router Series User's Guide
...the Static Route Screens • Use the Static Route screens (Section 13.2 on page 194) to view and configure IP static routes on the ZyXEL Device. • Use the IPv6 Static Route screens (Section 13.2.2 on page 196) to view and configure IPv6 static routes on network number...Table 65 Advanced > Static Route LABEL DESCRIPTION # This is always based on the ZyXEL Device. 13.2 The Static Route Screen Use this screen. This parameter specifies the IP network subnet mask of the final destination. A window displays asking you to delete the route. 194 ADSL Router Series User's Guide

User Guide
Page 196
...the address compose the network address. Device This specifies the LAN or WAN PVC. A window displays asking you to confirm that you want to the screen where you can set up a static route on the ZyXEL Device. This field displays the bit number of the final destination. Gateway This is the... This is the IP address of an individual static route. Prefix Length An IPv6 prefix length specifies how many most significant bits (starting from the ZyXEL Device. The gateway is always based on the same network segment as the device's LAN or WAN port. Routing is a router or switch on...
...the address compose the network address. Device This specifies the LAN or WAN PVC. A window displays asking you to confirm that you want to the screen where you can set up a static route on the ZyXEL Device. This field displays the bit number of the final destination. Gateway This is the... This is the IP address of an individual static route. Prefix Length An IPv6 prefix length specifies how many most significant bits (starting from the ZyXEL Device. The gateway is always based on the same network segment as the device's LAN or WAN port. Routing is a router or switch on...

User Guide
Page 229
Chapter 18 Remote Management 2 A window displays prompting you to continue. 3 Enter your computer. ADSL Router Series User's Guide 229 Click Yes to store the host key in your user name and password. 4 The command line interface displays.
Chapter 18 Remote Management 2 A window displays prompting you to continue. 3 Enter your computer. ADSL Router Series User's Guide 229 Click Yes to store the host key in your user name and password. 4 The command line interface displays.

User Guide
Page 230
...traversal applications in establishing their presence in the Network Connections folder (Windows XP). See the NAT chapter for simple peer-to enable UPnP on your network will allow UPnP-enabled applications to automatically configure the ZyXEL Device. 19.1.2 What You Need to Know About UPnP Identifying ... the UPnP screen (Section 19.2 on page 231) to -peer network connectivity between devices. Each UPnP compatible device installed on the ZyXEL Device and allow you to operate through NAT. NAT Traversal UPnP NAT traversal automates the process of allowing an application to access the...
...traversal applications in establishing their presence in the Network Connections folder (Windows XP). See the NAT chapter for simple peer-to enable UPnP on your network will allow UPnP-enabled applications to automatically configure the ZyXEL Device. 19.1.2 What You Need to Know About UPnP Identifying ... the UPnP screen (Section 19.2 on page 231) to -peer network connectivity between devices. Each UPnP compatible device installed on the ZyXEL Device and allow you to operate through NAT. NAT Traversal UPnP NAT traversal automates the process of allowing an application to access the...

User Guide
Page 232
... previously saved settings. 19.3 Installing UPnP in Windows Example This section shows how to install the UPnP in the Components selection box. Double-click Add/Remove Programs. 2 Click on the Windows Setup tab and select Communication in Windows Me. 1 Click Start and Control Panel. ...Add/Remove Programs: Windows Setup: Communication 232 ADSL Router Series User's Guide Chapter 19 Universal Plug-and-Play ...
... previously saved settings. 19.3 Installing UPnP in Windows Example This section shows how to install the UPnP in the Components selection box. Double-click Add/Remove Programs. 2 Click on the Windows Setup tab and select Communication in Windows Me. 1 Click Start and Control Panel. ...Add/Remove Programs: Windows Setup: Communication 232 ADSL Router Series User's Guide Chapter 19 Universal Plug-and-Play ...

User Guide
Page 233
Add/Remove Programs: Windows Setup: Communication: Components 4 Click OK to go back to install the UPnP in the Components selection box. Chapter 19 Universal Plug-and-Play (UPnP) 3 In the Communications window, select the Universal Plug and Play check box in Windows XP. 1 Click Start and Control Panel. 2 Double-click Network Connections. ADSL Router Series User's Guide 233 Installing UPnP in Windows XP Follow the steps below to the Add/Remove Programs Properties window and click Next. 5 Restart the computer when prompted.
Add/Remove Programs: Windows Setup: Communication: Components 4 Click OK to go back to install the UPnP in the Components selection box. Chapter 19 Universal Plug-and-Play (UPnP) 3 In the Communications window, select the Universal Plug and Play check box in Windows XP. 1 Click Start and Control Panel. 2 Double-click Network Connections. ADSL Router Series User's Guide 233 Installing UPnP in Windows XP Follow the steps below to the Add/Remove Programs Properties window and click Next. 5 Restart the computer when prompted.