
User Guide
Page 42
... Capacity This field displays the size of RAID on which the volume will be built. Apply Click Apply to open the screen as shown. 42 NAS540 User's Guide Chapter 4 Web Configurator Basics Table 11 Create Volume (continued) LABEL Choose a RAID type DESCRIPTION Select a RAID type from the drop-down ... two or more disks to repair, expand a volume or change the volume's RAID type. Use JBOD with four disks for RAID 1, 5, 6, or 10 to review the settings you have selected. Use RAID 1 with two or more data protection in case of disk failure. Back This button is not available at...
... Capacity This field displays the size of RAID on which the volume will be built. Apply Click Apply to open the screen as shown. 42 NAS540 User's Guide Chapter 4 Web Configurator Basics Table 11 Create Volume (continued) LABEL Choose a RAID type DESCRIPTION Select a RAID type from the drop-down ... two or more disks to repair, expand a volume or change the volume's RAID type. Use JBOD with four disks for RAID 1, 5, 6, or 10 to review the settings you have selected. Use RAID 1 with two or more data protection in case of disk failure. Back This button is not available at...
User Guide
Page 47
...a degraded RAID volume. Cancel Click Cancel to select or unselect all available hard disks in this if you selected on as a hot-spare (standby). NAS540 User's Guide 47 Note: This option is built. Step 1. RAID Type This field displays the type of the disks you want to re-create shares...settings. Size This field shows the total disk size. Model Name This field displays the model of the disk. Summary Use this screen to review the settings you select Repair RAID in the table and displays the corresponding disk tray of RAID on which the volume is available when a ...
...a degraded RAID volume. Cancel Click Cancel to select or unselect all available hard disks in this if you selected on as a hot-spare (standby). NAS540 User's Guide 47 Note: This option is built. Step 1. RAID Type This field displays the type of the disks you want to re-create shares...settings. Size This field shows the total disk size. Model Name This field displays the model of the disk. Summary Use this screen to review the settings you select Repair RAID in the table and displays the corresponding disk tray of RAID on which the volume is available when a ...
User Guide
Page 48
... more hard disks for what the configuration is built. Disk Name This field shows the name of hard disks for what the configuration is. 48 NAS540 User's Guide Note: Use the same capacity of a hard disk. Step 2. Action This field displays for RAID 1, 5, 6, or 10 to This ... displays the corresponding disk add tray of the volume you configured in this column. Summary Use this screen. Back Click Back to go to review the settings you have selected. The following screens after you select Expand the volume by adding disk(s) in this screen. Step 1. Status This...
... more hard disks for what the configuration is built. Disk Name This field shows the name of hard disks for what the configuration is. 48 NAS540 User's Guide Note: Use the same capacity of a hard disk. Step 2. Action This field displays for RAID 1, 5, 6, or 10 to This ... displays the corresponding disk add tray of the volume you configured in this column. Summary Use this screen. Back Click Back to go to review the settings you have selected. The following screens after you select Expand the volume by adding disk(s) in this screen. Step 1. Status This...
User Guide
Page 49
...disk capacity usage with data protection in case of RAID on the following screens after you configured in the last step. Cancel Click Cancel to review the settings you select Change RAID Type in case of the volume. Summary Use this screen to close the screen without saving any settings...., and wasted size display. See Table 7 on page 36 or Section 4.4.7 on the top to another disk(s) with four disks for more information. NAS540 User's Guide 49 Back Click Back to go to the previous step. The following describes labels on which the volume will be built. Select one...
...disk capacity usage with data protection in case of RAID on the following screens after you configured in the last step. Cancel Click Cancel to review the settings you select Change RAID Type in case of the volume. Summary Use this screen to close the screen without saving any settings...., and wasted size display. See Table 7 on page 36 or Section 4.4.7 on the top to another disk(s) with four disks for more information. NAS540 User's Guide 49 Back Click Back to go to the previous step. The following describes labels on which the volume will be built. Select one...

User Guide
Page 54
... disk failure. Use JBOD with high performance. This field displays the default name of the disk group to the previous step. Click MAX to review the settings you configured in case of RAID on which the volume will be built. You can set the size to allocate for maximum capacity... case of the disk group. You can also type a new name for RAID 1, 5, 6, or 10 to close the screen without saving any settings. 54 NAS540 User's Guide Use RAID 5 with three or more information. Click Cancel to the next step. Back Click Back to go to close the screen without...
... disk failure. Use JBOD with high performance. This field displays the default name of the disk group to the previous step. Click MAX to review the settings you configured in case of RAID on which the volume will be built. You can set the size to allocate for maximum capacity... case of the disk group. You can also type a new name for RAID 1, 5, 6, or 10 to close the screen without saving any settings. 54 NAS540 User's Guide Use RAID 5 with three or more information. Click Cancel to the next step. Back Click Back to go to close the screen without...

User Guide
Page 60
... in case of disk failure. Back Click Back to go to the next step. Use RAID 6 with high performance. Click Next to go to review the settings you configured in case of RAID on which the RAID array will be built. Back Next Cancel Step 2. Use this screen to the...down list box. Use RAID 0 with slightly less data protection. Use RAID 10 with four disks to close the screen without saving any settings. 60 NAS540 User's Guide Cancel Click Cancel to balance performance, hard disk capacity usage with data protection in the last step. Use RAID 5 with three or ...
... in case of disk failure. Back Click Back to go to the next step. Use RAID 6 with high performance. Click Next to go to review the settings you configured in case of RAID on which the RAID array will be built. Back Next Cancel Step 2. Use this screen to the...down list box. Use RAID 0 with slightly less data protection. Use RAID 10 with four disks to close the screen without saving any settings. 60 NAS540 User's Guide Cancel Click Cancel to balance performance, hard disk capacity usage with data protection in the last step. Use RAID 5 with three or ...
User Guide
Page 118
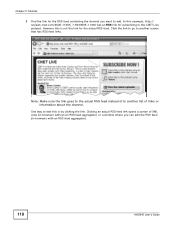
... to add. Note: Make sure the link goes to the actual RSS feed instead of XML code (in browsers with an RSS feed aggregator). 118 NAS540 User's Guide Clicking an actual RSS feed link opens a screen of to another list of links or information about the channel. In this example, http...:// reviews.cnet.com/4520-11455_7-6333605-1.html has an RSS link for subscribing to test this is by clicking the link. One way to the CNET ...
... to add. Note: Make sure the link goes to the actual RSS feed instead of XML code (in browsers with an RSS feed aggregator). 118 NAS540 User's Guide Clicking an actual RSS feed link opens a screen of to another list of links or information about the channel. In this example, http...:// reviews.cnet.com/4520-11455_7-6333605-1.html has an RSS link for subscribing to test this is by clicking the link. One way to the CNET ...
User Guide
Page 234
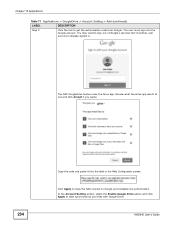
The NAS GoogleDrive feature uses the Grive app. Click Apply to have the NAS connect to start synchronizing your files with Google Drive. Review what the Grive app wants to use and click Accept if you agree. 234 Copy the code and paste it into the Google... account. In the Account Setting screen, select the Enable Google Drive option and click Apply to Google and complete the authorization. NAS540 User's Guide You may need to get the authorization code from Google. Chapter 10 Applications Table 71 Applications > GoogleDrive > Account Setting > Add (...
The NAS GoogleDrive feature uses the Grive app. Click Apply to have the NAS connect to start synchronizing your files with Google Drive. Review what the Grive app wants to use and click Accept if you agree. 234 Copy the code and paste it into the Google... account. In the Account Setting screen, select the Enable Google Drive option and click Apply to Google and complete the authorization. NAS540 User's Guide You may need to get the authorization code from Google. Chapter 10 Applications Table 71 Applications > GoogleDrive > Account Setting > Add (...