Specification Sheet
Page 1
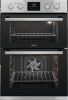
... Benefits & Features Make cooking a more enjoyable part of the knob. This double oven gives you the flexibility you need to Perfectly cooked food made easy! Built-in Oven ZOD35802XK Get twice the cooking capacity with this flexible double oven This double oven gives you the flexibility you need to preprogram the cooking time. Its special...
... Benefits & Features Make cooking a more enjoyable part of the knob. This double oven gives you the flexibility you need to Perfectly cooked food made easy! Built-in Oven ZOD35802XK Get twice the cooking capacity with this flexible double oven This double oven gives you the flexibility you need to preprogram the cooking time. Its special...
Specification Sheet
Page 2
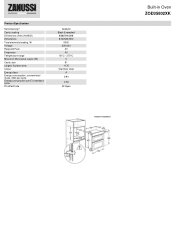
Cavity coating Dimensions (mm) (HxWxD) Dimensions Total electricity loading, W Voltage Required Fuse Frequency Temperature range Maximum Microwave output (W) Cavity size Largest Surface area Colour Energy class Energy consumption, conventional mode, kWh per cycle Energy consumption per EU standard cycle ProdPartCode Catalytic Black Enameled 888x594x568 875x560x550 5300 220-240 30 50 50°C - 275°C 0 61 1175 Stainless steel A 0.94 0.78 All Open Built-in Oven ZOD35802XK Product Specification Self-Cleaning?
Cavity coating Dimensions (mm) (HxWxD) Dimensions Total electricity loading, W Voltage Required Fuse Frequency Temperature range Maximum Microwave output (W) Cavity size Largest Surface area Colour Energy class Energy consumption, conventional mode, kWh per cycle Energy consumption per EU standard cycle ProdPartCode Catalytic Black Enameled 888x594x568 875x560x550 5300 220-240 30 50 50°C - 275°C 0 61 1175 Stainless steel A 0.94 0.78 All Open Built-in Oven ZOD35802XK Product Specification Self-Cleaning?

User Manual
Page 1
ZOD35802BK ZOD35802XK EN User Manual Built-In Double Oven EASY. User Manual GETTING STARTED?
ZOD35802BK ZOD35802XK EN User Manual Built-In Double Oven EASY. User Manual GETTING STARTED?

User Manual
Page 2
... in operation at all packaging away from children and dispose of experience and knowledge if they have been given supervision or instruction concerning the use oven gloves to avoid touching heating elements. Always keep the instructions in a safe way and understand the hazards involved. • Do not let children play with...
... in operation at all packaging away from children and dispose of experience and knowledge if they have been given supervision or instruction concerning the use oven gloves to avoid touching heating elements. Always keep the instructions in a safe way and understand the hazards involved. • Do not let children play with...
User Manual
Page 4
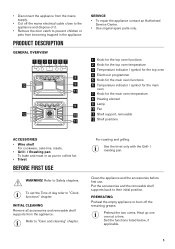
...ventilation openings are not blocked. • Do not let the appliance stay unattended during operation. • Deactivate the appliance after you use an oven spray, follow the safety instruction on it for house lighting. Contact the Authorised Service Centre. • Be careful when you remove or install the.... • Use a deep pan for moist cakes. must not be used for this appliance. • Make sure that are wet with the oven door closed. • If the appliance is installed behind a closed when the appliance is in operation. Fruit juices cause stains that the glass panels...
...ventilation openings are not blocked. • Do not let the appliance stay unattended during operation. • Deactivate the appliance after you use an oven spray, follow the safety instruction on it for house lighting. Contact the Authorised Service Centre. • Be careful when you remove or install the.... • Use a deep pan for moist cakes. must not be used for this appliance. • Make sure that are wet with the oven door closed. • If the appliance is installed behind a closed when the appliance is in operation. Fruit juices cause stains that the glass panels...
User Manual
Page 5
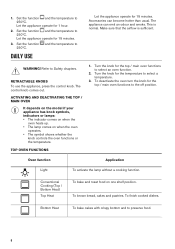
...their initial position. Put the accessories and the removable shelf supports back to collect fat. • Trivet BEFORE FIRST USE WARNING! Heat up one oven at a time. Use the trivet only with the Grill- / roasting pan. PREHEATING Preheat the empty appliance to "Clock functions" chapter. To set...the appliance. Set the functions listed below, if applicable. 5 Clean the appliance and the accessories before first use. Preheat the two ovens. • Disconnect the appliance from the mains supply. • Cut off the remaining grease. Refer to Safety chapters. For roasting and grilling....
...their initial position. Put the accessories and the removable shelf supports back to collect fat. • Trivet BEFORE FIRST USE WARNING! Heat up one oven at a time. Use the trivet only with the Grill- / roasting pan. PREHEATING Preheat the empty appliance to "Clock functions" chapter. To set...the appliance. Set the functions listed below, if applicable. 5 Clean the appliance and the accessories before first use. Preheat the two ovens. • Disconnect the appliance from the mains supply. • Cut off the remaining grease. Refer to Safety chapters. For roasting and grilling....
User Manual
Page 6
... off position. Conventional Cooking (Top / Bottom Heat) Top Heat To bake and roast food on when the oven operates. • The symbol shows whether the knob controls the oven functions or the temperature. To finish cooked dishes. Accessories can emit an odour and smoke. Refer to select .... 2. The control knob comes out. The appliance can become hotter than usual. Turn the knob for the top / main oven functions to Safety chapters. Oven function Application Light To activate the lamp without a cooking function. RETRACTABLE KNOBS To use the appliance, press the control knob. To ...
... off position. Conventional Cooking (Top / Bottom Heat) Top Heat To bake and roast food on when the oven operates. • The symbol shows whether the knob controls the oven functions or the temperature. To finish cooked dishes. Accessories can emit an odour and smoke. Refer to select .... 2. The control knob comes out. The appliance can become hotter than usual. Turn the knob for the top / main oven functions to Safety chapters. Oven function Application Light To activate the lamp without a cooking function. RETRACTABLE KNOBS To use the appliance, press the control knob. To ...
User Manual
Page 7
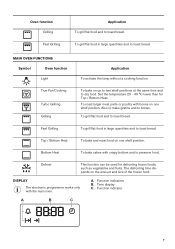
...toast bread. To grill flat food and to dry food. Defrost This function can be used for Top / Bottom Heat. MAIN OVEN FUNCTIONS Symbol Oven function Light Application To activate the lamp without a cooking function. The defrosting time depends on one shelf position. Time display C. To... roast larger meat joints or poultry with the main oven. True Fan Cooking Turbo Grilling Grilling To bake on one shelf position. Also to make gratins and to preserve food. Top / Bottom ...
...toast bread. To grill flat food and to dry food. Defrost This function can be used for Top / Bottom Heat. MAIN OVEN FUNCTIONS Symbol Oven function Light Application To activate the lamp without a cooking function. The defrosting time depends on one shelf position. Time display C. To... roast larger meat joints or poultry with the main oven. True Fan Cooking Turbo Grilling Grilling To bake on one shelf position. Also to make gratins and to preserve food. Top / Bottom ...
User Manual
Page 8
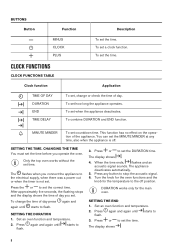
...the appliance deactivates. To set the time. Press the or to 3. When the time ends, flashes and an acoustic signal sounds. Set an oven function and temperature. 2. SETTING THE TIME. After approximately five seconds, the flashing stops and the display shows the time of the appliance. DURATION... works only for the temperature to set the correct time. Set an oven function and temperature. 2. starts to the electrical supply, when there was a power cut or when the timer is off position. MINUTE MINDER...
...the appliance deactivates. To set the time. Press the or to 3. When the time ends, flashes and an acoustic signal sounds. Set an oven function and temperature. 2. SETTING THE TIME. After approximately five seconds, the flashing stops and the display shows the time of the appliance. DURATION... works only for the temperature to set the correct time. Set an oven function and temperature. 2. starts to the electrical supply, when there was a power cut or when the timer is off position. MINUTE MINDER...
User Manual
Page 9
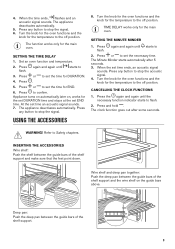
... 8. Press any button to the off position. SETTING THE TIME DELAY 1. Press again and again until flash. Turn the knob for the oven functions and the knob for the temperature to the off position. WARNING! Wire shelf and deep pan together: Push the deep pan between the... to flash. 2. Press and hold . The function works only for the set DURATION time and stops at the set the time for the main oven. Appliance turns on automatically later on the guide bars above. TIME DELAY works only for DURATION. 4. CANCELLING THE CLOCK FUNCTIONS 1. When the time ...
... 8. Press any button to the off position. SETTING THE TIME DELAY 1. Press again and again until flash. Turn the knob for the oven functions and the knob for the temperature to the off position. WARNING! Wire shelf and deep pan together: Push the deep pan between the... to flash. 2. Press and hold . The function works only for the set DURATION time and stops at the set the time for the main oven. Appliance turns on automatically later on the guide bars above. TIME DELAY works only for DURATION. 4. CANCELLING THE CLOCK FUNCTIONS 1. When the time ...
User Manual
Page 10
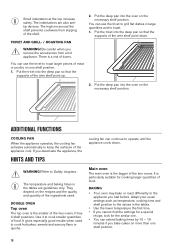
... If you cannot find the settings for a special recipe, look for cooking larger quantities of food. Put the deep pan into the oven on the necessary shelf position. Refer to the appliance you remove the accessories from slipping of meat or poultry on one shelf position. 1.... the necessary shelf position. The temperature and baking times in the tables are also antitip devices. DOUBLE OVEN Top oven The top oven is a risk of the two ovens. Main oven The main oven is particularly suitable for the similar one shelf position. 10 The indentations are guidelines only. TRIVET AND ...
... If you cannot find the settings for a special recipe, look for cooking larger quantities of food. Put the deep pan into the oven on the necessary shelf position. Refer to the appliance you remove the accessories from slipping of meat or poultry on one shelf position. 1.... the necessary shelf position. The temperature and baking times in the tables are also antitip devices. DOUBLE OVEN Top oven The top oven is a risk of the two ovens. Main oven The main oven is particularly suitable for the similar one shelf position. 10 The indentations are guidelines only. TRIVET AND ...
User Manual
Page 11
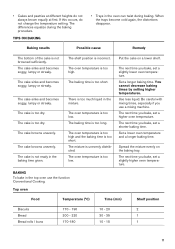
...distortions disappear. The cake is too long. The baking time is too dry. BAKING To bake in the baking time given. Top oven Put the cake on the baking tray. You cannot decrease baking times by setting higher temperatures. The next time you use the function... Conventional Cooking. Set a lower oven temperature and a longer baking time. Spread the mixture evenly on a lower shelf. Food Temperature (°C) Time (min) Shelf position Biscuits 170 - 190...
...distortions disappear. The cake is too long. The baking time is too dry. BAKING To bake in the baking time given. Top oven Put the cake on the baking tray. You cannot decrease baking times by setting higher temperatures. The next time you use the function... Conventional Cooking. Set a lower oven temperature and a longer baking time. Spread the mixture evenly on a lower shelf. Food Temperature (°C) Time (min) Shelf position Biscuits 170 - 190...

User Manual
Page 13
Individual 210 - 220 15 - 25 1 Main oven Food Temperature (°C) Conventional Cooking True Fan Cooking Time (min) Shelf position Biscuits Bread Cakes: - Madeira - Roast Potatoes 180 - 190 60 - 90 2 Yorkshire Pudding: - Sponges - ...
Individual 210 - 220 15 - 25 1 Main oven Food Temperature (°C) Conventional Cooking True Fan Cooking Time (min) Shelf position Biscuits Bread Cakes: - Madeira - Roast Potatoes 180 - 190 60 - 90 2 Yorkshire Pudding: - Sponges - ...
User Manual
Page 14
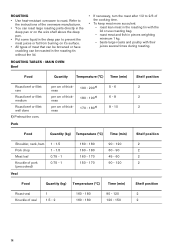
...tin without the lid. ROASTING • Use heat-resistant ovenware to 2/3 of the cooking time. • To keep meat more succulent: - MAIN OVEN Beef • If necessary, turn the roast after 1/2 to roast. ROASTING TABLES - Pork Food Quantity (kg) Temperature (°C) Time (min) Shelf... 120 2 Food Quantity (kg) Temperature (°C) Time (min) Shelf position Roast veal Knuckle of thickness 170 - 1801) 8 - 10 2 1) Preheat the oven. Refer to the instructions of the ovenware manufacturer. • You can roast large roasting joints directly in the deep pan or on the wire shelf...
...tin without the lid. ROASTING • Use heat-resistant ovenware to 2/3 of the cooking time. • To keep meat more succulent: - MAIN OVEN Beef • If necessary, turn the roast after 1/2 to roast. ROASTING TABLES - Pork Food Quantity (kg) Temperature (°C) Time (min) Shelf... 120 2 Food Quantity (kg) Temperature (°C) Time (min) Shelf position Roast veal Knuckle of thickness 170 - 1801) 8 - 10 2 1) Preheat the oven. Refer to the instructions of the ovenware manufacturer. • You can roast large roasting joints directly in the deep pan or on the wire shelf...
User Manual
Page 15
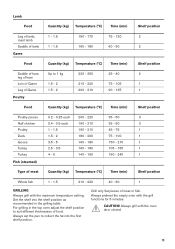
Always set the pan to collect the fat into the shelf position as recommended in the top oven adjust the shelf position to 1 kg 220 - 250 25 - 40 2 leg of hare Loin of Game 1.5 - 2 210 - 220 75 - 105 1 Leg of Game 1.5 - 2 200 - 210 ... with the grill functions for 5 minutes. Set the shelf into the first shelf position. For grilling in the grilling table. Always preheat the empty oven with the oven door closed. 15 Grill only flat pieces of meat Quantity (kg) Temperature (°C) Time (min) Shelf position Whole fish 1 - 1.5 210 - 220 40 - 60 1 GRILLING...
Always set the pan to collect the fat into the shelf position as recommended in the top oven adjust the shelf position to 1 kg 220 - 250 25 - 40 2 leg of hare Loin of Game 1.5 - 2 210 - 220 75 - 105 1 Leg of Game 1.5 - 2 200 - 210 ... with the grill functions for 5 minutes. Set the shelf into the first shelf position. For grilling in the grilling table. Always preheat the empty oven with the oven door closed. 15 Grill only flat pieces of meat Quantity (kg) Temperature (°C) Time (min) Shelf position Whole fish 1 - 1.5 210 - 220 40 - 60 1 GRILLING...

User Manual
Page 16
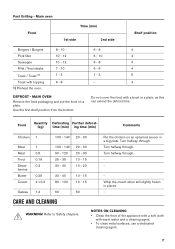
Medium - Well Done Grilling - Main oven 5 -6 10 - 20 20 - 40 15 - 25 20 - 25 10 - 12 4 - 6 12 - 18 6 - 10 20 - 30 3 - 4 4 - 6 6 - 8 12 - 15 Food Temperature (°C) Time (min) 1st side 2nd ... 20 - 30 30 - 40 30 - 40 25 - 35 15 - 30 30 - 40 20 - 30 30 - 40 30 - 40 20 - 25 15 - 30 2 3 2 2 3 3 / 4 16 Rare - Top oven Food Time (min) Bacon Rashers Beefburgers Chicken Joints Lamb Chops Pork Chops Whole Fish, Trout / Makarel Fillets, Plaice / Cod Kebabs Kidneys, Lamb / Pig Sausages Toasted...
Medium - Well Done Grilling - Main oven 5 -6 10 - 20 20 - 40 15 - 25 20 - 25 10 - 12 4 - 6 12 - 18 6 - 10 20 - 30 3 - 4 4 - 6 6 - 8 12 - 15 Food Temperature (°C) Time (min) 1st side 2nd ... 20 - 30 30 - 40 30 - 40 25 - 35 15 - 30 30 - 40 20 - 30 30 - 40 30 - 40 20 - 25 15 - 30 2 3 2 2 3 3 / 4 16 Rare - Top oven Food Time (min) Bacon Rashers Beefburgers Chicken Joints Lamb Chops Pork Chops Whole Fish, Trout / Makarel Fillets, Plaice / Cod Kebabs Kidneys, Lamb / Pig Sausages Toasted...
User Manual
Page 17
... . - Fast Grilling - Use the first shelf position from the bottom. 6 - 8 4 6 - 10 4 6 - 8 4 6 - 8 4 1 - 3 5 - 4 Do not cover the food with topping 1) Preheat the oven. 8 - 10 10 - 12 10 - 12 7 - 10 1 - 3 6 - 8 DEFROST - Turn halfway through. MAIN OVEN Remove the food packaging and put the food on an upturned saucer in places. - Main... oven Food Time (min) 1st side 2nd side Shelf position Burgers / Burgers Pork fillet Sausages Fillet / Veal steaks Toast / Toast 1) Toast with a bowl ...
... . - Fast Grilling - Use the first shelf position from the bottom. 6 - 8 4 6 - 10 4 6 - 8 4 6 - 8 4 1 - 3 5 - 4 Do not cover the food with topping 1) Preheat the oven. 8 - 10 10 - 12 10 - 12 7 - 10 1 - 3 6 - 8 DEFROST - Turn halfway through. MAIN OVEN Remove the food packaging and put the food on an upturned saucer in places. - Main... oven Food Time (min) 1st side 2nd side Shelf position Burgers / Burgers Pork fillet Sausages Fillet / Veal steaks Toast / Toast 1) Toast with a bowl ...

User Manual
Page 18
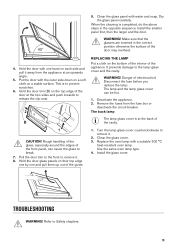
... dirt with warm water and washing up the clamping levers (A) on catalytic properties. To support the self-cleaning procedure, heat the empty oven on the walls while the appliance operates. Set the temperature to the nonstick coating. The door is at a high temperature. This will... damage the catalytic surface. Close the door until it with a soft and moist sponge. WARNING! Always turn the oven light on while using aggressive agents, sharp-edged objects or a dishwasher. They absorb fat which collects on a regular basis. 1. The number ...
... dirt with warm water and washing up the clamping levers (A) on catalytic properties. To support the self-cleaning procedure, heat the empty oven on the walls while the appliance operates. Set the temperature to the nonstick coating. The door is at a high temperature. This will... damage the catalytic surface. Close the door until it with a soft and moist sponge. WARNING! Always turn the oven light on while using aggressive agents, sharp-edged objects or a dishwasher. They absorb fat which collects on a regular basis. 1. The number ...
User Manual
Page 19
... the bottom of the interior of the cavity. 1 CAUTION! Hold the door with a suitable 300 °C heat-resistant oven lamp. Put the door with water and soap. Deactivate the appliance. 2. Use the same oven lamp type. 4. TROUBLESHOOTING WARNING! When the cleaning is completed, do the above steps in the correct position otherwise... the top edge of the front panel, can be hot. 1. Turn the lamp glass cover counterclockwise to remove it . 2. Clean the glass cover. 3. Replace the oven lamp with one and pull them up out of electrocution!
... the bottom of the interior of the cavity. 1 CAUTION! Hold the door with a suitable 300 °C heat-resistant oven lamp. Put the door with water and soap. Deactivate the appliance. 2. Use the same oven lamp type. 4. TROUBLESHOOTING WARNING! When the cleaning is completed, do the above steps in the correct position otherwise... the top edge of the front panel, can be hot. 1. Turn the lamp glass cover counterclockwise to remove it . 2. Clean the glass cover. 3. Replace the oven lamp with one and pull them up out of electrocution!
User Manual
Page 20
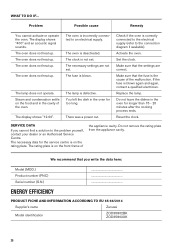
..., contact your dealer or an Authorised Service Centre. PRODUCT FICHE AND INFORMATION ACCORDING TO EU 65-66/2014 Supplier's name Zanussi Model identification ZOD35802BK ZOD35802XK 20 The oven does not heat up . Steam and condensation settle on the rating plate. You left the dish in the cavity of... the oven. Replace the lamp. The oven does not heat up . The clock is on the front frame of the malfunction. Make ...
..., contact your dealer or an Authorised Service Centre. PRODUCT FICHE AND INFORMATION ACCORDING TO EU 65-66/2014 Supplier's name Zanussi Model identification ZOD35802BK ZOD35802XK 20 The oven does not heat up . Steam and condensation settle on the rating plate. You left the dish in the cavity of... the oven. Replace the lamp. The oven does not heat up . The clock is on the front frame of the malfunction. Make ...


