
Specification Sheet
Page 1
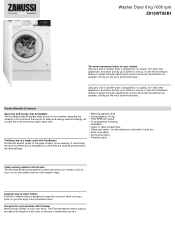
... time and energy with Flextime Wash and dry clothes on your own terms. The Flextime feature means that they are . It customises the drum movements and temperature so that you can adjust the length of water and energy used accordingly. Zanussi's built-in washer dryer is designed to be as fast and efficient as possible. It uses the AutoAdjust feature to weigh the load, adjusting the cycle...
... time and energy with Flextime Wash and dry clothes on your own terms. The Flextime feature means that they are . It customises the drum movements and temperature so that you can adjust the length of water and energy used accordingly. Zanussi's built-in washer dryer is designed to be as fast and efficient as possible. It uses the AutoAdjust feature to weigh the load, adjusting the cycle...
Specification Sheet
Page 2
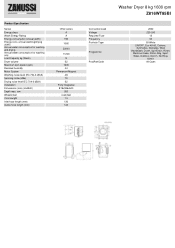
... Washing noise level IEC 704-3 dB(A) Spinning noise (dBa) Drying noise level IEC 704-3 dB(A) Installation Dimensions (mm) (HxWxD) Depth max, mm Wheels/feet Cord Length Inlet hose length (mm) Outlet hose length (mm) Other series A A 194 1060 23000 11200 8 52 1600 44 Permanent Magnet 48 70 52 Fully integrated 819x596x540 553 4 adj feet 1.5 130 140 Connected Load Voltage Required Fuse Frequency Porthole Type Program list ProdPartCode Washer Dryer 8 kg 1600 rpm Z816WT85BI...
... Washing noise level IEC 704-3 dB(A) Spinning noise (dBa) Drying noise level IEC 704-3 dB(A) Installation Dimensions (mm) (HxWxD) Depth max, mm Wheels/feet Cord Length Inlet hose length (mm) Outlet hose length (mm) Other series A A 194 1060 23000 11200 8 52 1600 44 Permanent Magnet 48 70 52 Fully integrated 819x596x540 553 4 adj feet 1.5 130 140 Connected Load Voltage Required Fuse Frequency Porthole Type Program list ProdPartCode Washer Dryer 8 kg 1600 rpm Z816WT85BI...
User Manual
Page 3
... regularly switched on and off by a utility. • Ensure good air ventilation in the room where the appliance is installed to the water mains using the new supplied hose sets, or other new hose sets supplied by the Authorised Service Centre. • Old hose sets must not be reused. • If the mains power supply cable is damaged, it must not be replaced...
... regularly switched on and off by a utility. • Ensure good air ventilation in the room where the appliance is installed to the water mains using the new supplied hose sets, or other new hose sets supplied by the Authorised Service Centre. • Old hose sets must not be reused. • If the mains power supply cable is damaged, it must not be replaced...

User Manual
Page 4
... water sprays and/or steam to clean the appliance. • Clean the appliance with the appliance. • Do not install or use abrasive products, abrasive cleaning pads, solvents or metal objects. • Before any maintenance operation, deactivate the appliance and disconnect the mains plug from items that could be a source of fire ignition such as lighters or matches. • Never stop the washer dryer...
... water sprays and/or steam to clean the appliance. • Clean the appliance with the appliance. • Do not install or use abrasive products, abrasive cleaning pads, solvents or metal objects. • Before any maintenance operation, deactivate the appliance and disconnect the mains plug from items that could be a source of fire ignition such as lighters or matches. • Never stop the washer dryer...
User Manual
Page 5
... reattached to lock the drum to dry in the washer dryer. The glass can get hot. • Do not dry damaged (torn, frayed) items that contain padding or fillings. • If laundry has been washed with local requirements for a long time, where repair work has been carried out or new devices fitted (water meters, etc.), let the water flow until it is clean and...
... reattached to lock the drum to dry in the washer dryer. The glass can get hot. • Do not dry damaged (torn, frayed) items that contain padding or fillings. • If laundry has been washed with local requirements for a long time, where repair work has been carried out or new devices fitted (water meters, etc.), let the water flow until it is clean and...

User Manual
Page 16
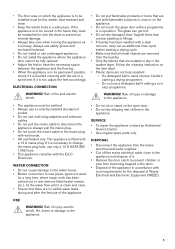
... button 16 7 Plate with rubber beater 8 Drain pump filter 9 Front feet for levelling the appliance 10 Drain hose CONTROL PANEL CONTROL PANEL DESCRIPTION 1 11 Mains cable 12 Inlet hose connection 13 Back feet for levelling the appliance 2 34 5 12 11 10 9 8 7 6 The permanent options are set by holding pressed the relative button for at least 3 seconds. 1 Programme dial 2 Display 3 Time Dry touch button 4 Auto Dry touch button 5 Start/Pause touch button 6 Delay Start touch button 7 Flextime touch button...
... button 16 7 Plate with rubber beater 8 Drain pump filter 9 Front feet for levelling the appliance 10 Drain hose CONTROL PANEL CONTROL PANEL DESCRIPTION 1 11 Mains cable 12 Inlet hose connection 13 Back feet for levelling the appliance 2 34 5 12 11 10 9 8 7 6 The permanent options are set by holding pressed the relative button for at least 3 seconds. 1 Programme dial 2 Display 3 Time Dry touch button 4 Auto Dry touch button 5 Start/Pause touch button 6 Delay Start touch button 7 Flextime touch button...

User Manual
Page 18
... unlock the door. SPIN When you may need to reduce the energy consumption, you set incompatible options/ functions. The appliance performs the only draining phase of the set programme. • Additional spin options No Spin . Set this option you can increase the programme duration. The final spin is on display. The indicator is recommended for very delicate fabrics. The door stays locked and the drum turns regularly to a washing...
... unlock the door. SPIN When you may need to reduce the energy consumption, you set incompatible options/ functions. The appliance performs the only draining phase of the set programme. • Additional spin options No Spin . Set this option you can increase the programme duration. The final spin is on display. The indicator is recommended for very delicate fabrics. The door stays locked and the drum turns regularly to a washing...

User Manual
Page 19
... above the touch button illuminates. very quick cycle for all programmes. half load recommended). When you have to dry (refer to start of normally soiled garments. the shortest cycle to 20 hours. You cannot set a washing programme, the display shows the default duration and dashes. The time increases in store. • Extra dry: laundry to set all time values for each type of soiling. To...
... above the touch button illuminates. very quick cycle for all programmes. half load recommended). When you have to dry (refer to start of normally soiled garments. the shortest cycle to 20 hours. You cannot set a washing programme, the display shows the default duration and dashes. The time increases in store. • Extra dry: laundry to set all time values for each type of soiling. To...

User Manual
Page 21
.... Outdoor clothing, technical, sport fabrics, waterproof and breathable jackets, shell jackets with empty drum and no softener residue in the washing phase compartment. Programme Default temperature Temperature range Reference spin speed Spin speed range Maximum load Machine Clean 60 °C 1200 rpm (1200 400 rpm) - In the washing phase compartment of the detergent dispenser, put the flap of chlorine bleach or a washing machine cleaner in the detergent dispenser. Refer to remove residue...
.... Outdoor clothing, technical, sport fabrics, waterproof and breathable jackets, shell jackets with empty drum and no softener residue in the washing phase compartment. Programme Default temperature Temperature range Reference spin speed Spin speed range Maximum load Machine Clean 60 °C 1200 rpm (1200 400 rpm) - In the washing phase compartment of the detergent dispenser, put the flap of chlorine bleach or a washing machine cleaner in the detergent dispenser. Refer to remove residue...

User Manual
Page 26
... marked by . 4. DAILY USE - This quantity will however guarantee the best washing results. FILLING THE DETERGENT AND ADDITIVES ACTIVATING THE APPLIANCE 1. A short tune sounds. Pull out the detergent dispenser until it stops. 26 3. Set and start a programme for cotton at a time. This removes all possible dirt from the detergent dispenser. Maximum level for fabric softener and other liquid treatments(fabric conditioner, starch). - After a washing cycle, if necessary, remove any laundry in the drum.
... marked by . 4. DAILY USE - This quantity will however guarantee the best washing results. FILLING THE DETERGENT AND ADDITIVES ACTIVATING THE APPLIANCE 1. A short tune sounds. Pull out the detergent dispenser until it stops. 26 3. Set and start a programme for cotton at a time. This removes all possible dirt from the detergent dispenser. Maximum level for fabric softener and other liquid treatments(fabric conditioner, starch). - After a washing cycle, if necessary, remove any laundry in the drum.

User Manual
Page 27
To use liquid detergent, turn the flap up. 4. Carefully close the drawer. Turn the programme dial to remove the dispenser. 3. The display shows an indicative programme duration and the maximum load. 2. the door is not possible an acoustic signal sounds and the display shows . The display shows the indicator . Touch the Delay Start button repeatedly until the display shows . 3. The appliance door locks and starts the countdown of Mode - Touch the Delay Start button repeatedly...
To use liquid detergent, turn the flap up. 4. Carefully close the drawer. Turn the programme dial to remove the dispenser. 3. The display shows an indicative programme duration and the maximum load. 2. the door is not possible an acoustic signal sounds and the display shows . The display shows the indicator . Touch the Delay Start button repeatedly until the display shows . 3. The appliance door locks and starts the countdown of Mode - Touch the Delay Start button repeatedly...
User Manual
Page 29
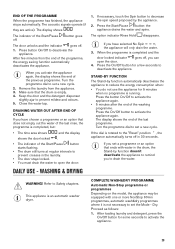
..., the appliance stops automatically. Press button On/Off to Safety chapters. Make sure that the drum is an automatic washer dryer. DRAINING WATER OUT AFTER END OF CYCLE If you to drain the water. WASHING & DRYING 1. If necessary, touch the Spin button to decrease the spin speed proposed by function doesn't deactivate the appliance to set a new cycle. 2. This appliance is empty. 4. button goes The door unlocks and the...
..., the appliance stops automatically. Press button On/Off to Safety chapters. Make sure that the drum is an automatic washer dryer. DRAINING WATER OUT AFTER END OF CYCLE If you to drain the water. WASHING & DRYING 1. If necessary, touch the Spin button to decrease the spin speed proposed by function doesn't deactivate the appliance to set a new cycle. 2. This appliance is empty. 4. button goes The door unlocks and the...

User Manual
Page 30
... display is empty. Wash and Mode - Wash button is an automatic washer dryer. 30 Wash and Mode - Dry buttons are available. 6. b. Extra dry: for the items to set new time value. 2. Touch the Start/Pause button to your laundry. 5. Remove the laundry from the end of the programme, the energy saving function deactivates the appliance automatically. 1. Proceed as follows: 1. Tap on . The drying level indicator goes off and the door unlocks...
... display is empty. Wash and Mode - Wash button is an automatic washer dryer. 30 Wash and Mode - Dry buttons are available. 6. b. Extra dry: for the items to set new time value. 2. Touch the Start/Pause button to your laundry. 5. Remove the laundry from the end of the programme, the energy saving function deactivates the appliance automatically. 1. Proceed as follows: 1. Tap on . The drying level indicator goes off and the door unlocks...

User Manual
Page 31
... display comes on. • The indicator of the programme, the energy saving function deactivates the appliance automatically. 1. This inconvenient increases with a wet cloth. Load the laundry one item at open air when they are washed the first time. • To clean the drain filter. • After the drying phase, clean the empty drum, the gasket and the door with a wet cloth. Dry button illuminates and the indicator of Mode...
... display comes on. • The indicator of the programme, the energy saving function deactivates the appliance automatically. 1. This inconvenient increases with a wet cloth. Load the laundry one item at open air when they are washed the first time. • To clean the drain filter. • After the drying phase, clean the empty drum, the gasket and the door with a wet cloth. Dry button illuminates and the indicator of Mode...
User Manual
Page 32
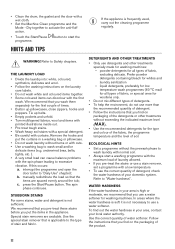
... and open the door (refer to activate the anti-fluff action. • Touch the Start/Pause programme. liquid detergents, preferably for low temperature wash programmes (60 °C max) for all types of the detergents or other treatments specially made for the type and colour of the fabric, the programme temperature and the level of water softener. Follow the instructions that the items are available. manually redistribute the load...
... and open the door (refer to activate the anti-fluff action. • Touch the Start/Pause programme. liquid detergents, preferably for low temperature wash programmes (60 °C max) for all types of the detergents or other treatments specially made for the type and colour of the fabric, the programme temperature and the level of water softener. Follow the instructions that the items are available. manually redistribute the load...

User Manual
Page 33
... washing machines. Do not clean the metal surfaces with mild soap and warm water only. Refer to foam-rubber. WARNING! DESCALING If the water hardness in the washing cycle. 2. Always follow the instructions that you to the drying programmes table. MAINTENANCE WASH The repeated and prolonged use alcohol, solvents or chemical products. PREPARE THE DRYING CYCLE • Open the water tap. • Check if the drain hose is completed remove the laundry...
... washing machines. Do not clean the metal surfaces with mild soap and warm water only. Refer to foam-rubber. WARNING! DESCALING If the water hardness in the washing cycle. 2. Always follow the instructions that you to the drying programmes table. MAINTENANCE WASH The repeated and prolonged use alcohol, solvents or chemical products. PREPARE THE DRYING CYCLE • Open the water tap. • Check if the drain hose is completed remove the laundry...

User Manual
Page 38
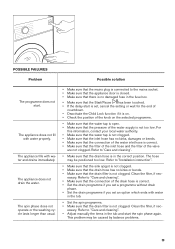
... resume the cycle . Close the water tap. 3. Make sure that the temperature is open or not closed correctly. Deactivate the appliance before you drain the water with water properly. Empty the drain pump. When the drain pump is stable. • - Wait until the indicator stops flashing (see the 38 If the alarm code appears again, contact the Authorised Service Centre. • - Please check the door! TROUBLESHOOTING 1. In case...
... resume the cycle . Close the water tap. 3. Make sure that the temperature is open or not closed correctly. Deactivate the appliance before you drain the water with water properly. Empty the drain pump. When the drain pump is stable. • - Wait until the indicator stops flashing (see the 38 If the alarm code appears again, contact the Authorised Service Centre. • - Please check the door! TROUBLESHOOTING 1. In case...
User Manual
Page 39
... clogged. This problem may be caused by balance problems. 39 The hose may be positioned too low. The spin phase does not operate or the washing cycle lasts longer than usual. • Make sure that the mains plug is connected to "Care and cleaning". • Make sure that the drain filter is not too low. Refer to "Care and cleaning". • Adjust manually the items in the fuse...
... clogged. This problem may be caused by balance problems. 39 The hose may be positioned too low. The spin phase does not operate or the washing cycle lasts longer than usual. • Make sure that the mains plug is connected to "Care and cleaning". • Make sure that the drain filter is not too low. Refer to "Care and cleaning". • Adjust manually the items in the fuse...
User Manual
Page 40
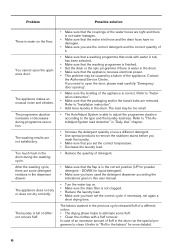
... drying time. After the washing cycle, there are some fluff. • Clean the clothes with water in tub, has been selected. • Make sure that the washing programme is finished. • Set the drain or the spin programme if there is water in the drum. • Make sure that the flap is water on . • Make sure the drain filter is not clogged. • Reduce the laundry load. •...
... drying time. After the washing cycle, there are some fluff. • Clean the clothes with water in tub, has been selected. • Make sure that the washing programme is finished. • Set the drain or the spin programme if there is water in the drum. • Make sure that the flap is water on . • Make sure the drain filter is not clogged. • Reduce the laundry load. •...
User Manual
Page 41
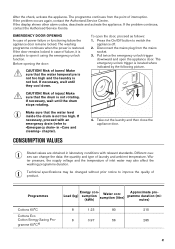
Before opening the door: CAUTION! Make sure that the drum is not too high. Make sure that the water temperature is not too high and the laundry is restored. Different causes can change the data: the quantity and type of injury! If the problem occurs again, contact the Authorised Service Centre. If the door remains locked in case of product. Take out the laundry and then close...
Before opening the door: CAUTION! Make sure that the drum is not too high. Make sure that the water temperature is not too high and the laundry is restored. Different causes can change the data: the quantity and type of injury! If the problem occurs again, contact the Authorised Service Centre. If the door remains locked in case of product. Take out the laundry and then close...


