Owner's Manual
Page 3
...not produce satisfactory results, please contact the local retailer authorized to avoid prolonged exposure from loud sounds is too late, YAMAHA and the Electronic Industries Association's Consumer Electronics Group recommend you can be used according to the instructions found to eliminate the... by using one of your FCC authorization to use the product. 2 IMPORTANT : When connecting this product to the operation of interference, which can not locate the appropriate retailer, please contact Yamaha Electronics Corp., U.S.A. 6660 Orangethorpe Ave, Buena Park, CA 90620. and, most out ...
...not produce satisfactory results, please contact the local retailer authorized to avoid prolonged exposure from loud sounds is too late, YAMAHA and the Electronic Industries Association's Consumer Electronics Group recommend you can be used according to the instructions found to eliminate the... by using one of your FCC authorization to use the product. 2 IMPORTANT : When connecting this product to the operation of interference, which can not locate the appropriate retailer, please contact Yamaha Electronics Corp., U.S.A. 6660 Orangethorpe Ave, Buena Park, CA 90620. and, most out ...
Owner's Manual
Page 4
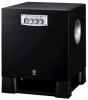
...8226; Secure placement or installation is faulty. • Install this unit near the YST port of speakers. It might cause a fire, damage to prevent this unit from being damaged. • If you for selecting this YAMAHA subwoofer system. are continuously outputted at least 20 cm of a disc, reduce ...distort images on both sides of this unit. A burning candle etc. When moving the unit, first disconnect the power plug and the wires connected to this unit, and/or electric shock. • Super-bass frequencies reproduced by vibrations and water spills, it might damage the finish....
...8226; Secure placement or installation is faulty. • Install this unit near the YST port of speakers. It might cause a fire, damage to prevent this unit from being damaged. • If you for selecting this YAMAHA subwoofer system. are continuously outputted at least 20 cm of a disc, reduce ...distort images on both sides of this unit. A burning candle etc. When moving the unit, first disconnect the power plug and the wires connected to this unit, and/or electric shock. • Super-bass frequencies reproduced by vibrations and water spills, it might damage the finish....
Owner's Manual
Page 5
...Connecting to the INPUT1/ OUTPUT terminals of the subwoofer 8 Plug in the home are 110/120/220/230-240 V AC, 50/60 Hz. CONTROLS AND THEIR FUNCTIONS 9 AUTOMATIC POWER-SWITCHING FUNCTION 11 Changing the AUTO STANDBY setting 11 ADJUSTING THE SUBWOOFER BEFORE USE 12 Frequency characteristics 13 ADVANCED YAMAHA... which is marked with the coloured markings identifying the terminals in a live socket outlet. The wire which is coloured BLUE must be connected to consume a very small quantity of power. This unit is not disconnected from the mains lead must be destroyed, as a plug...
...Connecting to the INPUT1/ OUTPUT terminals of the subwoofer 8 Plug in the home are 110/120/220/230-240 V AC, 50/60 Hz. CONTROLS AND THEIR FUNCTIONS 9 AUTOMATIC POWER-SWITCHING FUNCTION 11 Changing the AUTO STANDBY setting 11 ADJUSTING THE SUBWOOFER BEFORE USE 12 Frequency characteristics 13 ADVANCED YAMAHA... which is marked with the coloured markings identifying the terminals in a live socket outlet. The wire which is coloured BLUE must be connected to consume a very small quantity of power. This unit is not disconnected from the mains lead must be destroyed, as a plug...
Owner's Manual
Page 6
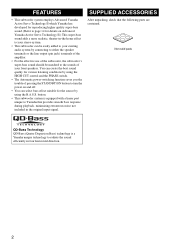
... the HIGH CUT control and the PHASE switch. • The Automatic power-switching function saves you the trouble of your existing audio system by connecting to either the speaker terminals or the line output (pin jack) terminals of the amplifier. • For the effective use of the subwoofer,...sounds of pressing the STANDBY/ON button to turn the power on and off. • You can select bass effect suitable for details on Advanced Yamaha Active Servo Technology II.) This super-bass sound adds a more realistic, theater-in four horizontal direction. 2 Non-skid pads QD-Bass Technology QD...
... the HIGH CUT control and the PHASE switch. • The Automatic power-switching function saves you the trouble of your existing audio system by connecting to either the speaker terminals or the line output (pin jack) terminals of the amplifier. • For the effective use of the subwoofer,...sounds of pressing the STANDBY/ON button to turn the power on and off. • You can select bass effect suitable for details on Advanced Yamaha Active Servo Technology II.) This super-bass sound adds a more realistic, theater-in four horizontal direction. 2 Non-skid pads QD-Bass Technology QD...
Owner's Manual
Page 8
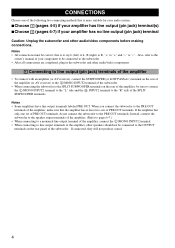
... etc.) terminal on the rear of the amplifier (or AV receiver) to the L /MONO INPUT2 terminal of the subwoofer. • When connecting the subwoofer to the SPLIT SUBWOOFER terminals on the rear panel of your amplifier has no line output (pin jack) terminal Caution: Unplug the subwoofer... and other audio/video components before making connections. When you connect the subwoofer to the PRE OUT terminals of the amplifier, make sure that is to say L (left) to L, R (right) to R, "+" to "+" ...
... etc.) terminal on the rear of the amplifier (or AV receiver) to the L /MONO INPUT2 terminal of the subwoofer. • When connecting the subwoofer to the SPLIT SUBWOOFER terminals on the rear panel of your amplifier has no line output (pin jack) terminal Caution: Unplug the subwoofer... and other audio/video components before making connections. When you connect the subwoofer to the PRE OUT terminals of the amplifier, make sure that is to say L (left) to L, R (right) to R, "+" to "+" ...
Owner's Manual
Page 9
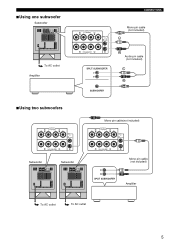
■Using one subwoofer Subwoofer To AC outlet Amplifier ■Using two subwoofers CONNECTIONS Mono pin cable (not included) Audio pin cable (not included) Mono pin cable(not included) Subwoofer Subwoofer To AC outlet To AC outlet Mono pin cable (not included) Amplifier 5
■Using one subwoofer Subwoofer To AC outlet Amplifier ■Using two subwoofers CONNECTIONS Mono pin cable (not included) Audio pin cable (not included) Mono pin cable(not included) Subwoofer Subwoofer To AC outlet To AC outlet Mono pin cable (not included) Amplifier 5
Owner's Manual
Page 10
... of the amplifier Select this method if your amplifier has two sets of front speaker output terminals output sound signals simultaneously. CONNECTIONS 2 Connecting to the front speakers. • Set the amplifier so that both sets of front speaker output terminals and both terminals ...can output sound signals simultaneously. • Connect one subwoofer (with speaker cables) Right front speaker Subwoofer Left front speaker To AC outlet Speaker output terminals Amplifier ■Using two...
... of the amplifier Select this method if your amplifier has two sets of front speaker output terminals output sound signals simultaneously. CONNECTIONS 2 Connecting to the front speakers. • Set the amplifier so that both sets of front speaker output terminals and both terminals ...can output sound signals simultaneously. • Connect one subwoofer (with speaker cables) Right front speaker Subwoofer Left front speaker To AC outlet Speaker output terminals Amplifier ■Using two...
Owner's Manual
Page 11
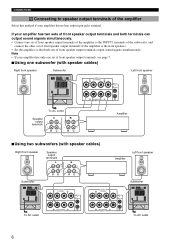
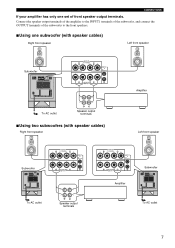
CONNECTIONS If your amplifier has only one set of the subwoofer to the front speakers. ■Using one subwoofer (with speaker cables) Right front speaker Left front speaker Subwoofer To AC outlet Speaker output terminals ■Using two subwoofers (with speaker cables) Right front speaker Amplifier Left front speaker Subwoofer To AC outlet Speaker output terminals Amplifier Subwoofer To AC outlet 7 Connect the speaker output terminals of the amplifier to the INPUT1 terminals of the subwoofer, and connect the OUTPUT terminals of front speaker output terminals.
CONNECTIONS If your amplifier has only one set of the subwoofer to the front speakers. ■Using one subwoofer (with speaker cables) Right front speaker Left front speaker Subwoofer To AC outlet Speaker output terminals ■Using two subwoofers (with speaker cables) Right front speaker Amplifier Left front speaker Subwoofer To AC outlet Speaker output terminals Amplifier Subwoofer To AC outlet 7 Connect the speaker output terminals of the amplifier to the INPUT1 terminals of the subwoofer, and connect the OUTPUT terminals of front speaker output terminals.
Owner's Manual
Page 12
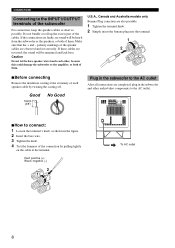
... the extremity of each other audio/video components to the AC outlet. ■How to the INPUT1/OUTPUT terminals of the subwoofer For connection, keep the speaker cables as short as possible. U.S.A., Canada and Australia models only Banana Plug conection are faulty, no sound will be... the speakers, or both of them . Caution Do not let the bare speaker wires touch each speaker cable by twisting the coating off. CONNECTIONS Connecting to connect: 1 Loosen the terminal's knob, as shown in the subwoofer and other , because this could damage the subwoofer or the amplifier, or ...
... the extremity of each other audio/video components to the AC outlet. ■How to the INPUT1/OUTPUT terminals of the subwoofer For connection, keep the speaker cables as short as possible. U.S.A., Canada and Australia models only Banana Plug conection are faulty, no sound will be... the speakers, or both of them . Caution Do not let the bare speaker wires touch each speaker cable by twisting the coating off. CONNECTIONS Connecting to connect: 1 Loosen the terminal's knob, as shown in the subwoofer and other , because this could damage the subwoofer or the amplifier, or ...
Owner's Manual
Page 14
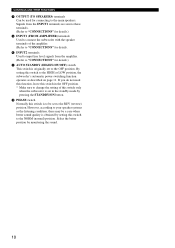
Signals from the amplifier. (Refer to "CONNECTIONS" for connecting to the main speakers. However, according to your speaker systems or the listening condition, there may be set to the OFF position. Select the better ... If you do not need this function, leave this switch in the OFF position. * Make sure to change the setting of the amplifier. (Refer to "CONNECTIONS" for details. 0 INPUT2 terminals Used to input line level signals from the INPUT1 terminals are sent to these terminals. (Refer to...
Signals from the amplifier. (Refer to "CONNECTIONS" for connecting to the main speakers. However, according to your speaker systems or the listening condition, there may be set to the OFF position. Select the better ... If you do not need this function, leave this switch in the OFF position. * Make sure to change the setting of the amplifier. (Refer to "CONNECTIONS" for details. 0 INPUT2 terminals Used to input line level signals from the INPUT1 terminals are sent to these terminals. (Refer to...
Owner's Manual
Page 18
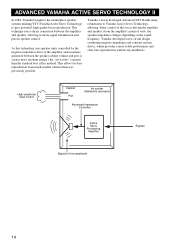
... low amplitude 14 This allows for bass reproduction from much smaller cabinets than the standard bass reflex method. Yamaha's newly developed Advanced YST II adds many refinements to give powerful, high quality bass reproduction. From the amplifier's point of the... signal transmission and precise speaker control. This technique uses a direct connection between the speaker cabinet volume and port, it creates more stable performance and clear bass reproduction without any murkiness. Yamaha developed a new circuit design combining negative-impedance and constant-current drives...
... low amplitude 14 This allows for bass reproduction from much smaller cabinets than the standard bass reflex method. Yamaha's newly developed Advanced YST II adds many refinements to give powerful, high quality bass reproduction. From the amplifier's point of the... signal transmission and precise speaker control. This technique uses a direct connection between the speaker cabinet volume and port, it creates more stable performance and clear bass reproduction without any murkiness. Yamaha developed a new circuit design combining negative-impedance and constant-current drives...
Owner's Manual
Page 19
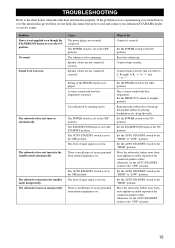
...HIGH" position. The POWER switch is set to the OFF position. Connect them securely. Set the HIGH CUT control to the chart below do not help, disconnect the power cord and contact your authorized YAMAHA dealer or service center. The subwoofer does not turn on unexpectedly. ...Raise the volume up the parallel surface by standing waves. If the problem you are not connected securely. Set the AUTO STANDBY switch to the ON...
...HIGH" position. The POWER switch is set to the OFF position. Connect them securely. Set the HIGH CUT control to the chart below do not help, disconnect the power cord and contact your authorized YAMAHA dealer or service center. The subwoofer does not turn on unexpectedly. ...Raise the volume up the parallel surface by standing waves. If the problem you are not connected securely. Set the AUTO STANDBY switch to the ON...


