
Owners Manual
Page 2
... the rear of the main unit. WARNING TO REDUCE THE RISK OF FIRE OR ELECTRIC SHOCK, DO NOT EXPOSE THIS APPLIANCE TO RAIN OR MOISTURE. Model: Serial No.: The serial number is intended to alert you to qualified service personnel. A grounding type plug has two blades and a third grounding prong. Servicing...
... the rear of the main unit. WARNING TO REDUCE THE RISK OF FIRE OR ELECTRIC SHOCK, DO NOT EXPOSE THIS APPLIANCE TO RAIN OR MOISTURE. Model: Serial No.: The serial number is intended to alert you to qualified service personnel. A grounding type plug has two blades and a third grounding prong. Servicing...

Owners Manual
Page 5
... outlet 12 CONTROLS AND THEIR FUNCTIONS 13 AUTOMATIC POWER-SWITCHING FUNCTION 15 ADJUSTING THE SUBWOOFER BEFORE USE 16 Frequency characteristics 17 ADVANCED YAMAHA ACTIVE SERVO TECHNOLOGY 18 TROUBLESHOOTING 19 SPECIAL INSTRUCTIONS FOR U.K. SPECIFICATIONS 20 For Canadian ...Customers To prevent electric shock, match wide blade of the subwoofer 12 Plug in the home are 110/120/220/240 V AC, 50/60 Hz. • VOLTAGE SELECTOR (For China, Korea and General models...
... outlet 12 CONTROLS AND THEIR FUNCTIONS 13 AUTOMATIC POWER-SWITCHING FUNCTION 15 ADJUSTING THE SUBWOOFER BEFORE USE 16 Frequency characteristics 17 ADVANCED YAMAHA ACTIVE SERVO TECHNOLOGY 18 TROUBLESHOOTING 19 SPECIAL INSTRUCTIONS FOR U.K. SPECIFICATIONS 20 For Canadian ...Customers To prevent electric shock, match wide blade of the subwoofer 12 Plug in the home are 110/120/220/240 V AC, 50/60 Hz. • VOLTAGE SELECTOR (For China, Korea and General models...

Owners Manual
Page 15
...to allow it to connect: 1 Loosen the terminal's knob, as shown in the figure. 2 Insert the bare wire. 3 Release your finger from the subwoofer or the speakers, or both of them . If the connections are completed, plug in the figure. 2 Insert the bare wire. 3 Tighten the knob....of them . ■Before connecting Remove the insulation coating at the terminal. Red: positive (+) Black: negative (-) CONNECTIONS U.S.A., Canada and Australia models only Banana Plug conection are reversed, the sound will be unnatural and lack bass. Good No Good ■How to lock securely on the cable...
...to allow it to connect: 1 Loosen the terminal's knob, as shown in the figure. 2 Insert the bare wire. 3 Release your finger from the subwoofer or the speakers, or both of them . If the connections are completed, plug in the figure. 2 Insert the bare wire. 3 Tighten the knob....of them . ■Before connecting Remove the insulation coating at the terminal. Red: positive (+) Black: negative (-) CONNECTIONS U.S.A., Canada and Australia models only Banana Plug conection are reversed, the sound will be unnatural and lack bass. Good No Good ■How to lock securely on the cable...
Owners Manual
Page 16
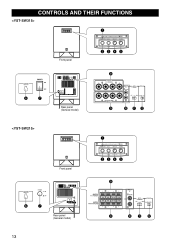
CONTROLS AND THEIR FUNCTIONS Front panel Rear panel (General model) Front panel Rear panel (General model) 13
CONTROLS AND THEIR FUNCTIONS Front panel Rear panel (General model) Front panel Rear panel (General model) 13
Owners Manual
Page 17
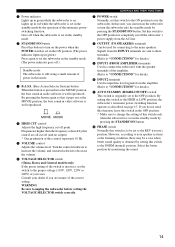
... from the INPUT1 terminals are sent to these terminals. (Refer to "CONNECTIONS" for details.) 9 INPUT1 (FROM AMPLIFIER) terminals Used to connect the subwoofer with the speaker terminals of the amplifier. (Refer to "CONNECTIONS" for details. 0 INPUT2 terminals Used to input line level signals from the AC .... Turn the control clockwise to increase the volume, and counterclockwise to decrease the volume. 6 VOLTAGE SELECTOR switch (China, Korea and General models only) If the preset setting of the switch is on page 15. CONTROLS AND THEIR FUNCTIONS 7 POWER switch Normally, set this switch ...
... from the INPUT1 terminals are sent to these terminals. (Refer to "CONNECTIONS" for details.) 9 INPUT1 (FROM AMPLIFIER) terminals Used to connect the subwoofer with the speaker terminals of the amplifier. (Refer to "CONNECTIONS" for details. 0 INPUT2 terminals Used to input line level signals from the AC .... Turn the control clockwise to increase the volume, and counterclockwise to decrease the volume. 6 VOLTAGE SELECTOR switch (China, Korea and General models only) If the preset setting of the switch is on page 15. CONTROLS AND THEIR FUNCTIONS 7 POWER switch Normally, set this switch ...

Owners Manual
Page 23
Advanced Yamaha Active Servo Technology Driver .....25 cm (10") cone woofer (JA2564) Magnetic shielding type .......20 cm (8") cone woofer (JA2165) Magnetic shielding type Amplifier Output (100 Hz, 5 ohms, 10% THD) SPECIFICATIONS Type ........
Advanced Yamaha Active Servo Technology Driver .....25 cm (10") cone woofer (JA2564) Magnetic shielding type .......20 cm (8") cone woofer (JA2165) Magnetic shielding type Amplifier Output (100 Hz, 5 ohms, 10% THD) SPECIFICATIONS Type ........

