MCXSP10 Manual
Page 2
... use attachments/accessories specified by the manufacturer. 12 Use only with the cart, stand, tripod, bracket, or table specified by vibrations and water spills, it . Model: Serial No.: The serial number is located on or pinched particularly at least 20 cm above, behind and on both sides of this apparatus near...
... use attachments/accessories specified by the manufacturer. 12 Use only with the cart, stand, tripod, bracket, or table specified by vibrations and water spills, it . Model: Serial No.: The serial number is located on or pinched particularly at least 20 cm above, behind and on both sides of this apparatus near...
MCXSP10 Manual
Page 5
... panel is marked with the coloured markings identifying the terminals in the home are 110/120/220/240 V AC, 50/60 Hz. SPECIFICATIONS 20 For Canadian Customers To prevent...with the letter N or coloured BLACK. • VOLTAGE SELECTOR (For China, Korea and General models) The voltage selector switch on the rear panel of this unit must be set . This Class...AND THEIR FUNCTIONS 13 AUTOMATIC POWER-SWITCHING FUNCTION 15 ADJUSTING THE SUBWOOFER BEFORE USE 16 Frequency characteristics 17 ADVANCED YAMAHA ACTIVE SERVO TECHNOLOGY 18 TROUBLESHOOTING 19 SPECIAL INSTRUCTIONS FOR U.K. The...
... panel is marked with the coloured markings identifying the terminals in the home are 110/120/220/240 V AC, 50/60 Hz. SPECIFICATIONS 20 For Canadian Customers To prevent...with the letter N or coloured BLACK. • VOLTAGE SELECTOR (For China, Korea and General models) The voltage selector switch on the rear panel of this unit must be set . This Class...AND THEIR FUNCTIONS 13 AUTOMATIC POWER-SWITCHING FUNCTION 15 ADJUSTING THE SUBWOOFER BEFORE USE 16 Frequency characteristics 17 ADVANCED YAMAHA ACTIVE SERVO TECHNOLOGY 18 TROUBLESHOOTING 19 SPECIAL INSTRUCTIONS FOR U.K. The...
MCXSP10 Manual
Page 15
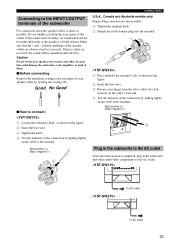
...into the terminal. 1 Press and hold the terminal's tab, as shown in the figure. 2 Insert the bare wire. 3 Release your finger from the subwoofer or the speakers, or both of them. ■Before connecting Remove the insulation coating at the extremity of them. Caution Do not let the bare...4 Test the firmness of the connection by pulling lightly on the cable at the terminal. Red: positive (+) Black: negative (-) CONNECTIONS U.S.A., Canada and Australia models only Banana Plug conection are faulty, no sound will be heard from the tab to allow it to the AC outlet. To AC outlet To...
...into the terminal. 1 Press and hold the terminal's tab, as shown in the figure. 2 Insert the bare wire. 3 Release your finger from the subwoofer or the speakers, or both of them. ■Before connecting Remove the insulation coating at the extremity of them. Caution Do not let the bare...4 Test the firmness of the connection by pulling lightly on the cable at the terminal. Red: positive (+) Black: negative (-) CONNECTIONS U.S.A., Canada and Australia models only Banana Plug conection are faulty, no sound will be heard from the tab to allow it to the AC outlet. To AC outlet To...
MCXSP10 Manual
Page 16
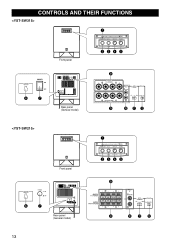
CONTROLS AND THEIR FUNCTIONS Front panel Rear panel (General model) Front panel Rear panel (General model) 13
CONTROLS AND THEIR FUNCTIONS Front panel Rear panel (General model) Front panel Rear panel (General model) 13
MCXSP10 Manual
Page 17
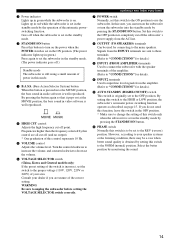
...Turn the control clockwise to increase the volume, and counterclockwise to decrease the volume. 6 VOLTAGE SELECTOR switch (China, Korea and General models only) If the preset setting of the switch is incorrect, set the switch to the proper voltage (110V, 120V, 220V or .... CONTROLS AND THEIR FUNCTIONS 7 POWER switch Normally, set this switch to your area. However, according to the HIGH or LOW position, the subwoofer's automatic power-switching function operates as described on . Frequencies higher than the frequency selected by pressing the STANDBY/ON button. 1 Power indicator Lights...
...Turn the control clockwise to increase the volume, and counterclockwise to decrease the volume. 6 VOLTAGE SELECTOR switch (China, Korea and General models only) If the preset setting of the switch is incorrect, set the switch to the proper voltage (110V, 120V, 220V or .... CONTROLS AND THEIR FUNCTIONS 7 POWER switch Normally, set this switch to your area. However, according to the HIGH or LOW position, the subwoofer's automatic power-switching function operates as described on . Frequencies higher than the frequency selected by pressing the STANDBY/ON button. 1 Power indicator Lights...
MCXSP10 Manual
Page 23
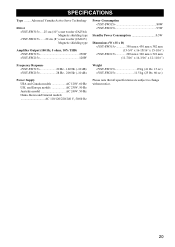
SPECIFICATIONS Type ........ Advanced Yamaha Active Servo Technology Driver .....25 cm (10") cone woofer (JA2564) Magnetic shielding type .......20 cm (8") cone woofer (JA2165) Magnetic shielding type Amplifier Output (100 Hz, 5 ohms, 10% THD)
SPECIFICATIONS Type ........ Advanced Yamaha Active Servo Technology Driver .....25 cm (10") cone woofer (JA2564) Magnetic shielding type .......20 cm (8") cone woofer (JA2165) Magnetic shielding type Amplifier Output (100 Hz, 5 ohms, 10% THD)

