Owner's Manual
Page 2
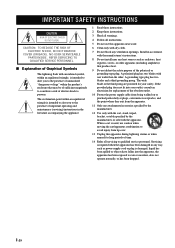
... . The wide blade or the third prong are provided for your outlet, consult an electrician for long periods of the obsolete outlet. 10 Protect the power supply cable from being walked on or pinched particularly at plugs, convenience receptacles, and the point where they exit from the apparatus. 11 Only use... only with the cart, stand, tripod, bracket, or table specified by the manufacturer, or sold with dry cloth. 7 Do not block any way, such as power-supply cord or plug is used, use caution when moving the cart/apparatus combination to persons.
... . The wide blade or the third prong are provided for your outlet, consult an electrician for long periods of the obsolete outlet. 10 Protect the power supply cable from being walked on or pinched particularly at plugs, convenience receptacles, and the point where they exit from the apparatus. 11 Only use... only with the cart, stand, tripod, bracket, or table specified by the manufacturer, or sold with dry cloth. 7 Do not block any way, such as power-supply cord or plug is used, use caution when moving the cart/apparatus combination to persons.
Owner's Manual
Page 3
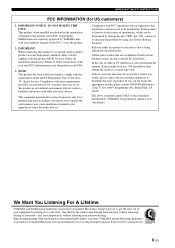
...contact the local retailer authorized to avoid prolonged exposure from excessive volume levels. Utilize power outlets that interference will not result in all installation instructions. If you to ...the interference. In the case of America or its subsidiaries. Since hearing damage from loud sounds is often undetectable until it at a safe level. This product, when installed as ... INSTRUCTIONS FCC INFORMATION (for Class "B" digital devices. IMPORTANT NOTICE: DO NOT MODIFY THIS UNIT! If the antenna lead-in is too late, YAMAHA and the Electronic Industries Association's Consumer...
...contact the local retailer authorized to avoid prolonged exposure from excessive volume levels. Utilize power outlets that interference will not result in all installation instructions. If you to ...the interference. In the case of America or its subsidiaries. Since hearing damage from loud sounds is often undetectable until it at a safe level. This product, when installed as ... INSTRUCTIONS FCC INFORMATION (for Class "B" digital devices. IMPORTANT NOTICE: DO NOT MODIFY THIS UNIT! If the antenna lead-in is too late, YAMAHA and the Electronic Industries Association's Consumer...

Owner's Manual
Page 4
... from the AC power source as long as it should never be connected to the AC wall outlet, even if this unit, and/or personal injury. IMPORTANT Please record the serial number of this sound system in hazardous radiation exposure. This Class B digital apparatus complies with this...a higher voltage than specified is hazardous if engaged in a live socket outlet. this unit with at least 5 cm of time (i.e. Contact qualified YAMAHA service personnel when any service is incorrectly replaced. In this state, this unit. - FOR CANADIAN CUSTOMERS To prevent electric shock, match wide blade ...
... from the AC power source as long as it should never be connected to the AC wall outlet, even if this unit, and/or personal injury. IMPORTANT Please record the serial number of this sound system in hazardous radiation exposure. This Class B digital apparatus complies with this...a higher voltage than specified is hazardous if engaged in a live socket outlet. this unit with at least 5 cm of time (i.e. Contact qualified YAMAHA service personnel when any service is incorrectly replaced. In this state, this unit. - FOR CANADIAN CUSTOMERS To prevent electric shock, match wide blade ...
Owner's Manual
Page 5
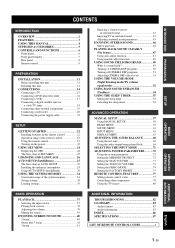
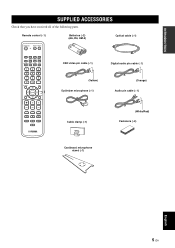
... TV 15 Connecting a DVD player/recorder 16 Connecting a VCR 17 Connecting a digital satellite tuner or a cable TV tuner 18 Connecting other external components 19 Connecting a subwoofer 20 Connecting the power supply cable 21 SETUP GETTING STARTED 22 Installing batteries in the remote control 22 ...macro 80 BASIC OPERATION PLAYBACK 37 Selecting the input source 37 Playing back sources 38 Adjusting the volume 39 Muting the sound 39 ENJOYING SURROUND SOUND 40 5 beam 40 Stereo plus 3 beam 41 3 beam 41 ADDITIONAL INFORMATION TROUBLESHOOTING 82 GLOSSARY 85 Audio formats 85...
... TV 15 Connecting a DVD player/recorder 16 Connecting a VCR 17 Connecting a digital satellite tuner or a cable TV tuner 18 Connecting other external components 19 Connecting a subwoofer 20 Connecting the power supply cable 21 SETUP GETTING STARTED 22 Installing batteries in the remote control 22 ...macro 80 BASIC OPERATION PLAYBACK 37 Selecting the input source 37 Playing back sources 38 Adjusting the volume 39 Muting the sound 39 ENJOYING SURROUND SOUND 40 5 beam 40 Stereo plus 3 beam 41 3 beam 41 ADDITIONAL INFORMATION TROUBLESHOOTING 82 GLOSSARY 85 Audio formats 85...
Owner's Manual
Page 6
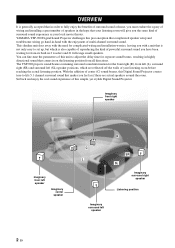
... speakers around the room. YAMAHA YSP-900 Digital Sound Projector challenges this simple, yet stylish Digital Sound Projector. This slimline unit does away with the need for from all directions. Imaginary front right speaker Imaginary front left speaker Imaginary center speaker C L R SR SL Imaginary surround right speaker Listening position Imaginary surround left (SL) speaker positions, which is also capable of reproducing the kind of powerful surround sound...
... speakers around the room. YAMAHA YSP-900 Digital Sound Projector challenges this simple, yet stylish Digital Sound Projector. This slimline unit does away with the need for from all directions. Imaginary front right speaker Imaginary front left speaker Imaginary center speaker C L R SR SL Imaginary surround right speaker Listening position Imaginary surround left (SL) speaker positions, which is also capable of reproducing the kind of powerful surround sound...
Owner's Manual
Page 8
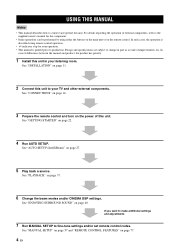
... and/or set remote control codes. See "CONNECTIONS" on page 14. 3 Prepare the remote control and turn on the remote control. See "ENJOYING SURROUND SOUND" on page 27. 5 Play back a source. See "AUTO SETUP (IntelliBeam)" on page 40. See "MANUAL SETUP" on page 57 and "REMOTE CONTROL...; y indicates a tip for the component. • Some operations can be performed by using either the buttons on the main unit or on the power of this unit. USING THIS MANUAL USING THIS MANUAL Notes • This manual describes how to your TV and other external components. See "INSTALLATION"...
... and/or set remote control codes. See "CONNECTIONS" on page 14. 3 Prepare the remote control and turn on the remote control. See "ENJOYING SURROUND SOUND" on page 27. 5 Play back a source. See "AUTO SETUP (IntelliBeam)" on page 40. See "MANUAL SETUP" on page 57 and "REMOTE CONTROL...; y indicates a tip for the component. • Some operations can be performed by using either the buttons on the main unit or on the power of this unit. USING THIS MANUAL USING THIS MANUAL Notes • This manual describes how to your TV and other external components. See "INSTALLATION"...
Owner's Manual
Page 9
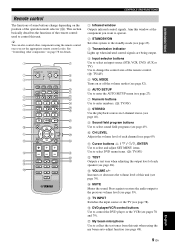
...;1) STANDBY/ON POWER POWER AV TV STB VCR DVD AUX TV INPUT1 INPUT2 MACRO TV AUTO VOL MODE SETUP INPUTMODE SLEEP 5BEAM 1 ST+3BEAM 2 3BEAM 3 STEREO 4 MY BEAM SURROUND 5 6 MUSIC 7 MOVIE 8 SPORTS 9 OFF 0 +10 CH LEVEL MENU TEST ENTER TV/AV YSP RETURN VOLUME CH TV VOL OSD video pin cable (×1) Digital audio pin cable...
...;1) STANDBY/ON POWER POWER AV TV STB VCR DVD AUX TV INPUT1 INPUT2 MACRO TV AUTO VOL MODE SETUP INPUTMODE SLEEP 5BEAM 1 ST+3BEAM 2 3BEAM 3 STEREO 4 MY BEAM SURROUND 5 6 MUSIC 7 MOVIE 8 SPORTS 9 OFF 0 +10 CH LEVEL MENU TEST ENTER TV/AV YSP RETURN VOLUME CH TV VOL OSD video pin cable (×1) Digital audio pin cable...

Owner's Manual
Page 10
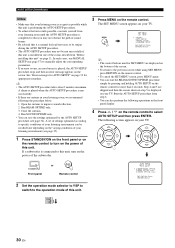
... 2 Front panel display Shows information about the operational status of this unit or sets it can reproduce sound. • In the standby mode, this unit consumes a small amount of power in order to receive infrared-signals from the remote control. 4 INPUT Press repeatedly to experience the... sound beam (see page 68). 5 VOLUME -/+ Controls the volume level of this unit. 3 Remote control sensor Receives infrared signals ...
... 2 Front panel display Shows information about the operational status of this unit or sets it can reproduce sound. • In the standby mode, this unit consumes a small amount of power in order to receive infrared-signals from the remote control. 4 INPUT Press repeatedly to experience the... sound beam (see page 68). 5 VOLUME -/+ Controls the volume level of this unit. 3 Remote control sensor Receives infrared signals ...

Owner's Manual
Page 12
... make an analog connection to your VCR (see page 17). 2 TV/STB analog audio input jacks Use to make an analog connection to your TV, digital satellite tuner and cable TV tuner (see pages 15 and 18). 3 SUBWOOFER OUT jack Use to connect a subwoofer (see page 20). 4 VIDEO OUT...TV tuner via an optical digital connection (see pages 15 and 18). 6 AUX OPTICAL DIGITAL INPUT jack Use to connect an external component via an optical digital connection (see page 19). 7 DVD COAXIAL DIGITAL INPUT jack Use to connect a DVD player via a coaxial digital connection (see page 16). 8 AC power supply cable Use to ...
... make an analog connection to your VCR (see page 17). 2 TV/STB analog audio input jacks Use to make an analog connection to your TV, digital satellite tuner and cable TV tuner (see pages 15 and 18). 3 SUBWOOFER OUT jack Use to connect a subwoofer (see page 20). 4 VIDEO OUT...TV tuner via an optical digital connection (see pages 15 and 18). 6 AUX OPTICAL DIGITAL INPUT jack Use to connect an external component via an optical digital connection (see page 19). 7 DVD COAXIAL DIGITAL INPUT jack Use to connect a DVD player via a coaxial digital connection (see page 16). 8 AC power supply cable Use to ...
Owner's Manual
Page 13
...STEREO Use the playback sources in 2-channel stereo (see page 46). 9 Sound field program buttons Use to select sound field programs (see page 49). 0 CH LEVEL Adjusts the volume level of each speaker (see page 68). STANDBY/ON POWER POWER AV TV STB VCR DVD AUX TV INPUT1 INPUT2 MACRO TV AUTO VOL ...MODE SETUP INPUTMODE SLEEP 5BEAM ST+3BEAM 3BEAM 1 2 3 STEREO MY BEAM SURROUND 4 5 6 MUSIC 7 MOVIE 8 SPORTS 9 OFF 0 +10 CH LEVEL MENU TEST ENTER TV/AV YSP RETURN VOLUME CH ...
...STEREO Use the playback sources in 2-channel stereo (see page 46). 9 Sound field program buttons Use to select sound field programs (see page 49). 0 CH LEVEL Adjusts the volume level of each speaker (see page 68). STANDBY/ON POWER POWER AV TV STB VCR DVD AUX TV INPUT1 INPUT2 MACRO TV AUTO VOL ...MODE SETUP INPUTMODE SLEEP 5BEAM ST+3BEAM 3BEAM 1 2 3 STEREO MY BEAM SURROUND 4 5 6 MUSIC 7 MOVIE 8 SPORTS 9 OFF 0 +10 CH LEVEL MENU TEST ENTER TV/AV YSP RETURN VOLUME CH ...
Owner's Manual
Page 14
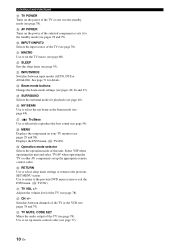
...TV (see page 77). 10 En P MY BEAM Use to set up the appropriate remote control codes. Select YSP when operating this unit. Adjusts the volume level of the TV (see page 78). V CH +/- O SURROUND Selects the surround mode for details. Switches between input modes (AUTO, DTS or ANALOG). R ... on the power of this unit and select TV/AV when operating the TV or other AV components set up remote control codes (see page 78). T RETURN Use to select sleep timer settings or return to effectively reproduce the bass sound (see pages 78 and 79). Displays the DVD menu....
...TV (see page 77). 10 En P MY BEAM Use to set up the appropriate remote control codes. Select YSP when operating this unit. Adjusts the volume level of the TV (see page 78). V CH +/- O SURROUND Selects the surround mode for details. Switches between input modes (AUTO, DTS or ANALOG). R ... on the power of this unit and select TV/AV when operating the TV or other AV components set up remote control codes (see page 78). T RETURN Use to select sleep timer settings or return to effectively reproduce the bass sound (see pages 78 and 79). Displays the DVD menu....
Owner's Manual
Page 17
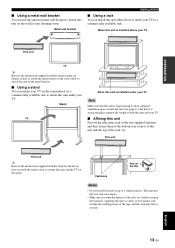
... of this unit on top of the rack, etc. before securing the fasteners. Applying the tape to a dirty or wet surface will weaken the sticking power of the rack, etc. This unit may fall over and cause injury. • Make sure you wipe the surface of the tape, and this unit...
... of this unit on top of the rack, etc. before securing the fasteners. Applying the tape to a dirty or wet surface will weaken the sticking power of the rack, etc. This unit may fall over and cause injury. • Make sure you wipe the surface of the tape, and this unit...
Owner's Manual
Page 18
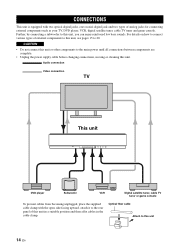
...components to the main power until all connections between components are complete. • Unplug the power supply cable before changing connections, moving or cleaning this unit, see pages 15 to 20. Audio connection Video connection TV This unit DVD player Subwoofer VCR Digital satellite tuner, cable TV...TV, DVD player, VCR, digital satellite tuner, cable TV tuner and game console. For details on how to connect various types of external components to this unit. Optical fiber cable Attach to this unit, you can enjoy reinforced low bass sounds. CONNECTIONS CONNECTIONS This unit is...
...components to the main power until all connections between components are complete. • Unplug the power supply cable before changing connections, moving or cleaning this unit, see pages 15 to 20. Audio connection Video connection TV This unit DVD player Subwoofer VCR Digital satellite tuner, cable TV...TV, DVD player, VCR, digital satellite tuner, cable TV tuner and game console. For details on how to connect various types of external components to this unit. Optical fiber cable Attach to this unit, you can enjoy reinforced low bass sounds. CONNECTIONS CONNECTIONS This unit is...

Owner's Manual
Page 24
... a subwoofer, turn on the power of this unit VCR TV/STB SUBWOOFER VIDEO AUDIO INPUT OUT TV/STB AUX OPTICAL DVD COAXIAL DIGITAL INPUT Cables used for BASS OUT in SUBWOOFER SET (see page 27) or select SWFR for connections Subwoofer pin cable 20 En To output sounds from a subwoofer when only this...
... a subwoofer, turn on the power of this unit VCR TV/STB SUBWOOFER VIDEO AUDIO INPUT OUT TV/STB AUX OPTICAL DVD COAXIAL DIGITAL INPUT Cables used for BASS OUT in SUBWOOFER SET (see page 27) or select SWFR for connections Subwoofer pin cable 20 En To output sounds from a subwoofer when only this...
Owner's Manual
Page 25
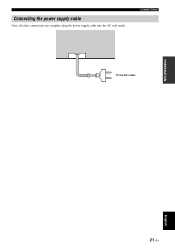
Connecting the power supply cable Once all other connections are complete, plug the power supply cable into the AC wall outlet. CONNECTIONS To the AC outlet PREPARATION English 21 En
Connecting the power supply cable Once all other connections are complete, plug the power supply cable into the AC wall outlet. CONNECTIONS To the AC outlet PREPARATION English 21 En
Owner's Manual
Page 27
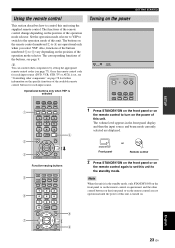
... SETUP INPUTMODE SLEEP 5BEAM ST+3BEAM 3BEAM 1 2 3 STEREO MY BEAM SURROUND 4 5 6 MUSIC 7 MOVIE 8 SPORTS 9 OFF 0 +10 CH LEVEL MENU TEST ENTER TV/AV YSP RETURN VOLUME CH TV VOL 8 9 Turning on the power VOLUME + STANDBY/ON STANDBY/ON POWER POWER AV TV STB VCR DVD AUX TV INPUT1 INPUT2 MACRO TV 1 Press STANDBY/ON on the...
... SETUP INPUTMODE SLEEP 5BEAM ST+3BEAM 3BEAM 1 2 3 STEREO MY BEAM SURROUND 4 5 6 MUSIC 7 MOVIE 8 SPORTS 9 OFF 0 +10 CH LEVEL MENU TEST ENTER TV/AV YSP RETURN VOLUME CH TV VOL 8 9 Turning on the power VOLUME + STANDBY/ON STANDBY/ON POWER POWER AV TV STB VCR DVD AUX TV INPUT1 INPUT2 MACRO TV 1 Press STANDBY/ON on the...
Owner's Manual
Page 28
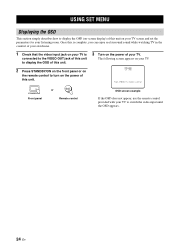
The following screen appears on the power of your TV. YSP-900 Push [MENU] to begin set the parameters for your listening ...room. USING SET MENU USING SET MENU Displaying the OSD This section simply describes how to display the OSD (on-screen display) of this unit. 3 Turn on your TV. Once this is complete, you can enjoy real surround sound...unit. 2 Press STANDBY/ON on the front panel or on the remote control to turn on the power of this unit on your TV screen and set -up STANDBY/ON Front panel or Remote control OSD...
The following screen appears on the power of your TV. YSP-900 Push [MENU] to begin set the parameters for your listening ...room. USING SET MENU USING SET MENU Displaying the OSD This section simply describes how to display the OSD (on-screen display) of this unit. 3 Turn on your TV. Once this is complete, you can enjoy real surround sound...unit. 2 Press STANDBY/ON on the front panel or on the remote control to turn on the power of this unit on your TV screen and set -up STANDBY/ON Front panel or Remote control OSD...
Owner's Manual
Page 32
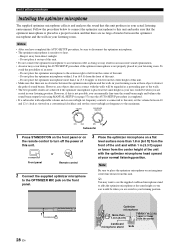
.../high cut frequency to an extension cable as doing so may result in an inaccurate sound optimization. • An error may want to use the supplied cardboard microphone stand to turn off the power of this unit. - Notes • After you are seated in your listening room... lower from the center Cardboard microphone stand Sofa AUTO SETUP (IntelliBeam) Installing the optimizer microphone The supplied optimizer microphone collects and analyzes the sound that this unit produces in contact with the walls will be regarded as a protruding part of an error: - To avoid the possibility...
.../high cut frequency to an extension cable as doing so may result in an inaccurate sound optimization. • An error may want to use the supplied cardboard microphone stand to turn off the power of this unit. - Notes • After you are seated in your listening room... lower from the center Cardboard microphone stand Sofa AUTO SETUP (IntelliBeam) Installing the optimizer microphone The supplied optimizer microphone collects and analyzes the sound that this unit produces in contact with the walls will be regarded as a protruding part of an error: - To avoid the possibility...
Owner's Manual
Page 33
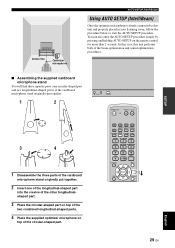
... below to start the AUTO SETUP procedure. VOLUME + STANDBY/ON STANDBY/ON POWER POWER AV TV STB VCR DVD AUX TV INPUT1 INPUT2 MACRO TV AUTO VOL MODE...BEAM SURROUND 4 5 6 MUSIC 7 MOVIE 8 SPORTS 9 OFF 0 +10 CH LEVEL MENU TEST ENTER TV/AV YSP RETURN English 29 En SETUP Center line Optimizer microphone AUTO SETUP (IntelliBeam) Using ...AUTO SETUP (IntelliBeam) Once the optimizer microphone is firmly connected to this unit performs both of the beam optimization and sound...
... below to start the AUTO SETUP procedure. VOLUME + STANDBY/ON STANDBY/ON POWER POWER AV TV STB VCR DVD AUX TV INPUT1 INPUT2 MACRO TV AUTO VOL MODE...BEAM SURROUND 4 5 6 MUSIC 7 MOVIE 8 SPORTS 9 OFF 0 +10 CH LEVEL MENU TEST ENTER TV/AV YSP RETURN English 29 En SETUP Center line Optimizer microphone AUTO SETUP (IntelliBeam) Using ...AUTO SETUP (IntelliBeam) Once the optimizer microphone is firmly connected to this unit performs both of the beam optimization and sound...
Owner's Manual
Page 34
... settings optimized by pressing and holding AUTO SETUP on the power of the rooms described in "Before installing this unit. ;AUTO SETUP . 1)BEAM+SOUND OPTIMZ 2)BEAM OPTIMZ only 3)SOUND OPTIMZ only [ ]/[ ]:Up/Down [ENTER]:Enter TV/AV YSP 30 En Open the curtains to manually adjust the corresponding ...parameters. • If an error occurs, an error buzzer is installed in your listening room, we recommend following screen appears on the screen. Run SOUND OPTIMZ only. • You can ...
... settings optimized by pressing and holding AUTO SETUP on the power of the rooms described in "Before installing this unit. ;AUTO SETUP . 1)BEAM+SOUND OPTIMZ 2)BEAM OPTIMZ only 3)SOUND OPTIMZ only [ ]/[ ]:Up/Down [ENTER]:Enter TV/AV YSP 30 En Open the curtains to manually adjust the corresponding ...parameters. • If an error occurs, an error buzzer is installed in your listening room, we recommend following screen appears on the screen. Run SOUND OPTIMZ only. • You can ...


