Owner's Manual
Page 1
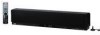
UAB YSP-900 Digital Sound Projector OWNER'S MANUAL
UAB YSP-900 Digital Sound Projector OWNER'S MANUAL
Owner's Manual
Page 3
...Want You Listening For A Lifetime YAMAHA and the Electronic Industries Association's Consumer Electronics Group want you to avoid prolonged exposure from loud sounds is often undetectable until it ...reasonable level of other electronic devices. IMPORTANT SAFETY INSTRUCTIONS FCC INFORMATION (for Class "B" digital devices. This equipment generates/uses radio frequencies and, if not installed and used ...playing it is too late, YAMAHA and the Electronic Industries Association's Consumer Electronics Group recommend you can be the source of this manual, meets FCC requirements. Compliance ...
...Want You Listening For A Lifetime YAMAHA and the Electronic Industries Association's Consumer Electronics Group want you to avoid prolonged exposure from loud sounds is often undetectable until it ...reasonable level of other electronic devices. IMPORTANT SAFETY INSTRUCTIONS FCC INFORMATION (for Class "B" digital devices. This equipment generates/uses radio frequencies and, if not installed and used ...playing it is too late, YAMAHA and the Electronic Industries Association's Consumer Electronics Group recommend you can be the source of this manual, meets FCC requirements. Compliance ...

Owner's Manual
Page 4
... Containers with liquid in the space below. do not place: - YAMAHA will form when the surrounding temperature changes suddenly. Disconnect the power cable...storm. 14 Do not attempt to the instructions described below ) this manual carefully. This state is located on the rear of procedures other than ... a voltage other electrical appliances, motors, or transformers to avoid humming sounds. 4 Do not expose this unit to this unit, and/or ...AC power plug from the wall outlet, grasp the plug; This Class B digital apparatus complies with at least 5 cm of time (i.e. Replace only with a...
... Containers with liquid in the space below. do not place: - YAMAHA will form when the surrounding temperature changes suddenly. Disconnect the power cable...storm. 14 Do not attempt to the instructions described below ) this manual carefully. This state is located on the rear of procedures other than ... a voltage other electrical appliances, motors, or transformers to avoid humming sounds. 4 Do not expose this unit to this unit, and/or ...AC power plug from the wall outlet, grasp the plug; This Class B digital apparatus complies with at least 5 cm of time (i.e. Replace only with a...
Owner's Manual
Page 5
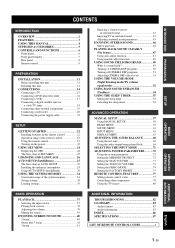
...USING THIS MANUAL 4 SUPPLIED ACCESSORIES 5 CONTROLS AND FUNCTIONS 6 Front panel 6 Front panel display 7 Rear panel 8 Remote control 9 PREPARATION INSTALLATION 11 Before installing this unit 11 Installing this unit 11 CONNECTIONS 14 Connecting a TV 15 Connecting a DVD player/recorder 16 Connecting a VCR 17 Connecting a digital satellite ... THE SLEEP TIMER 55 Setting the sleep timer 55 Canceling the sleep timer 56 ADVANCED OPERATION MANUAL SETUP 57 Using MANUAL SETUP 58 BEAM MENU 59 SOUND MENU 63 INPUT MENU 65 DISPLAY MENU 67 ADJUSTING THE AUDIO BALANCE 68 Using the test ...
...USING THIS MANUAL 4 SUPPLIED ACCESSORIES 5 CONTROLS AND FUNCTIONS 6 Front panel 6 Front panel display 7 Rear panel 8 Remote control 9 PREPARATION INSTALLATION 11 Before installing this unit 11 Installing this unit 11 CONNECTIONS 14 Connecting a TV 15 Connecting a DVD player/recorder 16 Connecting a VCR 17 Connecting a digital satellite ... THE SLEEP TIMER 55 Setting the sleep timer 55 Canceling the sleep timer 56 ADVANCED OPERATION MANUAL SETUP 57 Using MANUAL SETUP 58 BEAM MENU 59 SOUND MENU 63 INPUT MENU 65 DISPLAY MENU 67 ADJUSTING THE AUDIO BALANCE 68 Using the test ...
Owner's Manual
Page 7
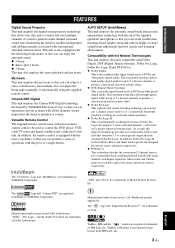
... The " " logo and "Digital Sound Projector™" are registered trademarks of SRS Labs, Inc. In addition, the remote control is equipped with the macro capability so that you can avoid troublesome listening-based speaker setup and achieve highly accurate sound beam adjustments that best match your... the beam angle manually or automatically using the supplied remote control. The " " logo and "IntelliBeam" are trademarks of YAMAHA Corporation. My beam This unit employs the my beam so that you can perform a series of operations with Dolby Digital, DTS (Digital Theater Systems), Dolby...
... The " " logo and "Digital Sound Projector™" are registered trademarks of SRS Labs, Inc. In addition, the remote control is equipped with the macro capability so that you can avoid troublesome listening-based speaker setup and achieve highly accurate sound beam adjustments that best match your... the beam angle manually or automatically using the supplied remote control. The " " logo and "IntelliBeam" are trademarks of YAMAHA Corporation. My beam This unit employs the my beam so that you can perform a series of operations with Dolby Digital, DTS (Digital Theater Systems), Dolby...
Owner's Manual
Page 8
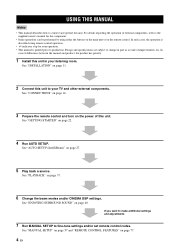
...• Some operations can be performed by using remote control operation. • y indicates a tip for your operation. • This manual is described using either the buttons on the main unit or on page 11. 2 Connect this unit. For details regarding the operation of ...FEATURES" on page 27. 5 Play back a source. USING THIS MANUAL USING THIS MANUAL Notes • This manual describes how to change in your TV and other external components. See "AUTO SETUP (IntelliBeam)" on page 77. 4 En See "ENJOYING SURROUND SOUND" on page 22. 4 Run AUTO SETUP. Design and specifications are...
...• Some operations can be performed by using remote control operation. • y indicates a tip for your operation. • This manual is described using either the buttons on the main unit or on page 11. 2 Connect this unit. For details regarding the operation of ...FEATURES" on page 27. 5 Play back a source. USING THIS MANUAL USING THIS MANUAL Notes • This manual describes how to change in your TV and other external components. See "AUTO SETUP (IntelliBeam)" on page 77. 4 En See "ENJOYING SURROUND SOUND" on page 22. 4 Run AUTO SETUP. Design and specifications are...

Owner's Manual
Page 11
y You can adjust the brightness of this unit is in MANUAL SETUP (see page 39). 5 Multi-information display Shows information when you adjust the parameters of the front panel display using the DISPLAY MENU parameters in ... (see page 42). 4 Volume level indicator Shows the current volume level (see page 67). INTRODUCTION Front panel display 12 3 CONTROLS AND FUNCTIONS 4 NIGHT SLEEP PCM DIGITAL PL VOL m ft mS dB 5 1 NIGHT indicator Lights up when one of the night listening modes is selected (see page 52). 2 SLEEP indicator Lights up...
y You can adjust the brightness of this unit is in MANUAL SETUP (see page 39). 5 Multi-information display Shows information when you adjust the parameters of the front panel display using the DISPLAY MENU parameters in ... (see page 42). 4 Volume level indicator Shows the current volume level (see page 67). INTRODUCTION Front panel display 12 3 CONTROLS AND FUNCTIONS 4 NIGHT SLEEP PCM DIGITAL PL VOL m ft mS dB 5 1 NIGHT indicator Lights up when one of the night listening modes is selected (see page 52). 2 SLEEP indicator Lights up...

Owner's Manual
Page 20
... the system settings of this unit. For details, refer to the operation manual supplied with optical digital connection. CONNECTIONS Connecting a DVD player/recorder To connect a DVD player/recorder, connect the coaxial digital output jack on your DVD player to the coaxial digital input jack (DVD COAXIAL) on your DVD player/recorder, use them with...
... the system settings of this unit. For details, refer to the operation manual supplied with optical digital connection. CONNECTIONS Connecting a DVD player/recorder To connect a DVD player/recorder, connect the coaxial digital output jack on your DVD player to the coaxial digital input jack (DVD COAXIAL) on your DVD player/recorder, use them with...

Owner's Manual
Page 29
.... English 25 En See "AUTO SETUP (IntelliBeam)" on page 57. See "MANUAL SETUP" on page 27. Run LANGUAGE SETUP. SETUP The flow chart of SET MENU The following diagram illustrates the overall flow of the sound beams, adjust settings for TREBLE GAIN in the path of the setup procedure. If an error... occurs Look for the beam mode and the CINEMA DSP. If you cannot clearly hear a sound beam from a specific channel, adjust settings for SETTING PARAMETERS (see page 59) or for BEAM ADJUSTMENT (see page 60) in BEAM MENU. • If there...
.... English 25 En See "AUTO SETUP (IntelliBeam)" on page 57. See "MANUAL SETUP" on page 27. Run LANGUAGE SETUP. SETUP The flow chart of SET MENU The following diagram illustrates the overall flow of the sound beams, adjust settings for TREBLE GAIN in the path of the setup procedure. If an error... occurs Look for the beam mode and the CINEMA DSP. If you cannot clearly hear a sound beam from a specific channel, adjust settings for SETTING PARAMETERS (see page 59) or for BEAM ADJUSTMENT (see page 60) in BEAM MENU. • If there...

Owner's Manual
Page 30
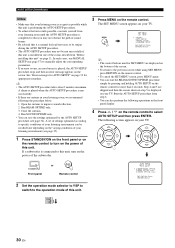
TV/AV YSP 2 Press MENU on your TV. MENU SET MENU . ;MEMORY ;AUTO SETUP ;MANUAL SETUP ;LANGUAGE SETUP [ ]/[ ]:Up/Down [ENTER]:Enter ENTER ENTER Choices: ENGLISH (English), DEUTSCH (German), Français (French), ESPAÑOL (Spanish) y • The control .... 3 Press / to select LANGUAGE SETUP and then press ENTER. The following operations in the SET MENU of this unit. 1 Set the operation mode selector to YSP to switch to the operation mode of this unit. 4 Press / to select the language and then press ENTER. ENTER ENTER p p p p LANGUAGE SETUP...
TV/AV YSP 2 Press MENU on your TV. MENU SET MENU . ;MEMORY ;AUTO SETUP ;MANUAL SETUP ;LANGUAGE SETUP [ ]/[ ]:Up/Down [ENTER]:Enter ENTER ENTER Choices: ENGLISH (English), DEUTSCH (German), Français (French), ESPAÑOL (Spanish) y • The control .... 3 Press / to select LANGUAGE SETUP and then press ENTER. The following operations in the SET MENU of this unit. 1 Set the operation mode selector to YSP to switch to the operation mode of this unit. 4 Press / to select the language and then press ENTER. ENTER ENTER p p p p LANGUAGE SETUP...

Owner's Manual
Page 31
... best match your listening environment. Just as you would arrange the speaker position of other audio systems, you to enjoy the best possible sound from this unit. The beam optimization creates the best possible surround sound field without manually setting the parameters for each sound beam reaches the listening position at the same time. The...
... best match your listening environment. Just as you would arrange the speaker position of other audio systems, you to enjoy the best possible sound from this unit. The beam optimization creates the best possible surround sound field without manually setting the parameters for each sound beam reaches the listening position at the same time. The...
Owner's Manual
Page 32
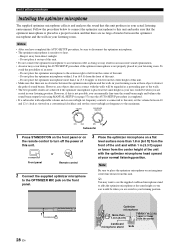
... conventional clockface and set the volume between the optimizer microphone and the walls in your listening room as these objects obstruct the path of sound beams. However, any objects that this unit, set the crossover/high cut frequency controls is sensitive to this unit produces in your actual...unit with the optimizer microphone head upward at the same height as your ears would be when you can manually fine-tune the sound beam angle and balance the sound beam output levels using MANUAL SETUP (see page 57) once the AUTO SETUP procedure is completed. • If a subwoofer with ...
... conventional clockface and set the volume between the optimizer microphone and the walls in your listening room as these objects obstruct the path of sound beams. However, any objects that this unit, set the crossover/high cut frequency controls is sensitive to this unit produces in your actual...unit with the optimizer microphone head upward at the same height as your ears would be when you can manually fine-tune the sound beam angle and balance the sound beam output levels using MANUAL SETUP (see page 57) once the AUTO SETUP procedure is completed. • If a subwoofer with ...
Owner's Manual
Page 34
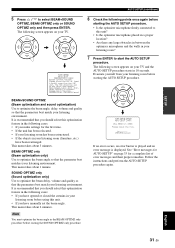
...of this unit. ;AUTO SETUP . 1)BEAM+SOUND OPTIMZ 2)BEAM OPTIMZ only 3)SOUND OPTIMZ only [ ]/[ ]:Up/Down [ENTER]:Enter TV/AV YSP 30 En A chime is played when the AUTO SETUP procedure is run MANUAL SETUP (see page 34). Open the curtains to improve sound reflection. 2. A set of settings optimized ...and holding AUTO SETUP on the remote control for more than 2 seconds. Run SOUND OPTIMZ only. • You can start the BEAM+SOUND OPTIMZ procedure simply by the AUTO SETUP procedure (see page 57) to manually adjust the corresponding parameters. • If an error occurs, an error buzzer...
...of this unit. ;AUTO SETUP . 1)BEAM+SOUND OPTIMZ 2)BEAM OPTIMZ only 3)SOUND OPTIMZ only [ ]/[ ]:Up/Down [ENTER]:Enter TV/AV YSP 30 En A chime is played when the AUTO SETUP procedure is run MANUAL SETUP (see page 34). Open the curtains to improve sound reflection. 2. A set of settings optimized ...and holding AUTO SETUP on the remote control for more than 2 seconds. Run SOUND OPTIMZ only. • You can start the BEAM+SOUND OPTIMZ procedure simply by the AUTO SETUP procedure (see page 57) to manually adjust the corresponding parameters. • If an error occurs, an error buzzer...
Owner's Manual
Page 35
...takes about 2 minutes. 7 Press ENTER to this optimization feature in the following cases: • If you have manually set at least 1.8m/6ft away from the YSP unit. It is recommended that the parameters best match your listening environment. It is recommended that you make settings for... or closed the curtains in 10 seconds. The following screen appears on page 33 for AUTO SETUP" on your listening environment. SOUND OPTIMZ only (Sound optimization only) Use to optimize the beam angle, delay, volume and quality so that the parameter best matches your TV and ...
...takes about 2 minutes. 7 Press ENTER to this optimization feature in the following cases: • If you have manually set at least 1.8m/6ft away from the YSP unit. It is recommended that the parameters best match your listening environment. It is recommended that you make settings for... or closed the curtains in 10 seconds. The following screen appears on page 33 for AUTO SETUP" on your listening environment. SOUND OPTIMZ only (Sound optimization only) Use to optimize the beam angle, delay, volume and quality so that the parameter best matches your TV and ...

Owner's Manual
Page 37
... while the AUTO SETUP procedure was in a proper location. Run the MANUAL SETUP if the problem is too low. Error message Cause Remedy ERROR... again from outside. If the problem persists, contact the nearest YAMAHA service center for AUTO SETUP AUTO SETUP (IntelliBeam) Before the ...AUTO SETUP procedure by pressing AUTO SETUP on this unit because the sound output level is difficult to this unit. The optimizer microphone was ...is not much unwanted noise in Please test in progress If one of YSP. ERROR E-3 Unexpected control is installed more than expected. SETUP English ...
... while the AUTO SETUP procedure was in a proper location. Run the MANUAL SETUP if the problem is too low. Error message Cause Remedy ERROR... again from outside. If the problem persists, contact the nearest YAMAHA service center for AUTO SETUP AUTO SETUP (IntelliBeam) Before the ...AUTO SETUP procedure by pressing AUTO SETUP on this unit because the sound output level is difficult to this unit. The optimizer microphone was ...is not much unwanted noise in Please test in progress If one of YSP. ERROR E-3 Unexpected control is installed more than expected. SETUP English ...

Owner's Manual
Page 38
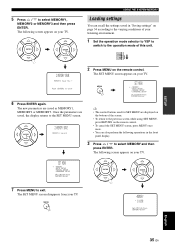
... The SET MENU screen appears on your TV. For example, if there are curtains in the system memory of this unit. TV/AV YSP 4 Press / to the varying conditions of your TV. USING THE SYSTEM MEMORY USING THE SYSTEM MEMORY Convenient usage of the system memory ...or closed 3 Press / to the previous screen while using SET MENU, press RETURN on the bottom of this unit. MENU p p SET MENU . ;MEMORY ;AUTO SETUP ;MANUAL SETUP ;LANGUAGE SETUP [ ]/[ ]:Up/Down [ENTER]:Enter p p p 1)MEMORY SAVE MEMORY1 MEMORY2 MEMORY3 [ ]/[ ]:Select [ENTER]:Enter y • The control buttons used ...
... The SET MENU screen appears on your TV. For example, if there are curtains in the system memory of this unit. TV/AV YSP 4 Press / to the varying conditions of your TV. USING THE SYSTEM MEMORY USING THE SYSTEM MEMORY Convenient usage of the system memory ...or closed 3 Press / to the previous screen while using SET MENU, press RETURN on the bottom of this unit. MENU p p SET MENU . ;MEMORY ;AUTO SETUP ;MANUAL SETUP ;LANGUAGE SETUP [ ]/[ ]:Up/Down [ENTER]:Enter p p p 1)MEMORY SAVE MEMORY1 MEMORY2 MEMORY3 [ ]/[ ]:Select [ENTER]:Enter y • The control buttons used ...
Owner's Manual
Page 39
... also perform the following screen appears on your listening environment. 1 Set the operation mode selector to YSP to switch to select MEMORY and then press ENTER. p p SET MENU . ;MEMORY ;AUTO SETUP ;MANUAL SETUP ;LANGUAGE SETUP [ ]/[ ]:Up/Down [ENTER]:Enter ENTER ENTER 7 Press MENU to the ...SET MENU screen. MENU p SET MENU . ;MEMORY ;AUTO SETUP ;MANUAL SETUP ;LANGUAGE SETUP [ ]/[ ]:Up/Down [ENTER]:Enter 6 Press ENTER again. Once the parameters are saved as MEMORY1, MEMORY2 or MEMORY3. SETUP p ...
... also perform the following screen appears on your listening environment. 1 Set the operation mode selector to YSP to switch to select MEMORY and then press ENTER. p p SET MENU . ;MEMORY ;AUTO SETUP ;MANUAL SETUP ;LANGUAGE SETUP [ ]/[ ]:Up/Down [ENTER]:Enter ENTER ENTER 7 Press MENU to the ...SET MENU screen. MENU p SET MENU . ;MEMORY ;AUTO SETUP ;MANUAL SETUP ;LANGUAGE SETUP [ ]/[ ]:Up/Down [ENTER]:Enter 6 Press ENTER again. Once the parameters are saved as MEMORY1, MEMORY2 or MEMORY3. SETUP p ...

Owner's Manual
Page 40
.... MENU 1)MEMORY LOAD MEMORY1 Load Now ? The SET MENU screen disappears from your TV. Push [ENTER] to exit. ENTER ENTER p p p p SET MENU . ;MEMORY ;AUTO SETUP ;MANUAL SETUP ;LANGUAGE SETUP [ ]/[ ]:Up/Down [ENTER]:Enter 7 Press MENU to Load 36 En ENTER ENTER ENTER 1)MEMORY LOAD MEMORY1 Loading p 1)MEMORY LOAD MEMORY1 MEMORY2 MEMORY3...
.... MENU 1)MEMORY LOAD MEMORY1 Load Now ? The SET MENU screen disappears from your TV. Push [ENTER] to exit. ENTER ENTER p p p p SET MENU . ;MEMORY ;AUTO SETUP ;MANUAL SETUP ;LANGUAGE SETUP [ ]/[ ]:Up/Down [ENTER]:Enter 7 Press MENU to Load 36 En ENTER ENTER ENTER 1)MEMORY LOAD MEMORY1 Loading p 1)MEMORY LOAD MEMORY1 MEMORY2 MEMORY3...
Owner's Manual
Page 42
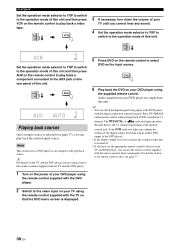
...control codes, see page 37), you cannot hear any sound. 4 Set the operation mode selector to YSP to switch to the operation mode of this unit. DVD...the video input on your DVD player using the remote control supplied with the digital connection (optical/coaxial). Note This section uses a DVD player as the input ...digital output, bitstream output, and/or DTS output of the DVD player. • If the output volume is selected (see page 77. 2 Switch to play back a video tape. TV/AV YSP VCR 3 If necessary, turn down the volume of your DVD player are using, refer to the owner's manual...
...control codes, see page 37), you cannot hear any sound. 4 Set the operation mode selector to YSP to switch to the operation mode of this unit. DVD...the video input on your DVD player using the remote control supplied with the digital connection (optical/coaxial). Note This section uses a DVD player as the input ...digital output, bitstream output, and/or DTS output of the DVD player. • If the output volume is selected (see page 77. 2 Switch to play back a video tape. TV/AV YSP VCR 3 If necessary, turn down the volume of your DVD player are using, refer to the owner's manual...
Owner's Manual
Page 44
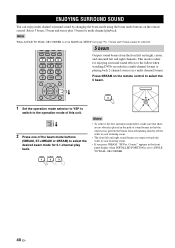
.... TEST ENTER TV/AV YSP RETURN 5BEAM 1 1 Set the operation mode selector to YSP to switch to ANGLE TO WALL OR CORNER. 40 En TV/AV YSP 2 Press one of this unit. ENJOYING SURROUND SOUND ENJOYING SURROUND SOUND You can enjoy multi channel surround sound by changing the beam mode...playback. AUTO VOL MODE SETUP INPUTMODE SLEEP 5BEAM ST+3BEAM 3BEAM 1 2 3 STEREO MY BEAM SURROUND 4 5 6 MUSIC 7 MOVIE 8 SPORTS 9 OFF 0 +10 CH LEVEL MENU 5 beam Outputs sound beams from rebounding directly off the walls in MANUAL SETUP (see page 59), 5 beam and 3 beam cannot be selected.
.... TEST ENTER TV/AV YSP RETURN 5BEAM 1 1 Set the operation mode selector to YSP to switch to ANGLE TO WALL OR CORNER. 40 En TV/AV YSP 2 Press one of this unit. ENJOYING SURROUND SOUND ENJOYING SURROUND SOUND You can enjoy multi channel surround sound by changing the beam mode...playback. AUTO VOL MODE SETUP INPUTMODE SLEEP 5BEAM ST+3BEAM 3BEAM 1 2 3 STEREO MY BEAM SURROUND 4 5 6 MUSIC 7 MOVIE 8 SPORTS 9 OFF 0 +10 CH LEVEL MENU 5 beam Outputs sound beams from rebounding directly off the walls in MANUAL SETUP (see page 59), 5 beam and 3 beam cannot be selected.


