Owner's Manual
Page 1
UB YSP-800 Digital Sound Projector OWNER'S MANUAL
UB YSP-800 Digital Sound Projector OWNER'S MANUAL

Owner's Manual
Page 3
...of America or its subsidiaries. and, most out of your equipment by YAMAHA Corporation of other electronic devices. Compliance with FCC regulations does not guarantee that lets the sound come through loud and clear without affecting your authority, granted by the ..., CA 90620. We Want You Listening For A Lifetime YAMAHA and the Electronic Industries Association's Consumer Electronics Group want you to use only high quality shielded cables. IMPORTANT SAFETY INSTRUCTIONS FCC INFORMATION (for Class "B" digital devices. IMPORTANT NOTICE: DO NOT MODIFY THIS UNIT! This...
...of America or its subsidiaries. and, most out of your equipment by YAMAHA Corporation of other electronic devices. Compliance with FCC regulations does not guarantee that lets the sound come through loud and clear without affecting your authority, granted by the ..., CA 90620. We Want You Listening For A Lifetime YAMAHA and the Electronic Industries Association's Consumer Electronics Group want you to use only high quality shielded cables. IMPORTANT SAFETY INSTRUCTIONS FCC INFORMATION (for Class "B" digital devices. IMPORTANT NOTICE: DO NOT MODIFY THIS UNIT! This...

Owner's Manual
Page 4
... fire, damage to this unit, and/or personal injury. 5 Avoid installing this unit - YAMAHA will form when the surrounding temperature changes suddenly. This state is incorrectly replaced. For details, ... for cooling. 19 Install this unit in a safe place for future reference. 2 Install this sound system in this unit with high humidity (i.e. IMPORTANT Please record the serial number of time (i.e. ..., dry cloth. 12 Only voltage specified on the rear of power. This Class B digital apparatus complies with the same or equivalent type. Note that this unit is coloured BROWN ...
... fire, damage to this unit, and/or personal injury. 5 Avoid installing this unit - YAMAHA will form when the surrounding temperature changes suddenly. This state is incorrectly replaced. For details, ... for cooling. 19 Install this unit in a safe place for future reference. 2 Install this sound system in this unit with high humidity (i.e. IMPORTANT Please record the serial number of time (i.e. ..., dry cloth. 12 Only voltage specified on the rear of power. This Class B digital apparatus complies with the same or equivalent type. Note that this unit is coloured BROWN ...

Owner's Manual
Page 5
... this unit 11 Installing this unit 11 CONNECTIONS 14 Connecting a TV 15 Connecting a DVD player/recorder 16 Connecting a VCR 17 Connecting a digital satellite tuner or a cable TV tuner 18 Connecting other external components 19 Connecting a subwoofer 20 Connecting the power supply cable 21 SETUP GETTING...timer 55 Canceling the sleep timer 56 ADVANCED OPERATION BASIC SETUP 57 MANUAL SETUP 63 Using MANUAL SETUP 64 BEAM MENU 65 SOUND MENU 69 INPUT MENU 71 DISPLAY MENU 73 ADJUSTING SYSTEM PARAMETERS ...........75 Setting the maximum volume level 75 Protecting the current settings...
... this unit 11 Installing this unit 11 CONNECTIONS 14 Connecting a TV 15 Connecting a DVD player/recorder 16 Connecting a VCR 17 Connecting a digital satellite tuner or a cable TV tuner 18 Connecting other external components 19 Connecting a subwoofer 20 Connecting the power supply cable 21 SETUP GETTING...timer 55 Canceling the sleep timer 56 ADVANCED OPERATION BASIC SETUP 57 MANUAL SETUP 63 Using MANUAL SETUP 64 BEAM MENU 65 SOUND MENU 69 INPUT MENU 71 DISPLAY MENU 73 ADJUSTING SYSTEM PARAMETERS ...........75 Setting the maximum volume level 75 Protecting the current settings...

Owner's Manual
Page 6
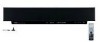
... time for the front right (R), front left (L), surround right (SR) and surround left speaker 2 YAMAHA YSP-800 Digital Sound Projector challenges this simple, yet stylish Digital Sound Projector. Imaginary front right speaker Imaginary front left speaker Imaginary center speaker C L R SR SL Imaginary surround right speaker Listening position Imaginary surround left (SL) speaker positions, which is generally accepted that in order to fully enjoy the benefits...
... time for the front right (R), front left (L), surround right (SR) and surround left speaker 2 YAMAHA YSP-800 Digital Sound Projector challenges this simple, yet stylish Digital Sound Projector. Imaginary front right speaker Imaginary front left speaker Imaginary center speaker C L R SR SL Imaginary surround right speaker Listening position Imaginary surround left (SL) speaker positions, which is generally accepted that in order to fully enjoy the benefits...

Owner's Manual
Page 7
...based speaker setup and achieve highly accurate sound beam adjustments that best match your video monitor. The " " logo and "Cinema DSP" are trademarks of Digital Theater Systems, Inc. "DTS", and "Neo:6" are registered trademarks of YAMAHA ...Digital This unit employs the Cinema DSP Digital technology developed by YAMAHA Electronics Corp. Versatile Remote Control The supplied remote control come with preset remote control codes to be used on DVDs and other purely digital media. INTRODUCTION FEATURES FEATURES Digital Sound Projector This unit employs the digital sound projector...
...based speaker setup and achieve highly accurate sound beam adjustments that best match your video monitor. The " " logo and "Cinema DSP" are trademarks of Digital Theater Systems, Inc. "DTS", and "Neo:6" are registered trademarks of YAMAHA ...Digital This unit employs the Cinema DSP Digital technology developed by YAMAHA Electronics Corp. Versatile Remote Control The supplied remote control come with preset remote control codes to be used on DVDs and other purely digital media. INTRODUCTION FEATURES FEATURES Digital Sound Projector This unit employs the digital sound projector...

Owner's Manual
Page 8
.... See "AUTO SETUP" on page 82. 4 See "MANUAL SETUP" on page 63 and "REMOTE CONTROL FEATURES" on page 26. 5 Play back a source and enjoy surround sound. In case of external components, refer to the supplied owner's manual for the component. • Some operations can be performed by using remote control operation...
.... See "AUTO SETUP" on page 82. 4 See "MANUAL SETUP" on page 63 and "REMOTE CONTROL FEATURES" on page 26. 5 Play back a source and enjoy surround sound. In case of external components, refer to the supplied owner's manual for the component. • Some operations can be performed by using remote control operation...

Owner's Manual
Page 10
... control. 4 INPUT Press repeatedly to the standby mode (see page 38). 6 STANDBY/ON Turns on the power of this unit or sets it can reproduce sound. • In the standby mode, this unit, you turn on the power of this unit consumes a small amount of all audio channels (see page 23...
... control. 4 INPUT Press repeatedly to the standby mode (see page 38). 6 STANDBY/ON Turns on the power of this unit or sets it can reproduce sound. • In the standby mode, this unit, you turn on the power of this unit consumes a small amount of all audio channels (see page 23...

Owner's Manual
Page 13
...Use to effectively reproduce the bass sound (see page 54). 6 YSP Switches to the operation mode of this unit. 7 Numeric buttons Use to enter numbers. 8 Sound field program buttons Use to select sound field programs (see page 49). 9 CH LEVEL Adjusts the volume level of...OFF +10 SURROUND CH LEVEL CINEMA DSP MENU TEST ENTER RETURN VOLUME CH TV VOL C D E MUTE TV INPUT TV MUTE CODE SET F G H I J K L M N O P Q R S 1 Infrared window Outputs infrared control signals. INTRODUCTION CONTROLS AND FUNCTIONS Remote control This section describes the function of each speaker (see page 78)....
...Use to effectively reproduce the bass sound (see page 54). 6 YSP Switches to the operation mode of this unit. 7 Numeric buttons Use to enter numbers. 8 Sound field program buttons Use to select sound field programs (see page 49). 9 CH LEVEL Adjusts the volume level of...OFF +10 SURROUND CH LEVEL CINEMA DSP MENU TEST ENTER RETURN VOLUME CH TV VOL C D E MUTE TV INPUT TV MUTE CODE SET F G H I J K L M N O P Q R S 1 Infrared window Outputs infrared control signals. INTRODUCTION CONTROLS AND FUNCTIONS Remote control This section describes the function of each speaker (see page 78)....

Owner's Manual
Page 15
.... • Rooms with surfaces inadequate for the corner installation. 11 English All five beam modes are available for the parallel installation whereas the 3 beam and 5 beam modes are likely to obstruct the path of sound beams • Rooms where the listening position is close to install the unit ...a rack or a stand. You may install this unit may not be sufficient when the unit is measured from the listening position to the speaker positions • Rooms where objects such as furniture Corner installation Install this unit in the corner at least 5 cm of space above your ...
.... • Rooms with surfaces inadequate for the corner installation. 11 English All five beam modes are available for the parallel installation whereas the 3 beam and 5 beam modes are likely to obstruct the path of sound beams • Rooms where the listening position is close to install the unit ...a rack or a stand. You may install this unit may not be sufficient when the unit is measured from the listening position to the speaker positions • Rooms where objects such as furniture Corner installation Install this unit in the corner at least 5 cm of space above your ...

Owner's Manual
Page 16
INSTALLATION ■ Using a metal wall bracket You can use the supplied projector mounting screws (M4, spare) instead if there is the information about using screws of the metal apparatus (M4) in the instructions supplied with the metal ... unit to mount this unit is strong enough to support the weight of "Detach the metal apparatuses from the Sound Projector" in the section of "Attach the small wall mount brackets to the Sound Projector". If there is the section of both this unit under your TV Note Make sure that the rack is...
INSTALLATION ■ Using a metal wall bracket You can use the supplied projector mounting screws (M4, spare) instead if there is the information about using screws of the metal apparatus (M4) in the instructions supplied with the metal ... unit to mount this unit is strong enough to support the weight of "Detach the metal apparatuses from the Sound Projector" in the section of "Attach the small wall mount brackets to the Sound Projector". If there is the section of both this unit under your TV Note Make sure that the rack is...

Owner's Manual
Page 18
.... Audio connection Video connection TV This unit DVD player 14 Subwoofer VCR Digital satellite tuner, cable TV tuner or game console CONNECTIONS CONNECTIONS This unit is equipped with two optical digital jacks, one coaxial digital jack and two types of external components to this unit, you can... enjoy reinforced low bass sounds. CAUTION Do not connect this unit or other components to this unit, ...
.... Audio connection Video connection TV This unit DVD player 14 Subwoofer VCR Digital satellite tuner, cable TV tuner or game console CONNECTIONS CONNECTIONS This unit is equipped with two optical digital jacks, one coaxial digital jack and two types of external components to this unit, you can... enjoy reinforced low bass sounds. CAUTION Do not connect this unit or other components to this unit, ...

Owner's Manual
Page 27
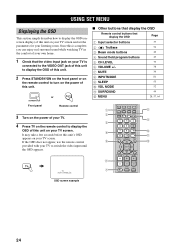
...INPUTMODE SLEEP ST+3BEAM 2 TARGET 5 3BEAM 3 TV 6 MUSIC 7 MOVIE 8 VOL MODE 9 SPORTS 0 OFF +10 SURROUND TV CH LEVEL CINEMA DSP MENU 5 TEST ENTER RETURN 6 7 8 9 1 Input selector buttons 2 YSP 3 Beam mode buttons 4 Sound field program buttons 5 Cursor buttons / / / , ENTER 6 VOL MODE 7 SURROUND 8 MENU 9 RETURN Turning on the power ...is operational, and the other control buttons on the front panel or on the remote control are operational only after you press YSP to switch to the operation mode of the available remote control buttons for each input source (TV, STB, VCR, DVD...
...INPUTMODE SLEEP ST+3BEAM 2 TARGET 5 3BEAM 3 TV 6 MUSIC 7 MOVIE 8 VOL MODE 9 SPORTS 0 OFF +10 SURROUND TV CH LEVEL CINEMA DSP MENU 5 TEST ENTER RETURN 6 7 8 9 1 Input selector buttons 2 YSP 3 Beam mode buttons 4 Sound field program buttons 5 Cursor buttons / / / , ENTER 6 VOL MODE 7 SURROUND 8 MENU 9 RETURN Turning on the power ...is operational, and the other control buttons on the front panel or on the remote control are operational only after you press YSP to switch to the operation mode of the available remote control buttons for each input source (TV, STB, VCR, DVD...
Owner's Manual
Page 28
...watching TV in the comfort of your own home. 1 Check that display the OSD Page 1 Input selector buttons 37 2 TruBass 3 Beam mode buttons 4 Sound field program buttons 5 CH LEVEL 6 VOLUME +/- 7 MUTE 8 INPUTMODE 9 SLEEP 0 VOL MODE A SURROUND B MENU 54 40 49 79 38 39 81 55 52 44 28,...4 5 6 7 DVD AUX VCR INPUT1 STB TV INPUT2 TV MACRO YSP 5BEAM 1 INPUTMODE SLEEP ST+3BEAM 2 3BEAM 3 STEREO TARGET 4 5 6 MUSIC 7 MOVIE 8 VOL MODE 9 SPORTS 0 OFF +10 SURROUND TV CH LEVEL CINEMA DSP MENU TEST ENTER RETURN VOLUME CH TV VOL MUTE TV INPUT TV MUTE CODE SET 8 9 0 A...
...watching TV in the comfort of your own home. 1 Check that display the OSD Page 1 Input selector buttons 37 2 TruBass 3 Beam mode buttons 4 Sound field program buttons 5 CH LEVEL 6 VOLUME +/- 7 MUTE 8 INPUTMODE 9 SLEEP 0 VOL MODE A SURROUND B MENU 54 40 49 79 38 39 81 55 52 44 28,...4 5 6 7 DVD AUX VCR INPUT1 STB TV INPUT2 TV MACRO YSP 5BEAM 1 INPUTMODE SLEEP ST+3BEAM 2 3BEAM 3 STEREO TARGET 4 5 6 MUSIC 7 MOVIE 8 VOL MODE 9 SPORTS 0 OFF +10 SURROUND TV CH LEVEL CINEMA DSP MENU TEST ENTER RETURN VOLUME CH TV VOL MUTE TV INPUT TV MUTE CODE SET 8 9 0 A...
Owner's Manual
Page 29
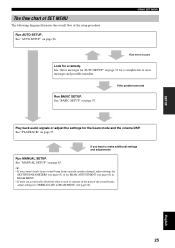
... to make additional settings and adjustments Run MANUAL SETUP. SETUP The flow chart of SET MENU The following diagram illustrates the overall flow of the sound beams, adjust settings for TREBLE GAIN in BEAM MENU (see page 68). See "MANUAL SETUP" on page 37. USING SET MENU If an... back audio signals or adjust the settings for a remedy. Run BASIC SETUP. See "PLAYBACK" on page 63. If you cannot clearly hear a sound beam from a specific speaker channel, adjust settings for SETTING PARAMETERS (see page 65) or for BEAM ADJUSTMENT (see page 66) in BEAM MENU. • If there are...
... to make additional settings and adjustments Run MANUAL SETUP. SETUP The flow chart of SET MENU The following diagram illustrates the overall flow of the sound beams, adjust settings for TREBLE GAIN in BEAM MENU (see page 68). See "MANUAL SETUP" on page 37. USING SET MENU If an... back audio signals or adjust the settings for a remedy. Run BASIC SETUP. See "PLAYBACK" on page 63. If you cannot clearly hear a sound beam from a specific speaker channel, adjust settings for SETTING PARAMETERS (see page 65) or for BEAM ADJUSTMENT (see page 66) in BEAM MENU. • If there are...

Owner's Manual
Page 30
.... *2 Optimizing the beam angle *3 Optimizing the beam delay, frequency and volume Beam optimization YPAO sound optimization 26 The YAMAHA Parametric Room Acoustic Optimizer (YPAO) technology performs the following checks and automatically makes appropriate sound adjustments. Just as you would arrange the speaker position of each sound beam reaches the listening position at the same time.
.... *2 Optimizing the beam angle *3 Optimizing the beam delay, frequency and volume Beam optimization YPAO sound optimization 26 The YAMAHA Parametric Room Acoustic Optimizer (YPAO) technology performs the following checks and automatically makes appropriate sound adjustments. Just as you would arrange the speaker position of each sound beam reaches the listening position at the same time.

Owner's Manual
Page 31
... listening position. Notes • After you have completed the AUTO SETUP procedure, be when you can manually fine-tune the sound beam angle and balance the sound beam output levels using a tripod SETUP OPTIMIZER MIC 2 Place the optimizer microphone on an imaginary center line drawn from the...your ears would be sure to disconnect the optimizer microphone. • The optimizer microphone is not possible, you are seated in an inaccurate sound optimization. • An error may want to use a tripod or the supplied cardboard microphone stand to an extension cable as doing so may...
... listening position. Notes • After you have completed the AUTO SETUP procedure, be when you can manually fine-tune the sound beam angle and balance the sound beam output levels using a tripod SETUP OPTIMIZER MIC 2 Place the optimizer microphone on an imaginary center line drawn from the...your ears would be sure to disconnect the optimizer microphone. • The optimizer microphone is not possible, you are seated in an inaccurate sound optimization. • An error may want to use a tripod or the supplied cardboard microphone stand to an extension cable as doing so may...

Owner's Manual
Page 33
... screen, press MENU once more. • You can also perform the following screen appears on the remote control. BEAM+SOUND OPTIMZ BEAM OPTIMZ only SOUND OPTIMZ only [ ]/[ ]:Up/Down [ENTER]:Enter English p 29 YSP p ;AUTO SETUP . MENU p SET MENU . ;MEMORY ;AUTO SETUP ;BASIC SETUP ;MANUAL SETUP [ ]/[ ]:Up/Down [...on your TV. STANDBY/ON Front panel or Remote control ENTER ENTER 2 Press YSP on your TV. The SET MENU screen appears on the remote control to switch to the operation mode of sound beams. To achieve the best results possible, however, it is normal for loud...
... screen, press MENU once more. • You can also perform the following screen appears on the remote control. BEAM+SOUND OPTIMZ BEAM OPTIMZ only SOUND OPTIMZ only [ ]/[ ]:Up/Down [ENTER]:Enter English p 29 YSP p ;AUTO SETUP . MENU p SET MENU . ;MEMORY ;AUTO SETUP ;BASIC SETUP ;MANUAL SETUP [ ]/[ ]:Up/Down [...on your TV. STANDBY/ON Front panel or Remote control ENTER ENTER 2 Press YSP on your TV. The SET MENU screen appears on the remote control to switch to the operation mode of sound beams. To achieve the best results possible, however, it is normal for loud...

Owner's Manual
Page 34
...installation), Angle to Wall or corner (Corner installation) Angle to Wall or corner Parallel to Wall BEAM OPT+SOUND OPTIMZ (Beam optimization and YPAO sound optimization) Use to select the installed position of YSP MIN 2m/6.5ft [ ]/[ ]:Up/Down/[p]/[ ]:Sel [ENTER]:Start p INSTALLING (Installing) Use to optimize the... the parameters best match your listening room (furniture, etc.) have opened or closed the curtains in your listening room before starting the SOUND OPTIMZ only procedure. 30 The beam mode is set the beam angle. • Select Angle to Wall (Parallel with the wall....
...installation), Angle to Wall or corner (Corner installation) Angle to Wall or corner Parallel to Wall BEAM OPT+SOUND OPTIMZ (Beam optimization and YPAO sound optimization) Use to select the installed position of YSP MIN 2m/6.5ft [ ]/[ ]:Up/Down/[p]/[ ]:Sel [ENTER]:Start p INSTALLING (Installing) Use to optimize the... the parameters best match your listening room (furniture, etc.) have opened or closed the curtains in your listening room before starting the SOUND OPTIMZ only procedure. 30 The beam mode is set the beam angle. • Select Angle to Wall (Parallel with the wall....

Owner's Manual
Page 35
... or SOUND OPTIMZ only in your listening room has highly reflective surfaces such as the PREPARATION procedure is in 10 SEC Move aside or behind YSP *****----- ACOUSTIC OPTIMIZATION . Follow the instructions and perform the AUTO SETUP procedure again. 31 English MOUNTING (Mounting) Use to select ...Skipped if you selected SOUND OPTIMZ only in step 5. ENVIRONMENT CHECK ;;;[OK] SUB WOOFER CHECK ;;;[NOT IN USE] WILL START in step 5. AUTO BEAM OPTIMIZATION AUTO BEAM MEASUREMENT/SET Skipped if you selected BEAM OPTIMZ only in 10 SEC Move aside or behind YSP *****----- See "Error ...
... or SOUND OPTIMZ only in your listening room has highly reflective surfaces such as the PREPARATION procedure is in 10 SEC Move aside or behind YSP *****----- ACOUSTIC OPTIMIZATION . Follow the instructions and perform the AUTO SETUP procedure again. 31 English MOUNTING (Mounting) Use to select ...Skipped if you selected SOUND OPTIMZ only in step 5. ENVIRONMENT CHECK ;;;[OK] SUB WOOFER CHECK ;;;[NOT IN USE] WILL START in step 5. AUTO BEAM OPTIMIZATION AUTO BEAM MEASUREMENT/SET Skipped if you selected BEAM OPTIMZ only in 10 SEC Move aside or behind YSP *****----- See "Error ...


