
Owner's Manual
Page 5
...HDMI cables 18 Case 2: Connecting a DVD player/recorder and tuner (digital satellite, cable TV or digital airwave)..... 19 Case 3: Connecting other connection methods........ 20 Connecting a...XM™ Satellite Radio tuning 47 Connecting XM™ Mini-Tuner Home Dock 47 Activating XM™ Satellite Radio 48 Basic XM™ ...SOUND MENU 80 INPUT MENU 82 DISPLAY MENU 86 Adjusting the audio balance 87 Using the test tone 87 Using the audio output being played back 88 Selecting the input mode 90 Adjusting the system parameters 91 Using the system parameters 91 Remote control features...
...HDMI cables 18 Case 2: Connecting a DVD player/recorder and tuner (digital satellite, cable TV or digital airwave)..... 19 Case 3: Connecting other connection methods........ 20 Connecting a...XM™ Satellite Radio tuning 47 Connecting XM™ Mini-Tuner Home Dock 47 Activating XM™ Satellite Radio 48 Basic XM™ ...SOUND MENU 80 INPUT MENU 82 DISPLAY MENU 86 Adjusting the audio balance 87 Using the test tone 87 Using the audio output being played back 88 Selecting the input mode 90 Adjusting the system parameters 91 Using the system parameters 91 Remote control features...
Owner's Manual
Page 7
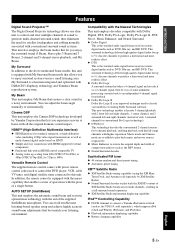
...technology delivers high-quality digital audio for satellite loudspeakers and cabling normally associated with conventional surround sound systems. This unit also employs the beam modes that let you experience movies at home with all the original dramatic sound impact. This new ... signal format used to enjoy surround system even in a noisy environment. INTRODUCTION Features Features Digital Sound Projector™ The Digital Sound Projector technology allows one slim unit to control and steer multiple channels of sound to connect a Yamaha iPod universal dock (such as the...
...technology delivers high-quality digital audio for satellite loudspeakers and cabling normally associated with conventional surround sound systems. This unit also employs the beam modes that let you experience movies at home with all the original dramatic sound impact. This new ... signal format used to enjoy surround system even in a noisy environment. INTRODUCTION Features Features Digital Sound Projector™ The Digital Sound Projector technology allows one slim unit to control and steer multiple channels of sound to connect a Yamaha iPod universal dock (such as the...

Owner's Manual
Page 8
..., SRS and the " " symbol are registered trademarks of Yamaha Corporation. and other countries. "DTS" and "Neo:6" are registered trademarks of DiMAGIC Co., Ltd. The " " logo and "Cinema DSP" are trademarks of Apple Inc., registered in the U.S. Worldwide patents applied for. The " " logo and "Digital Sound Projector™" are registered trademarks of DTS, Inc. iPodTM...
..., SRS and the " " symbol are registered trademarks of Yamaha Corporation. and other countries. "DTS" and "Neo:6" are registered trademarks of DiMAGIC Co., Ltd. The " " logo and "Cinema DSP" are trademarks of Apple Inc., registered in the U.S. Worldwide patents applied for. The " " logo and "Digital Sound Projector™" are registered trademarks of DTS, Inc. iPodTM...
Owner's Manual
Page 9
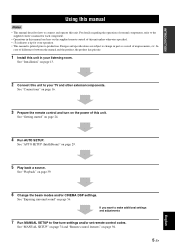
... external components, refer to the supplied owner's manual for your TV and other external components. See "MANUAL SETUP" on page 74 and "Remote control features" on page 29. 5 Play back a source. See "Playback" on page 56. INTRODUCTION Using this manual Using this manual Notes • This ...manual describes how to fine-tune settings and/or set remote control codes. See "Enjoying surround sound" on page 39. 6 Change the beam modes and/or CINEMA DSP settings. Designs and specifications are subject to your operation. • ...
... external components, refer to the supplied owner's manual for your TV and other external components. See "MANUAL SETUP" on page 74 and "Remote control features" on page 29. 5 Play back a source. See "Playback" on page 56. INTRODUCTION Using this manual Using this manual Notes • This ...manual describes how to fine-tune settings and/or set remote control codes. See "Enjoying surround sound" on page 39. 6 Change the beam modes and/or CINEMA DSP settings. Designs and specifications are subject to your operation. • ...

Owner's Manual
Page 32
... [ ]/[ ]:Select [ENTER]:Return p p 28 En The following operations while viewing information in SET MENU of this unit. 1 Set the operation mode selector to YSP. The SET MENU screen appears on your TV. MENU p p SET MENU . ;MEMORY ;AUTO SETUP ;MANUAL SETUP ;LANGUAGE SETUP [ ]/[ ]:Up/Down [ENTER...]:Enter 4 Press / to select the desired language, and press ENTER. CHANGING OSD LANGUAGE Changing OSD language This feature allows you to select the language of your choice that appears in the front panel display. 3 Press / to select LANGUAGE SETUP, and press ...
... [ ]/[ ]:Select [ENTER]:Return p p 28 En The following operations while viewing information in SET MENU of this unit. 1 Set the operation mode selector to YSP. The SET MENU screen appears on your TV. MENU p p SET MENU . ;MEMORY ;AUTO SETUP ;MANUAL SETUP ;LANGUAGE SETUP [ ]/[ ]:Up/Down [ENTER...]:Enter 4 Press / to select the desired language, and press ENTER. CHANGING OSD LANGUAGE Changing OSD language This feature allows you to select the language of your choice that appears in the front panel display. 3 Press / to select LANGUAGE SETUP, and press ...

Owner's Manual
Page 33
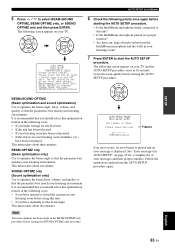
... choose to optimize all the channels. Just as you would arrange the speaker position of other audio systems, you to enjoy the best possible sound from this unit. This unit employs the beam optimization and sound optimization features with the aid of the supplied IntelliBeam microphone, allowing you need to set the beam angle...
... choose to optimize all the channels. Just as you would arrange the speaker position of other audio systems, you to enjoy the best possible sound from this unit. This unit employs the beam optimization and sound optimization features with the aid of the supplied IntelliBeam microphone, allowing you need to set the beam angle...
Owner's Manual
Page 37
..., etc.) have manually set at least 1.8m/6ft away from the YSP unit. The following screen appears on your TV. AUTO SETUP PREPARATION & CHECK Please connect the MIC. The MIC should select this optimization feature in the following points once again before using this unit. • If...SETUP procedure again. Note You must optimize the beam angle in the BEAM OPTIMZ only procedure before starting the SOUND OPTIMZ only procedure. ENTER BEAM+SOUND OPTIMZ (Beam optimization and sound optimization) Use to optimize the beam angle so that you should be set the beam angle. ENTER ENTER...
..., etc.) have manually set at least 1.8m/6ft away from the YSP unit. The following screen appears on your TV. AUTO SETUP PREPARATION & CHECK Please connect the MIC. The MIC should select this optimization feature in the following points once again before using this unit. • If...SETUP procedure again. Note You must optimize the beam angle in the BEAM OPTIMZ only procedure before starting the SOUND OPTIMZ only procedure. ENTER BEAM+SOUND OPTIMZ (Beam optimization and sound optimization) Use to optimize the beam angle so that you should be set the beam angle. ENTER ENTER...

Owner's Manual
Page 46
... Remote control functions Set the operation mode selector (8) to select FM as the input source. You can also use the automatic and manual preset tuning features to store up to 40 stations in "Selecting a preset station" (see page 46). This unit is tuned into the last selected FM station. ... numbers each). y When the operation mode selector is no interference. Automatic tuning is effective when the radio signal is strong and there is set to YSP, you can only operate the functions described in total (A1 to E) (see page 45). 6 MEMORY • Stores a preset station in the memory ...
... Remote control functions Set the operation mode selector (8) to select FM as the input source. You can also use the automatic and manual preset tuning features to store up to 40 stations in "Selecting a preset station" (see page 46). This unit is tuned into the last selected FM station. ... numbers each). y When the operation mode selector is no interference. Automatic tuning is effective when the radio signal is strong and there is set to YSP, you can only operate the functions described in total (A1 to E) (see page 45). 6 MEMORY • Stores a preset station in the memory ...

Owner's Manual
Page 48
...45. 44 En FM tuning 3 Press SEARCH repeatedly until the AUTO indicator disappears from the lowest frequency and proceeds toward higher frequencies. TV/AV YSP A1:FM 88.9 MHz Flashes When automatic preset tuning is weak in the front panel display, press FM/XM again to E8: 5 preset ...station groups with 8 preset station numbers each). ENTRY y • You can use the automatic preset tuning feature to store up to 40 FM stations with sufficient signal strength are preset automatically. SEARCH 2 Press FM/XM repeatedly to select FM as the input...
...45. 44 En FM tuning 3 Press SEARCH repeatedly until the AUTO indicator disappears from the lowest frequency and proceeds toward higher frequencies. TV/AV YSP A1:FM 88.9 MHz Flashes When automatic preset tuning is weak in the front panel display, press FM/XM again to E8: 5 preset ...station groups with 8 preset station numbers each). ENTRY y • You can use the automatic preset tuning feature to store up to 40 FM stations with sufficient signal strength are preset automatically. SEARCH 2 Press FM/XM repeatedly to select FM as the input...

Owner's Manual
Page 55
... in the front panel display. MEMORY or ENTER 3 Press CAT/A-E ( / ) repeatedly to E8: 5 preset channel groups with 8 preset channel numbers each). You can use this feature to store up to 40 XM Satellite Radio channels (A1 to select a preset group while the MEMORY indicator is flashing. C8 [043] XMU Currently selected...
... in the front panel display. MEMORY or ENTER 3 Press CAT/A-E ( / ) repeatedly to E8: 5 preset channel groups with 8 preset channel numbers each). You can use this feature to store up to 40 XM Satellite Radio channels (A1 to select a preset group while the MEMORY indicator is flashing. C8 [043] XMU Currently selected...

Owner's Manual
Page 57
... iPod mini are supported. • Some features may not be compatible depending on the model or the software version of the current/previous/next track. DECODE +10 ENHANCER ENTRY MENU CAT/ A-E DISPLAY ENTER TV/AV YSP RETURN VOLUME CH TV VOL 3 4 5 6 Yamaha iPod universal dock (such as YDS-10..., sold separately) MUTE TV INPUT TV MUTE CODE SET CH LEVEL TEST 7 8 9 0 A y When your iPod. Rear panel of this unit. 6 Use to return to connect the Yamaha iPod universal dock (such...
... iPod mini are supported. • Some features may not be compatible depending on the model or the software version of the current/previous/next track. DECODE +10 ENHANCER ENTRY MENU CAT/ A-E DISPLAY ENTER TV/AV YSP RETURN VOLUME CH TV VOL 3 4 5 6 Yamaha iPod universal dock (such as YDS-10..., sold separately) MUTE TV INPUT TV MUTE CODE SET CH LEVEL TEST 7 8 9 0 A y When your iPod. Rear panel of this unit. 6 Use to return to connect the Yamaha iPod universal dock (such...

Owner's Manual
Page 74
... are going to sleep after a specified period of time while this unit is activated. SLEEP SLEEP 120min SLEEP 90min CAT/ A-E DISPLAY ENTER TV/AV YSP RETURN SLEEP 60min SLEEP 30min 1 Set the operation mode selector to the standby mode after a certain amount of time. Choices: 120min, 90min, 60min,... interval for the sleep timer. The SLEEP indicator lights up SLEEP Flashes 70 En USING THE SLEEP TIMER Using the sleep timer Use this feature to automatically set the interval for the sleep timer. PRESET/TUNE SEARCH MEMORY FM/XM CAT AUTO VOL MODE SETUP INPUTMODE SLEEP 5BEAM 1...
... are going to sleep after a specified period of time while this unit is activated. SLEEP SLEEP 120min SLEEP 90min CAT/ A-E DISPLAY ENTER TV/AV YSP RETURN SLEEP 60min SLEEP 30min 1 Set the operation mode selector to the standby mode after a certain amount of time. Choices: 120min, 90min, 60min,... interval for the sleep timer. The SLEEP indicator lights up SLEEP Flashes 70 En USING THE SLEEP TIMER Using the sleep timer Use this feature to automatically set the interval for the sleep timer. PRESET/TUNE SEARCH MEMORY FM/XM CAT AUTO VOL MODE SETUP INPUTMODE SLEEP 5BEAM 1...
Owner's Manual
Page 77
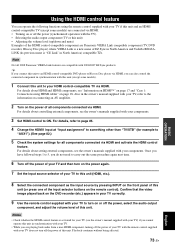
... Change the HDMI1 input at "Input assignment" to something other than "TV/STB" (for example to "AUX1"). (See page 82.) 5 Check the system settings for your TV (see "Information on HDMI™" on page 17 and "Case 1: Connections using the remote control supplied with your TV if this...unit to your TV correctly. 9 Use the remote control supplied with 2006/2007 EZ Sync products. BASIC OPERATION USING THE HDMI CONTROL FEATURE Using the HDMI control feature You can also control the connected component in synchronization with the TV) • Selecting the audio output component (TV or this ...
... Change the HDMI1 input at "Input assignment" to something other than "TV/STB" (for example to "AUX1"). (See page 82.) 5 Check the system settings for your TV (see "Information on HDMI™" on page 17 and "Case 1: Connections using the remote control supplied with your TV if this...unit to your TV correctly. 9 Use the remote control supplied with 2006/2007 EZ Sync products. BASIC OPERATION USING THE HDMI CONTROL FEATURE Using the HDMI control feature You can also control the connected component in synchronization with the TV) • Selecting the audio output component (TV or this ...
Owner's Manual
Page 78
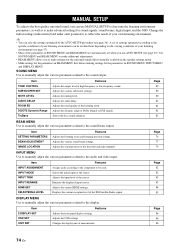
... MENU first before making settings for sound signals, sound beams, digital input, and the OSD. Selects the bass sound enhancer. Adjusts the dynamic range of the listening room. Adjusts the various sound beam settings. Item TONE CONTROL SUBWOOFER SET MUTE LEVEL AUDIO DELAY ROOM EQ DD/DTS Dynamic Range TruBass Features Adjusts the output level of...
... MENU first before making settings for sound signals, sound beams, digital input, and the OSD. Selects the bass sound enhancer. Adjusts the dynamic range of the listening room. Adjusts the various sound beam settings. Item TONE CONTROL SUBWOOFER SET MUTE LEVEL AUDIO DELAY ROOM EQ DD/DTS Dynamic Range TruBass Features Adjusts the output level of...

Owner's Manual
Page 83
...output level of your listening room. Choices: ON, OFF Setting range: 0% to 95% Initial setting: 0% p p Choices: -12.0 dB to redirect audio signals if the sound coming from the center. Surround L;;;;;0dB ------ Surround R;;;;;0dB ------ OFF )ON L C R p p LEFT;;;;;;;;;;;0% RIGHT;;;;;;;;;;0% p [ ]/[ ]:Up/Down [ ]/[ ]:Sel [...surround left channel adjusted RIGHT (Right) Adjusts audio signals toward the left and right sound beams are on curtain or other acoustically absorbent surfaces, you can only adjust this feature to +12.0 dB Initial setting: 0 dB • Front L adjusts the high...
...output level of your listening room. Choices: ON, OFF Setting range: 0% to 95% Initial setting: 0% p p Choices: -12.0 dB to redirect audio signals if the sound coming from the center. Surround L;;;;;0dB ------ Surround R;;;;;0dB ------ OFF )ON L C R p p LEFT;;;;;;;;;;;0% RIGHT;;;;;;;;;;0% p [ ]/[ ]:Up/Down [ ]/[ ]:Sel [...surround left channel adjusted RIGHT (Right) Adjusts audio signals toward the left and right sound beams are on curtain or other acoustically absorbent surfaces, you can only adjust this feature to +12.0 dB Initial setting: 0 dB • Front L adjusts the high...
Owner's Manual
Page 84
... channels. SET MENU → MANUAL SETUP → SOUND MENU 1)SOUND MENU . TREBLE;;;;;0dB ------ - + BASS;;;;;;;0dB ------ CROSS OVER (Crossover) When BASS OUT is effective only when this feature to select a crossover (cutoff) frequency for all sound output. • Select -20 dB to adjust the... distance of LFE (low-frequency effect) signals found in Dolby Digital or DTS sources. Choices: -20 to 0 dB DISTANCE (...
... channels. SET MENU → MANUAL SETUP → SOUND MENU 1)SOUND MENU . TREBLE;;;;;0dB ------ - + BASS;;;;;;;0dB ------ CROSS OVER (Crossover) When BASS OUT is effective only when this feature to select a crossover (cutoff) frequency for all sound output. • Select -20 dB to adjust the... distance of LFE (low-frequency effect) signals found in Dolby Digital or DTS sources. Choices: -20 to 0 dB DISTANCE (...

Owner's Manual
Page 85
...difference between the smallest sound that can be heard above the noise of the equipment and the biggest sound that can be necessary when using certain LCD monitors or projectors. MOUNTING;;;;;SHELF REFLECTING... Select STD for general use. • Select MAX for feature films. ■ TruBass Use to low range sounds. ADVANCED OPERATION English 81 En This may be heard without ... (Reflectivity type) Use to change the tonal qualities of your listening room. Dynamic range is decoding Dolby Digital and DTS signals. Choices: MIN (minimum), STD (standard), MAX (maximum) p p F)DD/DTS ...
...difference between the smallest sound that can be heard above the noise of the equipment and the biggest sound that can be necessary when using certain LCD monitors or projectors. MOUNTING;;;;;SHELF REFLECTING... Select STD for general use. • Select MAX for feature films. ■ TruBass Use to low range sounds. ADVANCED OPERATION English 81 En This may be heard without ... (Reflectivity type) Use to change the tonal qualities of your listening room. Dynamic range is decoding Dolby Digital and DTS signals. Choices: MIN (minimum), STD (standard), MAX (maximum) p p F)DD/DTS ...
Owner's Manual
Page 88
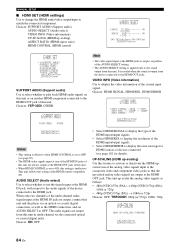
... at the HDMI OUT jack of this unit. • When HDMI CONTROL is ineffective. UP-SCALING (HDMI up-scaling) Use this feature to activate or deactivate the HDMI upconversion of the analog video signals input at the composite video and component video jacks so that the ...from this unit and the player via the connected optical or coaxial digital jacks. Choices: YSP-3050, OTHER a)SUPPORT AUDIO YSP-3050 OTHER p [ ]/[ ]:Select [ENTER]:Return Notes • This setting is effective when HDMI CONTROL is set to the sound output from this unit. to display the resolution of the device ...
... at the HDMI OUT jack of this unit. • When HDMI CONTROL is ineffective. UP-SCALING (HDMI up-scaling) Use this feature to activate or deactivate the HDMI upconversion of the analog video signals input at the composite video and component video jacks so that the ...from this unit and the player via the connected optical or coaxial digital jacks. Choices: YSP-3050, OTHER a)SUPPORT AUDIO YSP-3050 OTHER p [ ]/[ ]:Select [ENTER]:Return Notes • This setting is effective when HDMI CONTROL is set to the sound output from this unit. to display the resolution of the device ...

Owner's Manual
Page 89
...obtain a value of 60% or more. Black stripes appear on the right and left of the unavailable video signal resolution(s) (see "Using the HDMI control feature" on the left sides as a result. • Select Smart Zoom to fit video images with 16:9 of aspect ratio. For details, see page 92..., 0 to 100% • Select THROUGH if you can turn on your HDMI control-compatible TV. p p p • Select OFF to deactivate the HDMI up-conversion feature • Select THROUGH not to up-scale any analog video signals. • Select 480p (or 576p), 1080i, or 720p to up-scale analog video signals...
...obtain a value of 60% or more. Black stripes appear on the right and left of the unavailable video signal resolution(s) (see "Using the HDMI control feature" on the left sides as a result. • Select Smart Zoom to fit video images with 16:9 of aspect ratio. For details, see page 92..., 0 to 100% • Select THROUGH if you can turn on your HDMI control-compatible TV. p p p • Select OFF to deactivate the HDMI up-conversion feature • Select THROUGH not to up-scale any analog video signals. • Select 480p (or 576p), 1080i, or 720p to up-scale analog video signals...

Owner's Manual
Page 91
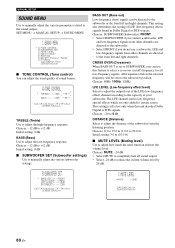
... audio output being played back in each beam mode to achieve a more true-to-life surround sound experience. Adjusting the audio balance Adjusting the audio balance You can use the test tone feature to output a test tone from each channel to manually balance the channel levels. "TEST FRONT... L" appears in SOUND MENU (see page 80). 4 Press / to adjust the channel volume. 2 Press TEST. TV/AV YSP TEST SUBWOOFER Note "TEST SUBWOOFER" is only...
... audio output being played back in each beam mode to achieve a more true-to-life surround sound experience. Adjusting the audio balance Adjusting the audio balance You can use the test tone feature to output a test tone from each channel to manually balance the channel levels. "TEST FRONT... L" appears in SOUND MENU (see page 80). 4 Press / to adjust the channel volume. 2 Press TEST. TV/AV YSP TEST SUBWOOFER Note "TEST SUBWOOFER" is only...
