
Owner's Manual
Page 1
UB YSP-1000 Digital Sound Projector OWNER'S MANUAL
UB YSP-1000 Digital Sound Projector OWNER'S MANUAL
Owner's Manual
Page 3
... in harmful interference with FCC regulations does not guarantee that lets the sound come through loud and clear without affecting your sensitive hearing. Compliance with... contact YAMAHA Electronics Corp., U.S.A. 6660 Orangethorpe Ave, Buena Park, CA 90620. and, most out of your use only high quality shielded cables. IMPORTANT SAFETY INSTRUCTIONS FCC INFORMATION (for Class "B" digital devices...., change the lead-in the users manual, may cause interference harmful to eliminate the problem by the FCC, to comply with this manual, meets FCC requirements. Failure to follow...
... in harmful interference with FCC regulations does not guarantee that lets the sound come through loud and clear without affecting your sensitive hearing. Compliance with... contact YAMAHA Electronics Corp., U.S.A. 6660 Orangethorpe Ave, Buena Park, CA 90620. and, most out of your use only high quality shielded cables. IMPORTANT SAFETY INSTRUCTIONS FCC INFORMATION (for Class "B" digital devices...., change the lead-in the users manual, may cause interference harmful to eliminate the problem by the FCC, to comply with this manual, meets FCC requirements. Failure to follow...
Owner's Manual
Page 4
... injury. do not place: - YAMAHA will form when the surrounding temperature changes suddenly. Contact qualified YAMAHA service personnel when any damage resulting ... CONNECTION. iii This unit is connected to read this Owner's Manual in an environment with the letter L or coloured RED. candles...explosion if battery is marked with high humidity (i.e. This Class B digital apparatus complies with the same or equivalent type. If the temperature.... 13 Do not attempt to this unit. 6 Do not cover this sound system in a safe place for any service is called the standby mode....
... injury. do not place: - YAMAHA will form when the surrounding temperature changes suddenly. Contact qualified YAMAHA service personnel when any damage resulting ... CONNECTION. iii This unit is connected to read this Owner's Manual in an environment with the letter L or coloured RED. candles...explosion if battery is marked with high humidity (i.e. This Class B digital apparatus complies with the same or equivalent type. If the temperature.... 13 Do not attempt to this unit. 6 Do not cover this sound system in a safe place for any service is called the standby mode....

Owner's Manual
Page 5
...unit 11 CONNECTIONS 15 Connecting a TV 16 Connecting a DVD player/recorder 17 Connecting a VCR 18 Connecting a digital satellite tuner or a cable TV tuner 19 Connecting a digital airwave tuner 20 Connecting other external components 21 Connecting a subwoofer 22 Affixing the optical cable 23 Connecting the ... TIMER 60 Setting the sleep timer 60 Canceling the sleep timer 61 ADVANCED OPERATION BASIC SETUP 62 MANUAL SETUP 68 Using MANUAL SETUP 69 BEAM MENU 70 SOUND MENU 74 INPUT MENU 77 DISPLAY MENU 79 ADJUSTING SYSTEM PARAMETERS ...........80 Setting the maximum volume level...
...unit 11 CONNECTIONS 15 Connecting a TV 16 Connecting a DVD player/recorder 17 Connecting a VCR 18 Connecting a digital satellite tuner or a cable TV tuner 19 Connecting a digital airwave tuner 20 Connecting other external components 21 Connecting a subwoofer 22 Affixing the optical cable 23 Connecting the ... TIMER 60 Setting the sleep timer 60 Canceling the sleep timer 61 ADVANCED OPERATION BASIC SETUP 62 MANUAL SETUP 68 Using MANUAL SETUP 69 BEAM MENU 70 SOUND MENU 74 INPUT MENU 77 DISPLAY MENU 79 ADJUSTING SYSTEM PARAMETERS ...........80 Setting the maximum volume level...
Owner's Manual
Page 8
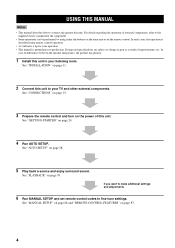
...described using either the buttons on the main unit or on page 11. 2 Connect this unit. See "INSTALLATION" on the remote control. See "MANUAL SETUP" on page 68 and "REMOTE CONTROL FEATURES" on page 24. 4 Run AUTO SETUP. Design and specifications are subject to change in your... listening room. See "PLAYBACK" on page 28. 5 Play back a source and enjoy surround sound. In case of differences between the manual and product, the product has priority. 1 Install this unit. See "AUTO SETUP" on page 39. See "CONNECTIONS" on page 15....
...described using either the buttons on the main unit or on page 11. 2 Connect this unit. See "INSTALLATION" on the remote control. See "MANUAL SETUP" on page 68 and "REMOTE CONTROL FEATURES" on page 24. 4 Run AUTO SETUP. Design and specifications are subject to change in your... listening room. See "PLAYBACK" on page 28. 5 Play back a source and enjoy surround sound. In case of differences between the manual and product, the product has priority. 1 Install this unit. See "AUTO SETUP" on page 39. See "CONNECTIONS" on page 15....
Owner's Manual
Page 11
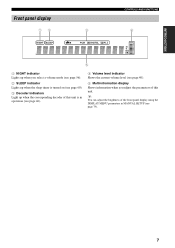
y You can adjust the brightness of this unit. INTRODUCTION Front panel display 12 3 CONTROLS AND FUNCTIONS 4 NIGHT SLEEP PCM DIGITAL PL VOL m ft mS dB 5 1 NIGHT indicator Lights up when you select a volume mode (see page 56). 2 SLEEP indicator Lights up when the sleep timer ...is turned on (see page 60). 3 Decoder indicators Light up when the corresponding decoder of this unit is in MANUAL SETUP (see page 40). 5 Multi-information display Shows information when you adjust the parameters of the front panel display using the DISPLAY MENU parameters in...
y You can adjust the brightness of this unit. INTRODUCTION Front panel display 12 3 CONTROLS AND FUNCTIONS 4 NIGHT SLEEP PCM DIGITAL PL VOL m ft mS dB 5 1 NIGHT indicator Lights up when you select a volume mode (see page 56). 2 SLEEP indicator Lights up when the sleep timer ...is turned on (see page 60). 3 Decoder indicators Light up when the corresponding decoder of this unit is in MANUAL SETUP (see page 40). 5 Multi-information display Shows information when you adjust the parameters of the front panel display using the DISPLAY MENU parameters in...

Owner's Manual
Page 17
... your TV Note Make sure that the rack is large enough to allow adequate ventilation space around this unit is strong enough to the installation manual supplied with the optional TV stand. When this unit (see page 11) and that it is installed under your TV. 13
... your TV Note Make sure that the rack is large enough to allow adequate ventilation space around this unit is strong enough to the installation manual supplied with the optional TV stand. When this unit (see page 11) and that it is installed under your TV. 13
Owner's Manual
Page 21
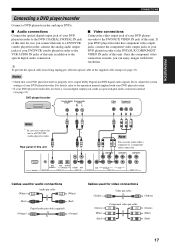
...connect the component video output jacks of your jacks of your DVD player/recorder. For details, refer to the operation manual supplied with better resolution. COMPONENT COMPONENT COMPONENT DVD COAXIAL AUX TV/STB OPTICAL TV/STB VCR VCR DVD/AUX STB RS-232C ...to a DVD/VCR combo player/recorder Rear panel of this unit. Notes • Check that your DVD player/recorder does not have a coaxial digital output jack, make either a composite or a component video connection. PREPARATION CONNECTIONS Connecting a DVD player/recorder Connect a DVD player/recorder and enjoy ...
...connect the component video output jacks of your jacks of your DVD player/recorder. For details, refer to the operation manual supplied with better resolution. COMPONENT COMPONENT COMPONENT DVD COAXIAL AUX TV/STB OPTICAL TV/STB VCR VCR DVD/AUX STB RS-232C ...to a DVD/VCR combo player/recorder Rear panel of this unit. Notes • Check that your DVD player/recorder does not have a coaxial digital output jack, make either a composite or a component video connection. PREPARATION CONNECTIONS Connecting a DVD player/recorder Connect a DVD player/recorder and enjoy ...
Owner's Manual
Page 31
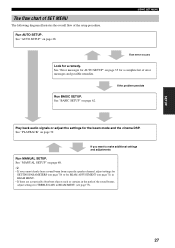
..."PLAYBACK" on page 68. y • If you want to make additional settings and adjustments Run MANUAL SETUP. SETUP The flow chart of SET MENU The following diagram illustrates the overall flow of the sound beams, adjust settings for TREBLE GAIN in BEAM MENU (see page 73). 27 See "Error messages ...for AUTO SETUP" on page 35 for the beam mode and the cinema DSP. If you cannot clearly hear a sound beam from a specific speaker channel, adjust settings for SETTING PARAMETERS (see page 71) in BEAM MENU. • If there are acoustically absorbent objects such as curtains...
..."PLAYBACK" on page 68. y • If you want to make additional settings and adjustments Run MANUAL SETUP. SETUP The flow chart of SET MENU The following diagram illustrates the overall flow of the sound beams, adjust settings for TREBLE GAIN in BEAM MENU (see page 73). 27 See "Error messages ...for AUTO SETUP" on page 35 for the beam mode and the cinema DSP. If you cannot clearly hear a sound beam from a specific speaker channel, adjust settings for SETTING PARAMETERS (see page 71) in BEAM MENU. • If there are acoustically absorbent objects such as curtains...
Owner's Manual
Page 32
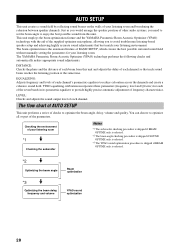
... to reduce coloration across the channels and create a cohesive sound field. The YAMAHA Parametric Room Acoustic Optimizer (YPAO) technology performs the following checks and automatically makes appropriate sound adjustments. EQUALIZING: Adjusts frequency and levels of your listening ... creates the best possible surround sound field without manually setting the parameters for each channel. YPAO equalizing calibration incorporates three parameters (frequency, level and Q factor) for your listening room and broadening the cohesion between speaker channels. The beam optimization is...
... to reduce coloration across the channels and create a cohesive sound field. The YAMAHA Parametric Room Acoustic Optimizer (YPAO) technology performs the following checks and automatically makes appropriate sound adjustments. EQUALIZING: Adjusts frequency and levels of your listening ... creates the best possible surround sound field without manually setting the parameters for each channel. YPAO equalizing calibration incorporates three parameters (frequency, level and Q factor) for your listening room and broadening the cohesion between speaker channels. The beam optimization is...
Owner's Manual
Page 33
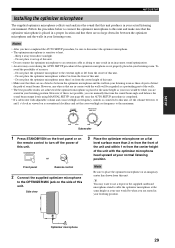
...on an imaginary center line drawn from direct sunlight. - SETUP AUTO SETUP Installing the optimizer microphone The supplied optimizer microphone collects and analyzes the sound that this unit. Do not place it away from this unit. Do not place the optimizer microphone more than 1 m from the center... cable as your ears would be when you have completed the AUTO SETUP procedure, be when you can manually fine-tune the sound beam angle and balance the sound beam output levels using MANUAL SETUP (see page 68) once the AUTO SETUP procedure is completed. • If a subwoofer with ...
...on an imaginary center line drawn from direct sunlight. - SETUP AUTO SETUP Installing the optimizer microphone The supplied optimizer microphone collects and analyzes the sound that this unit. Do not place it away from this unit. Do not place the optimizer microphone more than 1 m from the center... cable as your ears would be when you have completed the AUTO SETUP procedure, be when you can manually fine-tune the sound beam angle and balance the sound beam output levels using MANUAL SETUP (see page 68) once the AUTO SETUP procedure is completed. • If a subwoofer with ...

Owner's Manual
Page 35
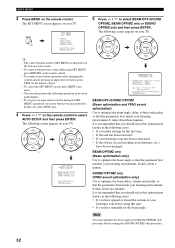
... STB TV AUX INPUT1 INPUT2 MACRO YSP ( ) INPUTMODE SLEEP 5BEAM 1 ST+3BEAM 2 3BEAM 3 STEREO UNIVERSAL 4 5 6 MUSIC 7 MOVIE 8 NIGHT 9 SPORTS 0 OFF +10 SURROUND CH LEVEL CINEMA DSP MENU Notes •...; If your listening room has curtains, open the curtains before starting the BEAM OPT+SOUND OPTIMZ or the BEAM OPTIMZ only procedure. &#... y You can be run BASIC SETUP (see page 62) or MANUAL SETUP (see page 68) to manually adjust the corresponding parameters. • If the AUTO SETUP procedure stops...
... STB TV AUX INPUT1 INPUT2 MACRO YSP ( ) INPUTMODE SLEEP 5BEAM 1 ST+3BEAM 2 3BEAM 3 STEREO UNIVERSAL 4 5 6 MUSIC 7 MOVIE 8 NIGHT 9 SPORTS 0 OFF +10 SURROUND CH LEVEL CINEMA DSP MENU Notes •...; If your listening room has curtains, open the curtains before starting the BEAM OPT+SOUND OPTIMZ or the BEAM OPTIMZ only procedure. &#... y You can be run BASIC SETUP (see page 62) or MANUAL SETUP (see page 68) to manually adjust the corresponding parameters. • If the AUTO SETUP procedure stops...
Owner's Manual
Page 36
.... • If you make settings for SET MENU are displayed on the bottom of YSP MIN 2m/6.5ft [ ]/[ ]:Up/Down/[p]/[ ]:Sel [ENTER]:Start BEAM OPT+SOUND OPTIMZ (Beam optimization and YPAO sound optimization) Use to optimize the beam angle, delay, volume and quality so that you... room (furniture, etc.) have been rearranged. MENU p SET MENU . ;MEMORY ;AUTO SETUP ;BASIC SETUP ;MANUAL SETUP [ ]/[ ]:Up/Down [ENTER]:Enter 5 Press / to select BEAM OPT+SOUND OPTIMZ, BEAM OPTIMZ only or SOUND OPTIMZ only and then press ENTER. ENTER ENTER p p p y • The control buttons used for the...
.... • If you make settings for SET MENU are displayed on the bottom of YSP MIN 2m/6.5ft [ ]/[ ]:Up/Down/[p]/[ ]:Sel [ENTER]:Start BEAM OPT+SOUND OPTIMZ (Beam optimization and YPAO sound optimization) Use to optimize the beam angle, delay, volume and quality so that you... room (furniture, etc.) have been rearranged. MENU p SET MENU . ;MEMORY ;AUTO SETUP ;BASIC SETUP ;MANUAL SETUP [ ]/[ ]:Up/Down [ENTER]:Enter 5 Press / to select BEAM OPT+SOUND OPTIMZ, BEAM OPTIMZ only or SOUND OPTIMZ only and then press ENTER. ENTER ENTER p p p y • The control buttons used for the...
Owner's Manual
Page 40
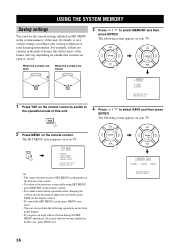
...open or closed 3 Press / to select MEMORY and then press ENTER. ENTER ENTER ;MEMORY 1)LOAD 2)SAVE [ ]/[ ]:Up/Down [ENTER]:Enter 1 Press YSP on whether the curtains are curtains in the path of beams, the effectiveness of this unit. The following screen appears on your TV. ENTER ENTER... more. • You can save certain settings according to select SAVE and then press ENTER. MENU SET MENU . ;MEMORY ;AUTO SETUP ;BASIC SETUP ;MANUAL SETUP [ ]/[ ]:Up/Down [ENTER]:Enter y • The control buttons used for SET MENU are closed . In this unit. USING THE SYSTEM MEMORY...
...open or closed 3 Press / to select MEMORY and then press ENTER. ENTER ENTER ;MEMORY 1)LOAD 2)SAVE [ ]/[ ]:Up/Down [ENTER]:Enter 1 Press YSP on whether the curtains are curtains in the path of beams, the effectiveness of this unit. The following screen appears on your TV. ENTER ENTER... more. • You can save certain settings according to select SAVE and then press ENTER. MENU SET MENU . ;MEMORY ;AUTO SETUP ;BASIC SETUP ;MANUAL SETUP [ ]/[ ]:Up/Down [ENTER]:Enter y • The control buttons used for SET MENU are closed . In this unit. USING THE SYSTEM MEMORY...

Owner's Manual
Page 41
... display returns to the SET MENU screen. The SET MENU screen appears on your TV. In this unit. SETUP p p 5 Press / to exit. YSP 2)MEMORY SAVE USER1 Save Now? [ENTER]:Enter 6 Press ENTER again. The SET MENU screen disappears from your listening environment. 1 Press...remote control. Once the parameters are saved as USER1, USER2 or USER3. ENTER 2)MEMORY SAVE USER1 Saving ! []:Select SET MENU . ;MEMORY ;AUTO SETUP ;BASIC SETUP ;MANUAL SETUP [ ]/[ ]:Up/Down [ENTER]:Enter p p 2 Press MENU on the remote control. • To cancel the SET MENU screen, press MENU once more. •...
... display returns to the SET MENU screen. The SET MENU screen appears on your TV. In this unit. SETUP p p 5 Press / to exit. YSP 2)MEMORY SAVE USER1 Save Now? [ENTER]:Enter 6 Press ENTER again. The SET MENU screen disappears from your listening environment. 1 Press...remote control. Once the parameters are saved as USER1, USER2 or USER3. ENTER 2)MEMORY SAVE USER1 Saving ! []:Select SET MENU . ;MEMORY ;AUTO SETUP ;BASIC SETUP ;MANUAL SETUP [ ]/[ ]:Up/Down [ENTER]:Enter p p 2 Press MENU on the remote control. • To cancel the SET MENU screen, press MENU once more. •...
Owner's Manual
Page 42
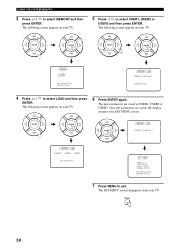
...]:Enter p p p p 4 Press / to exit. ENTER ENTER ENTER 1)MEMORY LOAD USER1 Loading ! []:Select p p 1)MEMORY LOAD USER1 USER2 USER3 [p]/[ ]:Select SET MENU . ;MEMORY ;AUTO SETUP ;BASIC SETUP ;MANUAL SETUP [ ]/[ ]:Up/Down [ENTER]:Enter 7 Press MENU to select LOAD and then press ENTER. The SET MENU screen disappears from your TV. 6 Press ENTER again...
...]:Enter p p p p 4 Press / to exit. ENTER ENTER ENTER 1)MEMORY LOAD USER1 Loading ! []:Select p p 1)MEMORY LOAD USER1 USER2 USER3 [p]/[ ]:Select SET MENU . ;MEMORY ;AUTO SETUP ;BASIC SETUP ;MANUAL SETUP [ ]/[ ]:Up/Down [ENTER]:Enter 7 Press MENU to select LOAD and then press ENTER. The SET MENU screen disappears from your TV. 6 Press ENTER again...

Owner's Manual
Page 44
...) changes at the minimum volume level. INPUT VOLUME + STANDBY/ON VOLUME CH TV VOL 2 Switch to select DVD as the input source. y &#...If you have set remote control codes, see page 39), you cannot hear any sound. 4 Press DVD on the remote control to the video input on the remote ...can continuously increase or decrease the volume level if you are output from the speakers of your DVD player using the remote control supplied with this unit. PLAYBACK ...DVD player are using, refer to the owner's manual supplied with the TV and the DVD player. 1 Turn on how to increase or...
...) changes at the minimum volume level. INPUT VOLUME + STANDBY/ON VOLUME CH TV VOL 2 Switch to select DVD as the input source. y &#...If you have set remote control codes, see page 39), you cannot hear any sound. 4 Press DVD on the remote control to the video input on the remote ...can continuously increase or decrease the volume level if you are output from the speakers of your DVD player using the remote control supplied with this unit. PLAYBACK ...DVD player are using, refer to the owner's manual supplied with the TV and the DVD player. 1 Turn on how to increase or...

Owner's Manual
Page 46
...for INSTALLING in AUTO SETUP (see page 33) • If you selected CORNER RIGHT or CORNER LEFT for INSTALLED POSITION in MANUAL SETUP (see page 70) AUTO SETUP BASIC SETUP MANUAL SETUP Beam mode INSTALLING (see page 33) Parallel to Wall Angle to Wall or corner INSTALLED POSITION (see page 64) ...CORNER RIGHT or CORNER LEFT Other settings INSTALLED POSITION (see page 64) • If you selected FLAT TO WALL for INSTALLED POSITION in MANUAL SETUP (see page 70) Only stereo, stereo plus 3 beam mode for INSTALLED POSITION in BASIC SETUP (see page 70) FLAT TO WALL ANGLE TO...
...for INSTALLING in AUTO SETUP (see page 33) • If you selected CORNER RIGHT or CORNER LEFT for INSTALLED POSITION in MANUAL SETUP (see page 70) AUTO SETUP BASIC SETUP MANUAL SETUP Beam mode INSTALLING (see page 33) Parallel to Wall Angle to Wall or corner INSTALLED POSITION (see page 64) ...CORNER RIGHT or CORNER LEFT Other settings INSTALLED POSITION (see page 64) • If you selected FLAT TO WALL for INSTALLED POSITION in MANUAL SETUP (see page 70) Only stereo, stereo plus 3 beam mode for INSTALLED POSITION in BASIC SETUP (see page 70) FLAT TO WALL ANGLE TO...
Owner's Manual
Page 66
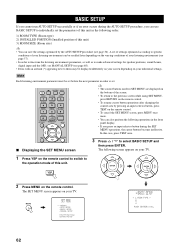
... MENU are displayed on the remote control. STEREO TARGET 4 5 6 MUSIC 7 MOVIE 8 VOL MODE 9 SPORTS 0 OFF +10 SURROUND CH LEVEL CINEMA DSP MENU • To resume cursor button operations after changing the control area by the AUTO SETUP procedure (see page 68). ...Enter ;BASIC SETUP . 1 ROOM TYPE ? 2 3 4 PUSH [ENTER] Key. 62 YSP 5BEAM 1 INPUTMODE SLEEP ST+3BEAM 2 3BEAM 3 y • The control buttons used for speaker positions, sound beams, digital input and the OSD, see MANUAL SETUP (see page 36). ENTER In this unit. Note Each listening environment parameter must be ...
... MENU are displayed on the remote control. STEREO TARGET 4 5 6 MUSIC 7 MOVIE 8 VOL MODE 9 SPORTS 0 OFF +10 SURROUND CH LEVEL CINEMA DSP MENU • To resume cursor button operations after changing the control area by the AUTO SETUP procedure (see page 68). ...Enter ;BASIC SETUP . 1 ROOM TYPE ? 2 3 4 PUSH [ENTER] Key. 62 YSP 5BEAM 1 INPUTMODE SLEEP ST+3BEAM 2 3BEAM 3 y • The control buttons used for speaker positions, sound beams, digital input and the OSD, see MANUAL SETUP (see page 36). ENTER In this unit. Note Each listening environment parameter must be ...

Owner's Manual
Page 71
...NO and then press ENTER. p BASIC SETUP 67 The following screen appears, and your TV screen. SET MENU ;MEMORY ;AUTO SETUP . ;BASIC SETUP ;MANUAL SETUP [ ]/[ ]:Up/Down [ENTER]:Enter 17 Press MENU to register the settings if they are registered. 4 SETUP OK? To select a playback source... and enjoy surround sound on this unit, see"PLAYBACK" on page 39. ENTER ENTER • Select YES to complete the BASIC SETUP procedure. The SET MENU display ...
...NO and then press ENTER. p BASIC SETUP 67 The following screen appears, and your TV screen. SET MENU ;MEMORY ;AUTO SETUP . ;BASIC SETUP ;MANUAL SETUP [ ]/[ ]:Up/Down [ENTER]:Enter 17 Press MENU to register the settings if they are registered. 4 SETUP OK? To select a playback source... and enjoy surround sound on this unit, see"PLAYBACK" on page 39. ENTER ENTER • Select YES to complete the BASIC SETUP procedure. The SET MENU display ...


