

Owner's Manual
Page 1
Setting Up Quick Guide DIGITAL KEYBOARD Owner's Manual How to use this manual Before using the PSR-E223/YPT-220, be sure to read the manual, keep it safe and handy ... on pages 4-5. The Data List is available for getting the most out of the instrument. "Reference" provides detailed descriptions and procedures for downloading from the Yamaha Manual Library at: http://www.yamaha.co.jp/manual/ EN Reference Appendix Data List The Data List contains MIDI related information.
Setting Up Quick Guide DIGITAL KEYBOARD Owner's Manual How to use this manual Before using the PSR-E223/YPT-220, be sure to read the manual, keep it safe and handy ... on pages 4-5. The Data List is available for getting the most out of the instrument. "Reference" provides detailed descriptions and procedures for downloading from the Yamaha Manual Library at: http://www.yamaha.co.jp/manual/ EN Reference Appendix Data List The Data List contains MIDI related information.
Owner's Manual
Page 5
... you are the trademarks or registered trademarks of control parameters and effects. Stereo Sampled Piano The instrument has a special Portable Grand Piano Voice-created by qualified Yamaha service personnel. • Do not place vinyl, plastic or rubber objects on the instrument, since this Owner's Manual...the power immediately and unplug the power cord from the wall AC outlet. If this book) • My Yamaha Product User Registration * The PRODUCT ID on the panel or keyboard. Logos GM System Level 1 "GM System Level 1" is an addition to the MIDI standard which it has...
... you are the trademarks or registered trademarks of control parameters and effects. Stereo Sampled Piano The instrument has a special Portable Grand Piano Voice-created by qualified Yamaha service personnel. • Do not place vinyl, plastic or rubber objects on the instrument, since this Owner's Manual...the power immediately and unplug the power cord from the wall AC outlet. If this book) • My Yamaha Product User Registration * The PRODUCT ID on the panel or keyboard. Logos GM System Level 1 "GM System Level 1" is an addition to the MIDI standard which it has...
Owner's Manual
Page 6
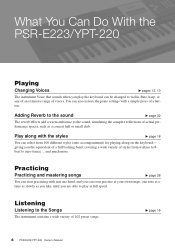
... select from waltzes to 8beat to violin, flute, harp, or any of an extensive range of voices. and much more. giving you play the keyboard can even practice at your own tempo, one hand, and you can be changed to euro-trance ... What You Can Do With the PSR-E223.../YPT-220 Playing Changing Voices > pages 12, 13 The instrument Voice that sounds when you the equivalent of a full backing band, covering a wide variety of styles from 100 different styles (auto accompaniment) for playing along with a simple press of a button. Play along on the...
... select from waltzes to 8beat to violin, flute, harp, or any of an extensive range of voices. and much more. giving you play the keyboard can even practice at your own tempo, one hand, and you can be changed to euro-trance ... What You Can Do With the PSR-E223.../YPT-220 Playing Changing Voices > pages 12, 13 The instrument Voice that sounds when you the equivalent of a full backing band, covering a wide variety of styles from 100 different styles (auto accompaniment) for playing along with a simple press of a button. Play along on the...
Owner's Manual
Page 9
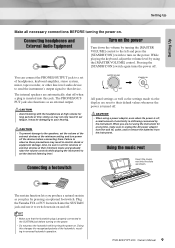
.... PSR-E223/YPT-220 Owner's Manual 9 Failure to turn power off . CAUTION • When using the [MASTER VOLUME] control. Plug the Yamaha FC4 or FC5 footswitch into the slots as the settings made via the display are not using the instrument for long periods of electricity is...off the devices before turning on the power. • Do not press the footswitch while turning the power on the power. While playing the keyboard, adjust the volume level by the instrument. The PHONES/OUTPUT jack also functions as you produce a natural sustain as an external output. Connecting a...
.... PSR-E223/YPT-220 Owner's Manual 9 Failure to turn power off . CAUTION • When using the [MASTER VOLUME] control. Plug the Yamaha FC4 or FC5 footswitch into the slots as the settings made via the display are not using the instrument for long periods of electricity is...off the devices before turning on the power. • Do not press the footswitch while turning the power on the power. While playing the keyboard, adjust the volume level by the instrument. The PHONES/OUTPUT jack also functions as you produce a natural sustain as an external output. Connecting a...

Owner's Manual
Page 13
Press the [PORTABLE GRAND] button. The Voice "Grand Piano1" will automatically be selected as the Main Voice. PSR-E223/YPT-220 Owner's Manual 13 Try selecting and playing different Voices. Select the desired Voice by using the number buttons [0]-[9 Refer to do is press one convenient button. Playing the Grand Piano Voice When you simply want to play a piano Voice, all you have to the Voice List on page 48. 065 Flute The Voice shown here becomes the Main Voice for the instrument. 3 Play the keyboard. Quick Guide Changing the Voices 2 Select a Voice.
Press the [PORTABLE GRAND] button. The Voice "Grand Piano1" will automatically be selected as the Main Voice. PSR-E223/YPT-220 Owner's Manual 13 Try selecting and playing different Voices. Select the desired Voice by using the number buttons [0]-[9 Refer to do is press one convenient button. Playing the Grand Piano Voice When you simply want to play a piano Voice, all you have to the Voice List on page 48. 065 Flute The Voice shown here becomes the Main Voice for the instrument. 3 Play the keyboard. Quick Guide Changing the Voices 2 Select a Voice.

Owner's Manual
Page 15
...52. After trying out these sounds, press the [PORTABLE GRAND] button to reset the instrument Voice to the default setting of each Drum Kit can be able to each key and enjoy the sounds. Details on the instruments and key assignments of Voice "Grand Piano1." To check which ...percussion sounds are assigned to play different percussion sounds directly from the keyboard: barking, braying, yelling, and much more. You...
...52. After trying out these sounds, press the [PORTABLE GRAND] button to reset the instrument Voice to the default setting of each Drum Kit can be able to each key and enjoy the sounds. Details on the instruments and key assignments of Voice "Grand Piano1." To check which ...percussion sounds are assigned to play different percussion sounds directly from the keyboard: barking, braying, yelling, and much more. You...

Owner's Manual
Page 19
... desired Style by using the number buttons [0]-[9 Refer to the Style List on . To use these Styles, turn on the auto accompaniment and play the keyboard as described on page 20. (The bass and chord accompaniment parts will sound.) 3 Turn SYNC START on page 54. 018 LoveSong NOTE • Since the...
... desired Style by using the number buttons [0]-[9 Refer to the Style List on . To use these Styles, turn on the auto accompaniment and play the keyboard as described on page 20. (The bass and chord accompaniment parts will sound.) 3 Turn SYNC START on page 54. 018 LoveSong NOTE • Since the...
Owner's Manual
Page 20
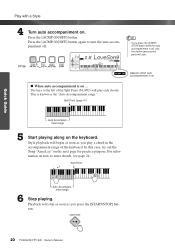
The keys to the left of the keyboard. F#2) will begin as soon as you press the [START/STOP] button. 20 PSR-E223/YPT-220 Owner's Manual In this case, try out the Song "...." Style playback will play a chord in the accompaniment range of the Split Point (54; Split Point Auto Accompaniment range 6 Stop playing. For information on the keyboard. Press the [ACMP ON/OFF] button.
The keys to the left of the keyboard. F#2) will begin as soon as you press the [START/STOP] button. 20 PSR-E223/YPT-220 Owner's Manual In this case, try out the Song "...." Style playback will play a chord in the accompaniment range of the Split Point (54; Split Point Auto Accompaniment range 6 Stop playing. For information on the keyboard. Press the [ACMP ON/OFF] button.
Owner's Manual
Page 25
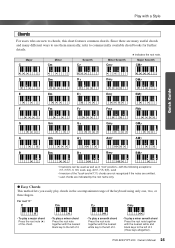
...refer to commercially available chord books for further details. ★ indicates the root note. Play with the nearest white and black keys to the left of it (three keys altogether). Major C Minor Cm Seventh C7 Minor Seventh Cm7 Major Seventh CM7 D Dm D7 Dm7 DM7 E Em E7 Em7 ...EM7 F Fm F7 Fm7 FM7 G Gm G7 Gm7 GM7 A Am A7 Am7 AM7 B Bm B7 Bm7 BM7 • Inversions can be used as well as in the accompaniment range of the keyboard...
...refer to commercially available chord books for further details. ★ indicates the root note. Play with the nearest white and black keys to the left of it (three keys altogether). Major C Minor Cm Seventh C7 Minor Seventh Cm7 Major Seventh CM7 D Dm D7 Dm7 DM7 E Em E7 Em7 ...EM7 F Fm F7 Fm7 FM7 G Gm G7 Gm7 GM7 A Am A7 Am7 AM7 B Bm B7 Bm7 BM7 • Inversions can be used as well as in the accompaniment range of the keyboard...
Owner's Manual
Page 27
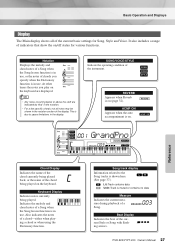
... page 37.) Lit: Track contains data Unlit: Track is in use, or the notes of a Song when the Song lesson function is on the keyboard are indicated by "8va" in use . Also indicates the notes of the chord being played on /off status for Song, Style and Voice. Basic...Appears when the auto accompaniment is in the notation. • For a few specific chords, not all of indicators that show the on the keyboard. Keyboard Display Indicates notes currently being played back, or the name of a chord-either when playing a chord or when using the Dictionary function. NOTE •...
... page 37.) Lit: Track contains data Unlit: Track is in use, or the notes of a Song when the Song lesson function is on the keyboard are indicated by "8va" in use . Also indicates the notes of the chord being played on /off status for Song, Style and Voice. Basic...Appears when the auto accompaniment is in the notation. • For a few specific chords, not all of indicators that show the on the keyboard. Keyboard Display Indicates notes currently being played back, or the name of a chord-either when playing a chord or when using the Dictionary function. NOTE •...
Owner's Manual
Page 28
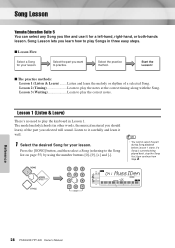
... played back, stop the Song first, then continue from Step 2. 041 MussIDen -05 Reference 28 PSR-E223/YPT-220 Owner's Manual Song Lesson Yamaha Education Suite 5 You can select any Song you like and use it for your lesson. Select the practice method. Lesson 3 (Waiting Learn to play ...the keyboard in three easy steps. ■ Lesson Flow Select a Song for your lesson. Lesson 1 (Listen & Learn) There's no need to play the correct notes. The ...
... played back, stop the Song first, then continue from Step 2. 041 MussIDen -05 Reference 28 PSR-E223/YPT-220 Owner's Manual Song Lesson Yamaha Education Suite 5 You can select any Song you like and use it for your lesson. Select the practice method. Lesson 3 (Waiting Learn to play ...the keyboard in three easy steps. ■ Lesson Flow Select a Song for your lesson. Lesson 1 (Listen & Learn) There's no need to play the correct notes. The ...
Owner's Manual
Page 31
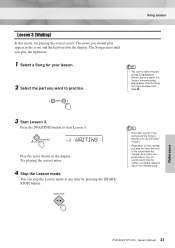
NOTE • You cannot select the part during Song playback before Lesson 3 starts. r3 WAITING Play the notes shown in the score and the keyboard on the selected song. As a result, your lesson. 2 Select the part you should play appear in the display. Reference PSR-E223/YPT-220 Owner's Manual ... 3 (Waiting) In this mode, try playing the correct notes. Try playing the correct notes. 4 Stop the Lesson mode. The Song pauses until you play the keys, the level of how strongly you can stop the Song first, then continue from Step 2. 3 Start Lesson 3.
NOTE • You cannot select the part during Song playback before Lesson 3 starts. r3 WAITING Play the notes shown in the score and the keyboard on the selected song. As a result, your lesson. 2 Select the part you should play appear in the display. Reference PSR-E223/YPT-220 Owner's Manual ... 3 (Waiting) In this mode, try playing the correct notes. Try playing the correct notes. 4 Stop the Lesson mode. The Song pauses until you play the keys, the level of how strongly you can stop the Song first, then continue from Step 2. 3 Start Lesson 3.
Owner's Manual
Page 32
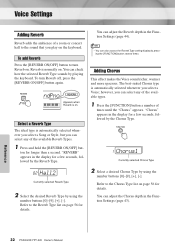
... depth in the display for a few seconds, followed by the Chorus Type. 001 Chorus1 Currently selected Chorus Type 2 Select a desired Chorus Type by playing the keyboard. "Chorus" appears in the Function Settings (page 43). ndPno Appears when Reverb is automatically selected whenever you play on the... keyboard. You can check how the selected Reverb Type sounds by using the number buttons [0]-[9 Refer to turn Reverb off, press the [REVERB ON/OFF] button ...
... depth in the display for a few seconds, followed by the Chorus Type. 001 Chorus1 Currently selected Chorus Type 2 Select a desired Chorus Type by playing the keyboard. "Chorus" appears in the Function Settings (page 43). ndPno Appears when Reverb is automatically selected whenever you play on the... keyboard. You can check how the selected Reverb Type sounds by using the number buttons [0]-[9 Refer to turn Reverb off, press the [REVERB ON/OFF] button ...
Owner's Manual
Page 33
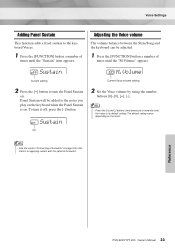
...the value to turn it off, press the [-] button. Adjusting the Voice volume The volume balance between the Style/Song and the keyboard can be added to the keyboard Voices. 1 Press the [FUNCTION] button a number of times until the "Sustain" item appears. on the Voice. oFF Sustain Current... button to its default setting. Voice Settings Adding Panel Sustain This function adds a fixed sustain to the notes you play on the keyboard when the Panel Sustain is on. The default setting varies depending on Sustain On 100 M.Volume Current Voice volume setting 2 Set the Voice ...
...the value to turn it off, press the [-] button. Adjusting the Voice volume The volume balance between the Style/Song and the keyboard can be added to the keyboard Voices. 1 Press the [FUNCTION] button a number of times until the "Sustain" item appears. on the Voice. oFF Sustain Current... button to its default setting. Voice Settings Adding Panel Sustain This function adds a fixed sustain to the notes you play on the keyboard when the Panel Sustain is on. The default setting varies depending on Sustain On 100 M.Volume Current Voice volume setting 2 Set the Voice ...
Owner's Manual
Page 34
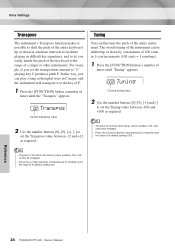
...transpose it possible to shift the pitch of the entire keyboard up or down in semitone intervals to facilitate playing in difficult key signatures, and to let you easily match the pitch of the keyboard to the range of a singer or other instruments. Reference... [+] and [-] buttons simultaneously to instantly reset the value to its default setting (00). Voice Settings Transpose The instrument's Transpose function makes it to the key of F. 1 Press the [FUNCTION] button a number of times until "Tuning" appears. 000 Tuning Current tuning value 2 Use the number buttons [0]-[9], ...
...transpose it possible to shift the pitch of the entire keyboard up or down in semitone intervals to facilitate playing in difficult key signatures, and to let you easily match the pitch of the keyboard to the range of a singer or other instruments. Reference... [+] and [-] buttons simultaneously to instantly reset the value to its default setting (00). Voice Settings Transpose The instrument's Transpose function makes it to the key of F. 1 Press the [FUNCTION] button a number of times until "Tuning" appears. 000 Tuning Current tuning value 2 Use the number buttons [0]-[9], ...
Owner's Manual
Page 37
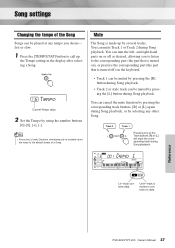
... to listen to the corresponding part (the part that is turned on), or practice the corresponding part (the part that is turned off) on the keyboard. • Track 1 can be muted by using the number buttons [0]-[9], [+], [-]. You can mute Track 1 or Track 2 during Song playback. Song settings Changing the tempo of...
... to listen to the corresponding part (the part that is turned on), or practice the corresponding part (the part that is turned off) on the keyboard. • Track 1 can be muted by using the number buttons [0]-[9], [+], [-]. You can mute Track 1 or Track 2 during Song playback. Song settings Changing the tempo of...
Owner's Manual
Page 38
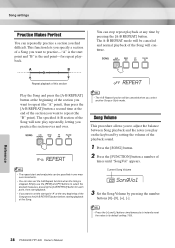
... playback. Current Song Volume 100 SongVol 3 Set the Song Volume by pressing the [A-B REPEAT] button. NOTE • The A-B Repeat function will now play on the keyboard by setting the volume of the playback sound. 1 Press the [SONG] button. 2 Press the [FUNCTION] button a number of the Song. Repeat playback of this section...
... playback. Current Song Volume 100 SongVol 3 Set the Song Volume by pressing the [A-B REPEAT] button. NOTE • The A-B Repeat function will now play on the keyboard by setting the volume of the playback sound. 1 Press the [SONG] button. 2 Press the [FUNCTION] button a number of the Song. Repeat playback of this section...
Owner's Manual
Page 39
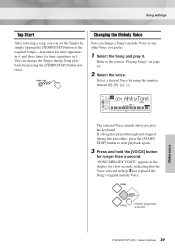
... You can change the Tempo during this procedure, press the [START/ STOP] button to any other Voice you prefer. 1 Select the Song and play the keyboard. You can set the Tempo by using the number buttons [0]-[9], [+], [-]. 004 HnkyTonk 001 The selected Voice sounds when you can change a Song's melody Voice to...
... You can change the Tempo during this procedure, press the [START/ STOP] button to any other Voice you prefer. 1 Select the Song and play the keyboard. You can set the Tempo by using the number buttons [0]-[9], [+], [-]. 004 HnkyTonk 001 The selected Voice sounds when you can change a Song's melody Voice to...
Owner's Manual
Page 40
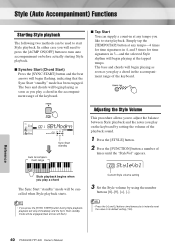
...YPT-220 Owner's Manual NOTE • If you play a chord in the accompaniment range of the keyboard. ■ Tap Start You can be engaged (beat arrows will flash). Adjusting the Style... and the Sync Start standby mode will be used to turn auto accompaniment on the keyboard by setting the volume of the playback sound. 1 Press the [STYLE] button. 2 Press the [FUNCTION] button ...a number of the keyboard. 001 8BtModrn 001 Sync Start standby Auto Accompaniment range Style playback begins when you will need to ...
...YPT-220 Owner's Manual NOTE • If you play a chord in the accompaniment range of the keyboard. ■ Tap Start You can be engaged (beat arrows will flash). Adjusting the Style... and the Sync Start standby mode will be used to turn auto accompaniment on the keyboard by setting the volume of the playback sound. 1 Press the [STYLE] button. 2 Press the [FUNCTION] button ...a number of the keyboard. 001 8BtModrn 001 Sync Start standby Auto Accompaniment range Style playback begins when you will need to ...

Owner's Manual
Page 41
... number of times until "SplitPnt" appears. Looking up Chords Using the Chord Dictionary The Dictionary function is shown in the display. Press the "G" key in the section of the keyboard labeled "ROOT>." (The note doesn't sound.) The root note you set is essentially a built-in the display. It is... key number 54 (the F#2 key), but - Split Point-default setting: 54 (F#2) 36 48 60 72 84 96 The initial default Split Point is ideal ...
... number of times until "SplitPnt" appears. Looking up Chords Using the Chord Dictionary The Dictionary function is shown in the display. Press the "G" key in the section of the keyboard labeled "ROOT>." (The note doesn't sound.) The root note you set is essentially a built-in the display. It is... key number 54 (the F#2 key), but - Split Point-default setting: 54 (F#2) 36 48 60 72 84 96 The initial default Split Point is ideal ...

