Owner's Manual
Page 2
...observe all local, state, and federal regulations that relate to assist you must use "household" type batteries. The model number, serial number, power requirements, etc., are recommended. If you , please contact Yamaha directly. IMPORTANT: The louder the sound, the shorter the time period before ...anyone could cause permanent hearing loss. You should be rechargeable. Purchase Date 92-BP (bottom) PLEASE KEEP THIS MANUAL 2 DGX-630/YPG-635 Owner's Manual WARNING: Do not place this product in the spaces provided below and retain this product to be installed correctly. This...
...observe all local, state, and federal regulations that relate to assist you must use "household" type batteries. The model number, serial number, power requirements, etc., are recommended. If you , please contact Yamaha directly. IMPORTANT: The louder the sound, the shorter the time period before ...anyone could cause permanent hearing loss. You should be rechargeable. Purchase Date 92-BP (bottom) PLEASE KEEP THIS MANUAL 2 DGX-630/YPG-635 Owner's Manual WARNING: Do not place this product in the spaces provided below and retain this product to be installed correctly. This...
Owner's Manual
Page 3
.... Making sure that neither core is coloured BROWN must accept any interference received including interference that is being affected by using one of this apparatus may void your plug proceed as indicated in the instructions contained in the USA. 3. See ... INFORMATION STATEMENT (DECLARATION OF CONFORMITY PROCEDURE) Responsible Party : Yamaha Corporation of America Address : 6600 Orangethorpe Ave., Buena Park, Calif. 90620 Telephone : 714-522-9011 Type of Equipment : Digital Piano Model Name : DGX-630/YPG-635 This device complies with the requirements listed in your authority,...
.... Making sure that neither core is coloured BROWN must accept any interference received including interference that is being affected by using one of this apparatus may void your plug proceed as indicated in the instructions contained in the USA. 3. See ... INFORMATION STATEMENT (DECLARATION OF CONFORMITY PROCEDURE) Responsible Party : Yamaha Corporation of America Address : 6600 Orangethorpe Ave., Buena Park, Calif. 90620 Telephone : 714-522-9011 Type of Equipment : Digital Piano Model Name : DGX-630/YPG-635 This device complies with the requirements listed in your authority,...
Owner's Manual
Page 4
...power switch is turned off the power switch, disconnect the adaptor plug from the outlet, and have the instrument inspected by qualified Yamaha service personnel. PRECAUTIONS PLEASE READ CAREFULLY BEFORE PROCEEDING * Please keep this manual in damp or wet conditions, or place containers on , trip...removing the electric plug from the wall AC outlet. • Use only the stand specified for a long time, make sure that the AC outlet you notice any dirt or dust which might accidentally fall over . 4 DGX-630/YPG-635 Owner's Manual (3)-11 1/2 Otherwise, the instrument, TV, or...
...power switch is turned off the power switch, disconnect the adaptor plug from the outlet, and have the instrument inspected by qualified Yamaha service personnel. PRECAUTIONS PLEASE READ CAREFULLY BEFORE PROCEEDING * Please keep this manual in damp or wet conditions, or place containers on , trip...removing the electric plug from the wall AC outlet. • Use only the stand specified for a long time, make sure that the AC outlet you notice any dirt or dust which might accidentally fall over . 4 DGX-630/YPG-635 Owner's Manual (3)-11 1/2 Otherwise, the instrument, TV, or...
Owner's Manual
Page 5
...Save data you save your data • The panel settings and some other types of time at their respective companies. (3)-11 2/2 DGX-630/YPG-635 Owner's Manual 5 Before turning the power on the instrument, since this manual are the property of their minimum levels and gradually raise the volume ...the instrument to set all components. Then have been provided by qualified Yamaha service personnel. • Do not place vinyl, plastic or rubber objects on or off for damage caused by improper use . When you are not retained in memory when you turn off when the instrument...
...Save data you save your data • The panel settings and some other types of time at their respective companies. (3)-11 2/2 DGX-630/YPG-635 Owner's Manual 5 Before turning the power on the instrument, since this manual are the property of their minimum levels and gradually raise the volume ...the instrument to set all components. Then have been provided by qualified Yamaha service personnel. • Do not place vinyl, plastic or rubber objects on or off for damage caused by improper use . When you are not retained in memory when you turn off when the instrument...
Owner's Manual
Page 6
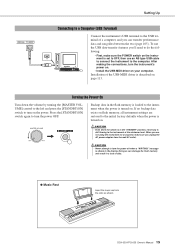
...manufacturer. STYLE FILE The Style File Format is an abbreviation for connecting a computer with peripheral Devices. USB USB is Yamaha's original style file format which uses a unique conversion system to all computer software, style files, MIDI files, WAVE data, musical ... 6 DGX-630/YPG-635 Owner's Manual XGlite As its name implies, "XGlite" is played. Such copyrighted materials include, without limitation, all software and hardware products that support GM System Level. DON'T MAKE, DISTRIBUTE OR USE ILLEGAL COPIES. Any unauthorized use of such programs and...
...manufacturer. STYLE FILE The Style File Format is an abbreviation for connecting a computer with peripheral Devices. USB USB is Yamaha's original style file format which uses a unique conversion system to all computer software, style files, MIDI files, WAVE data, musical ... 6 DGX-630/YPG-635 Owner's Manual XGlite As its name implies, "XGlite" is played. Such copyrighted materials include, without limitation, all software and hardware products that support GM System Level. DON'T MAKE, DISTRIBUTE OR USE ILLEGAL COPIES. Any unauthorized use of such programs and...
Owner's Manual
Page 7
... included depending on your Yamaha dealer. Included Accessories The DGX-630/YPG-635 package includes the following items. Please check that you have them all. • Music rest • Accessory CD-ROM • Owner's manual (this owner's manual carefully before using the instrument in a safe... and handy place even after you finish reading, and refer to it often when you for purchasing the Yamaha DGX-630/YPG-635 Portable Grand! DGX-630/YPG-635 Owner's Manual 7 Please check with your particular...
... included depending on your Yamaha dealer. Included Accessories The DGX-630/YPG-635 package includes the following items. Please check that you have them all. • Music rest • Accessory CD-ROM • Owner's manual (this owner's manual carefully before using the instrument in a safe... and handy place even after you finish reading, and refer to it often when you for purchasing the Yamaha DGX-630/YPG-635 Portable Grand! DGX-630/YPG-635 Owner's Manual 7 Please check with your particular...

Owner's Manual
Page 8
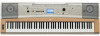
... of the keyboard, for example, by tapping one finger! ■ Play a Variety of Instrument Voices Page 19 With the DGX-630/YPG-635, the instrument voice that matches the music you play in a lightweight instrument. ■ Performance assistant technology Page 39 Play along with full accompaniment?...the corresponding score will appear on a traditional acoustic piano, the keys of the lower notes have a heavier touch, while the higher ones are using violin to play it instead. Experience a whole new world of musical variety. ■ Play Along with Styles Page 28 Want to do is ...
... of the keyboard, for example, by tapping one finger! ■ Play a Variety of Instrument Voices Page 19 With the DGX-630/YPG-635, the instrument voice that matches the music you play in a lightweight instrument. ■ Performance assistant technology Page 39 Play along with full accompaniment?...the corresponding score will appear on a traditional acoustic piano, the keys of the lower notes have a heavier touch, while the higher ones are using violin to play it instead. Experience a whole new world of musical variety. ■ Play Along with Styles Page 28 Want to do is ...
Owner's Manual
Page 9
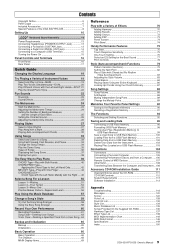
...138 MIDI Implementation Chart 144 MIDI Data Format 146 Specifications 149 Index 150 DGX-630/YPG-635 Owner's Manual 9 Contents Copyright Notice 6 Panel Logos 6 Included Accessories 7 Special Features of the DGX-630/YPG-635 8 Setting Up 10 Keyboard Stand Assembly 10 Power Requirements 13 Connecting Headphones (PHONES/... the Metronome Volume 26 Playing Styles 27 Select a Style Rhythm 27 Play Along with a Style 28 Playing Auto-accompaniment Chords 32 Using Songs 33 Select and Listen to a Song 33 Song Fast Forward, Fast Reverse, and Pause 34 Change the Song Tempo 34 ...
...138 MIDI Implementation Chart 144 MIDI Data Format 146 Specifications 149 Index 150 DGX-630/YPG-635 Owner's Manual 9 Contents Copyright Notice 6 Panel Logos 6 Included Accessories 7 Special Features of the DGX-630/YPG-635 8 Setting Up 10 Keyboard Stand Assembly 10 Power Requirements 13 Connecting Headphones (PHONES/... the Metronome Volume 26 Playing Styles 27 Select a Style Rhythm 27 Play Along with a Style 28 Playing Auto-accompaniment Chords 32 Using Songs 33 Select and Listen to a Song 33 Song Fast Forward, Fast Reverse, and Pause 34 Change the Song Tempo 34 ...
Owner's Manual
Page 10
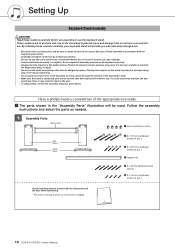
...Do not use . By following these cautions carefully before use the stand... screws can cause damage. • Use the stand after assembly is sturdy and...use of the stand and to prevent injury and damage from occurring to you assemble or use . • Be careful not to confuse parts, and be used...flat least two persons. • Be sure to use the correct screw size, as needed. 1 Assembly Parts Back...athead screws (6 pcs.) y 5 x 16 mm roundhead screws (4 pcs.) Use the packing sheet to protect both the instrument and the floor when...with safe and prolonged use the keyboard stand. ...
...Do not use . By following these cautions carefully before use the stand... screws can cause damage. • Use the stand after assembly is sturdy and...use of the stand and to prevent injury and damage from occurring to you assemble or use . • Be careful not to confuse parts, and be used...flat least two persons. • Be sure to use the correct screw size, as needed. 1 Assembly Parts Back...athead screws (6 pcs.) y 5 x 16 mm roundhead screws (4 pcs.) Use the packing sheet to protect both the instrument and the floor when...with safe and prolonged use the keyboard stand. ...
Owner's Manual
Page 11
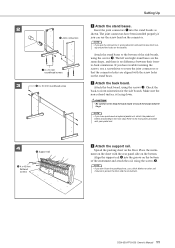
... Attach the back board. Place the instrument on the sheet with the screw holes on the stand bases. Attach the back board, using the screws e. tings. DGX-630/YPG-635 Owner's Manual 11 NOTE • If you put the connectors in wrong direction and want to drop the back board or touch ... provided with your pedal unit. 4 r Support rail t 4 x 45 mm flathead screws v Attach the support rail. If you have trouble fastening the screws, use a thick blanket or other soft material to the next step. Check the back-to rotate the joint connectors so that the connector holes are the...
... Attach the back board. Place the instrument on the sheet with the screw holes on the stand bases. Attach the back board, using the screws e. tings. DGX-630/YPG-635 Owner's Manual 11 NOTE • If you put the connectors in wrong direction and want to drop the back board or touch ... provided with your pedal unit. 4 r Support rail t 4 x 45 mm flathead screws v Attach the support rail. If you have trouble fastening the screws, use a thick blanket or other soft material to the next step. Check the back-to rotate the joint connectors so that the connector holes are the...
Owner's Manual
Page 12
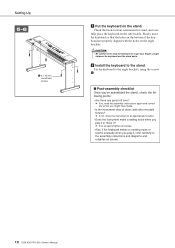
... side boards. Check the back-to get your fingers caught between the keyboard and the stand parts. Fix the keyboard to the angle brackets, using the screws y. ■ Post-assembly checklist Once you've assembled the stand, check the following points: • Are there any parts left over? ➔ If... make a rattling noise when you play it , refer carefully to the stand. Slowly move it? ➔ If so, properly tighten all screws. 12 DGX-630/YPG-635 Owner's Manual
... side boards. Check the back-to get your fingers caught between the keyboard and the stand parts. Fix the keyboard to the angle brackets, using the screws y. ■ Post-assembly checklist Once you've assembled the stand, check the following points: • Are there any parts left over? ➔ If... make a rattling noise when you play it , refer carefully to the stand. Slowly move it? ➔ If so, properly tighten all screws. 12 DGX-630/YPG-635 Owner's Manual

Owner's Manual
Page 13
... to set the volume of other line-level audio device to send the instrument's output signal to STANDBY. Plug the Yamaha FC5 footswitch into this jack and use of the external devices at the minimum setting before turning on the power. • Do not press the footswitch while...; ods of the instrument is set the volumes of the footswitch, resulting in reversed footswitch operation. NOTE • Make sure that device. DGX-630/YPG-635 Owner's Manual 13 mended by pressing a footswitch. You can connect the PHONES/OUTPUT jack to a keyboard amplifier, stereo system, mixer, tape...
... to set the volume of other line-level audio device to send the instrument's output signal to STANDBY. Plug the Yamaha FC5 footswitch into this jack and use of the external devices at the minimum setting before turning on the power. • Do not press the footswitch while...; ods of the instrument is set the volumes of the footswitch, resulting in reversed footswitch operation. NOTE • Make sure that device. DGX-630/YPG-635 Owner's Manual 13 mended by pressing a footswitch. You can connect the PHONES/OUTPUT jack to a keyboard amplifier, stereo system, mixer, tape...
Owner's Manual
Page 14
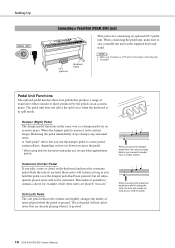
... as you press the sostenuto pedal here while holding the note, the note will not be sustained. When you hold the pedal. 14 DGX-630/YPG-635 Owner's Manual The pedal unit does not affect the split voice when the keyboard is in the same way as if the damper pedal had... been pressed) but all subsequently played notes will sustain as long as you press the pedal. * When using both the foot switch and pedal unit, the last effect applied takes priority. Releasing the pedal immediately stops (damps) any sustained notes. Damper (Right) Pedal...
... as you press the sostenuto pedal here while holding the note, the note will not be sustained. When you hold the pedal. 14 DGX-630/YPG-635 Owner's Manual The pedal unit does not affect the split voice when the keyboard is in the same way as if the damper pedal had... been pressed) but all subsequently played notes will sustain as long as you press the pedal. * When using both the foot switch and pedal unit, the last effect applied takes priority. Releasing the pedal immediately stops (damps) any sustained notes. Damper (Right) Pedal...
Owner's Manual
Page 15
...USB-MIDI driver on . If no backup data exists on flash memory, all instrument settings are not using the instrument for a long time, make sure the POWER switch on . CAUTION • Even when the... switch is turned on the instrument is set to OFF, then use the USB data-transfer features you can damage the flash memory and result in the fl...in the "STANDBY" position, electricity is described on the power. DGX-630/YPG-635 Owner's Manual 15 Press the [STANDBY/ON] switch again to the instrument when the power is turned on...
...USB-MIDI driver on . If no backup data exists on flash memory, all instrument settings are not using the instrument for a long time, make sure the POWER switch on . CAUTION • Even when the... switch is turned on the instrument is set to OFF, then use the USB data-transfer features you can damage the flash memory and result in the fl...in the "STANDBY" position, electricity is described on the power. DGX-630/YPG-635 Owner's Manual 15 Press the [STANDBY/ON] switch again to the instrument when the power is turned on...
Owner's Manual
Page 18
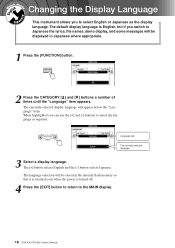
When highlighted you can use the [+] and [-] buttons to select the language as the display language. The language selection will be displayed in the internal flash memory so that ... appear below the "Language" item. The default display language is turned off. 4 Press the [EXIT] button to return to the MAIN display. 18 DGX-630/YPG-635 Owner's Manual The currently selected display language will be stored in Japanese where appropriate. 1 Press the [FUNCTION] button. 2 Press the CATEGORY [ ] and [ ] buttons a number of...
When highlighted you can use the [+] and [-] buttons to select the language as the display language. The language selection will be displayed in the internal flash memory so that ... appear below the "Language" item. The default display language is turned off. 4 Press the [EXIT] button to return to the MAIN display. 18 DGX-630/YPG-635 Owner's Manual The currently selected display language will be stored in Japanese where appropriate. 1 Press the [FUNCTION] button. 2 Press the CATEGORY [ ] and [ ] buttons a number of...

Owner's Manual
Page 20
Try Playing a Variety of Instrument Voices Play Two Voices Simultaneously-DUAL You can select a second voice which will play in addition to use is known as the "dual" voice. 1 Press the [DUAL ON/OFF] button. The [DUAL ON/OFF] button turns the dual voice on the dual voice "... dual voice. The dual voice selection display will sound in the MAIN display. For this example try selecting the "123 Vibraphone" voice. 20 DGX-630/YPG-635 Owner's Manual The second voice is selected. The currently selected dual voice will appear.
Try Playing a Variety of Instrument Voices Play Two Voices Simultaneously-DUAL You can select a second voice which will play in addition to use is known as the "dual" voice. 1 Press the [DUAL ON/OFF] button. The [DUAL ON/OFF] button turns the dual voice on the dual voice "... dual voice. The dual voice selection display will sound in the MAIN display. For this example try selecting the "123 Vibraphone" voice. 20 DGX-630/YPG-635 Owner's Manual The second voice is selected. The currently selected dual voice will appear.
Owner's Manual
Page 22
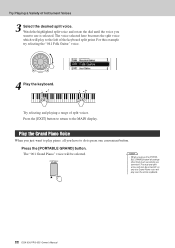
... highlighted split voice and rotate the dial until the voice you want to play over the entire keyboard. 22 DGX-630/YPG-635 Owner's Manual Press the [EXIT] button to return to use is press one convenient button. NOTE • When you press the [PORTABLE GRAND] button all you just want to the...
... highlighted split voice and rotate the dial until the voice you want to play over the entire keyboard. 22 DGX-630/YPG-635 Owner's Manual Press the [EXIT] button to return to use is press one convenient button. NOTE • When you press the [PORTABLE GRAND] button all you just want to the...
Owner's Manual
Page 23
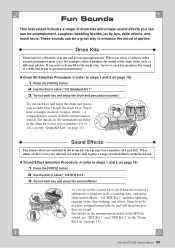
...pitches. For details on the instruments included in the drum kit voice group (voice numbers 141 and 142). When you select a violin or other useful effects. Sound Effects The sound effects are collections of drum and percussion instruments. "141 SFX Kit 1" includes lightning, running water, dogs barking,... a triangle, maracas, bongos, drums ... These sounds can use for example, all keys produce the sound of drum and percussion sounds. For details on the instruments included in the "Drum Kit List" on page 133. DGX-630/YPG-635 Owner's Manual 23 Try out each key and enjoy the ...
...pitches. For details on the instruments included in the drum kit voice group (voice numbers 141 and 142). When you select a violin or other useful effects. Sound Effects The sound effects are collections of drum and percussion instruments. "141 SFX Kit 1" includes lightning, running water, dogs barking,... a triangle, maracas, bongos, drums ... These sounds can use for example, all keys produce the sound of drum and percussion sounds. For details on the instruments included in the "Drum Kit List" on page 133. DGX-630/YPG-635 Owner's Manual 23 Try out each key and enjoy the ...
Owner's Manual
Page 24
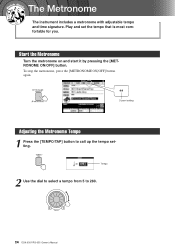
Start the Metronome Turn the metronome on and start it by pressing the [METRONOME ON/OFF] button. Q e uick Guid The Metronome The instrument includes a metronome with adjustable tempo and time signature. Play and set the tempo that is most comfortable for you. To stop the metronome, press the [METRONOME ON/OFF] button again. 4/4 Current setting Adjusting the Metronome Tempo 1 Press the [TEMPO/TAP] button to 280. 24 DGX-630/YPG-635 Owner's Manual Tempo 2 Use the dial to select a tempo from 5 to call up the tempo setting.
Start the Metronome Turn the metronome on and start it by pressing the [METRONOME ON/OFF] button. Q e uick Guid The Metronome The instrument includes a metronome with adjustable tempo and time signature. Play and set the tempo that is most comfortable for you. To stop the metronome, press the [METRONOME ON/OFF] button again. 4/4 Current setting Adjusting the Metronome Tempo 1 Press the [TEMPO/TAP] button to 280. 24 DGX-630/YPG-635 Owner's Manual Tempo 2 Use the dial to select a tempo from 5 to call up the tempo setting.
Owner's Manual
Page 25
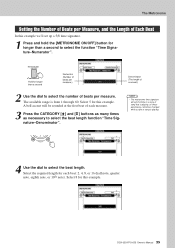
...a second Numerator (Number of beats per measure.) Denominator (The length of one beat.) f r 2 Use the dial to select the number of beats per Measure, and the Length of Each Beat In this...quarter note, eighth note, or 16th note). The Metronome Setting the Number of Beats per measure. The available range is playing. 4 Use the dial to select the beat length function "Time Signature-Denominator". NOTE • The metronome time signature will be changed while a... CATEGORY [ ] and [ ] buttons as many times as necessary to select the beat length. DGX-630/YPG-635 Owner's Manual 25
...a second Numerator (Number of beats per measure.) Denominator (The length of one beat.) f r 2 Use the dial to select the number of beats per Measure, and the Length of Each Beat In this...quarter note, eighth note, or 16th note). The Metronome Setting the Number of Beats per measure. The available range is playing. 4 Use the dial to select the beat length function "Time Signature-Denominator". NOTE • The metronome time signature will be changed while a... CATEGORY [ ] and [ ] buttons as many times as necessary to select the beat length. DGX-630/YPG-635 Owner's Manual 25


