
YMC10 Owners Manual Image
Page 1
YAMAHA T MCIDTOIENRrVTiSEAYPN0E+OO-C9DF1NP-C2FOVWE YAMAHA E E MIDI CONVERTER MIDI CONVERTER OWNER'S MANUAL
YAMAHA T MCIDTOIENRrVTiSEAYPN0E+OO-C9DF1NP-C2FOVWE YAMAHA E E MIDI CONVERTER MIDI CONVERTER OWNER'S MANUAL

YMC10 Owners Manual Image
Page 2
CONTENTS PRECAUTIONS 2 FUNCTION AND FEATURES OF THE YAMAHA MIDI CONVERTER YMC10 4 DIAGRAM OF THE YMC10 5 HOW TO USE THE YMC10 7 SYNCHRONIZED PLAYBACK • RECORDING 11 YMC10 CONVERSION INFORMATION 13 SPECIFICATIONS 15 RELATED EQUIPMENT 16 BLOCK DIAGRAM 17
CONTENTS PRECAUTIONS 2 FUNCTION AND FEATURES OF THE YAMAHA MIDI CONVERTER YMC10 4 DIAGRAM OF THE YMC10 5 HOW TO USE THE YMC10 7 SYNCHRONIZED PLAYBACK • RECORDING 11 YMC10 CONVERSION INFORMATION 13 SPECIFICATIONS 15 RELATED EQUIPMENT 16 BLOCK DIAGRAM 17
YMC10 Owners Manual Image
Page 3
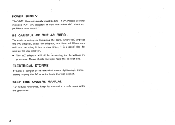
Never use a longer cable, there is a possibility of heat. MIDI CABLES Use cables conforming to the switches, dropping or rough handling. ters and transceivers, and wireless microphone or intercom systems are all cables before moving the YMC10. Cables are no user-serviceable parts inside. HANDLING Avoid applying excessive force to the MIDI standard. CONNECTION Turn off all power before connecting the YMC10 to other equipment, and disconnect all potential sources of...
Never use a longer cable, there is a possibility of heat. MIDI CABLES Use cables conforming to the switches, dropping or rough handling. ters and transceivers, and wireless microphone or intercom systems are all cables before moving the YMC10. Cables are no user-serviceable parts inside. HANDLING Avoid applying excessive force to the MIDI standard. CONNECTION Turn off all power before connecting the YMC10 to other equipment, and disconnect all potential sources of...
YMC10 Owners Manual Image
Page 4
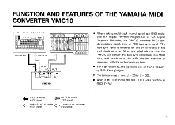
Please use other AC adaptors, problems may result. If you will differ according to the voltage in a safe place with the guarantee. 3 ELECTRICAL STORMS If there is a good idea to unplug the AC adaptor. • The AC adaptor will not be DC +12V. When you use the included... PA1 AC adaptor. BE CAREFUL OF THE AC CORD To avoid shorting or breaking the cord, when you have the correct one. KEEP THIS OWNERS MANUAL For future reference, keep its manual in your area. POWER SUPPLY The YMC10 power supply must be using it for a long time, it is danger of an electrical storm (lightening...
Please use other AC adaptors, problems may result. If you will differ according to the voltage in a safe place with the guarantee. 3 ELECTRICAL STORMS If there is a good idea to unplug the AC adaptor. • The AC adaptor will not be DC +12V. When you use the included... PA1 AC adaptor. BE CAREFUL OF THE AC CORD To avoid shorting or breaking the cord, when you have the correct one. KEEP THIS OWNERS MANUAL For future reference, keep its manual in your area. POWER SUPPLY The YMC10 power supply must be using it for a long time, it is danger of an electrical storm (lightening...
YMC10 Owners Manual Image
Page 5
... Recorder, the YMC10 converts MIDI synchronization signals into MIDI data, and synchronize the MIDI rhythm machine or sequencer with the performance on tape. • For high reliability, the tape sync uses an FSK (Frequency Shift Keying) signal. • The tempo range is recorded on one of the tracks of the multi-track recorder. This tape sync signal is from J = 25 to J = 300. • When in MIDI IN mode, the MIDI OUT jacks function...
... Recorder, the YMC10 converts MIDI synchronization signals into MIDI data, and synchronize the MIDI rhythm machine or sequencer with the performance on tape. • For high reliability, the tape sync uses an FSK (Frequency Shift Keying) signal. • The tempo range is recorded on one of the tracks of the multi-track recorder. This tape sync signal is from J = 25 to J = 300. • When in MIDI IN mode, the MIDI OUT jacks function...
YMC10 Owners Manual Image
Page 7
... MIDI IN mode, signals from this jack. OUT 1, 2 MIDI output jacks When the YMC10 is in MIDI IN mode, the two MIDI OUT jacks function as MIDI THRU jacks. 141MODE SELECT SWITCH This selects MIDI IN mode or TAPE IN mode. Use only the PA1 (B,C) AC adaptor. 6 I11POWER SWITCH This turns the unit on. (Check connections first.) 2 POWER INDICATOR When the power switch is on, the LED will convert them to MIDI start , continue, timing clock and stop signals. 5 TAPE SYNC JACKS Input and output jacks...
... MIDI IN mode, signals from this jack. OUT 1, 2 MIDI output jacks When the YMC10 is in MIDI IN mode, the two MIDI OUT jacks function as MIDI THRU jacks. 141MODE SELECT SWITCH This selects MIDI IN mode or TAPE IN mode. Use only the PA1 (B,C) AC adaptor. 6 I11POWER SWITCH This turns the unit on. (Check connections first.) 2 POWER INDICATOR When the power switch is on, the LED will convert them to MIDI start , continue, timing clock and stop signals. 5 TAPE SYNC JACKS Input and output jacks...
YMC10 Owners Manual Image
Page 8
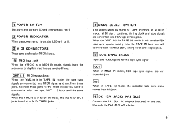
SYNCHRONIZE A TAPE WITH A RHYTHM MACHINE l5E96,1%. trg e® * OO I TAPE SYNC OUT IN MIDI MIDI OUT IN CH IN TAPE OUT MIDI IN MIDI OUT * O0O0 r YAMAHA Ten-TOS" -3 III III r- 1 =1MM IC=IR=1 Ed= ad=di i=did=i CZ= d • • Ldii..1IC= id==i 0=i C=1VII ff, 1 =lid= =I =I =I =I Doom. (=Dr to= r= 11_3=;} 1:;1.1= 7 HOW TO USE THE YMC10 1.
SYNCHRONIZE A TAPE WITH A RHYTHM MACHINE l5E96,1%. trg e® * OO I TAPE SYNC OUT IN MIDI MIDI OUT IN CH IN TAPE OUT MIDI IN MIDI OUT * O0O0 r YAMAHA Ten-TOS" -3 III III r- 1 =1MM IC=IR=1 Ed= ad=di i=did=i CZ= d • • Ldii..1IC= id==i 0=i C=1VII ff, 1 =lid= =I =I =I =I Doom. (=Dr to= r= 11_3=;} 1:;1.1= 7 HOW TO USE THE YMC10 1.
YMC10 Owners Manual Image
Page 9
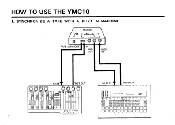
...Set the YMC10 mode switch to TAPE IN. 2 Set the RX7 sync to MIDI CLOCK. (See the RX7 owners manual.) Play the tape, and the RM7 will begin playing in MIDI IN mode, there will always be sure the recording level is over, it will change ...jack. RECORDING THE SYNC TRACK HI Connect a MIDI rhythm machine (such as the RX7) to the YMC10 and multi-track tape recorder (such as the MT100) as shown. 121 Set the YMC10 mode switch to MIDI IN. 3 Begin recording on the MT100 so that the MT100 level meter will read about OVU. • When in sync with the tape. (If you use the MT100 pitch control to change...
...Set the YMC10 mode switch to TAPE IN. 2 Set the RX7 sync to MIDI CLOCK. (See the RX7 owners manual.) Play the tape, and the RM7 will begin playing in MIDI IN mode, there will always be sure the recording level is over, it will change ...jack. RECORDING THE SYNC TRACK HI Connect a MIDI rhythm machine (such as the RX7) to the YMC10 and multi-track tape recorder (such as the MT100) as shown. 121 Set the YMC10 mode switch to MIDI IN. 3 Begin recording on the MT100 so that the MT100 level meter will read about OVU. • When in sync with the tape. (If you use the MT100 pitch control to change...
YMC10 Owners Manual Image
Page 10
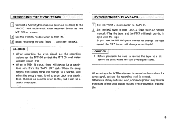
see the manuals of multitrack recording, Yamaha multitrack recorder MT100 and MIDI equipment. 2. MULTITRACK RECORDING WITH SYNCHRONIZED MIDI EQUIPMENT Here we will explain a multitrack recording system using the NOTE: For a detailed explanation of the MT100. RX7 OUT IN 2 track tape deck YMC10 tosI TAPE OUT MT100 12 3 4 O O i I I I I L Electric bass I Electric guitar Vocal mic MIDI signal Tape sync signal Audio signal 9
see the manuals of multitrack recording, Yamaha multitrack recorder MT100 and MIDI equipment. 2. MULTITRACK RECORDING WITH SYNCHRONIZED MIDI EQUIPMENT Here we will explain a multitrack recording system using the NOTE: For a detailed explanation of the MT100. RX7 OUT IN 2 track tape deck YMC10 tosI TAPE OUT MT100 12 3 4 O O i I I I I L Electric bass I Electric guitar Vocal mic MIDI signal Tape sync signal Audio signal 9
YMC10 Owners Manual Image
Page 11
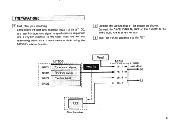
..., CH IN of the system as shown. TRK1 TRK2 TRK3 TRK4 MT100 Tape sync signal Rhythm guitar Electric bass Vocal YMC10 MIXER ch. 1 ch. 2 -, 2 track tape deck (R) ch. 3 (L) ch. 4 J RX7 1 j Synchronized 10 PREPARATIONS 1 First, plan your recording. Let's record the tape sync signal on a 2 track cassette deck, using the MT100's mixing function. 2 Connect the components of the MT100. 3 Input the rhythm patterns into the RX7.
..., CH IN of the system as shown. TRK1 TRK2 TRK3 TRK4 MT100 Tape sync signal Rhythm guitar Electric bass Vocal YMC10 MIXER ch. 1 ch. 2 -, 2 track tape deck (R) ch. 3 (L) ch. 4 J RX7 1 j Synchronized 10 PREPARATIONS 1 First, plan your recording. Let's record the tape sync signal on a 2 track cassette deck, using the MT100's mixing function. 2 Connect the components of the MT100. 3 Input the rhythm patterns into the RX7.
YMC10 Owners Manual Image
Page 12
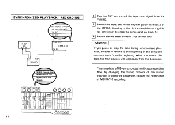
...-start the tape, the MIDI devices will start again from the beginning. This completes a MIDI-synchronized multi-track recording, Now, try changing the rhythm patterns of MIDI SYNC recording. 11 MT100, listening to the rhythm machine as a guide. (Be careful not to the beginning of the song and re-synchronize from the beginning. SYNCHRONIZED PLAYBACK • RECORDING RX7 MIDI OUT IN TR1 (P.B.) Tape sync signal...
...-start the tape, the MIDI devices will start again from the beginning. This completes a MIDI-synchronized multi-track recording, Now, try changing the rhythm patterns of MIDI SYNC recording. 11 MT100, listening to the rhythm machine as a guide. (Be careful not to the beginning of the song and re-synchronize from the beginning. SYNCHRONIZED PLAYBACK • RECORDING RX7 MIDI OUT IN TR1 (P.B.) Tape sync signal...
YMC10 Owners Manual Image
Page 13
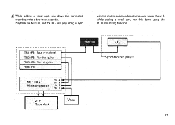
While adding a vocal part, mix this down the completed recording onto a two-track cassette. r TR1 (PB) Tape synC signal TR2 (PB) Rhythm guitar TR3 (PB) Electric guitar TR4 (PB) • RX7 - -Synchronized play along in sync with the rhythm guitar and electric bass on tracks 2 and 3. 14I While adding a vocal part, mix down using the MT100's mixing function. Playback the MT100, and the RX7 will play -a MT100's Mixing function ch. 4 ch. 3 ch. 2 ch. 1 2TR Tape deck Vocal 12
While adding a vocal part, mix this down the completed recording onto a two-track cassette. r TR1 (PB) Tape synC signal TR2 (PB) Rhythm guitar TR3 (PB) Electric guitar TR4 (PB) • RX7 - -Synchronized play along in sync with the rhythm guitar and electric bass on tracks 2 and 3. 14I While adding a vocal part, mix down using the MT100's mixing function. Playback the MT100, and the RX7 will play -a MT100's Mixing function ch. 4 ch. 3 ch. 2 ch. 1 2TR Tape deck Vocal 12
YMC10 Owners Manual Image
Page 14
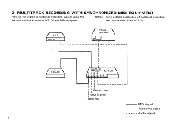
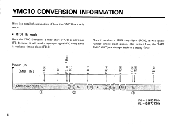
LL LI- 00 U 00 Li U 0-0" c`o- LL LL u.. (TAPE SYNC OUT) fL 13 fH L fH = 1.953KHz fL = 0.977KHz YMC10 CONVERSION INFORMATION Here is a detailed explanation of how the YMC10 actually works. • MIDI IN mode Once the YMC10 receives a MIDI start (FAH) or continue (FBH) signal, it will send a tape sync signal (fH) every time it receives a timing clock (F8H): Once it receives a MIDI stop signal (FCH), it will ignore further timing clock signals. (the output from the TAPE SYNC OUT jack changes back to a steady tone) LL Power ON O V (MIDI IN) 00 05 < o0 -
LL LI- 00 U 00 Li U 0-0" c`o- LL LL u.. (TAPE SYNC OUT) fL 13 fH L fH = 1.953KHz fL = 0.977KHz YMC10 CONVERSION INFORMATION Here is a detailed explanation of how the YMC10 actually works. • MIDI IN mode Once the YMC10 receives a MIDI start (FAH) or continue (FBH) signal, it will send a tape sync signal (fH) every time it receives a timing clock (F8H): Once it receives a MIDI stop signal (FCH), it will ignore further timing clock signals. (the output from the TAPE SYNC OUT jack changes back to a steady tone) LL Power ON O V (MIDI IN) 00 05 < o0 -
YMC10 Owners Manual Image
Page 15
... tape sync signals are received, it will send a MIDI timing clock (F8H). The YMC10 tape sync is not compatible with tape sync signals of synchronized playback, the MIDI sequencers and rhythm machines will start (FAH) and timing clock (F8H). Also, to ensure perfect synchronization, use the same YMC10 for recording and playback. 2 2 LL LL I 63.77rnsec 0 fH = 1.953KHz fL = O.977KHz 14 ■ TAPE SYNC IN mode When the YMC10 receives...
... tape sync signals are received, it will send a MIDI timing clock (F8H). The YMC10 tape sync is not compatible with tape sync signals of synchronized playback, the MIDI sequencers and rhythm machines will start (FAH) and timing clock (F8H). Also, to ensure perfect synchronization, use the same YMC10 for recording and playback. 2 2 LL LL I 63.77rnsec 0 fH = 1.953KHz fL = O.977KHz 14 ■ TAPE SYNC IN mode When the YMC10 receives...

YMC10 Owners Manual Image
Page 16
SPECIFICATIONS MIDI RECEIVE DATA START, CONTINUE TIMING CLOCK STOP TAPE SYNC OUT TAPE SYNC CLOCK (FSK SIGNAL): fH = 1.953KHz, fL = 0.977KHz OUTPUT LEVEL -10 dB (245 mV) TAPE SYNC IN MIDI TRANSMIT DATA TAPE SYNC CLOCK (FSK SIGNAL): INPUT LEVEL -20 dB (78 mV) ^ 0 dB (775 mV) START TIMING CLOCK STOP TEMPO RANGE Min. PA1 (B,C) 15 J = 25 Max. J = 300 SWITCHES POWER SWITCH ON/OFF (LED INDICATOR) MODE SWITCH MIDI MODE/TAPE SYNC IN MODE SWITCH INPUTJACKS MIDI TAPE SYNC DC (12V) IN x 1 OUT x 2 IN x 1 OUT x 1 IN x 1 DIMENSIONS (W x D x H) . . . . 190...
SPECIFICATIONS MIDI RECEIVE DATA START, CONTINUE TIMING CLOCK STOP TAPE SYNC OUT TAPE SYNC CLOCK (FSK SIGNAL): fH = 1.953KHz, fL = 0.977KHz OUTPUT LEVEL -10 dB (245 mV) TAPE SYNC IN MIDI TRANSMIT DATA TAPE SYNC CLOCK (FSK SIGNAL): INPUT LEVEL -20 dB (78 mV) ^ 0 dB (775 mV) START TIMING CLOCK STOP TEMPO RANGE Min. PA1 (B,C) 15 J = 25 Max. J = 300 SWITCHES POWER SWITCH ON/OFF (LED INDICATOR) MODE SWITCH MIDI MODE/TAPE SYNC IN MODE SWITCH INPUTJACKS MIDI TAPE SYNC DC (12V) IN x 1 OUT x 2 IN x 1 OUT x 1 IN x 1 DIMENSIONS (W x D x H) . . . . 190...
YMC10 Owners Manual Image
Page 17
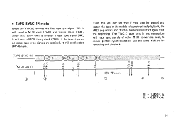
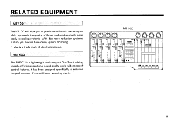
... and compact 6-in , you to enhance the performance of those produced on much more costly recording system's. MT100 -... . It has been designed specifically to produce multi-track master tapes which approach the quality of a small home recording studio. -. .. With dbx noise reduction systems built-in /2-out mixing console offering exceptional sound quality and a wide range of dbx Incorporated. W. .. , II .1 l'il...
... and compact 6-in , you to enhance the performance of those produced on much more costly recording system's. MT100 -... . It has been designed specifically to produce multi-track master tapes which approach the quality of a small home recording studio. -. .. With dbx noise reduction systems built-in /2-out mixing console offering exceptional sound quality and a wide range of dbx Incorporated. W. .. , II .1 l'il...
YMC10 Owners Manual Image
Page 19
YAMAHA YAMAHA CORPORATION PO.Box 1, Hamamatsu, Japan VD69540 88 08 R2 C) Printed in Japan
YAMAHA YAMAHA CORPORATION PO.Box 1, Hamamatsu, Japan VD69540 88 08 R2 C) Printed in Japan


