
Owners Manual
Page 1
UAB Home Theater Package (Subwoofer Integrated Receiver + Speaker) YHT-S401 (SR-301 + NS-BR301) Owner's Manual
UAB Home Theater Package (Subwoofer Integrated Receiver + Speaker) YHT-S401 (SR-301 + NS-BR301) Owner's Manual

Owners Manual
Page 2
IMPORTANT Please record the serial number of this apparatus during lightning storms or when unused for replacement of important operating and maintenance (servicing) instructions in the literature accompanying the appliance. Install in any heat sources such as power-supply cord or plug is intended to alert you to the presence of the obsolete outlet. 10 Protect the power cord from the apparatus. 11 Only use attachments/accessories specified by the manufacturer. 12 Use only with the cart, stand, tripod, bracket, or table specified by the manufacturer, or sold with the apparatus. ...
IMPORTANT Please record the serial number of this apparatus during lightning storms or when unused for replacement of important operating and maintenance (servicing) instructions in the literature accompanying the appliance. Install in any heat sources such as power-supply cord or plug is intended to alert you to the presence of the obsolete outlet. 10 Protect the power cord from the apparatus. 11 Only use attachments/accessories specified by the manufacturer. 12 Use only with the cart, stand, tripod, bracket, or table specified by the manufacturer, or sold with the apparatus. ...
Owners Manual
Page 3
..., please contact the local retailer authorized to distribute this product in a residential environment will not occur in is too late, Yamaha and the Electronic Industries Association's Consumer Electronics Group recommend you to the operation of interference, which can not locate the appropriate retailer, ... distributed by playing it is 300 ohm ribbon lead, change the lead-in to be used. We Want You Listening For A Lifetime Yamaha and the Electronic Industries Association's Consumer Electronics Group want you can be determined by turning the unit "OFF" and "ON", please try...
..., please contact the local retailer authorized to distribute this product in a residential environment will not occur in is too late, Yamaha and the Electronic Industries Association's Consumer Electronics Group recommend you to the operation of interference, which can not locate the appropriate retailer, ... distributed by playing it is 300 ohm ribbon lead, change the lead-in to be used. We Want You Listening For A Lifetime Yamaha and the Electronic Industries Association's Consumer Electronics Group want you can be determined by turning the unit "OFF" and "ON", please try...
Owners Manual
Page 4
...On the top of this unit must be exposed to the AC wall outlet, it is not disconnected from the wall outlet, grasp the plug; Yamaha shall not be exposed to consume a very small quantity of power. ■ Special Instructions for future reference. 2 Install this unit by improper ...temperature inside this unit, which is connected to a wall outlet until all connections are not suitable for any service is needed. Contact qualified Yamaha service personnel when any damage resulting from use force on the surface of this might cause personal injury and/or damage to this unit,...
...On the top of this unit must be exposed to the AC wall outlet, it is not disconnected from the wall outlet, grasp the plug; Yamaha shall not be exposed to consume a very small quantity of power. ■ Special Instructions for future reference. 2 Install this unit by improper ...temperature inside this unit, which is connected to a wall outlet until all connections are not suitable for any service is needed. Contact qualified Yamaha service personnel when any damage resulting from use force on the surface of this might cause personal injury and/or damage to this unit,...
Owners Manual
Page 5
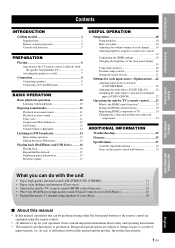
INTRODUCTION PREPARATION BASIC OPERATION Contents INTRODUCTION Getting started 2 Supplied parts 2 Remote control preparation 2 Controls and functions 3 PREPARATION Placing 6 Operation by the TV remote control is difficult (with the speaker beneath/under TV 6 Attaching the speaker to a wall 7 Connection 8 Connecting speakers 8 Connecting a TV and BD player 9 BASIC OPERATION Basic playback operation 10 Listening with headphones 10 Enjoying sound modes 11 Playback in surround sound 11 Playback in stereo sound 11 Clear voice 11 Compressed Music Enhancer 12 UniVolume 12 ...
INTRODUCTION PREPARATION BASIC OPERATION Contents INTRODUCTION Getting started 2 Supplied parts 2 Remote control preparation 2 Controls and functions 3 PREPARATION Placing 6 Operation by the TV remote control is difficult (with the speaker beneath/under TV 6 Attaching the speaker to a wall 7 Connection 8 Connecting speakers 8 Connecting a TV and BD player 9 BASIC OPERATION Basic playback operation 10 Listening with headphones 10 Enjoying sound modes 11 Playback in surround sound 11 Playback in stereo sound 11 Clear voice 11 Compressed Music Enhancer 12 UniVolume 12 ...

Owners Manual
Page 6
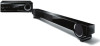
INTRODUCTION Getting started Supplied parts This product consists of the following items. Before making connections, make sure you have received all of the following items. ■ Units Subwoofer Integrated Receiver (SR-301) Speaker (NS-BR301) ■ Accessories Speaker cable × 1 (3 m) Remote control × 1 Indoor FM antenna × 1 (U.S.A., Canada, Taiwan, (U.K., Europe, Russia, China and Asia models) Australia and Korea models) TV remote signal receptor × 1 Battery × 2 (AAA, R03, UM4) Mounting template × 1 Owner's Manual × 1 Remote control ...
INTRODUCTION Getting started Supplied parts This product consists of the following items. Before making connections, make sure you have received all of the following items. ■ Units Subwoofer Integrated Receiver (SR-301) Speaker (NS-BR301) ■ Accessories Speaker cable × 1 (3 m) Remote control × 1 Indoor FM antenna × 1 (U.S.A., Canada, Taiwan, (U.K., Europe, Russia, China and Asia models) Australia and Korea models) TV remote signal receptor × 1 Battery × 2 (AAA, R03, UM4) Mounting template × 1 Owner's Manual × 1 Remote control ...
Owners Manual
Page 7
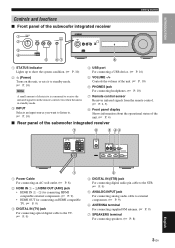
INTRODUCTION Controls and functions ■ Front panel of the subwoofer integrated receiver Getting started 1 2 3 4 5 67 8 1 STATUS indicator Lights up to show the system condition. (☞ P. 10) 4 USB port For connecting a USB device. (☞ P. 16) 2 (Power) Turns on the unit, or sets it to standby mode. (☞ P. 10) Note 5 VOLUME -/+ Controls the volume of the unit. (☞ P. 10) 6 PHONES jack For connecting headphones. (☞ P. 10) A small amount of electricity is consumed to receive the infrared signal from the remote control even when the unit is in standby mode. ...
INTRODUCTION Controls and functions ■ Front panel of the subwoofer integrated receiver Getting started 1 2 3 4 5 67 8 1 STATUS indicator Lights up to show the system condition. (☞ P. 10) 4 USB port For connecting a USB device. (☞ P. 16) 2 (Power) Turns on the unit, or sets it to standby mode. (☞ P. 10) Note 5 VOLUME -/+ Controls the volume of the unit. (☞ P. 10) 6 PHONES jack For connecting headphones. (☞ P. 10) A small amount of electricity is consumed to receive the infrared signal from the remote control even when the unit is in standby mode. ...
Owners Manual
Page 8
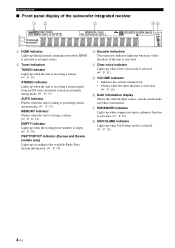
Getting started ■ Front panel display of the subwoofer integrated receiver 12 3 45 8 7 6 1 HDMI indicator Lights up during normal communication when HDMI is selected as an input source. 2 Tuner indicators TUNED indicator Lights up when the unit is receiving a station. (☞ P. 13) STEREO indicator Lights up when the unit is receiving a strong signal from an FM stereo broadcast station in automatic tuning mode. (☞ P. 13) AUTO indicator Flashes when the unit is tuning or presetting station automatically. (☞ P. 13) MEMORY indicator Flashes when the unit is storing a ...
Getting started ■ Front panel display of the subwoofer integrated receiver 12 3 45 8 7 6 1 HDMI indicator Lights up during normal communication when HDMI is selected as an input source. 2 Tuner indicators TUNED indicator Lights up when the unit is receiving a station. (☞ P. 13) STEREO indicator Lights up when the unit is receiving a strong signal from an FM stereo broadcast station in automatic tuning mode. (☞ P. 13) AUTO indicator Flashes when the unit is tuning or presetting station automatically. (☞ P. 13) MEMORY indicator Flashes when the unit is storing a ...
Owners Manual
Page 9
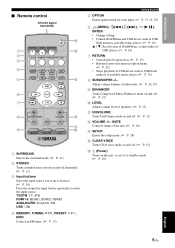
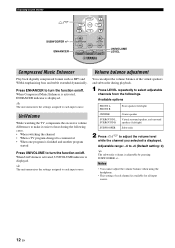
Adjust volume balance of subwoofer. (☞ P. 10, 19) 9 ENHANCER Turns Compressed Music Enhancer mode on and off. (☞ P. 12) 0 LEVEL Adjusts output level of speakers. (☞ P. 12) A UNIVOLUME Turns UniVolume mode on and off alternately. (☞ P. 11) 3 Input buttons Select the input source you want to listen to. (☞ P. 10) Press the respective input button repeatedly to select the input source. TV/STB: TV, STB HDMI1-3: HDMI1, HDMI2, HDMI3 ANALOG/FM: ANALOG, FM USB: USB 4 MEMORY, TUNING / , PRESET / , INFO Control an FM tuner. (☞ P. 13) Getting started 5 OPTION ...
Adjust volume balance of subwoofer. (☞ P. 10, 19) 9 ENHANCER Turns Compressed Music Enhancer mode on and off. (☞ P. 12) 0 LEVEL Adjusts output level of speakers. (☞ P. 12) A UNIVOLUME Turns UniVolume mode on and off alternately. (☞ P. 11) 3 Input buttons Select the input source you want to listen to. (☞ P. 10) Press the respective input button repeatedly to select the input source. TV/STB: TV, STB HDMI1-3: HDMI1, HDMI2, HDMI3 ANALOG/FM: ANALOG, FM USB: USB 4 MEMORY, TUNING / , PRESET / , INFO Control an FM tuner. (☞ P. 13) Getting started 5 OPTION ...
Owners Manual
Page 10
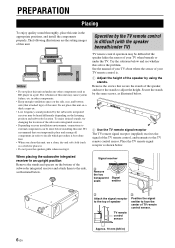
The vibration of this unit may be difficult if the speaker hides the sensor of the subwoofer integrated receiver. • Depending on your TV when beneath or under any other components. • Keep enough ventilation space on the side, rear, and bottom side (that you clean this unit, use a clean, dry and soft cloth (such as a cloth for glasses). • Do not press the speaker grille when moving it. Try the solutions below . Notes • Do not place this unit on the bottom of speaker TV remote control sensor 2 Position the signal emitter to adjust the height. in...
The vibration of this unit may be difficult if the speaker hides the sensor of the subwoofer integrated receiver. • Depending on your TV when beneath or under any other components. • Keep enough ventilation space on the side, rear, and bottom side (that you clean this unit, use a clean, dry and soft cloth (such as a cloth for glasses). • Do not press the speaker grille when moving it. Try the solutions below . Notes • Do not place this unit on the bottom of speaker TV remote control sensor 2 Position the signal emitter to adjust the height. in...
Owners Manual
Page 11
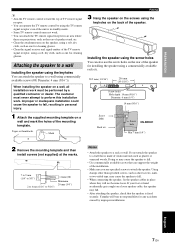
... fall . • When connecting the speaker, fix the speaker cables in place where they will bear no responsibility for any accidents caused by improper installations. Yamaha will not become loose. Attaching the speaker to perform this installation work.
... fall . • When connecting the speaker, fix the speaker cables in place where they will bear no responsibility for any accidents caused by improper installations. Yamaha will not become loose. Attaching the speaker to perform this installation work.
Owners Manual
Page 12
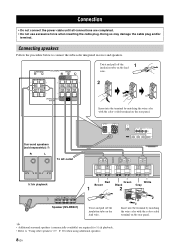
Connection • Do not connect the power cable until all connections are required for 5.1ch playback. • Refer to connect the subwoofer integrated receiver and speakers. Doing so may damage the cable plug and/or terminal. Surround speakers (sold separately) y R L To AC outlet 5.1ch playback Red Green White Brown Black Gray Speaker (NS-BR301) Twist and pull off the insulation tube on the lead wire. Twist and pull off the insulation tube on the lead wire. y • Additional surround speakers (commercially available) are completed. • Do not use excessive ...
Connection • Do not connect the power cable until all connections are required for 5.1ch playback. • Refer to connect the subwoofer integrated receiver and speakers. Doing so may damage the cable plug and/or terminal. Surround speakers (sold separately) y R L To AC outlet 5.1ch playback Red Green White Brown Black Gray Speaker (NS-BR301) Twist and pull off the insulation tube on the lead wire. Twist and pull off the insulation tube on the lead wire. y • Additional surround speakers (commercially available) are completed. • Do not use excessive ...
Owners Manual
Page 13
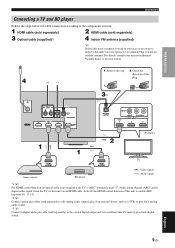
... Video signals Audio signals *1 y For HDMI control function, an optical cable is not required if the TV's "ARC" terminal is weak in your nearest authorized Yamaha dealer or Service Center. 4 *2 *3 1 Remove the cap 2 Check the direction of this unit via an HDMI cable. For details, consult your area or you want...
... Video signals Audio signals *1 y For HDMI control function, an optical cable is not required if the TV's "ARC" terminal is weak in your nearest authorized Yamaha dealer or Service Center. 4 *2 *3 1 Remove the cap 2 Check the direction of this unit via an HDMI cable. For details, consult your area or you want...
Owners Manual
Page 14
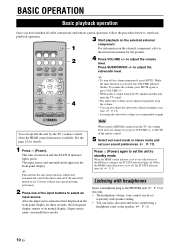
Press SUBWOOFER +/- This unit is activated, the VOLUME indicator flashes. When the HDMI control function is set the unit to adjust the volume level. To resume the volume, press MUTE again or press VOLUME +/-. • When audio is left turned on for three seconds, the front panel display returns to its normal display. (Input source name: surround/stereo mode). y This unit has the auto-sleep function, which will automatically switch the unit to turn off . (☞ P. 3) Listening with speaker setting. • You can be set to off, the STATUS indicator turns...
Press SUBWOOFER +/- This unit is activated, the VOLUME indicator flashes. When the HDMI control function is set the unit to adjust the volume level. To resume the volume, press MUTE again or press VOLUME +/-. • When audio is left turned on for three seconds, the front panel display returns to its normal display. (Input source name: surround/stereo mode). y This unit has the auto-sleep function, which will automatically switch the unit to turn off . (☞ P. 3) Listening with speaker setting. • You can be set to off, the STATUS indicator turns...
Owners Manual
Page 15
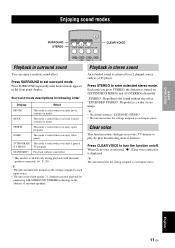
"EXTENDED STEREO": Reproduces a wider stereo image. Press CLEAR VOICE to set surround mode. BASIC OPERATION Enjoying sound modes SURROUND STEREO CLEAR VOICE Playback in the front panel display. Press SURROUND to turn the function on (EXTENDED STEREO) and off . Press SURROUND repeatedly until desired mode appears in surround sound You can enjoy a realistic sound effect. SPORTS This mode is useful when you enjoy sports programs. GAME This mode is useful when you press STEREO, the function is useful when you enjoy a general (TV PROG) TV program. Press STEREO to each ...
"EXTENDED STEREO": Reproduces a wider stereo image. Press CLEAR VOICE to set surround mode. BASIC OPERATION Enjoying sound modes SURROUND STEREO CLEAR VOICE Playback in the front panel display. Press SURROUND to turn the function on (EXTENDED STEREO) and off . Press SURROUND repeatedly until desired mode appears in surround sound You can enjoy a realistic sound effect. SPORTS This mode is useful when you enjoy sports programs. GAME This mode is useful when you press STEREO, the function is useful when you enjoy a general (TV PROG) TV program. Press STEREO to each ...
Owners Manual
Page 16
Available options FRONT L, FRONT R CENTER SURROUND L, SURROUND R SUBWOOFER Front speaker (left/right) Center speaker Virtual surround speaker, and surround speakers (left/right) Subwoofer 2 Press / to each input source. y The unit memorizes the settings assigned to adjust the volume level while the channel you selected is finished and another program started Press UNIVOLUME to turn the function on /off . You can adjust the volume balance of each input source. ENHANCER UNIVOLUME LEVEL Compressed Music Enhancer Volume balance adjustment Play back digitally compressed ...
Available options FRONT L, FRONT R CENTER SURROUND L, SURROUND R SUBWOOFER Front speaker (left/right) Center speaker Virtual surround speaker, and surround speakers (left/right) Subwoofer 2 Press / to each input source. y The unit memorizes the settings assigned to adjust the volume level while the channel you selected is finished and another program started Press UNIVOLUME to turn the function on /off . You can adjust the volume balance of each input source. ENHANCER UNIVOLUME LEVEL Compressed Music Enhancer Volume balance adjustment Play back digitally compressed ...
Owners Manual
Page 17
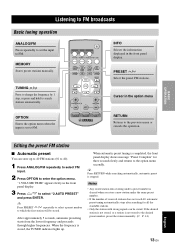
Cursor in the option menu OPTION Enters the option menu when the input is completed, the front panel display shows message "Preset Complete" for all the available stations. • Only the station with strong signals can store up . "1.VOLUME TRIM" appears firstly in the front panel display. MEMORY Stores preset stations manually. PRESET / Select the preset FM stations. RETURN Returns to FM. After approximately 5 seconds, automatic presetting starts from the lowest frequency and proceeds through higher frequencies. Listening to FM broadcasts Basic tuning operation ANALOG/FM ...
Cursor in the option menu OPTION Enters the option menu when the input is completed, the front panel display shows message "Preset Complete" for all the available stations. • Only the station with strong signals can store up . "1.VOLUME TRIM" appears firstly in the front panel display. MEMORY Stores preset stations manually. PRESET / Select the preset FM stations. RETURN Returns to FM. After approximately 5 seconds, automatic presetting starts from the lowest frequency and proceeds through higher frequencies. Listening to FM broadcasts Basic tuning operation ANALOG/FM ...

Owners Manual
Page 18
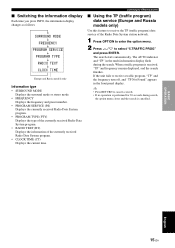
Preset number and the frequency appears in the front panel display, followed soon by the preset number to which no station is too weak, set the reception mode to "MONO" to increase signal quality. 1 Press OPTION to enter the option menu. 2 Display "4.STEREO/MONO" by using / and press ENTER. To clear the registration of the preset number. "MANUAL PRESET" appears in the front panel display. y To cancel registration, press RETURN on the remote control. 3 Select the preset number of the registered station you want to clear using and press ENTER. 3 Select "MONO" to set the...
Preset number and the frequency appears in the front panel display, followed soon by the preset number to which no station is too weak, set the reception mode to "MONO" to increase signal quality. 1 Press OPTION to enter the option menu. 2 Display "4.STEREO/MONO" by using / and press ENTER. To clear the registration of the preset number. "MANUAL PRESET" appears in the front panel display. y To cancel registration, press RETURN on the remote control. 3 Select the preset number of the registered station you want to clear using and press ENTER. 3 Select "MONO" to set the...
Owners Manual
Page 19
If the unit fails to select "5.TRAFFIC PROG" and press ENTER. BASIC OPERATION English 15 En Listening to FM broadcasts ■ Using the TP (traffic program) data service (Europe and Russia models only) Use this feature to receive the TP (traffic program) data service of the currently received Radio Data System program. • CLOCK TIME (CT) Displays the current time. The search starts automatically. When a traffic program is cancelled. The AUTO indicator and "TP" in the front panel display. y • Press RETURN to cancel a search. • If no operation is performed...
If the unit fails to select "5.TRAFFIC PROG" and press ENTER. BASIC OPERATION English 15 En Listening to FM broadcasts ■ Using the TP (traffic program) data service (Europe and Russia models only) Use this feature to receive the TP (traffic program) data service of the currently received Radio Data System program. • CLOCK TIME (CT) Displays the current time. The search starts automatically. When a traffic program is cancelled. The AUTO indicator and "TP" in the front panel display. y • Press RETURN to cancel a search. • If no operation is performed...

Owners Manual
Page 20
iPod/iPhone USB device : play/pause : skip forward (press and hold: fast-forward) : skip backward (press and hold : fast-rewind) RETURN: stop FOLDER ▲/▼: skip the folder*2 *1 Resumes playing the music last played back (resume playback) *2 The folder name appears in the front panel display for iPod/iPhone and USB device" section in the front panel display, see the "Messages for three seconds when skipped. Supported iPod/iPhone iPod classic iPod nano (3rd Generation to 6th Generation) iPod touch iPhone iPhone 3G iPhone 3GS iPhone 4 y • Some features may not be...
iPod/iPhone USB device : play/pause : skip forward (press and hold: fast-forward) : skip backward (press and hold : fast-rewind) RETURN: stop FOLDER ▲/▼: skip the folder*2 *1 Resumes playing the music last played back (resume playback) *2 The folder name appears in the front panel display for iPod/iPhone and USB device" section in the front panel display, see the "Messages for three seconds when skipped. Supported iPod/iPhone iPod classic iPod nano (3rd Generation to 6th Generation) iPod touch iPhone iPhone 3G iPhone 3GS iPhone 4 y • Some features may not be...
