Owners Manual
Page 3
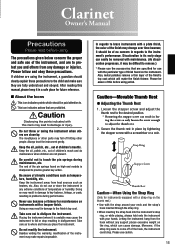
... with a screwdriver or a coin. Caution-Movable Thumb Rest l Adjusting the Thumb Rest 1. Strap Ring Stopper Screw Thumb Rest Caution-When Using the Strap Ring (Only for future reference. ■ About the Icons : This icon indicates points which will make the finish thinner. Moreover... performance. Besides voiding the warranty, modification of temperature or humidity. Be careful not to . : This icon indicates actions that are using the instrument, a guardian should clearly explain these precautions. The end of the hook, the instrument could drop. In regards to fall...
... with a screwdriver or a coin. Caution-Movable Thumb Rest l Adjusting the Thumb Rest 1. Strap Ring Stopper Screw Thumb Rest Caution-When Using the Strap Ring (Only for future reference. ■ About the Icons : This icon indicates points which will make the finish thinner. Moreover... performance. Besides voiding the warranty, modification of temperature or humidity. Be careful not to . : This icon indicates actions that are using the instrument, a guardian should clearly explain these precautions. The end of the hook, the instrument could drop. In regards to fall...
Owners Manual
Page 4
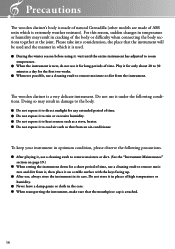
...of the body or difficulty when connecting the body sections together at the joint. Doing so may result in which is used. ● During the winter season before using it. Precautions The wooden clarinet's body is made of natural Grenadilla (other models are made of ABS resin which ...stove, heater. ● Do not expose it to 30 minutes a day for the first two weeks. ● Whenever possible, use it under the following precautions. ● After playing it, use a cleaning swab to remove moisture or dirt. (See the "Instrument Maintenance" section on page 19.) ● When setting the...
...of the body or difficulty when connecting the body sections together at the joint. Doing so may result in which is used. ● During the winter season before using it. Precautions The wooden clarinet's body is made of natural Grenadilla (other models are made of ABS resin which ...stove, heater. ● Do not expose it to 30 minutes a day for the first two weeks. ● Whenever possible, use it under the following precautions. ● After playing it, use a cleaning swab to remove moisture or dirt. (See the "Instrument Maintenance" section on page 19.) ● When setting the...
Owners Manual
Page 7
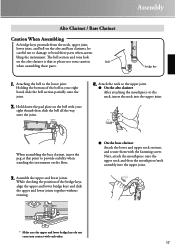
... lower and upper neck sections and secure them with each other. 17 Hold down the pad plate on the alto clarinet is thin so please use extra caution Bell when assembling these parts when assem- The bell section and tone hole on the bell with your right hand, slide the bell...
... lower and upper neck sections and secure them with each other. 17 Hold down the pad plate on the alto clarinet is thin so please use extra caution Bell when assembling these parts when assem- The bell section and tone hole on the bell with your right hand, slide the bell...
Owners Manual
Page 8
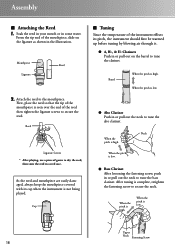
Assembly ■ Attaching the Reed 1. Reed Ligature Screws * After playing, use a piece of the reed then tighten the ligature screws to secure the reed. Mouthpiece Reed Ligature 2. When the pitch is high. Neck ● Bass Clarinet ...
Assembly ■ Attaching the Reed 1. Reed Ligature Screws * After playing, use a piece of the reed then tighten the ligature screws to secure the reed. Mouthpiece Reed Ligature 2. When the pitch is high. Neck ● Bass Clarinet ...
Owners Manual
Page 9
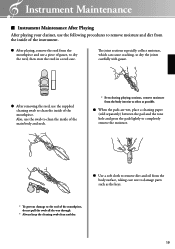
... sections especially collect moisture, which can cause cracking, so dry the joints carefully with gauze. ● After removing the reed, use the supplied cleaning swab to clean the inside of the mouthpiece. Instrument Maintenance ■ Instrument Maintenance After Playing After playing your clarinet..., use the following procedures to remove moisture and dirt from the inside of the instrument. ● After playing, remove the reed ...
... sections especially collect moisture, which can cause cracking, so dry the joints carefully with gauze. ● After removing the reed, use the supplied cleaning swab to clean the inside of the mouthpiece. Instrument Maintenance ■ Instrument Maintenance After Playing After playing your clarinet..., use the following procedures to remove moisture and dirt from the inside of the instrument. ● After playing, remove the reed ...
Owners Manual
Page 10
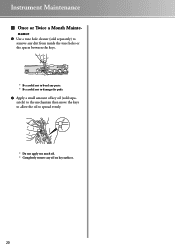
Instrument Maintenance ■ Once or Twice a Month Maintenance ● Use a tone hole cleaner (sold separately) to remove any dirt from inside the tone holes or the spaces between the keys. * Be careful not to bend any parts. * Be careful not to damage the pads. ● Apply a small amount of key oil (sold separately) to the mechanism then move the keys to allow the oil to spread evenly. * Do not apply too much oil. * Completely remove any oil on key surfaces. 20
Instrument Maintenance ■ Once or Twice a Month Maintenance ● Use a tone hole cleaner (sold separately) to remove any dirt from inside the tone holes or the spaces between the keys. * Be careful not to bend any parts. * Be careful not to damage the pads. ● Apply a small amount of key oil (sold separately) to the mechanism then move the keys to allow the oil to spread evenly. * Do not apply too much oil. * Completely remove any oil on key surfaces. 20
Owners Manual
Page 11
Do not directly expose the instrument to the joint cork. Please use caution. Also, when you store the instrument in temperature or humidity can cause cracking. If the joint is tight, apply a small amount of the instrument ...
Do not directly expose the instrument to the joint cork. Please use caution. Also, when you store the instrument in temperature or humidity can cause cracking. If the joint is tight, apply a small amount of the instrument ...
