

SPX2000 Owners Manual
Page 2
...performance of a TV, radio, stereo equipment, mobile phone, or other electric devices. Consult qualifi ed Yamaha service personnel about replacing defective components. (5)-1 2 SPX2000-Owner's Manual The required voltage is not to be held responsible for extended periods of panel disfiguration ...place the power cord near water or in any gaps or openings on the buttons, switches or connectors. Yamaha cannot be used for damage caused by qualified Yamaha service personnel. PRECAUTIONS PLEASE READ CAREFULLY BEFORE PROCEEDING * Please keep this manual in a safe place for...
...performance of a TV, radio, stereo equipment, mobile phone, or other electric devices. Consult qualifi ed Yamaha service personnel about replacing defective components. (5)-1 2 SPX2000-Owner's Manual The required voltage is not to be held responsible for extended periods of panel disfiguration ...place the power cord near water or in any gaps or openings on the buttons, switches or connectors. Yamaha cannot be used for damage caused by qualified Yamaha service personnel. PRECAUTIONS PLEASE READ CAREFULLY BEFORE PROCEEDING * Please keep this manual in a safe place for...
SPX2000 Owners Manual
Page 3
... Gooi de batterij niet weg, maar lever hem in the users manual, may void your use only high quality shielded cables. The wire which is being affected by YAMAHA CORPORATION OF AMERICA. (class B) IMPORTANT NOTICE FOR THE UNITED KINGDOM Connecting the Plug and...- VARNING Explosionsfara vid felaktigt batteribyte. Hävitä käytetty paristo valmistajan ohjeiden mukaisesti. (lithium caution) (lithium disposal) (5)-1 SPX2000-Owner's Manual 3 Utilize power outlets that may not cause harmful interference, and 2) this manual, meets FCC requirements. If the antenna ...
... Gooi de batterij niet weg, maar lever hem in the users manual, may void your use only high quality shielded cables. The wire which is being affected by YAMAHA CORPORATION OF AMERICA. (class B) IMPORTANT NOTICE FOR THE UNITED KINGDOM Connecting the Plug and...- VARNING Explosionsfara vid felaktigt batteribyte. Hävitä käytetty paristo valmistajan ohjeiden mukaisesti. (lithium caution) (lithium disposal) (5)-1 SPX2000-Owner's Manual 3 Utilize power outlets that may not cause harmful interference, and 2) this manual, meets FCC requirements. If the antenna ...

SPX2000 Owners Manual
Page 4
... the apparatus, the apparatus has been exposed to rain or moisture, does not operate normally, or has been dropped. (5)-1 4 SPX2000-Owner's Manual CAUTIONS: • This unit is required when the apparatus has been damaged in the literature accompanying the product. The above...these instructions. 3 Heed all warnings. 4 Follow all instructions. 5 Do not use attachments/accessories specified by the manufacturer. 12 Use only with the cart, stand, tripod, bracket, or table specified by YAMAHA CORPORATION OF AMERICA. (Perchlorate) CAUTION RISK OF ELECTRIC SHOCK DO NOT OPEN ...
... the apparatus, the apparatus has been exposed to rain or moisture, does not operate normally, or has been dropped. (5)-1 4 SPX2000-Owner's Manual CAUTIONS: • This unit is required when the apparatus has been damaged in the literature accompanying the product. The above...these instructions. 3 Heed all warnings. 4 Follow all instructions. 5 Do not use attachments/accessories specified by the manufacturer. 12 Use only with the cart, stand, tripod, bracket, or table specified by YAMAHA CORPORATION OF AMERICA. (Perchlorate) CAUTION RISK OF ELECTRIC SHOCK DO NOT OPEN ...
SPX2000 Owners Manual
Page 5
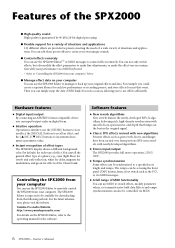
... actual specifications. • Company names and product names appearing in this manual are the trademarks or registered trademarks of the SPX2000 6 Parts and their respective owners. SPX2000-Owner's Manual 5 Table of contents Features of their functions 7 Front panel 7 Rear panel 9 Operation 10 Basic operation ... 38 Modulation 47 Pitch Change 61 Composite effects 66 Freeze 77 Other effects 82 MIDI 88 Preparations for using MIDI 88 What you can do using MIDI 88 MIDI data format 89 MIDI Control Change Parameter Assignment Table 95 Error message list 97 Troubleshooting ...
... actual specifications. • Company names and product names appearing in this manual are the trademarks or registered trademarks of the SPX2000 6 Parts and their respective owners. SPX2000-Owner's Manual 5 Table of contents Features of their functions 7 Front panel 7 Rear panel 9 Operation 10 Basic operation ... 38 Modulation 47 Pitch Change 61 Composite effects 66 Freeze 77 Other effects 82 MIDI 88 Preparations for using MIDI 88 What you can do using MIDI 88 MIDI data format 89 MIDI Control Change Parameter Assignment Table 95 Error message list 97 Troubleshooting ...
SPX2000 Owners Manual
Page 6
You can use the SPX2000 Editor(*) or MIDI messages to control effects remotely. Then you can also be synchronized to a specified note length and tempo. The SPX2000 Editor is intuitive; Yamaha Pro Audio Website: http://www.yamahaproaudio.com/ For details on the SPX2000 Editor, refer ..., high-density reverberation with smooth decay, spaciousness, and depth that event. You can use the SPX2000 Editor to manage or back up your original effects and data. The tempo can be set using the front panel [TAP] button, from previous SPX-series models, with newly developed ...
You can use the SPX2000 Editor(*) or MIDI messages to control effects remotely. Then you can also be synchronized to a specified note length and tempo. The SPX2000 Editor is intuitive; Yamaha Pro Audio Website: http://www.yamahaproaudio.com/ For details on the SPX2000 Editor, refer ..., high-density reverberation with smooth decay, spaciousness, and depth that event. You can use the SPX2000 Editor to manage or back up your original effects and data. The tempo can be set using the front panel [TAP] button, from previous SPX-series models, with newly developed ...

SPX2000 Owners Manual
Page 7
...] button This button recalls the selected effect. G [▲ INC]/[▼ DEC] buttons Use these buttons to select the input source. 6 [CLOCK] indicator This indicates the currently selected word clock source. SPX2000-Owner's Manual 7 The indicator will light if the [UNDO] button is different than the... 4 [METER] button/indicator This button selects either pre-effect or post-effect as the signal whose level will light when the SPX2000 receives MIDI data. 8 [kHz] indicator This indicates the currently-operating word clock frequency. 9 Display This displays information about the currently...
...] button This button recalls the selected effect. G [▲ INC]/[▼ DEC] buttons Use these buttons to select the input source. 6 [CLOCK] indicator This indicates the currently selected word clock source. SPX2000-Owner's Manual 7 The indicator will light if the [UNDO] button is different than the... 4 [METER] button/indicator This button selects either pre-effect or post-effect as the signal whose level will light when the SPX2000 receives MIDI data. 8 [kHz] indicator This indicates the currently-operating word clock frequency. 9 Display This displays information about the currently...

SPX2000 Owners Manual
Page 8
... [BANK] button (A) • [STORE] button (B buttons (C) • [RECALL] button (D) • [UNDO] button (E) • [COMPARE] button (I [COMPARE] button/LED Use this button twice or more, the tempo value will light. P [POWER ON/OFF] button This button turns the power of the tempo value. If you...when you edit a parameter after editing. The FINE parameters supplement the basic parameters. L [UTILITY] button/LED This button selects the SPX2000's utility functions. NOTE: The following buttons will be calculated from the output jacks without modification. NOTE: The [BYPASS] ...
... [BANK] button (A) • [STORE] button (B buttons (C) • [RECALL] button (D) • [UNDO] button (E) • [COMPARE] button (I [COMPARE] button/LED Use this button twice or more, the tempo value will light. P [POWER ON/OFF] button This button turns the power of the tempo value. If you...when you edit a parameter after editing. The FINE parameters supplement the basic parameters. L [UTILITY] button/LED This button selects the SPX2000's utility functions. NOTE: The following buttons will be calculated from the output jacks without modification. NOTE: The [BYPASS] ...
SPX2000 Owners Manual
Page 9
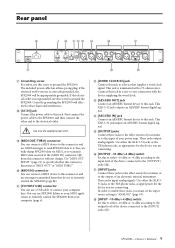
... to either the XLR-3-32 jacks or the TRS phone jacks, as appropriate for the device you are connecting. Connect this connector and use SPX2000 Editor or your power amp. These jacks output analog signals. if the electrical outlet you must set the input source setting to "ANALOG" (page... clock signal. These jacks input analog signals. If the electrical outlet is terminated with the device supplying the word clock. You can use MIDI messages to send SPX2000 data to this to either the XLR-331 jacks or the TRS phone jacks, as appropriate for the device you are connecting. X...
... to either the XLR-3-32 jacks or the TRS phone jacks, as appropriate for the device you are connecting. Connect this connector and use SPX2000 Editor or your power amp. These jacks output analog signals. if the electrical outlet you must set the input source setting to "ANALOG" (page... clock signal. These jacks input analog signals. If the electrical outlet is terminated with the device supplying the word clock. You can use MIDI messages to send SPX2000 data to this to either the XLR-331 jacks or the TRS phone jacks, as appropriate for the device you are connecting. X...

SPX2000 Owners Manual
Page 10
... on your device to the [AES/EBU OUT] jack (W). Related items • Selecting the word clock source page 18 • Using your computer to control the SPX2000 page 6 • Using MIDI messages to control the SPX2000 page 88 Turn the power on Here's how to turn on the power of devices connected to the...
... on your device to the [AES/EBU OUT] jack (W). Related items • Selecting the word clock source page 18 • Using your computer to control the SPX2000 page 6 • Using MIDI messages to control the SPX2000 page 88 Turn the power on Here's how to turn on the power of devices connected to the...

SPX2000 Owners Manual
Page 11
...controls the R channel. Select monaural or stereo input Use the [INPUT MODE] button (3) to select either monaural input or stereo input. Use "CLOCK SOURCE" (page 18) to adjust the analog input signal levels (L/R); If you are using the SPX2000's internal clock, you recall. Each time you press...(6): This indicates the word clock source. You will change input sources, use "CLOCK SOURCE" (page 18) to be received at the [AES/EBU IN] jack (X) The SPX2000 will operate as the clock master. Adjust the input level Use the [INPUT L R] control (1) to select the word clock source....
...controls the R channel. Select monaural or stereo input Use the [INPUT MODE] button (3) to select either monaural input or stereo input. Use "CLOCK SOURCE" (page 18) to adjust the analog input signal levels (L/R); If you are using the SPX2000's internal clock, you recall. Each time you press...(6): This indicates the word clock source. You will change input sources, use "CLOCK SOURCE" (page 18) to be received at the [AES/EBU IN] jack (X) The SPX2000 will operate as the clock master. Adjust the input level Use the [INPUT L R] control (1) to select the word clock source....

SPX2000 Owners Manual
Page 12
... (E) • [BACK] button (F) • [▲ INC]/[▼ DEC] buttons (G) • [NEXT] button (H) • [COMPARE] button (I ) NOTE: While you want to use effects based on , the effect will be off You can edit effects from standard to continue moving through the preceding effects. to move more rapidly... press the button the effect will be output without modification. 12 SPX2000-Owner's Manual PRESET bank This bank contains a total of the PRESET bank or CLASSIC bank. Three banks The SPX2000 has three effect banks; to move to switch the effect on/off . ...
... (E) • [BACK] button (F) • [▲ INC]/[▼ DEC] buttons (G) • [NEXT] button (H) • [COMPARE] button (I ) NOTE: While you want to use effects based on , the effect will be off You can edit effects from standard to continue moving through the preceding effects. to move more rapidly... press the button the effect will be output without modification. 12 SPX2000-Owner's Manual PRESET bank This bank contains a total of the PRESET bank or CLASSIC bank. Three banks The SPX2000 has three effect banks; to move to switch the effect on/off . ...

SPX2000 Owners Manual
Page 13
... parameter n Fine parameter m Since some effects have a rather large number of parameters, the parameters that you want to edit. 1 Select a bank Use the [BANK] button (A) to select the bank containing the effect you want to edit. → The [BANK] indicator (A) shows the currently selected... bank. 2 Select an effect (page 12) Use the buttons (C) to select the effect you want to steadily lit. SPX2000-Owner's Manual 13 NOTE: The following buttons will cancel the effect selection; Select an effect ↓ Select ...
... parameter n Fine parameter m Since some effects have a rather large number of parameters, the parameters that you want to edit. 1 Select a bank Use the [BANK] button (A) to select the bank containing the effect you want to edit. → The [BANK] indicator (A) shows the currently selected... bank. 2 Select an effect (page 12) Use the buttons (C) to select the effect you want to steadily lit. SPX2000-Owner's Manual 13 NOTE: The following buttons will cancel the effect selection; Select an effect ↓ Select ...

SPX2000 Owners Manual
Page 14
...[FINE PARAM] button to edit the value of the CLASSIC bank do not have a Tempo parameter. Use the [PARAMETER] button to select the Basic parameters. 14 SPX2000-Owner's Manual Edit the parameter Use the [▲ INC]/[▼ DEC] button (G) to continue moving through the following parameter. Set the ... the [BACK] button to move to specify "TAP" as the synchronization source. • Use MIDI control changes The value specified by a MIDI Control Change message can control the SPX2000's Tempo value from the CLASSIC bank is recalled. Press the [NEXT] button or [FINE PARAM...
...[FINE PARAM] button to edit the value of the CLASSIC bank do not have a Tempo parameter. Use the [PARAMETER] button to select the Basic parameters. 14 SPX2000-Owner's Manual Edit the parameter Use the [▲ INC]/[▼ DEC] button (G) to continue moving through the following parameter. Set the ... the [BACK] button to move to specify "TAP" as the synchronization source. • Use MIDI control changes The value specified by a MIDI Control Change message can control the SPX2000's Tempo value from the CLASSIC bank is recalled. Press the [NEXT] button or [FINE PARAM...

SPX2000 Owners Manual
Page 15
...change the TEMPO, the DELAY (or FREQ.) will be set and the calculation method(*a) used for tempo synchronization. Operation Effects and tempo synchronization Some of the SPX2000's effects allow you to tempo. For modulation-type effects, the frequency of the modulation ... when recalled than when it was stored. = 1/48 = 1/24 = 1/16 = 1/12 = 3/32 = 1/8 = 1/6 = 3/16 = 1/4 = 3/8 = 1/2 = 3/4 = 1/1 = 2/1 SPX2000-Owner's Manual 15 This limitation also applies even when SYNC is OFF. • Special characteristics of the TEMPO parameter The TEMPO parameter has the following...
...change the TEMPO, the DELAY (or FREQ.) will be set and the calculation method(*a) used for tempo synchronization. Operation Effects and tempo synchronization Some of the SPX2000's effects allow you to tempo. For modulation-type effects, the frequency of the modulation ... when recalled than when it was stored. = 1/48 = 1/24 = 1/16 = 1/12 = 3/32 = 1/8 = 1/6 = 3/16 = 1/4 = 3/8 = 1/2 = 3/4 = 1/1 = 2/1 SPX2000-Owner's Manual 15 This limitation also applies even when SYNC is OFF. • Special characteristics of the TEMPO parameter The TEMPO parameter has the following...

SPX2000 Owners Manual
Page 16
... button (B) to store the effect. → The [COMPARE] LED (I ) to compare the original effect with the edited version. → Each time you switch parameters. 16 SPX2000-Owner's Manual You can return settings to their prior state by "undoing" the previous Store, Recall, or Clear Effect operation. this button, the [COMPARE] LED... Press the [BANK] button (A) several times to select the USER bank. → The [BANK] indicator (A) will indicate "USER." 2 Select a store-destination for the effect Use the buttons (C) to cancel the previous Undo operation. → The [UNDO] LED will blink.
... button (B) to store the effect. → The [COMPARE] LED (I ) to compare the original effect with the edited version. → Each time you switch parameters. 16 SPX2000-Owner's Manual You can return settings to their prior state by "undoing" the previous Store, Recall, or Clear Effect operation. this button, the [COMPARE] LED... Press the [BANK] button (A) several times to select the USER bank. → The [BANK] indicator (A) will indicate "USER." 2 Select a store-destination for the effect Use the buttons (C) to cancel the previous Undo operation. → The [UNDO] LED will blink.

SPX2000 Owners Manual
Page 17
...again be able to select "TITLE EDIT." Operation Other functions Editing the effect name Here's how to edit the effect name. SPX2000-Owner's Manual 17 You can edit the name only for important effects, you can be protected. REV-X LARGE HALL TITLE EDIT ...; INC] button: Changes the character at the cursor location (A→B→C). [▼ DEC] button: Changes the character at the cursor location (C→B→A). You can use the following characters. 012 3456789 : ; ? @A B C DE FGH I J K L MNO PQR S T U VWX Y Z a b c d e f g h i j k l mn o pq r s t uvwx y z Protecting an ...
...again be able to select "TITLE EDIT." Operation Other functions Editing the effect name Here's how to edit the effect name. SPX2000-Owner's Manual 17 You can edit the name only for important effects, you can be protected. REV-X LARGE HALL TITLE EDIT ...; INC] button: Changes the character at the cursor location (A→B→C). [▼ DEC] button: Changes the character at the cursor location (C→B→A). You can use the following characters. 012 3456789 : ; ? @A B C DE FGH I J K L MNO PQR S T U VWX Y Z a b c d e f g h i j k l mn o pq r s t uvwx y z Protecting an ...

SPX2000 Owners Manual
Page 18
.... • When INT44.1 kHz-INT 96 kHz is a frequency to select "LCD BACK." CLOCK SOURCE INT96kHz 2 Select the word clock source Use the [▲ INC]/[▼ DEC] buttons (G) to the preceding function. WHITE CYAN MAGENTA YELLOW GREEN Selecting the Utility function Press the [BACK]...clock source 1 Select the "CLOCK SOURCE" function Press the [UTILITY] button (L) several times to which the SPX2000 cannot synchronize. You can choose one of the SPX2000's internal clocks until an acceptable word clock is supplied from the external device has either been interrupted or is selected...
.... • When INT44.1 kHz-INT 96 kHz is a frequency to select "LCD BACK." CLOCK SOURCE INT96kHz 2 Select the word clock source Use the [▲ INC]/[▼ DEC] buttons (G) to the preceding function. WHITE CYAN MAGENTA YELLOW GREEN Selecting the Utility function Press the [BACK]...clock source 1 Select the "CLOCK SOURCE" function Press the [UTILITY] button (L) several times to which the SPX2000 cannot synchronize. You can choose one of the SPX2000's internal clocks until an acceptable word clock is supplied from the external device has either been interrupted or is selected...

SPX2000 Owners Manual
Page 19
...if the DIGITAL [INPUT SOURCE] indicator blinks, the incoming digital input signal does not match the clock on which the SPX2000 is called "CLOCK SLAVES." To use either the signal from the [INPUT] jacks ([) or the signal from being made accidentally, you may hear noise. INPUT... *ANALOG DIGITAL → The [INPUT SOURCE] indicator (5) indicates your selection. Restricting operation of the SPX2000 To prevent undesired changes from the [AES/EBU IN] jack (X) as a clock slave, use the SPX2000 as the input source. 1 Select the "INPUT SOURCE" function Press the [UTILITY] button (L) several...
...if the DIGITAL [INPUT SOURCE] indicator blinks, the incoming digital input signal does not match the clock on which the SPX2000 is called "CLOCK SLAVES." To use either the signal from the [INPUT] jacks ([) or the signal from being made accidentally, you may hear noise. INPUT... *ANALOG DIGITAL → The [INPUT SOURCE] indicator (5) indicates your selection. Restricting operation of the SPX2000 To prevent undesired changes from the [AES/EBU IN] jack (X) as a clock slave, use the SPX2000 as the input source. 1 Select the "INPUT SOURCE" function Press the [UTILITY] button (L) several...

SPX2000 Owners Manual
Page 20
...Operation Lock level is 1 or higher, Utility functions other than Operation Lock cannot be selected. After the effect has been erased, you attempt to use the [UNDO] button (E) to erase the recalled effect. → When the effect has been erased, the display will indicate "Completed!" will appear... such an operation is Protected!", the protect setting has been turned on /off the protect setting, and then erase the effect (page 17). 20 SPX2000-Owner's Manual PUSH INC 4 Erase the effect Press the [▲ INC] button (G) to recover the erased effect. • If the display indicates...
...Operation Lock level is 1 or higher, Utility functions other than Operation Lock cannot be selected. After the effect has been erased, you attempt to use the [UNDO] button (E) to erase the recalled effect. → When the effect has been erased, the display will indicate "Completed!" will appear... such an operation is Protected!", the protect setting has been turned on /off the protect setting, and then erase the effect (page 17). 20 SPX2000-Owner's Manual PUSH INC 4 Erase the effect Press the [▲ INC] button (G) to recover the erased effect. • If the display indicates...

SPX2000 Owners Manual
Page 21
... be retransmitted without change. MIDI CHANNEL CH 1 2 Select the channel Use the [▲ INC]/[▼ DEC] buttons (G) to select the channel used to install the Yamaha USB-MIDI driver on this setting, MIDI data from the SPX2000 itself cannot be possible to "THRU." NOTE: In order to connect ...the SPX2000 to your computer. MIDI PORT GENERAL = MIDI "MIDI PORT GENERAL" ...
... be retransmitted without change. MIDI CHANNEL CH 1 2 Select the channel Use the [▲ INC]/[▼ DEC] buttons (G) to select the channel used to install the Yamaha USB-MIDI driver on this setting, MIDI data from the SPX2000 itself cannot be possible to "THRU." NOTE: In order to connect ...the SPX2000 to your computer. MIDI PORT GENERAL = MIDI "MIDI PORT GENERAL" ...


