Owner's Manual
Page 5
... Connecting the Zone 2 and Zone 3 components 111 Controlling Zone 2 or Zone 3 112 Advanced setup 117 Using the advanced setup menu 117 ADDITIONAL INFORMATION Troubleshooting 121 Resetting the system 129 Glossary 130 Sound field program information 134 Parametric equalizer information 135 Specifications 136 Index 138 APPENDIX (at the end of this manual...
... Connecting the Zone 2 and Zone 3 components 111 Controlling Zone 2 or Zone 3 112 Advanced setup 117 Using the advanced setup menu 117 ADDITIONAL INFORMATION Troubleshooting 121 Resetting the system 129 Glossary 130 Sound field program information 134 Parametric equalizer information 135 Specifications 136 Index 138 APPENDIX (at the end of this manual...

Owner's Manual
Page 124
...the setting was successful. LEARN See page 117 for the bi-amplifier connection (see page 19). ■ Parameter initialization INITIALIZE Use this feature to reset the parameters of this unit to the initial factory settings. Choices: ON, OFF • Select "ON" if you want to activate the bi...the (initial setting) default code. 2605 Operates this unit using an alternative code. *1 The remote control setting. *2 The setting of this unit receives the information of the advanced setup menu. ■ Tuner frequency step TUNER FRQ STEP (Asia and General models only) Use this feature to set...
...the setting was successful. LEARN See page 117 for the bi-amplifier connection (see page 19). ■ Parameter initialization INITIALIZE Use this feature to reset the parameters of this unit to the initial factory settings. Choices: ON, OFF • Select "ON" if you want to activate the bi...the (initial setting) default code. 2605 Operates this unit using an alternative code. *1 The remote control setting. *2 The setting of this unit receives the information of the advanced setup menu. ■ Tuner frequency step TUNER FRQ STEP (Asia and General models only) Use this feature to set...
Owner's Manual
Page 125
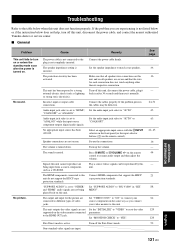
... speaker wire connections on this unit and on the remote control to resume audio output and then adjust the volume. Set "MONITOR CHECK" to reset the video parameters. Non-standard video signals are not secure. Connect the power cable firmly. Turn off this unit. "COAX/OPT" or "...CINPUT selector on the front panel (or the input selector buttons (1) on this unit, disconnect the power cable, and contact the nearest authorized Yamaha dealer or service center. ■ General Problem Cause Remedy This unit fails to turn on or enters the standby mode soon after 30 seconds...
... speaker wire connections on this unit and on the remote control to resume audio output and then adjust the volume. Set "MONITOR CHECK" to reset the video parameters. Non-standard video signals are not secure. Connect the power cable firmly. Turn off this unit. "COAX/OPT" or "...CINPUT selector on the front panel (or the input selector buttons (1) on this unit, disconnect the power cable, and contact the nearest authorized Yamaha dealer or service center. ■ General Problem Cause Remedy This unit fails to turn on or enters the standby mode soon after 30 seconds...

Owner's Manual
Page 131
...your iPod. Headphones are supported. See page 37 - Only iPod (Click and Wheel), iPod nano, and iPod mini are connected. Try resetting your iPod. Unplug HP! The iPod being used is not connected. Error message Connect MIC! Remedy Connect the supplied optimizer microphone to the... your iPod. ■ iPod Troubleshooting Note In case of a transmission error without a status message appearing in the front panel and in a Yamaha iPod universal dock (such as the YDS-10, sold separately) connected to the DOCK terminal of this unit, and the connection between your iPod...
...your iPod. Headphones are supported. See page 37 - Only iPod (Click and Wheel), iPod nano, and iPod mini are connected. Try resetting your iPod. Unplug HP! The iPod being used is not connected. Error message Connect MIC! Remedy Connect the supplied optimizer microphone to the... your iPod. ■ iPod Troubleshooting Note In case of a transmission error without a status message appearing in the front panel and in a Yamaha iPod universal dock (such as the YDS-10, sold separately) connected to the DOCK terminal of this unit, and the connection between your iPod...

Owner's Manual
Page 133
... release it outward to the OFF position to turn on this unit. Notes • This procedure completely resets all the parameters of this unit including the "SET MENU" parameters. English 129 En RESETTING THE SYSTEM Resetting the system Use this feature to reset all the parameters of this unit to the initial factory settings.
... release it outward to the OFF position to turn on this unit. Notes • This procedure completely resets all the parameters of this unit including the "SET MENU" parameters. English 129 En RESETTING THE SYSTEM Resetting the system Use this feature to reset all the parameters of this unit to the initial factory settings.

Owner's Manual
Page 144
..., Advanced setup 119 REMOTE IN jack 31 REMOTE OUT jack 31 REMOTE SENSOR, Advanced setup 117 Remote sensor, Advanced setup ........ 117 Repeat, iPod playback 65 Resetting the system 129 REV.DELAY, Sound field parameter 71 REV.LEVEL, Sound field parameter 71 REV.TIME, Sound field parameter .....71 Reverberation delay, Sound field...
..., Advanced setup 119 REMOTE IN jack 31 REMOTE OUT jack 31 REMOTE SENSOR, Advanced setup 117 Remote sensor, Advanced setup ........ 117 Repeat, iPod playback 65 Resetting the system 129 REV.DELAY, Sound field parameter 71 REV.LEVEL, Sound field parameter 71 REV.TIME, Sound field parameter .....71 Reverberation delay, Sound field...


