MCXSP10 Manual
Page 5
... 3 Getting started 4 Quick start guide 5 PREPARATION Connections 11 Optimizing the speaker setting for your listening room 28 Using AUTO SETUP 28 BASIC OPERATION Selecting the SCENE templates 33 Selecting the desired SCENE template 33 Creating your original SCENE templates 36 Playback 37 ...all remote control codes 89 Using multi-zone configuration 90 Connecting Zone 2 90 Controlling Zone 2 91 Advanced setup 93 Using the advanced setup 93 ADDITIONAL INFORMATION Troubleshooting 97 Resetting the system 104 Glossary 105 Sound field program information 107 Parametric equalizer ...
... 3 Getting started 4 Quick start guide 5 PREPARATION Connections 11 Optimizing the speaker setting for your listening room 28 Using AUTO SETUP 28 BASIC OPERATION Selecting the SCENE templates 33 Selecting the desired SCENE template 33 Creating your original SCENE templates 36 Playback 37 ...all remote control codes 89 Using multi-zone configuration 90 Connecting Zone 2 90 Controlling Zone 2 91 Advanced setup 93 Using the advanced setup 93 ADDITIONAL INFORMATION Troubleshooting 97 Resetting the system 104 Glossary 105 Sound field program information 107 Parametric equalizer ...

MCXSP10 Manual
Page 7
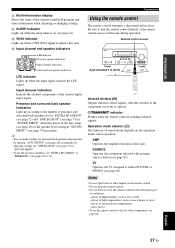
...Sleep timer Check that allow you received all sources ◆ Cinema and music night listening modes ◆ Remote control with the SCENE function Sound field programs ◆ Proprietary Yamaha technology for discrete multi- DISPLAY REC... displaying capability ◆ Battery charging capability Other features ◆ YPAO (Yamaha Parametric Room Acoustic Optimizer) for automatic speaker setup ◆ 192-kHz/24-bit D/A converter ◆ OSD (on-...SRCH MODE ENTER A-E/CAT. Remote control CODE SET TRANSMIT POWER TV POWER AV STANDBY POWER CD DVD DOCK V-AUX MD CD-R CBL DTV MULTI ...
...Sleep timer Check that allow you received all sources ◆ Cinema and music night listening modes ◆ Remote control with the SCENE function Sound field programs ◆ Proprietary Yamaha technology for discrete multi- DISPLAY REC... displaying capability ◆ Battery charging capability Other features ◆ YPAO (Yamaha Parametric Room Acoustic Optimizer) for automatic speaker setup ◆ 192-kHz/24-bit D/A converter ◆ OSD (on-...SRCH MODE ENTER A-E/CAT. Remote control CODE SET TRANSMIT POWER TV POWER AV STANDBY POWER CD DVD DOCK V-AUX MD CD-R CBL DTV MULTI ...
MCXSP10 Manual
Page 14
... ■ Additional feature Automatically turning off this unit to tune into the desired radio station. Quick start guide Case C: "I want to receive infrared signals from the standby mode, press the desired FSCENE buttons (or FSCENE) or AMAIN ZONE ON/OFF on the front panel (or... • Enjoying FM/AM radio programs ☞ P. 50 • Enjoying XM Satellite Radio programs ☞ P. 53 • Using your listening room (AUTO SETUP) ☞ P. 28 • Manually adjusting various parameters of this unit... Notes • To use the "Radio Listening" template (Case C), you want to...
... ■ Additional feature Automatically turning off this unit to tune into the desired radio station. Quick start guide Case C: "I want to receive infrared signals from the standby mode, press the desired FSCENE buttons (or FSCENE) or AMAIN ZONE ON/OFF on the front panel (or... • Enjoying FM/AM radio programs ☞ P. 50 • Enjoying XM Satellite Radio programs ☞ P. 53 • Using your listening room (AUTO SETUP) ☞ P. 28 • Manually adjusting various parameters of this unit... Notes • To use the "Radio Listening" template (Case C), you want to...

MCXSP10 Manual
Page 17
... part of this unit (see page 25). 4 ohm speakers can also select the function of the speakers connected to the EXTRA SP terminals in "AUTO SETUP" (see page 72). Cables are faulty, this unit and/or the speakers. Connect the striped (grooved, etc.) cable to the "+" (red) terminals of the speakers...
... part of this unit (see page 25). 4 ohm speakers can also select the function of the speakers connected to the EXTRA SP terminals in "AUTO SETUP" (see page 72). Cables are faulty, this unit and/or the speakers. Connect the striped (grooved, etc.) cable to the "+" (red) terminals of the speakers...

MCXSP10 Manual
Page 18
... shorting bars or bridges of your speakers support biamplification. Check if your speakers to the instruction manuals of the corresponding terminal. 10 mm (0.4 in "ADVANCED SETUP" (see page 96).
... shorting bars or bridges of your speakers support biamplification. Check if your speakers to the instruction manuals of the corresponding terminal. 10 mm (0.4 in "ADVANCED SETUP" (see page 96).

MCXSP10 Manual
Page 20
...-ch Linear PCM 8ch, 32-192 kHz, DVD-Audio, etc. 16/20/24 bit DSD 2/5.1ch, 2.8224 MHz, 1 bit SACD, etc. to "ON" in "MANUAL SETUP" (see page 41).
...-ch Linear PCM 8ch, 32-192 kHz, DVD-Audio, etc. 16/20/24 bit DSD 2/5.1ch, 2.8224 MHz, 1 bit SACD, etc. to "ON" in "MANUAL SETUP" (see page 41).

MCXSP10 Manual
Page 27
...the monaural analog mini cable as the input source. PREPARATION ■ Connecting a Yamaha iPod universal dock This unit is not the Yamaha product, set "SCENE IR" in S V L R O Infrared signal receiver or Yamaha component Yamaha component (CD or DVD player, etc.) Game console or video camera English ... VIDEO L AUDIO R OPTICAL Remote control out Remote control in the advanced setup menu to turn down the volume of the SCENE control signals, this unit using the supplied remote control. DOCK Yamaha iPod universal dock (such as the YDS-10, sold separately) Using the...
...the monaural analog mini cable as the input source. PREPARATION ■ Connecting a Yamaha iPod universal dock This unit is not the Yamaha product, set "SCENE IR" in S V L R O Infrared signal receiver or Yamaha component Yamaha component (CD or DVD player, etc.) Game console or video camera English ... VIDEO L AUDIO R OPTICAL Remote control out Remote control in the advanced setup menu to turn down the volume of the SCENE control signals, this unit using the supplied remote control. DOCK Yamaha iPod universal dock (such as the YDS-10, sold separately) Using the...
MCXSP10 Manual
Page 29
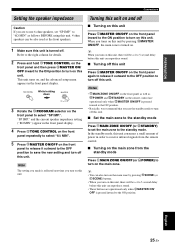
... Press BMASTER ON/OFF on the front panel inward to the ON position to turn on this unit. y When you turn on , and the advanced setup menu appears in the front panel display. PREPARATION Connections Setting the speaker impedance Caution If you use 6 ohm speakers, set the main zone to the... Press AMAIN ZONE ON/OFF (or GSTANDBY) to turn on the main zone. and the current speaker impedance setting ("8Ω MIN") appear in order to receive infrared signals from the remote control. ■ Turning on the main zone from the standby mode Press AMAIN ZONE ON/OFF (or HPOWER) to set...
... Press BMASTER ON/OFF on the front panel inward to the ON position to turn on this unit. y When you turn on , and the advanced setup menu appears in the front panel display. PREPARATION Connections Setting the speaker impedance Caution If you use 6 ohm speakers, set the main zone to the... Press AMAIN ZONE ON/OFF (or GSTANDBY) to turn on the main zone. and the current speaker impedance setting ("8Ω MIN") appear in order to receive infrared signals from the remote control. ■ Turning on the main zone from the standby mode Press AMAIN ZONE ON/OFF (or HPOWER) to set...

MCXSP10 Manual
Page 30
... 4 HDMI indicator Lights up only when "XM" is selected as the input source. J NIGHT indicator Lights up when you station your iPod in a Yamaha iPod universal dock (such as the YDS-10, sold separately) connected to show the currently selected input source. 8 YPAO indicator Lights up when you run... and V-AUX is selected as the input source. Connections Front panel display Note The XM indicator is only applicable to the set in "AUTO SETUP" are activated. and Canada models only NO 1B Input signal indicators Lights up when this unit is reproducing DSD (Direct Stream Digital) or PCM ...
... 4 HDMI indicator Lights up only when "XM" is selected as the input source. J NIGHT indicator Lights up when you station your iPod in a Yamaha iPod universal dock (such as the YDS-10, sold separately) connected to show the currently selected input source. 8 YPAO indicator Lights up when you run... and V-AUX is selected as the input source. Connections Front panel display Note The XM indicator is only applicable to the set in "AUTO SETUP" are activated. and Canada models only NO 1B Input signal indicators Lights up when this unit is reproducing DSD (Direct Stream Digital) or PCM ...
MCXSP10 Manual
Page 31
... SR LFE indicator Presence speaker indicators Input channel indicators Surround back speaker indicators LFE indicator Lights up while the sleep timer is in the auto setup (see page 28) or the speaker level setting in "SOUND MENU" (see page 73) in "SOUND MENU" when this unit. Aim this ...either DTV/CBL or PHONO (see page 88. English 27 En y • You can make settings for surround back speakers automatically by running "AUTO SETUP" (see page 28) or manually by adjusting settings for other components, see page 86). TV Operates the TV assigned to this unit during operation. ...
... SR LFE indicator Presence speaker indicators Input channel indicators Surround back speaker indicators LFE indicator Lights up while the sleep timer is in the auto setup (see page 28) or the speaker level setting in "SOUND MENU" (see page 73) in "SOUND MENU" when this unit. Aim this ...either DTV/CBL or PHONO (see page 88. English 27 En y • You can make settings for surround back speakers automatically by running "AUTO SETUP" (see page 28) or manually by adjusting settings for other components, see page 86). TV Operates the TV assigned to this unit during operation. ...
MCXSP10 Manual
Page 32
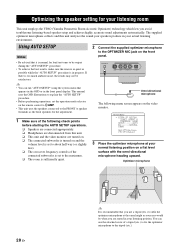
...microphone [ [ [ 28 En y It is sufficiently quiet. If there is normal for your listening room This unit employs the YPAO (Yamaha Parametric Room Acoustic Optimizer) technology which lets you are turned on. ❏ The connected subwoofer is turned on the front panel. &#...position. OPTIMIZER MIC VIDEO AUX S VIDEO VIDEO L AUDIO R OPTICAL Omni-directional microphone The following check points before starting the AUTO SETUP operations. ❏ Speakers are connected appropriately. ❏ Headphones are disconnected from this unit analyzes the sound your speakers produce in ...
...microphone [ [ [ 28 En y It is sufficiently quiet. If there is normal for your listening room This unit employs the YPAO (Yamaha Parametric Room Acoustic Optimizer) technology which lets you are turned on. ❏ The connected subwoofer is turned on the front panel. &#...position. OPTIMIZER MIC VIDEO AUX S VIDEO VIDEO L AUDIO R OPTICAL Omni-directional microphone The following check points before starting the AUTO SETUP operations. ❏ Speakers are connected appropriately. ❏ Headphones are disconnected from this unit analyzes the sound your speakers produce in ...

MCXSP10 Manual
Page 33
... room. Notes • "RELOAD" or "UNDO" is in "SOUND MENU" (see page 96) or "EXTRA SP ASSIGN" in the auto setup procedure. Choices: NATURAL, FLAT, FRONT • Select "NATURAL" to create a cohesive sound field in accordance with higher frequencies being less emphasized.... Recommended if your front speakers are output from the following choices. This unit starts the auto setup procedure. Once all items are of similar quality. • Select "FRONT" to deactivate the EXTRA SP terminals. It takes approximately...
... room. Notes • "RELOAD" or "UNDO" is in "SOUND MENU" (see page 96) or "EXTRA SP ASSIGN" in the auto setup procedure. Choices: NATURAL, FLAT, FRONT • Select "NATURAL" to create a cohesive sound field in accordance with higher frequencies being less emphasized.... Recommended if your front speakers are output from the following choices. This unit starts the auto setup procedure. Once all items are of similar quality. • Select "FRONT" to deactivate the EXTRA SP terminals. It takes approximately...

MCXSP10 Manual
Page 34
...WARNING" and the number of warning messages appears in step 5, no test tones are as follows: AUTO:MENU EXTRA SP ASSIGN ZONE2 >FRONT B PRESENCE NONE SETUP;;;;;;;AUTO EQ;;;;;;;NATURAL . [ [ [ Optimizing the speaker setting for each channel. AUTO:RESULT RESULT SP : 3/4/0.1 DIST: 14.0/17.0ft LVL : -9.0/+6.5dB ... [ENTER]:Enter AUTO:RESULT . The display changes as follows: Number of speakers SP Displays the number of speakers connected to display the setup results in "SOUND MENU" (see page 32). • Depending on the listening environment, "SWFR PHASE:REV" appears during the testing...
...WARNING" and the number of warning messages appears in step 5, no test tones are as follows: AUTO:MENU EXTRA SP ASSIGN ZONE2 >FRONT B PRESENCE NONE SETUP;;;;;;;AUTO EQ;;;;;;;NATURAL . [ [ [ Optimizing the speaker setting for each channel. AUTO:RESULT RESULT SP : 3/4/0.1 DIST: 14.0/17.0ft LVL : -9.0/+6.5dB ... [ENTER]:Enter AUTO:RESULT . The display changes as follows: Number of speakers SP Displays the number of speakers connected to display the setup results in "SOUND MENU" (see page 32). • Depending on the listening environment, "SWFR PHASE:REV" appears during the testing...

MCXSP10 Manual
Page 35
...speaker Results of the speaker output level y If you change speakers, speaker positions, or the layout of each parameter, use "MANUAL SETUP" (see page 69). The optimizer microphone is pointing at "SET" and "CANCEL" and then press Dl / h to toggle between the...Results of the setting of each speaker size Results of the parametric equalizer of your listening environment, run "AUTO SETUP" again to toggle between the parameters in a results. SET MENU . ;AUTO SETUP ;MANUAL SETUP .A;SIGNAL INFO [ ]/[ ]:Up/Down [ENTER]:Enter 13 Press NSET MENU to provide finer adjustments. Notes &#...
...speaker Results of the speaker output level y If you change speakers, speaker positions, or the layout of each parameter, use "MANUAL SETUP" (see page 69). The optimizer microphone is pointing at "SET" and "CANCEL" and then press Dl / h to toggle between the...Results of the setting of each speaker size Results of the parametric equalizer of your listening environment, run "AUTO SETUP" again to toggle between the parameters in a results. SET MENU . ;AUTO SETUP ;MANUAL SETUP .A;SIGNAL INFO [ ]/[ ]:Up/Down [ENTER]:Enter 13 Press NSET MENU to provide finer adjustments. Notes &#...

MCXSP10 Manual
Page 36
...CENTER PL PR SL SR SBL SBR [ ]/[[]:Select [ENTER]:Return y • For details about each warning message, see the "AUTO SETUP" section in the "AUTO:RESULT" display. The following display is an example when "E-9:USER CANCEL" appears in that warnings do not cancel the ...the warning. E-9:USER CANCEL Don't operate any function. >RETRY EXIT [ ]/[[]:Select [ENTER]:Enter Choices: RETRY, EXIT • Select "RETRY" to retry the "AUTO SETUP" procedure. • Select "EXIT" to exit from errors in the OSD. WARNING(3) RESULT SP : 3/4/0.1 DIST: 14.0/17.0ft LVL : -9.0/+6.5dB >SET CANCEL...
...CENTER PL PR SL SR SBL SBR [ ]/[[]:Select [ENTER]:Return y • For details about each warning message, see the "AUTO SETUP" section in the "AUTO:RESULT" display. The following display is an example when "E-9:USER CANCEL" appears in that warnings do not cancel the ...the warning. E-9:USER CANCEL Don't operate any function. >RETRY EXIT [ ]/[[]:Select [ENTER]:Enter Choices: RETRY, EXIT • Select "RETRY" to retry the "AUTO SETUP" procedure. • Select "EXIT" to exit from errors in the OSD. WARNING(3) RESULT SP : 3/4/0.1 DIST: 14.0/17.0ft LVL : -9.0/+6.5dB >SET CANCEL...

MCXSP10 Manual
Page 44
... AUX S VIDEO VIDEO L AUDIO R OPTICAL Press the input selector buttons (A) on the remote control again to exit from "SET MENU". 40 En SET MENU . ;AUTO SETUP ;MANUAL SETUP .A;SIGNAL INFO [ ]/[ ]:Up/Down [ENTER]:Enter 2 Press Dn repeatedly to resume the audio output. y • You can adjust the muting level by using the...
... AUX S VIDEO VIDEO L AUDIO R OPTICAL Press the input selector buttons (A) on the remote control again to exit from "SET MENU". 40 En SET MENU . ;AUTO SETUP ;MANUAL SETUP .A;SIGNAL INFO [ ]/[ ]:Up/Down [ENTER]:Enter 2 Press Dn repeatedly to resume the audio output. y • You can adjust the muting level by using the...

MCXSP10 Manual
Page 52
... the MULTI CH INPUT jacks. y Speaker and headphone adjustments are not possible when this unit is in the Pure Direct mode. This is in "AUTO SETUP" (see page 28) and "SPEAKER LEVEL" (see page 73). • The available speaker channels differ depending on momentarily when an operation is activated, this feature...
... the MULTI CH INPUT jacks. y Speaker and headphone adjustments are not possible when this unit is in the Pure Direct mode. This is in "AUTO SETUP" (see page 28) and "SPEAKER LEVEL" (see page 73). • The available speaker channels differ depending on momentarily when an operation is activated, this feature...

MCXSP10 Manual
Page 73
... "SET MENU" to adjust a variety of system settings and customize the way this feature to manually adjust speaker and system parameters. CUSTOMIZING THIS UNIT (MANUAL SETUP) Customizing this unit (MANUAL SETUP) You can use the following parameters in bold under each parameter) to reflect the needs of your listening environment. ■ Auto...
... "SET MENU" to adjust a variety of system settings and customize the way this feature to manually adjust speaker and system parameters. CUSTOMIZING THIS UNIT (MANUAL SETUP) Customizing this unit (MANUAL SETUP) You can use the following parameters in bold under each parameter) to reflect the needs of your listening environment. ■ Auto...

MCXSP10 Manual
Page 74
... unit charges the battery of the display and converts video signals. Page 81 83 83 83 84 84 84 70 En Customizing this unit (MANUAL SETUP) Option menu 3 OPTION MENU Use this menu to check audio and video signal information (see page 40). Initializes the parameters of a group of the XM...
... unit charges the battery of the display and converts video signals. Page 81 83 83 83 84 84 84 70 En Customizing this unit (MANUAL SETUP) Option menu 3 OPTION MENU Use this menu to check audio and video signal information (see page 40). Initializes the parameters of a group of the XM...

MCXSP10 Manual
Page 75
... then press DENTER to enter "SET MENU". A)SPEAKER SET B)SPEAKER LEVEL C)SP DISTANCE D)EQUALIZER E)LFE LEVEL [ ]/[ ]:Up/Down [ENTER]:Enter MANUAL SETUP 1 SOUND MENU 2/2 . p p p SOUND MENU E)LFE LEVEL . English 71 En y • You can change the parameter settings. 6 Press NSET MENU to ... to KAMP and then press NSET MENU to select and enter the desired menu. SET MENU . ;AUTO SETUP ;MANUAL SETUP .A;SIGNAL INFO [ ]/[ ]:Up/Down [ENTER]:Enter 2 Press Dk / n to select "MANUAL SETUP" and then DENTER to exit from "SET MENU". SPEAKER;;;;;;0dB HEADPHONE;;;;0dB [ ]/[ ]:Up/Down [p]/[[]:Adjust...
... then press DENTER to enter "SET MENU". A)SPEAKER SET B)SPEAKER LEVEL C)SP DISTANCE D)EQUALIZER E)LFE LEVEL [ ]/[ ]:Up/Down [ENTER]:Enter MANUAL SETUP 1 SOUND MENU 2/2 . p p p SOUND MENU E)LFE LEVEL . English 71 En y • You can change the parameter settings. 6 Press NSET MENU to ... to KAMP and then press NSET MENU to select and enter the desired menu. SET MENU . ;AUTO SETUP ;MANUAL SETUP .A;SIGNAL INFO [ ]/[ ]:Up/Down [ENTER]:Enter 2 Press Dk / n to select "MANUAL SETUP" and then DENTER to exit from "SET MENU". SPEAKER;;;;;;0dB HEADPHONE;;;;0dB [ ]/[ ]:Up/Down [p]/[[]:Adjust...

