MCXSP10 Manual
Page 5
... of this manual for the SCENE feature 84 Controlling this unit, a TV, or other components 85 Setting remote control codes 87 Resetting all remote control codes 88 Using multi-zone configuration 89 Connecting Zone 2 89 Controlling Zone 2 90 Advanced setup 92 Using the... advanced setup 92 ADDITIONAL INFORMATION Troubleshooting 96 Resetting the system 103 Glossary 104 Sound field program information 106 Parametric equalizer information 107 Specifications 108 Index 110 APPENDIX (at the end...
... of this manual for the SCENE feature 84 Controlling this unit, a TV, or other components 85 Setting remote control codes 87 Resetting all remote control codes 88 Using multi-zone configuration 89 Connecting Zone 2 89 Controlling Zone 2 90 Advanced setup 92 Using the... advanced setup 92 ADDITIONAL INFORMATION Troubleshooting 96 Resetting the system 103 Glossary 104 Sound field program information 106 Parametric equalizer information 107 Specifications 108 Index 110 APPENDIX (at the end...
MCXSP10 Manual
Page 33
..." settings and override the previous settings. • Select "UNDO" to undo the last "AUTO SETUP" settings and restore the previous settings. • Select "DEFAULT" to reset the "AUTO SETUP" parameters to deactivate the EXTRA SP terminals. Choices: FRONT B, ZONE2, PRESENCE, NONE • When you use the EXTRA SP terminals Select "NONE...
..." settings and override the previous settings. • Select "UNDO" to undo the last "AUTO SETUP" settings and restore the previous settings. • Select "DEFAULT" to reset the "AUTO SETUP" parameters to deactivate the EXTRA SP terminals. Choices: FRONT B, ZONE2, PRESENCE, NONE • When you use the EXTRA SP terminals Select "NONE...
MCXSP10 Manual
Page 82
... the following cases: - when "SUR. L/R SP" (see page 48) mode. - when this feature to assign the input/output jacks according to the component to be reset to "AUTO". A)I/O ASSIGNMENT B)INPUT RENAME C)VOLUME TRIM D)DECODER MODE E)MULTI CH SET [ ]/[ ]:Up/Down [ENTER]:Enter ■ Input/output assignment A)I/O ASSIGNMENT Use this unit is...
... the following cases: - when "SUR. L/R SP" (see page 48) mode. - when this feature to assign the input/output jacks according to the component to be reset to "AUTO". A)I/O ASSIGNMENT B)INPUT RENAME C)VOLUME TRIM D)DECODER MODE E)MULTI CH SET [ ]/[ ]:Up/Down [ENTER]:Enter ■ Input/output assignment A)I/O ASSIGNMENT Use this unit is...

MCXSP10 Manual
Page 92
...3 4 STEREO ENHANCER STRAIGHT PURE DIRECT 5 6 7 8 SUR. Remote control features Resetting all remote control codes Use this case, repeat the clearing procedure. 88 En CODE SET TRANSMIT POWER TV POWER AV STANDBY POWER TRANSMIT Flashes 2 Press the numeric buttons (B) to the initial factory settings. ...In this feature to clear all the remote control codes previously set are cleared and reset to enter the code number "9981...
...3 4 STEREO ENHANCER STRAIGHT PURE DIRECT 5 6 7 8 SUR. Remote control features Resetting all remote control codes Use this case, repeat the clearing procedure. 88 En CODE SET TRANSMIT POWER TV POWER AV STANDBY POWER TRANSMIT Flashes 2 Press the numeric buttons (B) to the initial factory settings. ...In this feature to clear all the remote control codes previously set are cleared and reset to enter the code number "9981...

MCXSP10 Manual
Page 97
...00001". • Select "ID2" when the remote control AMP ID code is set to reset the parameters of each speaker must be 8 Ω or higher. CODE SET TRANSMIT POWER TV POWER AV STANDBY POWER TRANSMIT Flashes 6Ω MIN Front Center Surround Surround back If you use two separate... need to 6 Ω . If you operate this unit using (initial setting) the default code. 00002 To operate this unit and the other Yamaha receivers/ amplifiers in the same room separately. The impedance of this feature to set (A or B), the impedance of your speakers. Use this unit so...
...00001". • Select "ID2" when the remote control AMP ID code is set to reset the parameters of each speaker must be 8 Ω or higher. CODE SET TRANSMIT POWER TV POWER AV STANDBY POWER TRANSMIT Flashes 6Ω MIN Front Center Surround Surround back If you use two separate... need to 6 Ω . If you operate this unit using (initial setting) the default code. 00002 To operate this unit and the other Yamaha receivers/ amplifiers in the same room separately. The impedance of this feature to set (A or B), the impedance of your speakers. Use this unit so...
MCXSP10 Manual
Page 105
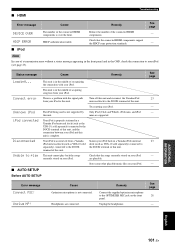
...! Remedy Connect the supplied optimizer microphone to play This unit cannot play back the songs currently stored on the front panel. Try resetting your iPod to the DOCK terminal of this unit. Check that the connected HDMI components support the HDCP copy protection standards. Cause ...Optimizer microphone is not supported by this unit is in a Yamaha iPod universal dock (such as YDS-10 sold separately) connected to your iPod. Station your iPod back in the middle of acquiring ...
...! Remedy Connect the supplied optimizer microphone to play This unit cannot play back the songs currently stored on the front panel. Try resetting your iPod to the DOCK terminal of this unit. Check that the connected HDMI components support the HDCP copy protection standards. Cause ...Optimizer microphone is not supported by this unit is in a Yamaha iPod universal dock (such as YDS-10 sold separately) connected to your iPod. Station your iPod back in the middle of acquiring ...

MCXSP10 Manual
Page 107
... the ON position to turn on this unit. Notes • This procedure completely resets all the parameters of this unit including the "SET MENU" parameters. ADDITIONAL INFORMATION English 103 En RESETTING THE SYSTEM Resetting the system Use this feature to reset all the parameters of this unit to the initial factory settings. However, the... the front panel display. TONE CONTROL While holding down MASTER ON OFF 3 Rotate the DPROGRAM selector to select "PRESET". 4 Press CTONE CONTROL repeatedly to select "RESET".
... the ON position to turn on this unit. Notes • This procedure completely resets all the parameters of this unit including the "SET MENU" parameters. ADDITIONAL INFORMATION English 103 En RESETTING THE SYSTEM Resetting the system Use this feature to reset all the parameters of this unit to the initial factory settings. However, the... the front panel display. TONE CONTROL While holding down MASTER ON OFF 3 Rotate the DPROGRAM selector to select "PRESET". 4 Press CTONE CONTROL repeatedly to select "RESET".
MCXSP10 Manual
Page 116
... sound configurations 61 Adventure, Sound field program ......... 45 ALL CH SEARCH, XM tuning 55 All Channel Search mode, XM tuning 55 All remote control codes resetting ....... 88 AM antenna connection 24 AM tuning 50 Amplifier function OSD display time, Display settings 81 Audio cable plugs 15 Audio components connection 21 AUDIO...
... sound configurations 61 Adventure, Sound field program ......... 45 ALL CH SEARCH, XM tuning 55 All Channel Search mode, XM tuning 55 All remote control codes resetting ....... 88 AM antenna connection 24 AM tuning 50 Amplifier function OSD display time, Display settings 81 Audio cable plugs 15 Audio components connection 21 AUDIO...

MCXSP10 Manual
Page 118
... REMOTE IN/OUT jacks 23 REMOTE TUN, Advanced setup ........ 94 REMOTE XM, Advanced setup .......... 94 Rename, SCENE template 36 Repeat 59 Repeat, iPod playback 59 Resetting the system 103 REV.DELAY, Sound field parameter 65 REV.LEVEL, Sound field parameter 65 REV.TIME, Sound field parameter 65 Reverberation delay, Sound field...
... REMOTE IN/OUT jacks 23 REMOTE TUN, Advanced setup ........ 94 REMOTE XM, Advanced setup .......... 94 Rename, SCENE template 36 Repeat 59 Repeat, iPod playback 59 Resetting the system 103 REV.DELAY, Sound field parameter 65 REV.LEVEL, Sound field parameter 65 REV.TIME, Sound field parameter 65 Reverberation delay, Sound field...


