MCXSP10 Manual
Page 5
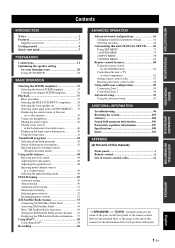
... OPERATION Advanced sound configurations 61 Changing sound field parameter settings 61 Selecting decoders 66 Customizing this unit (MANUAL SETUP).........69 Using SET MENU 71 1 SOUND MENU 72 2 INPUT MENU 78 3 OPTION MENU 81 Remote control features 84 Using the remote control for the information about each position of the parts on the front panel...
... OPERATION Advanced sound configurations 61 Changing sound field parameter settings 61 Selecting decoders 66 Customizing this unit (MANUAL SETUP).........69 Using SET MENU 71 1 SOUND MENU 72 2 INPUT MENU 78 3 OPTION MENU 81 Remote control features 84 Using the remote control for the information about each position of the parts on the front panel...
MCXSP10 Manual
Page 7
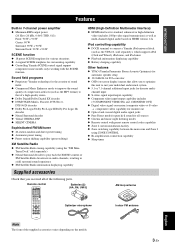
... POWER AV STANDBY...8 SUR. DECODE NIGHT 9 0 +10 SLEEP ENT LEVEL TITLE BAND RETURN XM MEMORY PRESET/CH SET MENU MENU SRCH MODE ENTER A-E/CAT. DISPLAY REC SCENE 1 2 3 4 Batteries (2) (AA, R6, UM...Playback information displaying capability ◆ Battery charging capability Other features ◆ YPAO (Yamaha Parametric Room Acoustic Optimizer) for discrete multi- channel input ◆ S-video ... connection capability ◆ Sleep timer Supplied accessories Check that allow you received all of the supplied accessories varies depending on -screen display) menus that...
... POWER AV STANDBY...8 SUR. DECODE NIGHT 9 0 +10 SLEEP ENT LEVEL TITLE BAND RETURN XM MEMORY PRESET/CH SET MENU MENU SRCH MODE ENTER A-E/CAT. DISPLAY REC SCENE 1 2 3 4 Batteries (2) (AA, R6, UM...Playback information displaying capability ◆ Battery charging capability Other features ◆ YPAO (Yamaha Parametric Room Acoustic Optimizer) for discrete multi- channel input ◆ S-video ... connection capability ◆ Sleep timer Supplied accessories Check that allow you received all of the supplied accessories varies depending on -screen display) menus that...
MCXSP10 Manual
Page 17
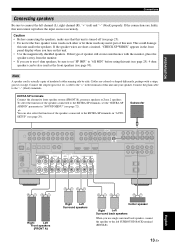
... short-circuited, "CHECK SP WIRES" appears in "AUTO SETUP" (see page 93). y You can be sure to set the "EXTRA SP ASSIGN" parameter in "SOUND MENU" (see page 25). • Do not let the bare speaker wires touch each other or let them touch any metal part of this unit and...
... short-circuited, "CHECK SP WIRES" appears in "AUTO SETUP" (see page 93). y You can be sure to set the "EXTRA SP ASSIGN" parameter in "SOUND MENU" (see page 25). • Do not let the bare speaker wires touch each other or let them touch any metal part of this unit and...
MCXSP10 Manual
Page 22
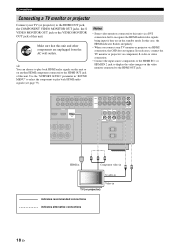
Use the "SUPPORT AUDIO" parameter in "SOUND MENU" to select the component to play back HDMI audio signals on this unit. Connections Connecting a TV monitor or projector Connect your TV monitor or projector ...
Use the "SUPPORT AUDIO" parameter in "SOUND MENU" to select the component to play back HDMI audio signals on this unit. Connections Connecting a TV monitor or projector Connect your TV monitor or projector ...

MCXSP10 Manual
Page 27
...VIDEO VIDEO L AUDIO R OPTICAL REMOTE IN OUT S VIDEO VIDEO L AUDIO R OPTICAL Remote control out Remote control in the advanced setup menu to "OFF" (see page 95). Notes • The audio signals input at the DOCK terminal on the rear panel take priority ...one of the SCENE buttons. PREPARATION ■ Connecting a Yamaha iPod universal dock This unit is not the Yamaha product, set "SCENE IR" in S V L R O S-Video output Video Audio Optical output output output Infrared signal receiver or Yamaha component Yamaha component Game console or video camera English 23 En
...VIDEO VIDEO L AUDIO R OPTICAL REMOTE IN OUT S VIDEO VIDEO L AUDIO R OPTICAL Remote control out Remote control in the advanced setup menu to "OFF" (see page 95). Notes • The audio signals input at the DOCK terminal on the rear panel take priority ...one of the SCENE buttons. PREPARATION ■ Connecting a Yamaha iPod universal dock This unit is not the Yamaha product, set "SCENE IR" in S V L R O S-Video output Video Audio Optical output output output Infrared signal receiver or Yamaha component Yamaha component Game console or video camera English 23 En
MCXSP10 Manual
Page 29
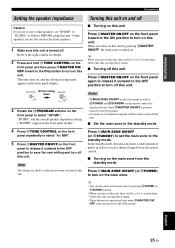
... front speakers. 1 Make sure this unit is turned off this unit. In the standby mode, this unit consumes a small amount of power in order to receive infrared signals from the remote control. ■ Turning on the main zone from the standby mode Press AMAIN ZONE ON/OFF (or HPOWER) to use... unit Press BMASTER ON/OFF on the front panel inward to the ON position to turn off . This unit turns on, and the advanced setup menu appears in the front panel display. 4 Press CTONE CONTROL on the front panel repeatedly to select "6Ω MIN". 5 Press BMASTER ON/OFF on the front...
... front speakers. 1 Make sure this unit is turned off this unit. In the standby mode, this unit consumes a small amount of power in order to receive infrared signals from the remote control. ■ Turning on the main zone from the standby mode Press AMAIN ZONE ON/OFF (or HPOWER) to use... unit Press BMASTER ON/OFF on the front panel inward to the ON position to turn off . This unit turns on, and the advanced setup menu appears in the front panel display. 4 Press CTONE CONTROL on the front panel repeatedly to select "6Ω MIN". 5 Press BMASTER ON/OFF on the front...

MCXSP10 Manual
Page 31
...; Do not drop the remote control. • Do not leave or store the remote control in "SOUND MENU". • To use the presence speakers, set the remote control codes for other components, see page 85)....unit is in the auto setup (see page 28) or the speaker level setting in "SOUND MENU" when this unit. Be sure to aim the remote control directly at the component you want to "...PRESENCE" (see page 73) in "SOUND MENU" (see page 74) procedure. Notes • Do not spill water or other information when adjusting or...
...; Do not drop the remote control. • Do not leave or store the remote control in "SOUND MENU". • To use the presence speakers, set the remote control codes for other components, see page 85)....unit is in the auto setup (see page 28) or the speaker level setting in "SOUND MENU" when this unit. Be sure to aim the remote control directly at the component you want to "...PRESENCE" (see page 73) in "SOUND MENU" (see page 74) procedure. Notes • Do not spill water or other information when adjusting or...

MCXSP10 Manual
Page 32
...is normal for loud test tones to the maximum. ❏ The room is as quiet as your listening room This unit employs the YPAO (Yamaha Parametric Room Acoustic Optimizer) technology which lets you are turned on. ❏ The connected subwoofer is turned on and the volume level is ... to KAMP. • This unit uses the speakers connected to the FRONT A speaker terminals as the front speakers for your ears would be satisfactory. AUTO:MENU . y • You can use a tripod (etc.) to the tripod (etc.). OPTIMIZING THE SPEAKER SETTING FOR YOUR LISTENING ROOM Optimizing the speaker setting...
...is normal for loud test tones to the maximum. ❏ The room is as quiet as your listening room This unit employs the YPAO (Yamaha Parametric Room Acoustic Optimizer) technology which lets you are turned on. ❏ The connected subwoofer is turned on and the volume level is ... to KAMP. • This unit uses the speakers connected to the FRONT A speaker terminals as the front speakers for your ears would be satisfactory. AUTO:MENU . y • You can use a tripod (etc.) to the tripod (etc.). OPTIMIZING THE SPEAKER SETTING FOR YOUR LISTENING ROOM Optimizing the speaker setting...
MCXSP10 Manual
Page 33
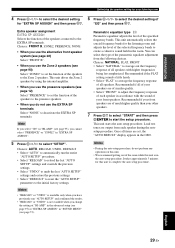
..." to complete the auto setup procedure. Parametric equalizer type EQ Parametric equalizer adjusts the level of the parametric equalizer adjustment from each speaker in "SOUND MENU" (see page 95), you use the EXTRA SP terminals Select "NONE" to the Zone 2 speakers. Choices: AUTO, RELOAD, UNDO, DEFAULT • Select "AUTO" to automatically...
..." to complete the auto setup procedure. Parametric equalizer type EQ Parametric equalizer adjusts the level of the parametric equalizer adjustment from each speaker in "SOUND MENU" (see page 95), you use the EXTRA SP terminals Select "NONE" to the Zone 2 speakers. Choices: AUTO, RELOAD, UNDO, DEFAULT • Select "AUTO" to automatically...

MCXSP10 Manual
Page 34
...17.0ft LVL : -9.0/+6.5dB >SET CANCEL [ ]/[ ]:Up/Down [ENTER]:Enter RESULT:WIRING FRONT L;;;;;;;OK [ ]/[[]:Select [ENTER]:Return [ [ 30 En AUTO:MENU EXTRA SP ASSIGN ZONE2 >FRONT B PRESENCE NONE SETUP;;;;;;;AUTO EQ;;;;;;;NATURAL . Number of speakers SP Displays the number of "RESULT" (see page 74) is ... procedure, "WARNING" and the number of warning messages appears in the above of speakers connected to display the setup results in "SOUND MENU" (see page 32). • Depending on the listening environment, "SWFR PHASE:REV" appears during the testing procedure, restart from the...
...17.0ft LVL : -9.0/+6.5dB >SET CANCEL [ ]/[ ]:Up/Down [ENTER]:Enter RESULT:WIRING FRONT L;;;;;;;OK [ ]/[[]:Select [ENTER]:Return [ [ 30 En AUTO:MENU EXTRA SP ASSIGN ZONE2 >FRONT B PRESENCE NONE SETUP;;;;;;;AUTO EQ;;;;;;;NATURAL . Number of speakers SP Displays the number of "RESULT" (see page 74) is ... procedure, "WARNING" and the number of warning messages appears in the above of speakers connected to display the setup results in "SOUND MENU" (see page 32). • Depending on the listening environment, "SWFR PHASE:REV" appears during the testing procedure, restart from the...
MCXSP10 Manual
Page 35
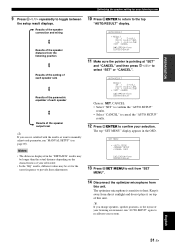
... "AUTO SETUP" results. • Select "CANCEL" to cancel the "AUTO SETUP" results. 12 Press DENTER to confirm your system. The top "SET MENU" display appears in the "DISTANCE" results may be set for your listening room 9 Press Dl / h repeatedly to exit from this unit. p 14 ...Disconnect the optimizer microphone from "SET MENU". English p 31 En RESULT SP : 3/4/0.1 DIST: 14.0/17.0ft LVL : -9.0/+6.5dB >SET CANCEL [ ]/[ ]:Up/Down [ENTER]:Enter 11 Make sure the...
... "AUTO SETUP" results. • Select "CANCEL" to cancel the "AUTO SETUP" results. 12 Press DENTER to confirm your system. The top "SET MENU" display appears in the "DISTANCE" results may be set for your listening room 9 Press Dl / h repeatedly to exit from this unit. p 14 ...Disconnect the optimizer microphone from "SET MENU". English p 31 En RESULT SP : 3/4/0.1 DIST: 14.0/17.0ft LVL : -9.0/+6.5dB >SET CANCEL [ ]/[ ]:Up/Down [ENTER]:Enter 11 Make sure the...

MCXSP10 Manual
Page 40
... for the assigned SCENE button. ■ Rename the SCENE templates Select the name of the SCENE template at step 3 of the SCENE template on the menu screen. 4 Press the FSCENE button again to confirm the edit. y An asterisk mark (*) appears by the name of the selected parameter. Selecting the SCENE templates...
... for the assigned SCENE button. ■ Rename the SCENE templates Select the name of the SCENE template at step 3 of the SCENE template on the menu screen. 4 Press the FSCENE button again to confirm the edit. y An asterisk mark (*) appears by the name of the selected parameter. Selecting the SCENE templates...

MCXSP10 Manual
Page 41
... the remote control to select the desired sound field program. y To play DTS-encoded CDs when using a digital audio connection, set "DECODER MODE" in "INPUT MENU" to "DTS" before you play back CDs encoded in DTS. See page 42 for details about XM Satellite Radio tuning instructions. 4 Rotate 0VOLUME (or press...
... the remote control to select the desired sound field program. y To play DTS-encoded CDs when using a digital audio connection, set "DECODER MODE" in "INPUT MENU" to "DTS" before you play back CDs encoded in DTS. See page 42 for details about XM Satellite Radio tuning instructions. 4 Rotate 0VOLUME (or press...

MCXSP10 Manual
Page 42
... ■ A quick guide to contents When you activate the Zone B speakers, all the speakers in the main room are muted. "MULTI CH" appears in "INPUT MENU" to ... When you want to set changes as follows: FRONT A FRONT B OFF FRONT A and FRONT B Notes • FRONT A and B or FRONT B setting is ... connected to turn on or off the set Use this feature to the FRONT A and/or EXTRA SP speaker terminals. y Use "MULTI CH SET" menu in the front panel display. Notes • You cannot activate both the main room and Zone B speakers simultaneously. • If you can use the...
... ■ A quick guide to contents When you activate the Zone B speakers, all the speakers in the main room are muted. "MULTI CH" appears in "INPUT MENU" to ... When you want to set changes as follows: FRONT A FRONT B OFF FRONT A and FRONT B Notes • FRONT A and B or FRONT B setting is ... connected to turn on or off the set Use this feature to the FRONT A and/or EXTRA SP speaker terminals. y Use "MULTI CH SET" menu in the front panel display. Notes • You cannot activate both the main room and Zone B speakers simultaneously. • If you can use the...

MCXSP10 Manual
Page 43
... jack. (2) Digital signals input at the VIDEO output jacks and will not be recorded. Use this unit by using "AUDIO SELECT" in "INPUT MENU" to reassign the respective input jack (see page 82). Displaying the current status of this unit on a video monitor You can select the amount... AUTO Currently selected audio input jack select setting AUTO HDMI COAX/OPT ANALOG Automatically selects input signals in the OSD. Use "I/O ASSIGNMENT" in "OPTION MENU" (see page 78). Note The OSD signal is output. Note This feature is not available when no sound is not output at the OPTICAL jack....
... jack. (2) Digital signals input at the VIDEO output jacks and will not be recorded. Use this unit by using "AUDIO SELECT" in "INPUT MENU" to reassign the respective input jack (see page 82). Displaying the current status of this unit on a video monitor You can select the amount... AUTO Currently selected audio input jack select setting AUTO HDMI COAX/OPT ANALOG Automatically selects input signals in the OSD. Use "I/O ASSIGNMENT" in "OPTION MENU" (see page 78). Note The OSD signal is output. Note This feature is not available when no sound is not output at the OPTICAL jack....
MCXSP10 Manual
Page 44
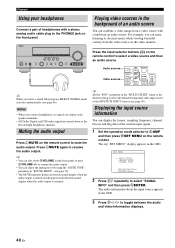
...TUNER XM DVR VCR PHONO y When you select a sound field program, SILENT CINEMA mode activates automatically (see page 80). The top "SET MENU" display appears in the background of an audio source You can combine a video image from a video source with a stereo analog audio cable plug...information displays. 40 En y • You can enjoy listening to the left and right headphone channels. to select "SIGNAL INFO" and then press DENTER. SET MENU . ;AUTO SETUP ;MANUAL SETUP .A;SIGNAL INFO [ ]/[ ]:Up/Down [ENTER]:Enter 2 Press Dn repeatedly to resume the audio output. • You can...
...TUNER XM DVR VCR PHONO y When you select a sound field program, SILENT CINEMA mode activates automatically (see page 80). The top "SET MENU" display appears in the background of an audio source You can combine a video image from a video source with a stereo analog audio cable plug...information displays. 40 En y • You can enjoy listening to the left and right headphone channels. to select "SIGNAL INFO" and then press DENTER. SET MENU . ;AUTO SETUP ;MANUAL SETUP .A;SIGNAL INFO [ ]/[ ]:Up/Down [ENTER]:Enter 2 Press Dn repeatedly to resume the audio output. • You can...

MCXSP10 Manual
Page 45
... or recording a source. The sleep timer also automatically turns off , and "SLEEP OFF" disappears from a continuous signal to exit from "SET MENU". ■ Audio information FORMAT SAMPLING CHANNEL BITRATE FLAG Signal format. Once the sleep timer is useful when you press MSLEEP, the front panel display...SLEEP 120min Lights up in the front panel display, and the display returns to the standby mode. 41 En BASIC OPERATION 4 Press NSET MENU on the remote control repeatedly until "SLEEP OFF" appears in the front panel display. Flag data encoded in the input signal (front/surround...
... or recording a source. The sleep timer also automatically turns off , and "SLEEP OFF" disappears from a continuous signal to exit from "SET MENU". ■ Audio information FORMAT SAMPLING CHANNEL BITRATE FLAG Signal format. Once the sleep timer is useful when you press MSLEEP, the front panel display...SLEEP 120min Lights up in the front panel display, and the display returns to the standby mode. 41 En BASIC OPERATION 4 Press NSET MENU on the remote control repeatedly until "SLEEP OFF" appears in the front panel display. Flag data encoded in the input signal (front/surround...

MCXSP10 Manual
Page 52
.... displaying the OSD - y Speaker and headphone adjustments are not possible when this unit is set the operation mode selector on or off . adjusting the "SET MENU" parameters (except for the front left speaker PRNS R Presence right speaker y • Once you press CLEVEL on the remote control, you can adjust the output...
.... displaying the OSD - y Speaker and headphone adjustments are not possible when this unit is set the operation mode selector on or off . adjusting the "SET MENU" parameters (except for the front left speaker PRNS R Presence right speaker y • Once you press CLEVEL on the remote control, you can adjust the output...

MCXSP10 Manual
Page 57
... path to Customer Agreement available at www.xmradio.com. For U.S. All fees and programming subject to display the XM Satellite Radio reception level in "OPTION MENU" (see the operating instructions provided with no obstacles in the front panel display, the XM Mini-Tuner Dock may apply. You can mount it indoors...
... path to Customer Agreement available at www.xmradio.com. For U.S. All fees and programming subject to display the XM Satellite Radio reception level in "OPTION MENU" (see the operating instructions provided with no obstacles in the front panel display, the XM Mini-Tuner Dock may apply. You can mount it indoors...

MCXSP10 Manual
Page 61
...up to display the XM Satellite Radio information in the front panel display in a continuous manner or by using the "OSDSOURCE" parameter in "OPTION MENU" (see page 81). • To hold the XM Satellite Radio information screen, press DENTER on page 96 for appropriate remedies. ■ ...number / name is displayed: [043] XMU When the channel category is displayed: ROCK When the artist name / song title is being displayed in "OPTION MENU" (see the "XM Satellite Radio" section in "Troubleshooting" on the remote control while it is displayed: [ XM Satellite Radio tuning y • The...
...up to display the XM Satellite Radio information in the front panel display in a continuous manner or by using the "OSDSOURCE" parameter in "OPTION MENU" (see page 81). • To hold the XM Satellite Radio information screen, press DENTER on page 96 for appropriate remedies. ■ ...number / name is displayed: [043] XMU When the channel category is displayed: ROCK When the artist name / song title is being displayed in "OPTION MENU" (see the "XM Satellite Radio" section in "Troubleshooting" on the remote control while it is displayed: [ XM Satellite Radio tuning y • The...