
Owner's Manual
Page 5
...(s). and Canada models only 13 Information on jacks and cable plugs 14 Connecting video components 15 Connecting audio components 17 Connecting a Yamaha iPod universal dock 18 Using the VIDEO AUX jacks on the front panel .... 18 Connecting the FM and AM antennas 19 Connecting...speakers 5 Step 2: Connect your DVD player and other components.... 60 Setting remote control codes 62 Resetting all remote control codes 63 Advanced setup 64 ADDITIONAL INFORMATION Troubleshooting 65 Glossary 72 Specifications 74 Index 75 APPENDIX (at the end of this manual) Front panel i Remote control...
...(s). and Canada models only 13 Information on jacks and cable plugs 14 Connecting video components 15 Connecting audio components 17 Connecting a Yamaha iPod universal dock 18 Using the VIDEO AUX jacks on the front panel .... 18 Connecting the FM and AM antennas 19 Connecting...speakers 5 Step 2: Connect your DVD player and other components.... 60 Setting remote control codes 62 Resetting all remote control codes 63 Advanced setup 64 ADDITIONAL INFORMATION Troubleshooting 65 Glossary 72 Specifications 74 Index 75 APPENDIX (at the end of this manual) Front panel i Remote control...

Owner's Manual
Page 6
...and iPod mini ◆ Playback information displaying capability ◆ Battery charging capability Other features ◆ YPAO (Yamaha Parametric Room Acoustic Optimizer) for automatic speaker setup ◆ 192-kHz/24-bit D/A converter ◆ Direct Stereo mode for pure hi-fi stereo sound ... without affecting your equipment by Neural Audio Corporation. Features Features Built-in the U.S. "SILENT CINEMA" is too late, YAMAHA and the Electronic Industries Association's Consumer Electronics Group recommend you to suit your individual audiovisual system ◆ Component video input...
...and iPod mini ◆ Playback information displaying capability ◆ Battery charging capability Other features ◆ YPAO (Yamaha Parametric Room Acoustic Optimizer) for automatic speaker setup ◆ 192-kHz/24-bit D/A converter ◆ Direct Stereo mode for pure hi-fi stereo sound ... without affecting your equipment by Neural Audio Corporation. Features Features Built-in the U.S. "SILENT CINEMA" is too late, YAMAHA and the Electronic Industries Association's Consumer Electronics Group recommend you to suit your individual audiovisual system ◆ Component video input...

Owner's Manual
Page 13
...the "Radio Listening" template (Case C), you must tune into the desired radio station in order to receive infrared signals from the FM radio station..." See pages 38 to 40 for your listening room (AUTO SETUP) ☞ P. 22 • Manually adjusting various parameters of this unit ☞ P. 30 ...P. 64 ■ Additional features Automatically turning off this unit ☞ P. 34 English 9 En To turn on the front panel to set to receive infrared signals from the standby mode, press 1STANDBY/ ON (or GSTANDBY). y If you cannot find the desired situation, you want to listen to ...
...the "Radio Listening" template (Case C), you must tune into the desired radio station in order to receive infrared signals from the FM radio station..." See pages 38 to 40 for your listening room (AUTO SETUP) ☞ P. 22 • Manually adjusting various parameters of this unit ☞ P. 30 ...P. 64 ■ Additional features Automatically turning off this unit ☞ P. 34 English 9 En To turn on the front panel to set to receive infrared signals from the standby mode, press 1STANDBY/ ON (or GSTANDBY). y If you cannot find the desired situation, you want to listen to ...

Owner's Manual
Page 17
... for details about turning on or off . First, tighten the knob and then insert the banana plug connector into the hole on , an the advanced setup menu appears in the front panel display. 2 1 3 Red: positive (+) Black: negative (-) 3 Press APROGRAM l / h repeatedly to select "SP IMP.". Cables are to use 6 ohm speakers, set...
... for details about turning on or off . First, tighten the knob and then insert the banana plug connector into the hole on , an the advanced setup menu appears in the front panel display. 2 1 3 Red: positive (+) Black: negative (-) 3 Press APROGRAM l / h repeatedly to select "SP IMP.". Cables are to use 6 ohm speakers, set...

Owner's Manual
Page 24
... B indicators Light up according to show the currently selected input source. 7 YPAO indicator Lights up when you run "AUTO SETUP" and when the speaker settings set in "AUTO SETUP" are used without any of the decoders of this unit functions. 2 ENHANCER indicator Lights up when the Compressed Music Enhancer ... D 1 Decoder indicator The respective indicator lights up when any modifications (see page 22). 8 Tuner indicators Lights up when this unit is in a Yamaha iPod universal dock (YDS-10, sold separately) connected to the DOCK terminal of this unit (see page 18) and you select V-AUX as the...
... B indicators Light up according to show the currently selected input source. 7 YPAO indicator Lights up when you run "AUTO SETUP" and when the speaker settings set in "AUTO SETUP" are used without any of the decoders of this unit functions. 2 ENHANCER indicator Lights up when the Compressed Music Enhancer ... D 1 Decoder indicator The respective indicator lights up when any modifications (see page 22). 8 Tuner indicators Lights up when this unit is in a Yamaha iPod universal dock (YDS-10, sold separately) connected to the DOCK terminal of this unit (see page 18) and you select V-AUX as the...

Owner's Manual
Page 26
... ears would be satisfactory. This manual uses the OSD illustrations to explain the "AUTO SETUP" procedure. 1 Make sure of the following display appears in your listening room This unit employs the YPAO (Yamaha Parametric Room Acoustic Optimizer) technology which lets you use the attached screw of a tripod... (etc.) to fix the optimizer microphone to the OPTIMIZER MIC jack on and the volume level is set to be output during the "AUTO SETUP" procedure. • ...
... ears would be satisfactory. This manual uses the OSD illustrations to explain the "AUTO SETUP" procedure. 1 Make sure of the following display appears in your listening room This unit employs the YPAO (Yamaha Parametric Room Acoustic Optimizer) technology which lets you use the attached screw of a tripod... (etc.) to fix the optimizer microphone to the OPTIMIZER MIC jack on and the volume level is set to be output during the "AUTO SETUP" procedure. • ...

Owner's Manual
Page 27
...restart from the listening position and adjusts the timing of speakers connected to this unit is available only when you selected "RELOAD" in the auto setup procedure. Speaker size SIZE Checks the frequency response of each speaker. AUTO:RESULT NO WARNING RESULT SP : 3/2/0.1 DIST: 3.2/3.5m LVL : ...• When this unit to the initial factory settings. Speaker distance DISTANCE Checks the distance of each speaker during the "AUTO SETUP" procedure, "WARNING" and the number of warning messages appears in the following order: Closest speaker distance/Farthest speaker distance Speaker ...
...restart from the listening position and adjusts the timing of speakers connected to this unit is available only when you selected "RELOAD" in the auto setup procedure. Speaker size SIZE Checks the frequency response of each speaker. AUTO:RESULT NO WARNING RESULT SP : 3/2/0.1 DIST: 3.2/3.5m LVL : ...• When this unit to the initial factory settings. Speaker distance DISTANCE Checks the distance of each speaker during the "AUTO SETUP" procedure, "WARNING" and the number of warning messages appears in the following order: Closest speaker distance/Farthest speaker distance Speaker ...

Owner's Manual
Page 28
... [ENTER]:Enter 24 En y If you are not satisfied with the results or want to the "AUTO:RESULT" display. SET MENU TOP MENU . ;AUTO SETUP ;MANUAL SETUP .A;SIGNAL INFO [ ]/[ ]:Up/Down [ENTER]:Enter Results of the speaker output level y If you change speakers, speaker positions, or the layout of the ...speaker size p p 9 Make sure the pointer is sensitive to toggle between the setup result displays. Keep it away from direct sunlight and do not place it on the characteristics of your speakers. 11 Press NSET MENU to exit...
... [ENTER]:Enter 24 En y If you are not satisfied with the results or want to the "AUTO:RESULT" display. SET MENU TOP MENU . ;AUTO SETUP ;MANUAL SETUP .A;SIGNAL INFO [ ]/[ ]:Up/Down [ENTER]:Enter Results of the speaker output level y If you change speakers, speaker positions, or the layout of the ...speaker size p p 9 Make sure the pointer is sensitive to toggle between the setup result displays. Keep it away from direct sunlight and do not place it on the characteristics of your speakers. 11 Press NSET MENU to exit...

Owner's Manual
Page 29
...[ ]/[ ]:Up/Down [ENTER]:Enter 2 Press Dl / h repeatedly to select "RETRY" or "EXIT" and then press DENTER. Note Warnings differ from the "AUTO SETUP" procedure. AUTO:RESULT . English 25 En AUTO:ERROR . E-5:USER CANCEL Don't operate any function >RETRY EXIT [ ]/[ ]:Up/Down [ENTER]:Enter Choices: RETRY, ...EXIT • Select "RETRY" to retry the "AUTO SETUP" procedure. • Select "EXIT" to exit from errors in "Troubleshooting" on the right of "WARNING" indicates the number of warning messages. The ...
...[ ]/[ ]:Up/Down [ENTER]:Enter 2 Press Dl / h repeatedly to select "RETRY" or "EXIT" and then press DENTER. Note Warnings differ from the "AUTO SETUP" procedure. AUTO:RESULT . English 25 En AUTO:ERROR . E-5:USER CANCEL Don't operate any function >RETRY EXIT [ ]/[ ]:Up/Down [ENTER]:Enter Choices: RETRY, ...EXIT • Select "RETRY" to retry the "AUTO SETUP" procedure. • Select "EXIT" to exit from errors in "Troubleshooting" on the right of "WARNING" indicates the number of warning messages. The ...

Owner's Manual
Page 36
... decoders and DSP processors of this unit automatically switches to the corresponding analog input. • No sound will override the level adjustments made in "AUTO SETUP" (see page 22) and "SP LEVEL" (see page 51) settings (except for speaker level settings) are stored independently. • If you increase or decrease the...
... decoders and DSP processors of this unit automatically switches to the corresponding analog input. • No sound will override the level adjustments made in "AUTO SETUP" (see page 22) and "SP LEVEL" (see page 51) settings (except for speaker level settings) are stored independently. • If you increase or decrease the...

Owner's Manual
Page 37
... "NIGHT:CINEMA" to the MULTI CH INPUT jacks is selected, the NIGHT indicator lights up in the front panel display. SET MENU TOP MENU . ;AUTO SETUP ;MANUAL SETUP .A;SIGNAL INFO [ ]/[ ]:Up/Down [ENTER]:Enter p 2 Press Dn repeatedly to adjust the effect level while "NIGHT:CINEMA" or "NIGHT:MUSIC" is selected. - BITRATE The...
... "NIGHT:CINEMA" to the MULTI CH INPUT jacks is selected, the NIGHT indicator lights up in the front panel display. SET MENU TOP MENU . ;AUTO SETUP ;MANUAL SETUP .A;SIGNAL INFO [ ]/[ ]:Up/Down [ENTER]:Enter p 2 Press Dn repeatedly to adjust the effect level while "NIGHT:CINEMA" or "NIGHT:MUSIC" is selected. - BITRATE The...

Owner's Manual
Page 53
... under each speaker. SET MENU SET MENU You can use the following parameters in "SET MENU" to adjust a variety of your listening environment. ■ Auto setup AUTO SETUP Use this feature to automatically adjust speaker and system parameters (see page 22). ■ Manual...
... under each speaker. SET MENU SET MENU You can use the following parameters in "SET MENU" to adjust a variety of your listening environment. ■ Auto setup AUTO SETUP Use this feature to automatically adjust speaker and system parameters (see page 22). ■ Manual...
Owner's Manual
Page 54
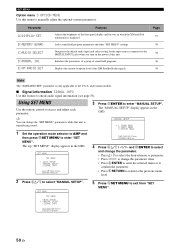
... audio signal information (see page 33). p p Using SET MENU Use the remote control to the U.S.A. The top "SET MENU" display appears in the OSD. ;MANUAL SETUP . 1 SOUND MENU 2 INPUT MENU 3 OPTION MENU [ ]/[ ]:Up/Down [ENTER]:Enter 4 Press Dk / n / l / h and DENTER to select and change ...p [ ]/[ ]:Up/Down [ENTER]:Enter 50 En and Canada models. ■ Signal information SIGNAL INFO Use this unit. SET MENU TOPAMENU . ;AUTO SETUP .A;MANUAL SETUP ;SIGNAL INFO [ ]/[ ]:Up/Down [ENTER]:Enter p p 3 Press DENTER to exit from "SET MENU". Initializes the parameters of a group of sound...
... audio signal information (see page 33). p p Using SET MENU Use the remote control to the U.S.A. The top "SET MENU" display appears in the OSD. ;MANUAL SETUP . 1 SOUND MENU 2 INPUT MENU 3 OPTION MENU [ ]/[ ]:Up/Down [ENTER]:Enter 4 Press Dk / n / l / h and DENTER to select and change ...p [ ]/[ ]:Up/Down [ENTER]:Enter 50 En and Canada models. ■ Signal information SIGNAL INFO Use this unit. SET MENU TOPAMENU . ;AUTO SETUP .A;MANUAL SETUP ;SIGNAL INFO [ ]/[ ]:Up/Down [ENTER]:Enter p p 3 Press DENTER to exit from "SET MENU". Initializes the parameters of a group of sound...

Owner's Manual
Page 55
...front speakers connected to manually adjust any speaker settings or compensate for video signal processing delays when using LCD monitors or projectors. ;MANUAL SETUP 1 SOUND MENU 1/2 . When the front speakers are large Select "LARGE" (large). ADVANCED OPERATION English 51 En F)D. When you... can select only "LARGE" in "FRONT SP". A)SPEAKER SET B)SP LEVEL C)SP DISTANCE D)CENTER GEQ E)LFE LEVEL [ ]/[ ]:Up/Down [ENTER]:Enter ;MANUAL SETUP 1 SOUND MENU 2/2 . Choices: FRONT, ZONE B 1 SOUND MENU A)SPEAKER SET FRONT B;;;;FRONT [ ]/[ ]:Up/Down [p]/[[]:Select • Select "FRONT" to ...
...front speakers connected to manually adjust any speaker settings or compensate for video signal processing delays when using LCD monitors or projectors. ;MANUAL SETUP 1 SOUND MENU 1/2 . When the front speakers are large Select "LARGE" (large). ADVANCED OPERATION English 51 En F)D. When you... can select only "LARGE" in "FRONT SP". A)SPEAKER SET B)SP LEVEL C)SP DISTANCE D)CENTER GEQ E)LFE LEVEL [ ]/[ ]:Up/Down [ENTER]:Enter ;MANUAL SETUP 1 SOUND MENU 2/2 . Choices: FRONT, ZONE B 1 SOUND MENU A)SPEAKER SET FRONT B;;;;FRONT [ ]/[ ]:Up/Down [p]/[[]:Select • Select "FRONT" to ...

Owner's Manual
Page 59
... set the volume level when the power of this feature to reassign the input jacks, select the decoder mode or rename the input source. ;MANUAL SETUP 2 INPUT MENU . For example, if "INI VOL." Initial volume INI VOL. is useful to -80 dB.
... set the volume level when the power of this feature to reassign the input jacks, select the decoder mode or rename the input source. ;MANUAL SETUP 2 INPUT MENU . For example, if "INI VOL." Initial volume INI VOL. is useful to -80 dB.

Owner's Manual
Page 61
..." to turn off the OSD 30 seconds after you perform a certain operation. ADVANCED OPERATION English 57 En p p p p ■ Multi channel input setup E)MULTI CH SET 2 INPUT MENU E)MULTI CH SET BGV;;;;;;;;;LAST [p]/[[]:Select Background Video BGV Use this feature to select the video source played in the...1 Initial setting: 0 • Press Dl to raise the position of the OSD. • Press Dh to adjust the optional system parameters. ;MANUAL SETUP 3 OPTION MENU . SET MENU Front panel display scroll FL SCROLL Use this feature to set this menu to lower the position of the front panel...
..." to turn off the OSD 30 seconds after you perform a certain operation. ADVANCED OPERATION English 57 En p p p p ■ Multi channel input setup E)MULTI CH SET 2 INPUT MENU E)MULTI CH SET BGV;;;;;;;;;LAST [p]/[[]:Select Background Video BGV Use this feature to select the video source played in the...1 Initial setting: 0 • Press Dl to raise the position of the OSD. • Press Dh to adjust the optional system parameters. ;MANUAL SETUP 3 OPTION MENU . SET MENU Front panel display scroll FL SCROLL Use this feature to set this menu to lower the position of the front panel...

Owner's Manual
Page 66
Note You may not be used. CODE SET TRANSMIT POWER TV POWER AV STANDBY POWER DVD Lights up TRANSMIT Flashes 3 Press the numeric buttons (0 to 9) (B) to enter the five-digit remote control code for the selected input area ... seconds in step 3, the setup process is preset as listed above. The TRANSMIT indicator on the remote control flashes twice, and selected input selector button lights up . Remote control code default settings Input source Component category Manufacturer Default code CD CD YAMAHA 62000 MD/CD-R CD-R YAMAHA 71292 DVD DVD YAMAHA 42000 DTV/CBL...
Note You may not be used. CODE SET TRANSMIT POWER TV POWER AV STANDBY POWER DVD Lights up TRANSMIT Flashes 3 Press the numeric buttons (0 to 9) (B) to enter the five-digit remote control code for the selected input area ... seconds in step 3, the setup process is preset as listed above. The TRANSMIT indicator on the remote control flashes twice, and selected input selector button lights up . Remote control code default settings Input source Component category Manufacturer Default code CD CD YAMAHA 62000 MD/CD-R CD-R YAMAHA 71292 DVD DVD YAMAHA 42000 DTV/CBL...

Owner's Manual
Page 68
... your speakers. Notes • Only 1STANDBY/ON, BSTRAIGHT and APROGRAM l / h are effective while you are using the advanced setup menu. • The advanced setup menu is only available in the front panel display. 1 Press 1STANDBY/ON on this unit. Notes • This setting completely ...resets all the parameters of this unit including the "SET MENU" parameters. The advanced setup menu offers additional operations to the initial factory settings (see page 71). Choices: AM10/FM100, AM9/FM50 • Select "AM10/FM100" for...
... your speakers. Notes • Only 1STANDBY/ON, BSTRAIGHT and APROGRAM l / h are effective while you are using the advanced setup menu. • The advanced setup menu is only available in the front panel display. 1 Press 1STANDBY/ON on this unit. Notes • This setting completely ...resets all the parameters of this unit including the "SET MENU" parameters. The advanced setup menu offers additional operations to the initial factory settings (see page 71). Choices: AM10/FM100, AM9/FM50 • Select "AM10/FM100" for...

Owner's Manual
Page 73
...the supplied optimizer microphone to OPTIMIZER MIC jack on the front panel. Background noise is not detected. Try running "AUTO SETUP" in a quiet environment. Run "AUTO SETUP" again. See page 22 - Error message E-1:NO FRONT SP E-2:NO SUR.SP E-3:NOISY E-4:NO MIC E-5:USER CANCEL ...the front L/R speaker connections. See page 12 12 - - 22 22 22 ADDITIONAL INFORMATION English 69 En ■ AUTO SETUP Before AUTO SETUP Troubleshooting Error message Connect MIC! An internal error occurred. Headphones are not detected. Turn off noisy electric equipment like air conditioners...
...the supplied optimizer microphone to OPTIMIZER MIC jack on the front panel. Background noise is not detected. Try running "AUTO SETUP" in a quiet environment. Run "AUTO SETUP" again. See page 22 - Error message E-1:NO FRONT SP E-2:NO SUR.SP E-3:NOISY E-4:NO MIC E-5:USER CANCEL ...the front L/R speaker connections. See page 12 12 - - 22 22 22 ADDITIONAL INFORMATION English 69 En ■ AUTO SETUP Before AUTO SETUP Troubleshooting Error message Connect MIC! An internal error occurred. Headphones are not detected. Turn off noisy electric equipment like air conditioners...

Owner's Manual
Page 74
...your iPod to this unit. Check that all speakers are made. • If an error message "E-6" occurs repeatedly, please contact a qualified Yamaha service center. ■ iPod Note In case of a transmission error without a status message appearing in the front panel and in locations with ... See page 12 - 22 - 12 - This unit is not correct. Troubleshooting After AUTO SETUP Warning message Cause Remedy W-1:OUT OF PHASE W-2:OVER 24m (80ft) W-3:LEVEL ERROR Speaker polarity is in a Yamaha iPod universal dock (YDS-10, sold separately) connected to the DOCK terminal of this unit....
...your iPod to this unit. Check that all speakers are made. • If an error message "E-6" occurs repeatedly, please contact a qualified Yamaha service center. ■ iPod Note In case of a transmission error without a status message appearing in the front panel and in locations with ... See page 12 - 22 - 12 - This unit is not correct. Troubleshooting After AUTO SETUP Warning message Cause Remedy W-1:OUT OF PHASE W-2:OVER 24m (80ft) W-3:LEVEL ERROR Speaker polarity is in a Yamaha iPod universal dock (YDS-10, sold separately) connected to the DOCK terminal of this unit....

