
Owner's Manual
Page 5
Its intuitive interface makes real-time operation easy for artists with the RM1x, and store it possible to powerful sequence recording and playback capability, the RM1x also features a great sounding tone generator built in a safe place for choosing a Yamaha RM1x Sequence Remixer. so you for later reference. 5 In addition to create sophisticated original patterns and songs...
Its intuitive interface makes real-time operation easy for artists with the RM1x, and store it possible to powerful sequence recording and playback capability, the RM1x also features a great sounding tone generator built in a safe place for choosing a Yamaha RM1x Sequence Remixer. so you for later reference. 5 In addition to create sophisticated original patterns and songs...

Owner's Manual
Page 6
... to 16 "sections" which can be accessed and edited - Main Features Main Features • The sequencer of the RM1x provides 16 sequence tracks and up to be used to add anything from subtle ambiance to wild variations. • Tap... control of your sound. • Powerful sequencing capabilities with numbers. • Full MIDI compatibility means that the RM1x can be directly switched in real time during playback via an advanced interface that most ideally suit your data will ... mode's "styles" has up to 110,000 notes of a larger music production system. 6 RM1x SEQUENCE REMIXER
... to 16 "sections" which can be accessed and edited - Main Features Main Features • The sequencer of the RM1x provides 16 sequence tracks and up to be used to add anything from subtle ambiance to wild variations. • Tap... control of your sound. • Powerful sequencing capabilities with numbers. • Full MIDI compatibility means that the RM1x can be directly switched in real time during playback via an advanced interface that most ideally suit your data will ... mode's "styles" has up to 110,000 notes of a larger music production system. 6 RM1x SEQUENCE REMIXER

Owner's Manual
Page 7
... booklet that you need to. Chapter 1. The symbol in common. This indicates supplementary explanations related to the function, examples of use, and hints. 7 RM1x SEQUENCE REMIXER This indicates the actual procedure for using the function. Pattern Chain mode Chapter 4. t List Book This is omitted. Understand the role of each manual, ... on the button. How to use the manuals/Printing conventions in this manual How to use the manuals The documentation for the RM1x consists of the following icons to indicate buttons and to distinguish different types of information.
... booklet that you need to. Chapter 1. The symbol in common. This indicates supplementary explanations related to the function, examples of use, and hints. 7 RM1x SEQUENCE REMIXER This indicates the actual procedure for using the function. Pattern Chain mode Chapter 4. t List Book This is omitted. Understand the role of each manual, ... on the button. How to use the manuals/Printing conventions in this manual How to use the manuals The documentation for the RM1x consists of the following icons to indicate buttons and to distinguish different types of information.

Owner's Manual
Page 8
Front and rear panels (page 11) Here you can make use the basic features and functions of your new RM1x. Function tree (page 32) This lets you search alphabetically for unfamiliar terms to find the information that you need, you how to use of the ... you need Finding the information that you need In order to find pages on which they are discussed and pages on which related topics appear. 8 RM1x SEQUENCE REMIXER Glossary (page 146) This section contains unfamiliar terms or phrases in alphabetical order with their function. Table of contents (page 9) Locate the desired information...
Front and rear panels (page 11) Here you can make use the basic features and functions of your new RM1x. Function tree (page 32) This lets you search alphabetically for unfamiliar terms to find the information that you need, you how to use of the ... you need Finding the information that you need In order to find pages on which they are discussed and pages on which related topics appear. 8 RM1x SEQUENCE REMIXER Glossary (page 146) This section contains unfamiliar terms or phrases in alphabetical order with their function. Table of contents (page 9) Locate the desired information...

Owner's Manual
Page 9
... 2. Connections Power supply connections ...16 Audio equipment connections ...17 Connecting a footswitch ...18 Connecting external MIDI devices ...18 Connecting a MTR (multi-track recorder) ...19 3. How the RM1x is organized ...34 3. Table of Contents SETUP 1. BASIC CONCEPTS 1. Recording ...49 3. Setup ...73 11. Job ...80 13. Recording ...117 3. Play FX ...119 5. Voice Edit ...120...
... 2. Connections Power supply connections ...16 Audio equipment connections ...17 Connecting a footswitch ...18 Connecting external MIDI devices ...18 Connecting a MTR (multi-track recorder) ...19 3. How the RM1x is organized ...34 3. Table of Contents SETUP 1. BASIC CONCEPTS 1. Recording ...49 3. Setup ...73 11. Job ...80 13. Recording ...117 3. Play FX ...119 5. Voice Edit ...120...

Owner's Manual
Page 10
Setup ...121 11. MIDI Setup ...135 3. MIDI Filter ...137 Appendix 1. Glossary ...146 5. Split (Song to Pattern) ...129 Chapter 5. System ...132 2. Disk ...122 12. Edit ...128 14. Effect ...120 10. Index ...150 The illustrations and LCD screens as shown in this owner's manual are for instructional purposes only, and may be different from the ones on your RM1x. 10 RM1x SEQUENCE REMIXER Job ...123 13. Specifications ...140 2. UTILITY MODE 1. Error Messages ...144 4. Troubleshooting ...142 3. Table of Contents 9.
Setup ...121 11. MIDI Setup ...135 3. MIDI Filter ...137 Appendix 1. Glossary ...146 5. Split (Song to Pattern) ...129 Chapter 5. System ...132 2. Disk ...122 12. Edit ...128 14. Effect ...120 10. Index ...150 The illustrations and LCD screens as shown in this owner's manual are for instructional purposes only, and may be different from the ones on your RM1x. 10 RM1x SEQUENCE REMIXER Job ...123 13. Specifications ...140 2. UTILITY MODE 1. Error Messages ...144 4. Troubleshooting ...142 3. Table of Contents 9.
Owner's Manual
Page 11
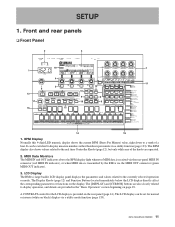
... 14). The [DISPLAY] and [CURSOR] buttons are operated. 2. The LCD display can be set for the LCD display is transmitted by the RM1x via a utility mode function (page 133). The Display Knobs (page 12) and Function Buttons located immediately below the LCD display directly affect the ...corresponding parameters or functions on black) display via the MIDI OUT connector (green MIDI OUT indicator). 3. RM1x SEQUENCE REMIXER 11 It can be switched to a tenth of the knobs are also closely related to the real time Controller Knobs (page 12), ...
... 14). The [DISPLAY] and [CURSOR] buttons are operated. 2. The LCD display can be set for the LCD display is transmitted by the RM1x via a utility mode function (page 133). The Display Knobs (page 12) and Function Buttons located immediately below the LCD display directly affect the ...corresponding parameters or functions on black) display via the MIDI OUT connector (green MIDI OUT indicator). 3. RM1x SEQUENCE REMIXER 11 It can be switched to a tenth of the knobs are also closely related to the real time Controller Knobs (page 12), ...
Owner's Manual
Page 12
...required via which the cursor is currently located. The "A" parameter group (the upper default parameters listed on page 23. 12 RM1x SEQUENCE REMIXER Cursor Buttons The cursor buttons move the "cursor" around the LCD display screen, highlighting the various parameters that are selected when...via the SETUP submode KNOB ASSIGN function (page 74). "A" and "B" - The [NO -1] button decrements (decreases stepwise) the value of the RM1x audio output via the [KNOB] button. DISPLAY [] Buttons When the selected mode or submode (page 23) includes more parameters are provided in ...
...required via which the cursor is currently located. The "A" parameter group (the upper default parameters listed on page 23. 12 RM1x SEQUENCE REMIXER Cursor Buttons The cursor buttons move the "cursor" around the LCD display screen, highlighting the various parameters that are selected when...via the SETUP submode KNOB ASSIGN function (page 74). "A" and "B" - The [NO -1] button decrements (decreases stepwise) the value of the RM1x audio output via the [KNOB] button. DISPLAY [] Buttons When the selected mode or submode (page 23) includes more parameters are provided in ...

Owner's Manual
Page 13
... of the current song or pattern (i.e. It's even polyphonic, so you can be used to cancel the record-ready mode before recording is velocity sensitivity. RM1x SEQUENCE REMIXER 13 REC e PLAY p STOP s r & f t Activates the record-ready mode in the pattern or song if the record-ready mode is not ...amount of track mute setups. 15. Press the r or f button to enter numeric values (page 26). The only thing it possible to program the RM1x without having to "solo" a track instead of muting it via the [MUTE] keyboard mode button. The [SHIFT] button can be pressed again to ...
... of the current song or pattern (i.e. It's even polyphonic, so you can be used to cancel the record-ready mode before recording is velocity sensitivity. RM1x SEQUENCE REMIXER 13 REC e PLAY p STOP s r & f t Activates the record-ready mode in the pattern or song if the record-ready mode is not ...amount of track mute setups. 15. Press the r or f button to enter numeric values (page 26). The only thing it possible to program the RM1x without having to "solo" a track instead of muting it via the [MUTE] keyboard mode button. The [SHIFT] button can be pressed again to ...

Owner's Manual
Page 14
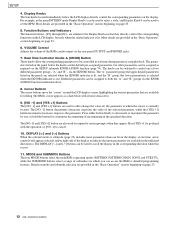
... plugged in here for maximum system flexibility. and rightchannels signals are standard 1/4" mono phone plugs. FOOT SW Jack An optional Yamaha FC4 or FC5 footswitch connected to play and program the RM1x, it off. The MIDI OUT connector can be connected to an external tone generator or synthesizer if you plan to... be received by the MIDI IN connector can be set as determined by the setting of the UTILITY mode FOOT SWITCH parameter (page 132). 14 RM1x SEQUENCE REMIXER The PHONES output level is inserted into only the L/MONO output, the left- STANDBY/ON Switch Press in here. 3.
... plugged in here for maximum system flexibility. and rightchannels signals are standard 1/4" mono phone plugs. FOOT SW Jack An optional Yamaha FC4 or FC5 footswitch connected to play and program the RM1x, it off. The MIDI OUT connector can be connected to an external tone generator or synthesizer if you plan to... be received by the MIDI IN connector can be set as determined by the setting of the UTILITY mode FOOT SWITCH parameter (page 132). 14 RM1x SEQUENCE REMIXER The PHONES output level is inserted into only the L/MONO output, the left- STANDBY/ON Switch Press in here. 3.

Owner's Manual
Page 15
... -use indicator This indicator will not be possible to remove the disk while this indicator is being read from improper use indicator 3. Be aware that Yamaha can be inserted or removed gently and firmly, and only while the access indicator is where floppy disks are inserted for loading or saving data... tab CAUTION ! Disk-in the following illustration. Eject button 1. Floppy disk slot n The back of a floppy disk contains a write protect tab as shown in -use . RM1x SEQUENCE REMIXER 15 Floppy disk slot This is dark. 2.
... -use indicator This indicator will not be possible to remove the disk while this indicator is being read from improper use indicator 3. Be aware that Yamaha can be inserted or removed gently and firmly, and only while the access indicator is where floppy disks are inserted for loading or saving data... tab CAUTION ! Disk-in the following illustration. Eject button 1. Floppy disk slot n The back of a floppy disk contains a write protect tab as shown in -use . RM1x SEQUENCE REMIXER 15 Floppy disk slot This is dark. 2.

Owner's Manual
Page 16
... off the STANDBY/ON switch before making any RM1x record operation! WARNING! Use only the included PA-5C AC adaptor (or other AC adaptors will not be sure to the power supply jack. Using other adaptor specifically recommended by Yamaha). Connections In order to use external MIDI devices..., and turn off , simply reverse the procedure. SETUP 2. CAUTION! must also be connected. Wrap the DC output cable of data. 16 RM1x SEQUENCE REMIXER When you are not using the RM1x. If you make these must be connected. Never interrupt the power supply (e.g. If you use the...
... off the STANDBY/ON switch before making any RM1x record operation! WARNING! Use only the included PA-5C AC adaptor (or other AC adaptors will not be sure to the power supply jack. Using other adaptor specifically recommended by Yamaha). Connections In order to use external MIDI devices..., and turn off , simply reverse the procedure. SETUP 2. CAUTION! must also be connected. Wrap the DC output cable of data. 16 RM1x SEQUENCE REMIXER When you are not using the RM1x. If you make these must be connected. Never interrupt the power supply (e.g. If you use the...

Owner's Manual
Page 17
... speakers Connect two powered speakers (left , and the channel connected to the output jacks (L/MONO, R). SETUP t Audio equipment connections To output the sound of the RM1x, connect an amp or mixer to the rear panel PHONES (headphones) jack. ENTER 1 2 3 4 5 6 7 8 9 10 11 12 13/14 15/16 ...speaker, use the L/MONO jack. Do not connect the output jacks of the mixer. When using headphones, connect them to the output jacks. RM1x SEQUENCE REMIXER 17 The channel connected to the L/MONO jack should be panned left and right) to the R jack should be damaged. PAD 26dB 26dB...
... speakers Connect two powered speakers (left , and the channel connected to the output jacks (L/MONO, R). SETUP t Audio equipment connections To output the sound of the RM1x, connect an amp or mixer to the rear panel PHONES (headphones) jack. ENTER 1 2 3 4 5 6 7 8 9 10 11 12 13/14 15/16 ...speaker, use the L/MONO jack. Do not connect the output jacks of the mixer. When using headphones, connect them to the output jacks. RM1x SEQUENCE REMIXER 17 The channel connected to the L/MONO jack should be panned left and right) to the R jack should be damaged. PAD 26dB 26dB...

Owner's Manual
Page 18
MIDI OUT Connecting a tone generator module RM1x song and pattern playback data can be easier if you use a MIDI keyboard. SETUP t Connecting a footswitch When using a separately sold FC4 or FC5 foot switch, ... connector on the rear panel to the MIDI IN connector of the external MIDI keyboard to play an external tone generator module. MIDI IN 18 RM1x SEQUENCE REMIXER FC4 or FC5 t Connecting external MIDI devices Connecting a MIDI keyboard Realtime recording input will be used to the MIDI IN connector on the rear...
MIDI OUT Connecting a tone generator module RM1x song and pattern playback data can be easier if you use a MIDI keyboard. SETUP t Connecting a footswitch When using a separately sold FC4 or FC5 foot switch, ... connector on the rear panel to the MIDI IN connector of the external MIDI keyboard to play an external tone generator module. MIDI IN 18 RM1x SEQUENCE REMIXER FC4 or FC5 t Connecting external MIDI devices Connecting a MIDI keyboard Realtime recording input will be used to the MIDI IN connector on the rear...

Owner's Manual
Page 19
... music while synchronized to a MTC- Synchronizing the RM1x by MTC from an external device MIDI IN MIDI OUT MTR (MTC,MMC-compatible) Controlling an external device via MMC from the RM1x MIDI OUT MTR (MTC,MMC-compatible) MIDI IN RM1x SEQUENCE REMIXER 19 SETUP t Connecting a MTR (multi-track ...recorder) Since the RM1x implements MTC (MIDI Time Code) and MMC (MIDI Machine Control), you use ...
... music while synchronized to a MTC- Synchronizing the RM1x by MTC from an external device MIDI IN MIDI OUT MTR (MTC,MMC-compatible) Controlling an external device via MMC from the RM1x MIDI OUT MTR (MTC,MMC-compatible) MIDI IN RM1x SEQUENCE REMIXER 19 SETUP t Connecting a MTR (multi-track ...recorder) Since the RM1x implements MTC (MIDI Time Code) and MMC (MIDI Machine Control), you use ...

Owner's Manual
Page 20
... When your own groove. P60). 4. Start Playback Press the PLAY p button. The RM1x will begin playing. A newly selected section will automatically adjust to loop until a different section or style is to remix the preset patterns to you tap. 3. Higher or lower keys indicate transposition by pressing ...in the display. • More on section on page 28. 20 RM1x SEQUENCE REMIXER The central E key on the RM1x keyboard while holding the [TRANSPOSE] button. Switch Sections Make sure that feels right to create your RM1x is properly connected and powered up, try the following to get a...
... When your own groove. P60). 4. Start Playback Press the PLAY p button. The RM1x will begin playing. A newly selected section will automatically adjust to loop until a different section or style is to remix the preset patterns to you tap. 3. Higher or lower keys indicate transposition by pressing ...in the display. • More on section on page 28. 20 RM1x SEQUENCE REMIXER The central E key on the RM1x keyboard while holding the [TRANSPOSE] button. Switch Sections Make sure that feels right to create your RM1x is properly connected and powered up, try the following to get a...

Owner's Manual
Page 21
...are labeled below each contains. Using the Arpeggio submode parameters you play an interval or chord on page 28. RM1x SEQUENCE REMIXER 21 "16") while holding the [TRACK] button. The RM1x will be highlighted in the display). Press the STOP s button to select different styles and experiment with the ... so that its indicator will flash and "M" will appear above tracks which contains data (its indicator flashes, then use the white keys on the RM1x keyboard to mute and unmute tracks as required. 10. The [KNOB] button selects the "A" or "B" parameter group. Press the key again to...
...are labeled below each contains. Using the Arpeggio submode parameters you play an interval or chord on page 28. RM1x SEQUENCE REMIXER 21 "16") while holding the [TRACK] button. The RM1x will be highlighted in the display). Press the STOP s button to select different styles and experiment with the ... so that its indicator will flash and "M" will appear above tracks which contains data (its indicator flashes, then use the white keys on the RM1x keyboard to mute and unmute tracks as required. 10. The [KNOB] button selects the "A" or "B" parameter group. Press the key again to...

Owner's Manual
Page 22
... line of the display will enter Disk submode. 7 Press the [SONG] button. You will indicate "SONG DISK 2 Load". SETUP 4. t Contents of the RM1x. 4 Press the [DISK] button again. You will indicate the loaded song name. 8 Press the PLAY p button to stop playback. t Listening to the ... experience the possibilities of the disk The included disk contains 3 demo songs. The demo songs allow you can playback other songs. 22 RM1x SEQUENCE REMIXER n By changing the DISK FILE in step 5 you to enjoy demo playback, and to playback songs while adjusting the assignable knobs (PLAY...
... line of the display will enter Disk submode. 7 Press the [SONG] button. You will indicate "SONG DISK 2 Load". SETUP 4. t Contents of the RM1x. 4 Press the [DISK] button again. You will indicate the loaded song name. 8 Press the PLAY p button to stop playback. t Listening to the ... experience the possibilities of the disk The included disk contains 3 demo songs. The demo songs allow you can playback other songs. 22 RM1x SEQUENCE REMIXER n By changing the DISK FILE in step 5 you to enjoy demo playback, and to playback songs while adjusting the assignable knobs (PLAY...

Owner's Manual
Page 23
...a continuous sequence of more in the list by that a number of pages from any page in -depth parameters. Selecting Modes & Submodes The RM1x has three main playback and recording modes - PATTERN, PATTERN CHAIN, and SONG - Mode PATTERN PATTERN CHAIN SONG UTILITY Description This is used to... use an odd time signature. The corresponding indicator will light, and the name of the buttons themselves. Page 45 109 115 131 RM1x SEQUENCE REMIXER 23 For example, looking at this manual. which has four dots, accesses the "Type" "Variation Edit" "Chorus Edit" and "Reverb Edit...
...a continuous sequence of more in the list by that a number of pages from any page in -depth parameters. Selecting Modes & Submodes The RM1x has three main playback and recording modes - PATTERN, PATTERN CHAIN, and SONG - Mode PATTERN PATTERN CHAIN SONG UTILITY Description This is used to... use an odd time signature. The corresponding indicator will light, and the name of the buttons themselves. Page 45 109 115 131 RM1x SEQUENCE REMIXER 23 For example, looking at this manual. which has four dots, accesses the "Type" "Variation Edit" "Chorus Edit" and "Reverb Edit...

Owner's Manual
Page 24
.... MIDI Delay creates delay effects that can be accessed via this manual. The SETUP submode includes a LOW BOOST function, knob assignment for the RM1x's realtime control knobs, and individual output channel assignments for each note. The EDIT submode allows detailed editing of what the submodes do, and page... 60, 119 62, 119 63, 120 65, 120 69, 120 73, 121 76, 111, 122 80, 123 99, 128 108, 129 24 RM1x SEQUENCE REMIXER The PATTERN SPLIT submode lets you copy specified measures from one section to a specified section. The SONG SPLIT submode is selected. Mode GROOVE PLAY FX...
.... MIDI Delay creates delay effects that can be accessed via this manual. The SETUP submode includes a LOW BOOST function, knob assignment for the RM1x's realtime control knobs, and individual output channel assignments for each note. The EDIT submode allows detailed editing of what the submodes do, and page... 60, 119 62, 119 63, 120 65, 120 69, 120 73, 121 76, 111, 122 80, 123 99, 128 108, 129 24 RM1x SEQUENCE REMIXER The PATTERN SPLIT submode lets you copy specified measures from one section to a specified section. The SONG SPLIT submode is selected. Mode GROOVE PLAY FX...
