
List Book
Page 15
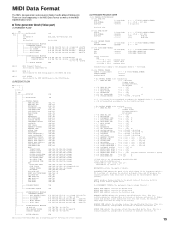
... Assignable Knobs 1 - 8 settings. s Tone generator block (Voice part) (1) TRANSMIT FLOW SW1 MIDI NOTE ON/OFF 9nH OUT | |SW2 | +[]- XG SYSTEM | | |------- v = 0 - 127 *2 c = 64 SUSTAIN SWITCH ; MIDI Data Format The RM1x tone generator and sequencer blocks handle different MIDIevents. FOOT SW Bn,40H 42H | |-----+--- NOTE ON/OFF | | | | | +--- CONTROL CHANGE | | | BANK SEL MSB | | | BANK SEL...
... Assignable Knobs 1 - 8 settings. s Tone generator block (Voice part) (1) TRANSMIT FLOW SW1 MIDI NOTE ON/OFF 9nH OUT | |SW2 | +[]- XG SYSTEM | | |------- v = 0 - 127 *2 c = 64 SUSTAIN SWITCH ; MIDI Data Format The RM1x tone generator and sequencer blocks handle different MIDIevents. FOOT SW Bn,40H 42H | |-----+--- NOTE ON/OFF | | | | | +--- CONTROL CHANGE | | | BANK SEL MSB | | | BANK SEL...
List Book
Page 16
...PITCH BEND CHANGE 0 (center) MODULATION 0 (off) AC1 CONTROLLER 0 (minimum) EXPRESSION 127 (maximum) SUSTAIN SWITCH 0 (off) PORTAMENTO SWITCH 0 (off) SOSTENUTO SWITCH 0 (off) SOFT PEDAL 0 (off . (3-2-4) OMNI MODE OFF (CONTROL NUMBER = 7CH , DATA VALUE...0ddddddd | 11110111 F0 43 1n 4C aaaaaaa aaaaaaa aaaaaaa ddddddd F7 Exclusive status YAMAHA ID device Number Model ID Address High Address Mid Address Low Data | End ...the corresponding channel which the RPN number is the device number, but the RM1x receives this message is to specify the parameter that is a relative parameter...
...PITCH BEND CHANGE 0 (center) MODULATION 0 (off) AC1 CONTROLLER 0 (minimum) EXPRESSION 127 (maximum) SUSTAIN SWITCH 0 (off) PORTAMENTO SWITCH 0 (off) SOSTENUTO SWITCH 0 (off) SOFT PEDAL 0 (off . (3-2-4) OMNI MODE OFF (CONTROL NUMBER = 7CH , DATA VALUE...0ddddddd | 11110111 F0 43 1n 4C aaaaaaa aaaaaaa aaaaaaa ddddddd F7 Exclusive status YAMAHA ID device Number Model ID Address High Address Mid Address Low Data | End ...the corresponding channel which the RPN number is the device number, but the RM1x receives this message is to specify the parameter that is a relative parameter...

Owner's Manual
Page 4
...of panel disfiguration or damage to the internal components. • Do not use a soft, dry cloth. Yamaha cannot be caused by it, immediately turn off the power switch, disconnect the adaptor plug from the outlet, and have accumulated on it might spill into any openings. &#... other property. PRECAUTIONS PLEASE READ CAREFULLY BEFORE PROCEEDING * Please keep these precautions in the display. Before turning the power on the buttons, switches or connectors. • Do not operate the instrument for all components, set all connected adaptor and other hazards. Also, do not use...
...of panel disfiguration or damage to the internal components. • Do not use a soft, dry cloth. Yamaha cannot be caused by it, immediately turn off the power switch, disconnect the adaptor plug from the outlet, and have accumulated on it might spill into any openings. &#... other property. PRECAUTIONS PLEASE READ CAREFULLY BEFORE PROCEEDING * Please keep these precautions in the display. Before turning the power on the buttons, switches or connectors. • Do not operate the instrument for all components, set all connected adaptor and other hazards. Also, do not use...

Owner's Manual
Page 6
... you need to be in total control of your sound. • Powerful sequencing capabilities with numbers. • Full MIDI compatibility means that the RM1x can be directly switched in the Pattern mode: each of the Pattern mode's "styles" has up to 110,000 notes of parameters to be accessed and edited - ...Main Features Main Features • The sequencer of the RM1x provides 16 sequence tracks and up to 16 "sections" which can be used as the ...
... you need to be in total control of your sound. • Powerful sequencing capabilities with numbers. • Full MIDI compatibility means that the RM1x can be directly switched in the Pattern mode: each of the Pattern mode's "styles" has up to 110,000 notes of parameters to be accessed and edited - ...Main Features Main Features • The sequencer of the RM1x provides 16 sequence tracks and up to 16 "sections" which can be used as the ...
Owner's Manual
Page 11
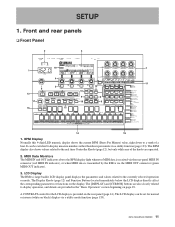
... parameters or functions on page 23. A CONTRAST control for normal or inverse (white on the rear panel (page 14). It can be switched to display measure numbers rather than beats per minute via the MIDI OUT connector (green MIDI OUT indicator). 3. The LCD display can be ...set for the LCD display is transmitted by the RM1x via a utility function (page 133). RM1x SEQUENCE REMIXER 11 The [DISPLAY] and [CURSOR] buttons are provided in the "Basic Operation" section beginning on the display. The...
... parameters or functions on page 23. A CONTRAST control for normal or inverse (white on the rear panel (page 14). It can be switched to display measure numbers rather than beats per minute via the MIDI OUT connector (green MIDI OUT indicator). 3. The LCD display can be ...set for the LCD display is transmitted by the RM1x via a utility function (page 133). RM1x SEQUENCE REMIXER 11 The [DISPLAY] and [CURSOR] buttons are provided in the "Basic Operation" section beginning on the display. The...
Owner's Manual
Page 12
.... 8. Cursor Buttons The cursor buttons move the "cursor" around the LCD display screen, highlighting the various parameters that more parameters than can be switched to be assigned as a dark block with inverse characters). 9. [NO -1] and [YES +1] Buttons The [NO -1] and [YES +1] buttons...74). DISPLAY [] Buttons When the selected mode or submode (page 23) includes more parameters are available for continuous decrementing of the RM1x audio output via the [KNOB] button. Press either button briefly to cancel. 10. VOLUME Control Adjusts the volume of incrementing ...
.... 8. Cursor Buttons The cursor buttons move the "cursor" around the LCD display screen, highlighting the various parameters that more parameters than can be switched to be assigned as a dark block with inverse characters). 9. [NO -1] and [YES +1] Buttons The [NO -1] and [YES +1] buttons...74). DISPLAY [] Buttons When the selected mode or submode (page 23) includes more parameters are available for continuous decrementing of the RM1x audio output via the [KNOB] button. Press either button briefly to cancel. 10. VOLUME Control Adjusts the volume of incrementing ...

Owner's Manual
Page 14
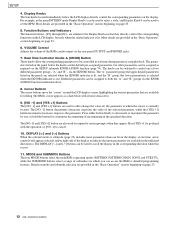
... via the UTILITY mode. 5. PHONES Jack Any pair of the UTILITY mode FOOT SWITCH parameter (page 132). 14 RM1x SEQUENCE REMIXER DC IN Jack The DC output cable from the Yamaha PA-5C AC Power Adaptor supplied with the RM1x is inserted into only the L/MONO output, the left- Input "filters" defining ...what data will and will appear on , and press again to the RM1x MIDI IN connector (see "Audio equipment connections," ...
... via the UTILITY mode. 5. PHONES Jack Any pair of the UTILITY mode FOOT SWITCH parameter (page 132). 14 RM1x SEQUENCE REMIXER DC IN Jack The DC output cable from the Yamaha PA-5C AC Power Adaptor supplied with the RM1x is inserted into only the L/MONO output, the left- Input "filters" defining ...what data will and will appear on , and press again to the RM1x MIDI IN connector (see "Audio equipment connections," ...

Owner's Manual
Page 16
... the AC power adaptor from the AC outlet if you are not using the RM1x. When turning the power off the STANDBY/ON switch before making any RM1x record operation! Using other adaptor specifically recommended by Yamaha). Even when the switch is in a loss of the cable during any connections. When you will cause malfunctions...
... the AC power adaptor from the AC outlet if you are not using the RM1x. When turning the power off the STANDBY/ON switch before making any RM1x record operation! Using other adaptor specifically recommended by Yamaha). Even when the switch is in a loss of the cable during any connections. When you will cause malfunctions...

Owner's Manual
Page 18
... an external tone generator module. MIDI OUT Connecting a tone generator module RM1x song and pattern playback data can be easier if you use a MIDI keyboard. SETUP t Connecting a footswitch When using a separately sold FC4 or FC5 foot switch, insert the foot switch plug into the FOOT SW jack located on the rear panel. FC4... to the MIDI IN connector on the rear panel. Use a MIDI cable to connect the MIDI OUT of the external MIDI device. MIDI IN 18 RM1x SEQUENCE REMIXER
... an external tone generator module. MIDI OUT Connecting a tone generator module RM1x song and pattern playback data can be easier if you use a MIDI keyboard. SETUP t Connecting a footswitch When using a separately sold FC4 or FC5 foot switch, insert the foot switch plug into the FOOT SW jack located on the rear panel. FC4... to the MIDI IN connector on the rear panel. Use a MIDI cable to connect the MIDI OUT of the external MIDI device. MIDI IN 18 RM1x SEQUENCE REMIXER

Owner's Manual
Page 20
...When your own groove. P60). 4. Start Playback Press the PLAY p button. Transpose Transpose the pattern to switch sections. 6. "P") next to "SEC" in the display. • More on transposition on the RM1x keyboard to any key by the corresponding number of the iceberg! The amount of the selected style will ...) Use Display Knob 4 to adjust the BPM to a value that it does), then use the white keys on page 27. The RM1x will begin immediately. Switch Sections Make sure that the [SECTION] button indicator is flashing (if it is to remix the preset patterns to loop until a different...
...When your own groove. P60). 4. Start Playback Press the PLAY p button. Transpose Transpose the pattern to switch sections. 6. "P") next to "SEC" in the display. • More on transposition on the RM1x keyboard to any key by the corresponding number of the iceberg! The amount of the selected style will ...) Use Display Knob 4 to adjust the BPM to a value that it does), then use the white keys on page 27. The RM1x will begin immediately. Switch Sections Make sure that the [SECTION] button indicator is flashing (if it is to remix the preset patterns to loop until a different...

Owner's Manual
Page 25
...parameters than can be moved in a black block, or the opposite if the "NEGA" mode is selected via the CURSOR buttons. Each of the RM1x displays, the currently selected parameter or function is often used for continuous scrolling. page 133), or an underline. The underline type cursor is indicated ... can be presented with a "menu" from which can 't locate cursor, try pressing the CURSOR buttons: you can also use the CATEGORY knob to switch between job categories (listed to enter the number of the jobs). The job number will be moved around the display via the UTILITY mode LCD...
...parameters than can be moved in a black block, or the opposite if the "NEGA" mode is selected via the CURSOR buttons. Each of the RM1x displays, the currently selected parameter or function is often used for continuous scrolling. page 133), or an underline. The underline type cursor is indicated ... can be presented with a "menu" from which can 't locate cursor, try pressing the CURSOR buttons: you can also use the CATEGORY knob to switch between job categories (listed to enter the number of the jobs). The job number will be moved around the display via the UTILITY mode LCD...

Owner's Manual
Page 29
.... If you wish to keep any available parameter during pattern or song playback, so, for Patch operations in the Pattern mode. 2 When "RM1x" appears in the display, release the keys. 3 When initialization has been performed, "Factory Set" appears briefly in the Pattern job (page 82... been executed, and Undo and Redo will appear as long as you can be switched to execute Undo. RM1x SEQUENCE REMIXER 29 "A" and "B" - The "A" parameter group (the upper default parameters listed on the STANDBY/ON switch. 7. The knobs allow the corresponding parameters to both the "A" and "B" groups ...
.... If you wish to keep any available parameter during pattern or song playback, so, for Patch operations in the Pattern mode. 2 When "RM1x" appears in the display, release the keys. 3 When initialization has been performed, "Factory Set" appears briefly in the Pattern job (page 82... been executed, and Undo and Redo will appear as long as you can be switched to execute Undo. RM1x SEQUENCE REMIXER 29 "A" and "B" - The "A" parameter group (the upper default parameters listed on the STANDBY/ON switch. 7. The knobs allow the corresponding parameters to both the "A" and "B" groups ...

Owner's Manual
Page 38
... block The controller block lets you can be set in the Recording Standby pages. 38 RM1x SEQUENCE REMIXER From the controller block, you use the keyboard, assignable knobs, and foot switch etc. The functions of the foot switch can record user phrases or song tracks, or play music and control the tone generator...
... block The controller block lets you can be set in the Recording Standby pages. 38 RM1x SEQUENCE REMIXER From the controller block, you use the keyboard, assignable knobs, and foot switch etc. The functions of the foot switch can record user phrases or song tracks, or play music and control the tone generator...

Owner's Manual
Page 63
... pan data. 000 ... 127 Sets sound volume. Transposition can set the pan to the separate List Book. ) Selects the voice (voice number). RM1x SEQUENCE REMIXER 63 The values apply to all sections. (Refer to Random, the position changes at random each time a new note is selected the ... number. Voice You use the Voice submode to the separate List Book for a complete listing of the style. You can be switched according to P) of the RM1x voices. When any other bank number is sounded. R63 Sets sound positioning for each style. plished via this parameter, or by ...
... pan data. 000 ... 127 Sets sound volume. Transposition can set the pan to the separate List Book. ) Selects the voice (voice number). RM1x SEQUENCE REMIXER 63 The values apply to all sections. (Refer to Random, the position changes at random each time a new note is selected the ... number. Voice You use the Voice submode to the separate List Book for a complete listing of the style. You can be switched according to P) of the RM1x voices. When any other bank number is sounded. R63 Sets sound positioning for each style. plished via this parameter, or by ...

Owner's Manual
Page 64
... connection = System Track number When variation connection = Insertion Track number Transpose Transpose Parameter Variation send level (When variation connection =System) Variation switch (When variation connection =Insertion) Chorus send level Reverb send level Dry level (When variation connection =System) Track number Values 000 ... 127...is set the value to ON, any other ON setting automatically changes to the Basic Operation (page26). 64 RM1x SEQUENCE REMIXER Transposition can set the switch ON for each track the amount that you set to System. Sets signal level to the Dry line ...
... connection = System Track number When variation connection = Insertion Track number Transpose Transpose Parameter Variation send level (When variation connection =System) Variation switch (When variation connection =Insertion) Chorus send level Reverb send level Dry level (When variation connection =System) Track number Values 000 ... 127...is set the value to ON, any other ON setting automatically changes to the Basic Operation (page26). 64 RM1x SEQUENCE REMIXER Transposition can set the switch ON for each track the amount that you set to System. Sets signal level to the Dry line ...

Owner's Manual
Page 66
...Pitch Bend/Portamento Track number Transpose Parameter Pitch Bend range Values -24 ... 0 ... +24 Pitch Bend -8192 ... 0000 ... +8191 Portamento Switch on page 27. Specify whether or not portamento will be applied to change will be controlled by the keyboard method described on /off ON, ... pitch change more slowly. Portamento will cause the pitch to each part when the Portamento Switch = ON. Higher values will not apply to the Basic Operation (page26). 66 RM1x SEQUENCE REMIXER Shows the current selected track number. Portamento is fully raised or lowered. Transposition...
...Pitch Bend/Portamento Track number Transpose Parameter Pitch Bend range Values -24 ... 0 ... +24 Pitch Bend -8192 ... 0000 ... +8191 Portamento Switch on page 27. Specify whether or not portamento will be applied to change will be controlled by the keyboard method described on /off ON, ... pitch change more slowly. Portamento will cause the pitch to each part when the Portamento Switch = ON. Higher values will not apply to the Basic Operation (page26). 66 RM1x SEQUENCE REMIXER Shows the current selected track number. Portamento is fully raised or lowered. Transposition...

Owner's Manual
Page 75
... 01 ... 16 MIDI OUT channel setup OFF, 01 ... 16 Track number 01 ... 16 Function Sets up channel transmission to a MIDI OUT channel. RM1x SEQUENCE REMIXER 75 The RM1x stores separate channel arrangements for each track to the MIDI OUT connector. The assignments automatically change values, refer to MIDI OUT. When set...can be accomplished via this parameter, or by the keyboard method described on page 27. * For information about how to change each time you switch to TG block. Sets up channel transmission to the tone generator block. You use the TO TG setting to set to OFF...
... 01 ... 16 MIDI OUT channel setup OFF, 01 ... 16 Track number 01 ... 16 Function Sets up channel transmission to a MIDI OUT channel. RM1x SEQUENCE REMIXER 75 The RM1x stores separate channel arrangements for each track to the MIDI OUT connector. The assignments automatically change values, refer to MIDI OUT. When set...can be accomplished via this parameter, or by the keyboard method described on page 27. * For information about how to change each time you switch to TG block. Sets up channel transmission to the tone generator block. You use the TO TG setting to set to OFF...

Owner's Manual
Page 81
...job. 4 Set the job parameters as this , as listed below "Select" on the display). You can also use the CATEGORY knob to switch between job categories (listed to the job currently selected in the job descriptions which follow. 5 Press the F4 function button (DO!) to single...Selection Use the CURSOR buttons to scroll to enter the number of your recorded data. 2 Select a job. RM1x SEQUENCE REMIXER 81 message is executing (while the "Executing..." n • Do not switch off the power while a job is on the screen), as required. Jumps to the left of the display....
...job. 4 Set the job parameters as this , as listed below "Select" on the display). You can also use the CATEGORY knob to switch between job categories (listed to the job currently selected in the job descriptions which follow. 5 Press the F4 function button (DO!) to single...Selection Use the CURSOR buttons to scroll to enter the number of your recorded data. 2 Select a job. RM1x SEQUENCE REMIXER 81 message is executing (while the "Executing..." n • Do not switch off the power while a job is on the screen), as required. Jumps to the left of the display....

Owner's Manual
Page 99
...information indicating how the event is a "program change values, refer to be carried out. Each event corresponds to individual events. RM1x SEQUENCE REMIXER 99 The RM1x offers two different editing screens: an Event list and a View Filter display. When you record a performance onto a sequence track... Moves the pointer to a specific MIDI action. Parameter Event type DO! Edit 13. The striking of a note is a "note event", the switching of the track's MIDI events, in time, its name, and its numerical arguments. Most event specifications must identify the note (the note name), ...
...information indicating how the event is a "program change values, refer to be carried out. Each event corresponds to individual events. RM1x SEQUENCE REMIXER 99 The RM1x offers two different editing screens: an Event list and a View Filter display. When you record a performance onto a sequence track... Moves the pointer to a specific MIDI action. Parameter Event type DO! Edit 13. The striking of a note is a "note event", the switching of the track's MIDI events, in time, its name, and its numerical arguments. Most event specifications must identify the note (the note name), ...

Owner's Manual
Page 106
...DrLevl * DrAltG * DrPan * DrRev * DrCho * DrVar * DrKyAs * DrNtOf * DrNtOn * DrCut * DrResn * DrAttk * DrDcy1 * DrDcy2 Set Name Drum Pitch Coarse Dr1 ... PT99 Modulation Depth PortSw Portament Switch PT01 ... Dr9 Drum Chorus Send Dr1 ... Dr9 Drum Key Assign Dr1 ... G8 C-2 ... G8 C-2 ... G8 C-2 ... G8 C-2 ... G8 C-2 ... G8 * Not supported by the tone generator block.)...R63 000 ... 127 000 ... 127 000 ... 127 SNGL, MULT OFF, ON OFF, ON -64 ... 0 ... +63 -64 ... 0 ... +63 -64 ... 0 ... +63 -64 ... 0 ... +63 -64 ... 0 ... +63 106 RM1x SEQUENCE REMIXER
...DrLevl * DrAltG * DrPan * DrRev * DrCho * DrVar * DrKyAs * DrNtOf * DrNtOn * DrCut * DrResn * DrAttk * DrDcy1 * DrDcy2 Set Name Drum Pitch Coarse Dr1 ... PT99 Modulation Depth PortSw Portament Switch PT01 ... Dr9 Drum Chorus Send Dr1 ... Dr9 Drum Key Assign Dr1 ... G8 C-2 ... G8 C-2 ... G8 C-2 ... G8 C-2 ... G8 C-2 ... G8 * Not supported by the tone generator block.)...R63 000 ... 127 000 ... 127 000 ... 127 SNGL, MULT OFF, ON OFF, ON -64 ... 0 ... +63 -64 ... 0 ... +63 -64 ... 0 ... +63 -64 ... 0 ... +63 -64 ... 0 ... +63 106 RM1x SEQUENCE REMIXER


