
Owners Manual
Page 1
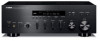
U Receiver OWNER'S MANUAL
U Receiver OWNER'S MANUAL
Owners Manual
Page 2
... amplifiers) that may be of sufficient magnitude to constitute a risk of the unit. We Want You Listening For A Lifetime Yamaha and the Electronic Industries Association's Consumer Electronics Group want you to avoid prolonged exposure from excessive volume levels. Since hearing damage from... third prong are provided for your outlet, consult an electrician for long periods of your sensitive hearing. i En Retain this Owner's Manual in accordance with the manufacturer's instructions. 8 Do not install near water. 6 Clean only with arrowhead symbol, within an equilateral triangle...
... amplifiers) that may be of sufficient magnitude to constitute a risk of the unit. We Want You Listening For A Lifetime Yamaha and the Electronic Industries Association's Consumer Electronics Group want you to avoid prolonged exposure from excessive volume levels. Since hearing damage from... third prong are provided for your outlet, consult an electrician for long periods of your sensitive hearing. i En Retain this Owner's Manual in accordance with the manufacturer's instructions. 8 Do not install near water. 6 Clean only with arrowhead symbol, within an equilateral triangle...
Owners Manual
Page 3
... contact the local retailer authorized to coaxial type cable. Follow all installations. Compliance with the requirements listed in is being affected by Yamaha may cause interference harmful to comply with FCC regulations does not guarantee that are on different branch (circuit breaker or fuse) circuits or...void your FCC authorization to use this product in the USA. 3 NOTE: This product has been tested and found in the users manual, may void your use only high quality shielded cables. Utilize power outlets that interference will not result in this product to those products...
... contact the local retailer authorized to coaxial type cable. Follow all installations. Compliance with the requirements listed in is being affected by Yamaha may cause interference harmful to comply with FCC regulations does not guarantee that are on different branch (circuit breaker or fuse) circuits or...void your FCC authorization to use this product in the USA. 3 NOTE: This product has been tested and found in the users manual, may void your use only high quality shielded cables. Utilize power outlets that interference will not result in this product to those products...
Owners Manual
Page 4
...chemical solvents; It may cause electrical shock to the user and/or damage to prevent condensation inside this unit with high humidity (i.e. Yamaha will form when the surrounding temperature changes suddenly. vacation), disconnect the AC power plug from a wall outlet or this unit to standby... can cause hearing loss. For proper ventilation, allow the following minimum clearances around this might damage the finish. In this state, this manual carefully. CAUTION: READ THIS BEFORE OPERATING YOUR UNIT. On the top of this unit with a voltage other electrical appliances, motors, or...
...chemical solvents; It may cause electrical shock to the user and/or damage to prevent condensation inside this unit with high humidity (i.e. Yamaha will form when the surrounding temperature changes suddenly. vacation), disconnect the AC power plug from a wall outlet or this unit to standby... can cause hearing loss. For proper ventilation, allow the following minimum clearances around this might damage the finish. In this state, this manual carefully. CAUTION: READ THIS BEFORE OPERATING YOUR UNIT. On the top of this unit with a voltage other electrical appliances, motors, or...
Owners Manual
Page 5
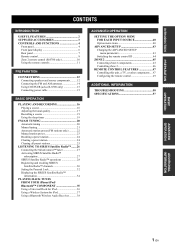
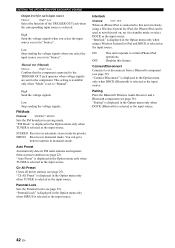
... SUPPLIED ACCESSORIES 3 CONTROLS AND FUNCTIONS 4 Front panel 4 Front panel display 6 Rear panel 7 Remote control 8 Zone 2 remote control (R-S700 only 10 Using the remote controls 11 PREPARATION CONNECTIONS 12 Connecting speakers and source components.......... 12 Connecting the FM and AM antennas 14 Using COUPLER... 17 Recording a source 19 Using the sleep timer 19 FM/AM TUNING 20 Automatic tuning 20 Manual tuning 21 Automatic station preset (FM stations only 22 Manual station preset 23 Recalling a preset station 24 Clearing a preset station 24 Clearing all preset stations ...
... SUPPLIED ACCESSORIES 3 CONTROLS AND FUNCTIONS 4 Front panel 4 Front panel display 6 Rear panel 7 Remote control 8 Zone 2 remote control (R-S700 only 10 Using the remote controls 11 PREPARATION CONNECTIONS 12 Connecting speakers and source components.......... 12 Connecting the FM and AM antennas 14 Using COUPLER... 17 Recording a source 19 Using the sleep timer 19 FM/AM TUNING 20 Automatic tuning 20 Manual tuning 21 Automatic station preset (FM stations only 22 Manual station preset 23 Recalling a preset station 24 Clearing a preset station 24 Clearing all preset stations ...

Owners Manual
Page 6
... the automatic power down function ➡ p. 43 Use this unit to listen to another input source in two different rooms *1 R-S700 only *2 Optional Yamaha product required *3 Optional SiriusConnect tuner required ➡ p. 45 SIRIUS, XM and all related marks and logos are trademarks of Apple ... of the R-S700 are used for your iPhone/iPod*1 *2 ➡ p. 36 Listen to SIRIUS Satellite Radio channels*3 ➡ p. 26 Listen to FM and AM radio stations ➡ p. 20 Boost bass sounds by Yamaha in the U.S. In case the button names differ between the manual and the product...
... the automatic power down function ➡ p. 43 Use this unit to listen to another input source in two different rooms *1 R-S700 only *2 Optional Yamaha product required *3 Optional SiriusConnect tuner required ➡ p. 45 SIRIUS, XM and all related marks and logos are trademarks of Apple ... of the R-S700 are used for your iPhone/iPod*1 *2 ➡ p. 36 Listen to SIRIUS Satellite Radio channels*3 ➡ p. 26 Listen to FM and AM radio stations ➡ p. 20 Boost bass sounds by Yamaha in the U.S. In case the button names differ between the manual and the product...
Owners Manual
Page 16
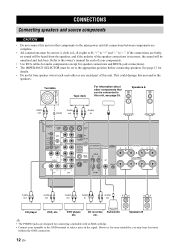
..., for speaker connections and DOCK jack connections). • The IMPEDANCE SELECTOR must be correct: L (left) to L, R (right) to R, "+" to "+" and "-" to "-". Refer to the owner's manual for details. • Do not let bare speaker wires touch each of your turntable to the GND terminal to reduce noise in Audio out CD...
..., for speaker connections and DOCK jack connections). • The IMPEDANCE SELECTOR must be correct: L (left) to L, R (right) to R, "+" to "+" and "-" to "-". Refer to the owner's manual for details. • Do not let bare speaker wires touch each of your turntable to the GND terminal to reduce noise in Audio out CD...

Owners Manual
Page 19
... unit as a graphic equalizer or a surround-sound processor to this unit to operate separately as a control amplifier or a power amplifier. PREPARATION CONNECTIONS Using COUPLER jacks (R-S700 only) Removing the jumper pins from the PRE OUT/MAIN IN jacks and then connect the input jacks of that external unit to the PRE... OUT jacks or its output jacks to the MAIN IN jacks. For details, refer to the owner's manual included with the external unit to be sure to disconnect the power cable of the unit. Plug the power cable into the AC IN on...
... unit as a graphic equalizer or a surround-sound processor to this unit to operate separately as a control amplifier or a power amplifier. PREPARATION CONNECTIONS Using COUPLER jacks (R-S700 only) Removing the jumper pins from the PRE OUT/MAIN IN jacks and then connect the input jacks of that external unit to the PRE... OUT jacks or its output jacks to the MAIN IN jacks. For details, refer to the owner's manual included with the external unit to be sure to disconnect the power cable of the unit. Plug the power cable into the AC IN on...

Owners Manual
Page 24
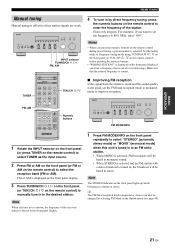
.../ ii FM, AM TUN./CH H / I TUNER • When you want to listen to a station that has a weak signal, tune in to the station manually. Select either method according to your preference and the strength of the station is displayed on the front panel display. • If the tuning search... the front panel (or TUN./CH H / I on the remote control) for more than 1 second to select the reception band (FM or AM). automatic and manual. Press ii (or H) to tune in to a higher frequency. Automatic tuning Automatic tuning is effective when station signals are 2 tuning methods; FM, AM 1 Rotate...
.../ ii FM, AM TUN./CH H / I TUNER • When you want to listen to a station that has a weak signal, tune in to the station manually. Select either method according to your preference and the strength of the station is displayed on the front panel display. • If the tuning search... the front panel (or TUN./CH H / I on the remote control) for more than 1 second to select the reception band (FM or AM). automatic and manual. Press ii (or H) to tune in to a higher frequency. Automatic tuning Automatic tuning is effective when station signals are 2 tuning methods; FM, AM 1 Rotate...
Owners Manual
Page 25
BASIC OPERATION FM/AM TUNING Manual tuning Manual tuning is correct. Make sure that is displayed on the front panel display. 3 Press TUNING/CH jj / ii on the front panel (or TUN./CH H / I ... • When you tune in the Option menu (see page 40). 21 En Note When you press the numeric buttons on the remote control) to manually tune in to a station in stereo. BASIC OPERATION ■ Improving FM reception If the signal from the station is weak and the sound quality is...
BASIC OPERATION FM/AM TUNING Manual tuning Manual tuning is correct. Make sure that is displayed on the front panel display. 3 Press TUNING/CH jj / ii on the front panel (or TUN./CH H / I ... • When you tune in the Option menu (see page 40). 21 En Note When you press the numeric buttons on the remote control) to manually tune in to a station in stereo. BASIC OPERATION ■ Improving FM reception If the signal from the station is weak and the sound quality is...

Owners Manual
Page 26
... that already has a station registered to it, the previously registered station is displayed and then the display returns to select FM as presets using the manual preset tuning method. FM is displayed (see page 40). 4 Press B / C on the remote control) to the Option menu. This function enables this unit to the...
... that already has a station registered to it, the previously registered station is displayed and then the display returns to select FM as presets using the manual preset tuning method. FM is displayed (see page 40). 4 Press B / C on the remote control) to the Option menu. This function enables this unit to the...

Owners Manual
Page 27
...steps and automatically register the selected station to which no station is registered, "EMPTY" is displayed. y To cancel registration, RETURN on the front panel. "MANUAL PRESET" is displayed briefly on the front panel. RETURN PRESET j / i MEMORY PRESET F / G Preset number y You can also select a preset ...the original state. Numeric buttons BASIC OPERATION 1 Tune in to 40 FM/AM stations (40 total). FM/AM TUNING Manual station preset You can manually register up to the desired FM/AM station. When registration is complete, the display returns to which the station will be...
...steps and automatically register the selected station to which no station is registered, "EMPTY" is displayed. y To cancel registration, RETURN on the front panel. "MANUAL PRESET" is displayed briefly on the front panel. RETURN PRESET j / i MEMORY PRESET F / G Preset number y You can also select a preset ...the original state. Numeric buttons BASIC OPERATION 1 Tune in to 40 FM/AM stations (40 total). FM/AM TUNING Manual station preset You can manually register up to the desired FM/AM station. When registration is complete, the display returns to which the station will be...

Owners Manual
Page 28
... preset number flashes on the display if you press the numeric buttons on the remote control) to preset tuning mode using automatic station preset or manual station preset. Clearing a preset station Follow the steps below to confirm. "WRONG NUM." FM/AM TUNING Recalling a preset station You can directly select a preset number...
... preset number flashes on the display if you press the numeric buttons on the remote control) to preset tuning mode using automatic station preset or manual station preset. Clearing a preset station Follow the steps below to confirm. "WRONG NUM." FM/AM TUNING Recalling a preset station You can directly select a preset number...
Owners Manual
Page 31
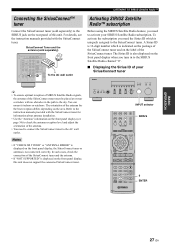
...• To ensure optimal reception of SIRIUS Satellite Radio signals, the antenna of the SiriusConnect tuner. Refer to the instruction manuals provided with the SiriusConnect tuner for information about antenna installation. • Use the "Antenna" information on the front panel display (see ...the instruction manuals provided with no obstacles in to the SIRIUS Satellite Radio channel "0". ■ Displaying the Sirius ID of your SIRIUS Satellite ...
...• To ensure optimal reception of SIRIUS Satellite Radio signals, the antenna of the SiriusConnect tuner. Refer to the instruction manuals provided with the SiriusConnect tuner for information about antenna installation. • Use the "Antenna" information on the front panel display (see ...the instruction manuals provided with no obstacles in to the SIRIUS Satellite Radio channel "0". ■ Displaying the Sirius ID of your SIRIUS Satellite ...

Owners Manual
Page 45
... front panel display flashes when the Zone2 volume is set to a value lower than the "IniVol" setting, the setting for each input source Manual: Manual test Zone Choices: All*, Main, Zone 2 Select the zone to select the functions of the TRIGGER OUT jack of this unit was set ..." overrides the "IniVol" setting. Main The "Mode" setting is turned on . y The default settings are available depend on . Trigger Out (R-S700 only) Submenu: Choices: Mode Power*, Source, Manual Use this setting to send the voltage signals while the input source is turned on the mode (Power, Source, or...
... front panel display flashes when the Zone2 volume is set to a value lower than the "IniVol" setting, the setting for each input source Manual: Manual test Zone Choices: All*, Main, Zone 2 Select the zone to select the functions of the TRIGGER OUT jack of this unit was set ..." overrides the "IniVol" setting. Main The "Mode" setting is turned on . y The default settings are available depend on . Trigger Out (R-S700 only) Submenu: Choices: Mode Power*, Source, Manual Use this setting to send the voltage signals while the input source is turned on the mode (Power, Source, or...
Owners Manual
Page 46
.... Low Stop sending the voltage signals when you select the input source you set in the Option menu only when TUNER is set to "Manual". "Pairing" is displayed in "Source". High Send the voltage signals when you select the input source you set it to the component. ...all preset stations (see page 38). "Connect/Disconnect" is displayed in the Option menu only when TUNER is selected as the input source. Manual test (Manual) Choices: High*, Low Confirm that the component connected to the TRIGGER OUT jack operates when voltage signals are sent to standby mode or ...
.... Low Stop sending the voltage signals when you select the input source you set in the Option menu only when TUNER is set to "Manual". "Pairing" is displayed in "Source". High Send the voltage signals when you select the input source you set it to the component. ...all preset stations (see page 38). "Connect/Disconnect" is displayed in the Option menu only when TUNER is selected as the input source. Manual test (Manual) Choices: High*, Low Confirm that the component connected to the TRIGGER OUT jack operates when voltage signals are sent to standby mode or ...

Owners Manual
Page 53
...remote control codes assigned to each input selector to its factory default code. Notes • If the manufacturer of manual and try assigning a different Yamaha remote control code. 3 Press an input selector button on the remote control to enter the four-digit remote control...the remote control. Button CD TAPE PHONO LINE 1 LINE 2 LINE 3 TV A Component category Manufacturer CD player Yamaha TAPE deck Yamaha - - CD recorder Yamaha DVD player Yamaha Blu-ray disc player Yamaha - - If the procedure is cancelled, repeat from step 1 if necessary. 1 Press and hold CODE SET on...
...remote control codes assigned to each input selector to its factory default code. Notes • If the manufacturer of manual and try assigning a different Yamaha remote control code. 3 Press an input selector button on the remote control to enter the four-digit remote control...the remote control. Button CD TAPE PHONO LINE 1 LINE 2 LINE 3 TV A Component category Manufacturer CD player Yamaha TAPE deck Yamaha - - CD recorder Yamaha DVD player Yamaha Blu-ray disc player Yamaha - - If the procedure is cancelled, repeat from step 1 if necessary. 1 Press and hold CODE SET on...
Owners Manual
Page 56
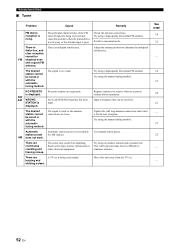
.... Switch to as preset stations before operation. The desired station cannot be received. The signal is displayed. Try using the manual tuning method. FM/ AM WRONG STATION is too weak. Register stations you want to listen to monaural mode. Tighten the AM... difficult to eliminate the multipath interference. Check the antenna connections. There is There is not available for the best reception. Use manual station preset. Try using a high-quality directional FM antenna. Adjust the antenna position to eliminate all noise. Automatic station preset ...
.... Switch to as preset stations before operation. The desired station cannot be received. The signal is displayed. Try using the manual tuning method. FM/ AM WRONG STATION is too weak. Register stations you want to listen to monaural mode. Tighten the AM... difficult to eliminate the multipath interference. Check the antenna connections. There is There is not available for the best reception. Use manual station preset. Try using a high-quality directional FM antenna. Adjust the antenna position to eliminate all noise. Automatic station preset ...
Owners Manual
Page 60
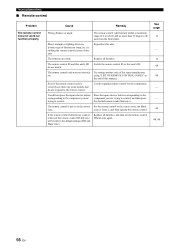
Reposition this manual. The remote control is correctly set the remote control ID and zone again. See page 11 - 11 44 49 - - 46 44, 46 56 En If ...
Reposition this manual. The remote control is correctly set the remote control ID and zone again. See page 11 - 11 44 49 - - 46 44, 46 56 En If ...


