
Reference Manual
Page 2
... Recording a musical performance 11 Adjusting the recording level 12 Simple recording (musical practice, meeting, etc 13 Recording from an external audio device (such as a CD player 14 Recording Settings 16 Changing the Recording mode (Selecting a sound quality 16 Changing Recording mode 17 Turning the ALC (Auto Level Control) on and off... all files from a folder 46 Formatting a microSD card (Deleting all data 46 Using the Timer Functions 47 Programming Timer recording 47 Programming the alarm 48 POCKETRAK CX Reference Manual 2
... Recording a musical performance 11 Adjusting the recording level 12 Simple recording (musical practice, meeting, etc 13 Recording from an external audio device (such as a CD player 14 Recording Settings 16 Changing the Recording mode (Selecting a sound quality 16 Changing Recording mode 17 Turning the ALC (Auto Level Control) on and off... all files from a folder 46 Formatting a microSD card (Deleting all data 46 Using the Timer Functions 47 Programming Timer recording 47 Programming the alarm 48 POCKETRAK CX Reference Manual 2
Reference Manual
Page 3
POCKETRAK CX Reference Manual 3 Table of Contents About the Menu Settings 50 Menu and menu item list 50 Setting the menu options 51 Selecting the battery type 51 Turning the beep sound on your personal use. • This Reference Manual is the exclusive copyrights of Yamaha Corporation....is explained in this Reference Manual (this file) and also in the Owner's Manual (printed version). Owner's Manual (printed version): The Owner's Manual includes information about precautions, setup and basic operation that will help you started as easily as a Music Player 62 Ripping CDs ...
POCKETRAK CX Reference Manual 3 Table of Contents About the Menu Settings 50 Menu and menu item list 50 Setting the menu options 51 Selecting the battery type 51 Turning the beep sound on your personal use. • This Reference Manual is the exclusive copyrights of Yamaha Corporation....is explained in this Reference Manual (this file) and also in the Owner's Manual (printed version). Owner's Manual (printed version): The Owner's Manual includes information about precautions, setup and basic operation that will help you started as easily as a Music Player 62 Ripping CDs ...

Reference Manual
Page 4
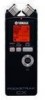
... at least two (2) seconds to confirm the item selection or the operation. 9 Built-in stereo microphone The recorder features a high-performance X-Y stereo microphone. POCKETRAK CX Reference Manual 4 Press this button to return to the previous screen during the menu setting operation or while the list screen is displayed, press and hold down...
... at least two (2) seconds to confirm the item selection or the operation. 9 Built-in stereo microphone The recorder features a high-performance X-Y stereo microphone. POCKETRAK CX Reference Manual 4 Press this button to return to the previous screen during the menu setting operation or while the list screen is displayed, press and hold down...
Reference Manual
Page 5
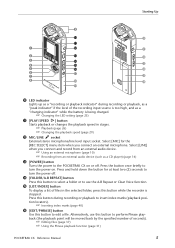
... playback (the playback point will be moved back by the specified number of the recording input source is too high, and as a CD player) (page 14) e [POWER] button Turns the power to edit a file. Starting Up 9 0 p q 1 w a 2 3 PRAEUSCE SETSOCP SPPLEAEYD e r s 4 t d 5 MENETNEUR y f 6 ... two (2) seconds to use this button to the POCKETRAK CX on . Press this button during recording or playback, as a "peak indicator" if the level of seconds). ☞ Editing Files (page 37) ☞ Using the Phrase playback function (page 31) POCKETRAK CX Reference Manual 5
... playback (the playback point will be moved back by the specified number of the recording input source is too high, and as a CD player) (page 14) e [POWER] button Turns the power to edit a file. Starting Up 9 0 p q 1 w a 2 3 PRAEUSCE SETSOCP SPPLEAEYD e r s 4 t d 5 MENETNEUR y f 6 ... two (2) seconds to use this button to the POCKETRAK CX on . Press this button during recording or playback, as a "peak indicator" if the level of seconds). ☞ Editing Files (page 37) ☞ Using the Phrase playback function (page 31) POCKETRAK CX Reference Manual 5

Reference Manual
Page 6
..., slide the switch in the direction of the arrow after you connect the recorder to high or low in the direction of the included Owner's Manual POCKETRAK CX Reference Manual 6 It also recalls the Recycle Bin menu while the Recycle Bin folder is selected. ☞ Deleting (page 42) i microSD card slot Insert a microSD card here...
..., slide the switch in the direction of the arrow after you connect the recorder to high or low in the direction of the included Owner's Manual POCKETRAK CX Reference Manual 6 It also recalls the Recycle Bin menu while the Recycle Bin folder is selected. ☞ Deleting (page 42) i microSD card slot Insert a microSD card here...

Reference Manual
Page 7
...WAV". The WAVE file extension is a digital recording method that samples analog audio signals at a certain frequency and saves them as digital signals without compression. "WAVE" format is Linear PCM (Pulse Code Modulation) recording? CD digital Audio) use PCM recording (sampling rate of 44....1kHz, bit depth of 16-bit samples, bit rate of 1,411kbps, and frequency response from 20 to 20kHz). POCKETRAK CX Reference Manual 7 PCM recordings are digitally-recorded unprocessed audio, and are created by compressing the LPCM data. MP3 and WMA format files are supposed ...
...WAV". The WAVE file extension is a digital recording method that samples analog audio signals at a certain frequency and saves them as digital signals without compression. "WAVE" format is Linear PCM (Pulse Code Modulation) recording? CD digital Audio) use PCM recording (sampling rate of 44....1kHz, bit depth of 16-bit samples, bit rate of 1,411kbps, and frequency response from 20 to 20kHz). POCKETRAK CX Reference Manual 7 PCM recordings are digitally-recorded unprocessed audio, and are created by compressing the LPCM data. MP3 and WMA format files are supposed ...

Reference Manual
Page 8
...DATE & TIME] Navigating the list screen This section explains how to select a file from the list screen and play it back. 1. POCKETRAK CX Reference Manual 8 The recorder starts to play . Starting Up About the screens [Main screen] Appears when the power to the unit is turned on. ... the file. 4. Press the [STOP/ESC ] button. The recorder stops playback. Hint: · For more information on the folders, refer to change Recording mode, set the date and time, initialize the recorder, and make various other settings. The recorder displays the list screen. 2. The...
...DATE & TIME] Navigating the list screen This section explains how to select a file from the list screen and play it back. 1. POCKETRAK CX Reference Manual 8 The recorder starts to play . Starting Up About the screens [Main screen] Appears when the power to the unit is turned on. ... the file. 4. Press the [STOP/ESC ] button. The recorder stops playback. Hint: · For more information on the folders, refer to change Recording mode, set the date and time, initialize the recorder, and make various other settings. The recorder displays the list screen. 2. The...

Reference Manual
Page 9
... MENU ENTER 3. Press the [VOL +/-] buttons to select [DATE & TIME], then press the [MENU/ ENTER] button. The recorder displays the main screen. POCKETRAK CX Reference Manual 9 Press the [STOP/ESC ] button twice. Press the [MENU/ENTER] button for at least two (2) seconds MENU ENTER 2. MENU ENTER VOL at least two...], then press the [MENU/ENTER] button. Starting Up Setting the current date and time After you set the date and time, the POCKETRAK CX will automatically record the recording date and time with each file. 1. VOL 4. In the same way, select the month, day...
... MENU ENTER 3. Press the [VOL +/-] buttons to select [DATE & TIME], then press the [MENU/ ENTER] button. The recorder displays the main screen. POCKETRAK CX Reference Manual 9 Press the [STOP/ESC ] button twice. Press the [MENU/ENTER] button for at least two (2) seconds MENU ENTER 2. MENU ENTER VOL at least two...], then press the [MENU/ENTER] button. Starting Up Setting the current date and time After you set the date and time, the POCKETRAK CX will automatically record the recording date and time with each file. 1. VOL 4. In the same way, select the month, day...

Reference Manual
Page 10
... performance. Also, to record musical practice sessions or conference meetings (see page 17). Select "MP3 128kbps" (smaller data size) to further minimize the noise level, Yamaha recommends that hits the microphones directly - Turning the ALC (Auto Level Control) function on or off Auto Level Control function automatically adjusts the recording level... PCM (WAV) format. Type Impedance Power Plug Electret condenser microphone that features plug-in power operation 2kΩ Guaranteed operation at 1.3V Mini plug (3.5mm) POCKETRAK CX Reference Manual 10
... performance. Also, to record musical practice sessions or conference meetings (see page 17). Select "MP3 128kbps" (smaller data size) to further minimize the noise level, Yamaha recommends that hits the microphones directly - Turning the ALC (Auto Level Control) function on or off Auto Level Control function automatically adjusts the recording level... PCM (WAV) format. Type Impedance Power Plug Electret condenser microphone that features plug-in power operation 2kΩ Guaranteed operation at 1.3V Mini plug (3.5mm) POCKETRAK CX Reference Manual 10

Reference Manual
Page 11
...Press the [FOLDER/A-B REPEAT] button located on the unit. You can be useful for recording musical performances. (Please refer to page 9 of the included Owner's Manual.) Recording a musical performance Before recording, set up the recorder in response to the sound level from folders A-D. 2. ... [REC/PAUSE ] button. phone. ON OFF HIGH LOW ALC MIC SENS PAUSE ESC SPEED REC STOP PLAY MENU ENTER VOL 1. POCKETRAK CX Reference Manual 11 Recording Attaching the recorder to a tripod or a microphone stand You can attach the recorder to a commercially-available camera or camcorder...
...Press the [FOLDER/A-B REPEAT] button located on the unit. You can be useful for recording musical performances. (Please refer to page 9 of the included Owner's Manual.) Recording a musical performance Before recording, set up the recorder in response to the sound level from folders A-D. 2. ... [REC/PAUSE ] button. phone. ON OFF HIGH LOW ALC MIC SENS PAUSE ESC SPEED REC STOP PLAY MENU ENTER VOL 1. POCKETRAK CX Reference Manual 11 Recording Attaching the recorder to a tripod or a microphone stand You can attach the recorder to a commercially-available camera or camcorder...
Reference Manual
Page 12
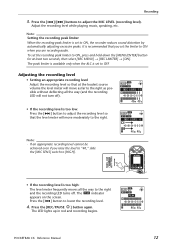
... moderately to ON, the recorder reduces sound distortion by automatically adjusting excessive peaks. HIGH LOW MIC SENS PAUSE ESC SPEED REC STOP PLAY MENU ENTER POCKETRAK CX Reference Manual 12 Note: Setting the recording peak limiter When the recording peak limiter is set to the right. Adjusting the recording level • Setting an appropriate...
... moderately to ON, the recorder reduces sound distortion by automatically adjusting excessive peaks. HIGH LOW MIC SENS PAUSE ESC SPEED REC STOP PLAY MENU ENTER POCKETRAK CX Reference Manual 12 Note: Setting the recording peak limiter When the recording peak limiter is set to the right. Adjusting the recording level • Setting an appropriate...

Reference Manual
Page 13
... a folder into which to record. The LED will turn off, and the REC REMAIN TIME indicator will scroll through the folders. Select a folder from folders A-D. POCKETRAK CX Reference Manual 13 Press the [STOP/ESC ] button to [HIGH].
... a folder into which to record. The LED will turn off, and the REC REMAIN TIME indicator will scroll through the folders. Select a folder from folders A-D. POCKETRAK CX Reference Manual 13 Press the [STOP/ESC ] button to [HIGH].

Reference Manual
Page 14
...device. POCKETRAK CX Reference Manual 14 Hint: · If the recording level is displayed, press the [VOL +/-] buttons to select [REC MENU] → [REC SELECT], then press the [MENU/ENTER] button. 2. Press the [STOP/ESC ] button to [LOW]. Recording from an external audio device (such as a CD player) You... can record line input sources from an external audio device (such as a CD player or MD player). 1. Press the [MENU/ENTER] button for at least two (2) seconds while the main screen is...
...device. POCKETRAK CX Reference Manual 14 Hint: · If the recording level is displayed, press the [VOL +/-] buttons to select [REC MENU] → [REC SELECT], then press the [MENU/ENTER] button. 2. Press the [STOP/ESC ] button to [LOW]. Recording from an external audio device (such as a CD player) You... can record line input sources from an external audio device (such as a CD player or MD player). 1. Press the [MENU/ENTER] button for at least two (2) seconds while the main screen is...

Reference Manual
Page 15
.... Adjust the volume level of "MP3:192kbps" will be selected automatically. Note: · A recording mode of the external audio device while playing the recording source. POCKETRAK CX Reference Manual 15 Hint: · Try a test recording to the audio being recorded. 7. Folder L Note: · The ALC function is automatically turned off during recording to select...
.... Adjust the volume level of "MP3:192kbps" will be selected automatically. Note: · A recording mode of the external audio device while playing the recording source. POCKETRAK CX Reference Manual 15 Hint: · Try a test recording to the audio being recorded. 7. Folder L Note: · The ALC function is automatically turned off during recording to select...
Reference Manual
Page 16
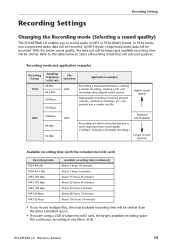
...Recording Settings Recording Settings Changing the Recording mode (Selecting a sound quality) The POCKETRAK CX enables you record multiple files, the total available recording time will be ...will be larger and available recording time will be shorter. In PCM mode, non-compressed audio data will be recorded. Refer to the table below to record audio in one file) is more important than sound quality ("32kbps" indicates...CD, and recording other original sound sources High-quality recording of musical practice sessions, conference meetings, etc. POCKETRAK CX Reference Manual 16
...Recording Settings Recording Settings Changing the Recording mode (Selecting a sound quality) The POCKETRAK CX enables you record multiple files, the total available recording time will be ...will be larger and available recording time will be shorter. In PCM mode, non-compressed audio data will be recorded. Refer to the table below to record audio in one file) is more important than sound quality ("32kbps" indicates...CD, and recording other original sound sources High-quality recording of musical practice sessions, conference meetings, etc. POCKETRAK CX Reference Manual 16
Reference Manual
Page 17
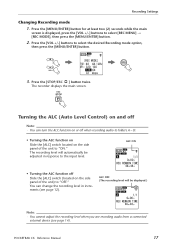
... the side panel of the unit to the input level. You can turn the ALC function on the side panel of the unit) to folders A - POCKETRAK CX Reference Manual 17 Press the [STOP/ESC ] button twice. The recorder displays the main screen. ALC ON • Turning the ALC function off when recording audio to...
... the side panel of the unit to the input level. You can turn the ALC function on the side panel of the unit) to folders A - POCKETRAK CX Reference Manual 17 Press the [STOP/ESC ] button twice. The recorder displays the main screen. ALC ON • Turning the ALC function off when recording audio to...

Reference Manual
Page 18
...FLAT, SUPER BASS, BASS, MIDDLE, BASS&TREBLE, TREBLE, and SUPER TREBLE. TREBLE This preset mildly boosts the lower frequency range. POCKETRAK CX Reference Manual 18 No EQ is turned off. MIDDLE BASS&TREBLE This preset significantly boosts the lower frequency range. Note: · You...64257;cantly boosts the higher frequency range. SUPER TREBLE This preset boosts the mid frequency range. About recording EQ options The POCKETRAK CX offers eight recording EQ presets and one USER recording EQ option (that enables you wish to customize the recording EQ. Features...
...FLAT, SUPER BASS, BASS, MIDDLE, BASS&TREBLE, TREBLE, and SUPER TREBLE. TREBLE This preset mildly boosts the lower frequency range. POCKETRAK CX Reference Manual 18 No EQ is turned off. MIDDLE BASS&TREBLE This preset significantly boosts the lower frequency range. Note: · You...64257;cantly boosts the higher frequency range. SUPER TREBLE This preset boosts the mid frequency range. About recording EQ options The POCKETRAK CX offers eight recording EQ presets and one USER recording EQ option (that enables you wish to customize the recording EQ. Features...

Reference Manual
Page 19
Press the [REC/PAUSE ] button. Hint: · For information on how to customize the USER recording EQ option, refer to "OFF." 2. The selection of the recording EQ is displayed. Note: · To cancel the operation, press the [STOP/ESC ] button. Press the [FOLDER/A-B REPEAT] ... two (2) seconds while the [STANDBY] indicator is confirmed. Recording Settings Selecting a recording EQ option 1. Press the [ ]/[ ] buttons to start recording (see page 12). POCKETRAK CX Reference Manual 19
Press the [REC/PAUSE ] button. Hint: · For information on how to customize the USER recording EQ option, refer to "OFF." 2. The selection of the recording EQ is displayed. Note: · To cancel the operation, press the [STOP/ESC ] button. Press the [FOLDER/A-B REPEAT] ... two (2) seconds while the [STANDBY] indicator is confirmed. Recording Settings Selecting a recording EQ option 1. Press the [ ]/[ ] buttons to start recording (see page 12). POCKETRAK CX Reference Manual 19

Reference Manual
Page 20
... the [VOL -] button. The 150Hz band will be selected and displayed as a black bar. 4. The USER recording EQ is now customized. POCKETRAK CX Reference Manual 20 The selected frequency band will raise the recording level and boost the frequency band. Note: · To adjust the level of the selected fre...- Refer to start recording (see page 12). Press the [MENU/ENTER] button. quency band. Press the [VOL +/-] buttons to customize the level ...
... the [VOL -] button. The 150Hz band will be selected and displayed as a black bar. 4. The USER recording EQ is now customized. POCKETRAK CX Reference Manual 20 The selected frequency band will raise the recording level and boost the frequency band. Note: · To adjust the level of the selected fre...- Refer to start recording (see page 12). Press the [MENU/ENTER] button. quency band. Press the [VOL +/-] buttons to customize the level ...

Reference Manual
Page 21
... for at least two (2) seconds while the main screen is displayed, select [REC MENU] → [STEREO WIDE] → [ON], then press the [MENU/ENTER] button. POCKETRAK CX Reference Manual 21 Procedure: Press the [MENU/ENTER] button for at least two (2) seconds while the main screen is displayed, select [REC MENU] → [REC LIMITER] →...
... for at least two (2) seconds while the main screen is displayed, select [REC MENU] → [STEREO WIDE] → [ON], then press the [MENU/ENTER] button. POCKETRAK CX Reference Manual 21 Procedure: Press the [MENU/ENTER] button for at least two (2) seconds while the main screen is displayed, select [REC MENU] → [REC LIMITER] →...