
Reference Manual
Page 2
... Recording a musical performance 11 Adjusting the recording level 12 Simple recording (musical practice, meeting, etc 13 Recording from an external audio device (such as a CD player 14 Recording Settings 16 Changing the Recording mode (Selecting a sound quality 16 Changing Recording mode 17 Turning the ALC (Auto Level Control) on and off... all files from a folder 46 Formatting a microSD card (Deleting all data 46 Using the Timer Functions 47 Programming Timer recording 47 Programming the alarm 48 POCKETRAK CX Reference Manual 2
... Recording a musical performance 11 Adjusting the recording level 12 Simple recording (musical practice, meeting, etc 13 Recording from an external audio device (such as a CD player 14 Recording Settings 16 Changing the Recording mode (Selecting a sound quality 16 Changing Recording mode 17 Turning the ALC (Auto Level Control) on and off... all files from a folder 46 Formatting a microSD card (Deleting all data 46 Using the Timer Functions 47 Programming Timer recording 47 Programming the alarm 48 POCKETRAK CX Reference Manual 2
Reference Manual
Page 3
...a CD-R 60 Using the POCKETRAK CX as a Music Player 62 Ripping CDs (Creating compatible music files from music CDs 62 Transferring music files to the POCKETRAK CX (Sync function 64 Playing back ...messages 72 Troubleshooting 74 FAQ 78 Specifications 80 Index 82 About the manuals The operation of the POCKETRAK CX is a registered trademark of Microsoft® Corporation in the United States...The illustrations and LCD screens shown in this manual are for your personal use. • This Reference Manual is the exclusive copyrights of Yamaha Corporation. • Windows is explained in the...
...a CD-R 60 Using the POCKETRAK CX as a Music Player 62 Ripping CDs (Creating compatible music files from music CDs 62 Transferring music files to the POCKETRAK CX (Sync function 64 Playing back ...messages 72 Troubleshooting 74 FAQ 78 Specifications 80 Index 82 About the manuals The operation of the POCKETRAK CX is a registered trademark of Microsoft® Corporation in the United States...The illustrations and LCD screens shown in this manual are for your personal use. • This Reference Manual is the exclusive copyrights of Yamaha Corporation. • Windows is explained in the...

Reference Manual
Page 4
... monitoring. Press this button for at least two (2) seconds to the previous screen during menu operation or file selection. 6 [ ] button Fast reverse button. POCKETRAK CX Reference Manual 4 During the menu setting operation or while the list screen is displayed, press this button to return to display the menu screen. Also, it moves...
... monitoring. Press this button for at least two (2) seconds to the previous screen during menu operation or file selection. 6 [ ] button Fast reverse button. POCKETRAK CX Reference Manual 4 During the menu setting operation or while the list screen is displayed, press this button to return to display the menu screen. Also, it moves...
Reference Manual
Page 5
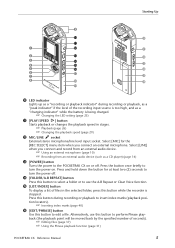
... during recording or playback, as a "peak indicator" if the level of the recording input source is too high, and as a CD player) (page 14) e [POWER] button Turns the power to the POCKETRAK CX on . Starting Up 9 0 p q 1 w a 2 3 PRAEUSCE SETSOCP SPPLEAEYD e r s 4 t d 5 MENETNEUR y f 6 VOL u 7 g 8 i h o 0 LED indicator Lights up as a "... [LIST/INDEX] button To display a list of seconds). ☞ Editing Files (page 37) ☞ Using the Phrase playback function (page 31) POCKETRAK CX Reference Manual 5 Select [LINE] when you connect an external microphone.
... during recording or playback, as a "peak indicator" if the level of the recording input source is too high, and as a CD player) (page 14) e [POWER] button Turns the power to the POCKETRAK CX on . Starting Up 9 0 p q 1 w a 2 3 PRAEUSCE SETSOCP SPPLEAEYD e r s 4 t d 5 MENETNEUR y f 6 VOL u 7 g 8 i h o 0 LED indicator Lights up as a "... [LIST/INDEX] button To display a list of seconds). ☞ Editing Files (page 37) ☞ Using the Phrase playback function (page 31) POCKETRAK CX Reference Manual 5 Select [LINE] when you connect an external microphone.

Reference Manual
Page 6
... 11) ☞ Page 9 of the arrow. s [ALC ON/OFF] switch Set this terminal to high or low in the direction of the included Owner's Manual POCKETRAK CX Reference Manual 6 To start recharging the eneloop battery, slide the switch in the direction of the arrow after you connect the recorder to a computer. ☞ Recharging the...
... 11) ☞ Page 9 of the arrow. s [ALC ON/OFF] switch Set this terminal to high or low in the direction of the included Owner's Manual POCKETRAK CX Reference Manual 6 To start recharging the eneloop battery, slide the switch in the direction of the arrow after you connect the recorder to a computer. ☞ Recharging the...

Reference Manual
Page 7
... WMA format files are supposed to be of the highest sound quality. Linear PCM (LPCM) recording is ".WAV". POCKETRAK CX Reference Manual 7 "WAVE" format is Linear PCM (Pulse Code Modulation) recording? PCM recordings are digitally-recorded unprocessed audio, and are created by compressing the LPCM data. Music CDs (CD-DA - The WAVE fi...
... WMA format files are supposed to be of the highest sound quality. Linear PCM (LPCM) recording is ".WAV". POCKETRAK CX Reference Manual 7 "WAVE" format is Linear PCM (Pulse Code Modulation) recording? PCM recordings are digitally-recorded unprocessed audio, and are created by compressing the LPCM data. Music CDs (CD-DA - The WAVE fi...

Reference Manual
Page 8
... VOL [List screen] LIST Appears when you wish to change Recording mode, set the date and time, initialize the recorder, and make various other settings. POCKETRAK CX Reference Manual 8
... VOL [List screen] LIST Appears when you wish to change Recording mode, set the date and time, initialize the recorder, and make various other settings. POCKETRAK CX Reference Manual 8

Reference Manual
Page 9
...] button. Press the [VOL +/-] buttons to select [DATE & TIME], then press the [MENU/ ENTER] button. POCKETRAK CX Reference Manual 9 VOL MENU ENTER 3. Starting Up Setting the current date and time After you set the date and time, the POCKETRAK CX will automatically record the recording date and time with each file. 1. In the same...
...] button. Press the [VOL +/-] buttons to select [DATE & TIME], then press the [MENU/ ENTER] button. POCKETRAK CX Reference Manual 9 VOL MENU ENTER 3. Starting Up Setting the current date and time After you set the date and time, the POCKETRAK CX will automatically record the recording date and time with each file. 1. In the same...

Reference Manual
Page 10
...a weak air conditioning breeze that features plug-in power operation 2kΩ Guaranteed operation at 1.3V Mini plug (3.5mm) POCKETRAK CX Reference Manual 10 Select "MP3 128kbps" (smaller data size) to [HIGH]. Musical performance and nature recordings ALC ON The recording dynamics... slight breeze or breath - Selecting a Recording mode The POCKETRAK CX records audio in stereo microphone is too high, set the [MIC SENS] (microphone sensitivity) switch on the right side of wind and other environmental noise, Yamaha recommends that you turn on or off Auto Level Control function...
...a weak air conditioning breeze that features plug-in power operation 2kΩ Guaranteed operation at 1.3V Mini plug (3.5mm) POCKETRAK CX Reference Manual 10 Select "MP3 128kbps" (smaller data size) to [HIGH]. Musical performance and nature recordings ALC ON The recording dynamics... slight breeze or breath - Selecting a Recording mode The POCKETRAK CX records audio in stereo microphone is too high, set the [MIC SENS] (microphone sensitivity) switch on the right side of wind and other environmental noise, Yamaha recommends that you turn on or off Auto Level Control function...

Reference Manual
Page 11
... the [FOLDER/A-B REPEAT] button located on the unit. Select a folder from the micro- Press the [REC/PAUSE ] button. POCKETRAK CX Reference Manual 11 You can attach the recorder to page 9 of the included Owner's Manual.) Recording a musical performance Before recording, set up the recorder in response to the sound level from folders A-D. 2. This can...
... the [FOLDER/A-B REPEAT] button located on the unit. Select a folder from the micro- Press the [REC/PAUSE ] button. POCKETRAK CX Reference Manual 11 You can attach the recorder to page 9 of the included Owner's Manual.) Recording a musical performance Before recording, set up the recorder in response to the sound level from folders A-D. 2. This can...
Reference Manual
Page 12
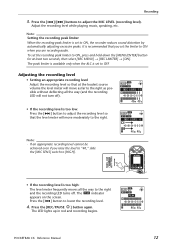
... will move moderately to the right. Press the [REC/PAUSE ] button again. HIGH LOW MIC SENS PAUSE ESC SPEED REC STOP PLAY MENU ENTER POCKETRAK CX Reference Manual 12 To set the limiter to the right as possible without deflecting all the way to the right and the recording LED turns...
... will move moderately to the right. Press the [REC/PAUSE ] button again. HIGH LOW MIC SENS PAUSE ESC SPEED REC STOP PLAY MENU ENTER POCKETRAK CX Reference Manual 12 To set the limiter to the right as possible without deflecting all the way to the right and the recording LED turns...

Reference Manual
Page 13
Select a folder from folders A-D. POCKETRAK CX Reference Manual 13 FOLDER PAUSE ESC SPEED REC STOP PLAY MENU ENTER Hint: · Pressing the [FOLDER/A-B REPEAT] button repeatedly will be displayed on the side panel ...
Select a folder from folders A-D. POCKETRAK CX Reference Manual 13 FOLDER PAUSE ESC SPEED REC STOP PLAY MENU ENTER Hint: · Pressing the [FOLDER/A-B REPEAT] button repeatedly will be displayed on the side panel ...

Reference Manual
Page 14
Press the [REC/PAUSE ] button. Recording from an external audio device (such as a CD player) You can record line input sources from an external audio device (such as a CD player or MD player). 1. Connect the recorder's [MIC/LINE] socket to select [LINE], then press the [MENU/ENTER] button. Hint: · If the recording level... MENU ENTER Note: · Please note that you cannot adjust the recording level on the screen. 2. The LED lights up in red and recording begins. POCKETRAK CX Reference Manual 14 Press the [STOP/ESC ] button to [LOW].
Press the [REC/PAUSE ] button. Recording from an external audio device (such as a CD player) You can record line input sources from an external audio device (such as a CD player or MD player). 1. Connect the recorder's [MIC/LINE] socket to select [LINE], then press the [MENU/ENTER] button. Hint: · If the recording level... MENU ENTER Note: · Please note that you cannot adjust the recording level on the screen. 2. The LED lights up in red and recording begins. POCKETRAK CX Reference Manual 14 Press the [STOP/ESC ] button to [LOW].

Reference Manual
Page 15
... input from the connected external device, no resistance). Recording starts. Folder L Note: · The ALC function is automatically turned off during recording to stop recording. POCKETRAK CX Reference Manual 15 Recording Use a commercially-available audio cable (stereo mini plug, 3.5mm, with no audio will be heard from the speaker. Hint: · Try a test...
... input from the connected external device, no resistance). Recording starts. Folder L Note: · The ALC function is automatically turned off during recording to stop recording. POCKETRAK CX Reference Manual 15 Recording Use a commercially-available audio cable (stereo mini plug, 3.5mm, with no audio will be heard from the speaker. Hint: · Try a test...
Reference Manual
Page 16
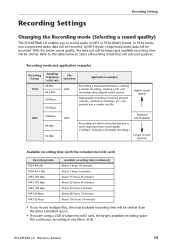
.... In PCM mode, non-compressed audio data will be larger and available recording time will suit your purpose. POCKETRAK CX Reference Manual 16 Recording Settings Recording Settings Changing the Recording mode (Selecting a sound quality) The POCKETRAK CX enables you are using a 2GB or larger microSD card, the largest available recording space (for which extended duration...
.... In PCM mode, non-compressed audio data will be larger and available recording time will suit your purpose. POCKETRAK CX Reference Manual 16 Recording Settings Recording Settings Changing the Recording mode (Selecting a sound quality) The POCKETRAK CX enables you are using a 2GB or larger microSD card, the largest available recording space (for which extended duration...
Reference Manual
Page 17
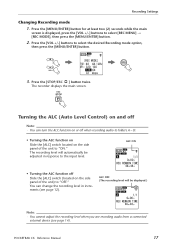
... will automatically be displayed.) Note: · You cannot adjust the recording level when you are recording audio from a connected external device (see page 12). POCKETRAK CX Reference Manual 17 The recording level will be adjusted in increments (see page 14). ALC ON • Turning the ALC function off Slide the [ALC] switch (located...
... will automatically be displayed.) Note: · You cannot adjust the recording level when you are recording audio from a connected external device (see page 12). POCKETRAK CX Reference Manual 17 The recording level will be adjusted in increments (see page 14). ALC ON • Turning the ALC function off Slide the [ALC] switch (located...

Reference Manual
Page 18
... the USER recording EQ option if you to record the audio of the desired tonal quality by cutting and boosting five EQ bands individually). POCKETRAK CX Reference Manual 18 Recording Settings Setting the recording EQ (equalizer) Setting the recording EQ enables to customize by boosting the lower or higher frequency ranges. This...
... the USER recording EQ option if you to record the audio of the desired tonal quality by cutting and boosting five EQ bands individually). POCKETRAK CX Reference Manual 18 Recording Settings Setting the recording EQ (equalizer) Setting the recording EQ enables to customize by boosting the lower or higher frequency ranges. This...

Reference Manual
Page 19
... to customize the EQ settings). The unit displays the [STANDBY] indicator. 4. The selection of the recording EQ is displayed. Press the [ ]/[ ] buttons to "OFF." 2. POCKETRAK CX Reference Manual 19 Hint: · For information on how to customize the USER recording EQ option, refer to start recording (see page 12). Recording Settings Selecting a recording...
... to customize the EQ settings). The unit displays the [STANDBY] indicator. 4. The selection of the recording EQ is displayed. Press the [ ]/[ ] buttons to "OFF." 2. POCKETRAK CX Reference Manual 19 Hint: · For information on how to customize the USER recording EQ option, refer to start recording (see page 12). Recording Settings Selecting a recording...

Reference Manual
Page 20
... a black bar. 3. The selected frequency band will be lost if you change the battery without first turning the power off or change the battery. POCKETRAK CX Reference Manual 20 quency band. Note: · To adjust the level of the selected fre- The USER recording EQ is dis- Refer to customize the level...
... a black bar. 3. The selected frequency band will be lost if you change the battery without first turning the power off or change the battery. POCKETRAK CX Reference Manual 20 quency band. Note: · To adjust the level of the selected fre- The USER recording EQ is dis- Refer to customize the level...

Reference Manual
Page 21
... cut the low frequency range by automatically adjusting excessive peaks. Setting Stereo Wide recording Recording with the STEREO WIDE option set to record clearer audio. POCKETRAK CX Reference Manual 21 Procedure: Press the [MENU/ENTER] button for at least two (2) seconds while the main screen is displayed, select [REC MENU] → [REC LIMITER...
... cut the low frequency range by automatically adjusting excessive peaks. Setting Stereo Wide recording Recording with the STEREO WIDE option set to record clearer audio. POCKETRAK CX Reference Manual 21 Procedure: Press the [MENU/ENTER] button for at least two (2) seconds while the main screen is displayed, select [REC MENU] → [REC LIMITER...