Owner's Manual
Page 2
... plate, or specifically recommended by Yamaha are therefore the owners responsibility. The model number, serial number, power requirements, etc., are designed to be at the time of assurance that accompany the accessory product. Purchase Date 92-BP (bottom) PLEASE KEEP THIS MANUAL FCC INFORMATION (U.S.A.) 1. Follow all batteries away from children. Compliance with the components supplied or; In the case of America, Electronic Service Division, 6600...
... plate, or specifically recommended by Yamaha are therefore the owners responsibility. The model number, serial number, power requirements, etc., are designed to be at the time of assurance that accompany the accessory product. Purchase Date 92-BP (bottom) PLEASE KEEP THIS MANUAL FCC INFORMATION (U.S.A.) 1. Follow all batteries away from children. Compliance with the components supplied or; In the case of America, Electronic Service Division, 6600...
Owner's Manual
Page 6
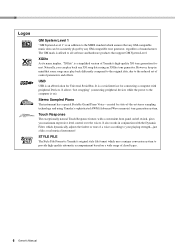
... of chord types. 6 Owner's Manual USB USB is an abbreviation for connecting a computer with the Dynamic Filter, which dynamically adjusts the timbre or tone of control parameters and effects. It allows "hot swapping" (connecting peripheral devices while the power to the reduced set of a voice according to provide high-quality automatic accompaniment based on ). Stereo Sampled Piano The instrument has a special Portable Grand Piano Voice-created by any XG song data using Yamaha's sophisticated...
... of chord types. 6 Owner's Manual USB USB is an abbreviation for connecting a computer with the Dynamic Filter, which dynamically adjusts the timbre or tone of control parameters and effects. It allows "hot swapping" (connecting peripheral devices while the power to the reduced set of a voice according to provide high-quality automatic accompaniment based on ). Stereo Sampled Piano The instrument has a special Portable Grand Piano Voice-created by any XG song data using Yamaha's sophisticated...
Owner's Manual
Page 7
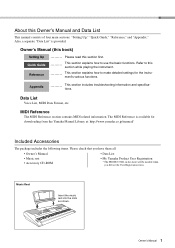
... the User Registration form. This section explains how to this section while playing the instrument. tions. Data List Voice List, MIDI Data Format, etc. Music Rest Insert the music rest into the slots as shown. The MIDI Reference is provided. This section explains how to use the basic functions. Appendix This section includes troubleshooting information and specifica- MIDI Reference The MIDI Reference section contains MIDI related information. Owner's Manual 7 Owner's Manual (this book) Setting Up Quick Guide Reference...
... the User Registration form. This section explains how to this section while playing the instrument. tions. Data List Voice List, MIDI Data Format, etc. Music Rest Insert the music rest into the slots as shown. The MIDI Reference is provided. This section explains how to use the basic functions. Appendix This section includes troubleshooting information and specifica- MIDI Reference The MIDI Reference section contains MIDI related information. Owner's Manual 7 Owner's Manual (this book) Setting Up Quick Guide Reference...
Owner's Manual
Page 8
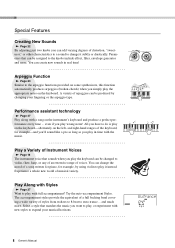
... the auto-accompaniment Styles. Special Features Creating New Sounds Page 22 By adjusting just two knobs you can add varying degrees of distortion, "sweetness," or other characteristics to a sound to the arpeggio functions provided on some synthesizers, this function automatically produces arpeggios (broken chords) when you simply play the appropriate notes on the keyboard. Arpeggio Function Page 20 Similar to change the mood of a song written for piano, for...
... the auto-accompaniment Styles. Special Features Creating New Sounds Page 22 By adjusting just two knobs you can add varying degrees of distortion, "sweetness," or other characteristics to a sound to the arpeggio functions provided on some synthesizers, this function automatically produces arpeggios (broken chords) when you simply play the appropriate notes on the keyboard. Arpeggio Function Page 20 Similar to change the mood of a song written for piano, for...
Owner's Manual
Page 9
... Adding Reverb 51 Adding Chorus 51 Pitch Controls (Transpose 52 Pitch Controls (Tuning 52 Setting the Metronome Time Signature 53 Adjusting the Metronome Volume 53 Pitch Bend 54 One Touch Setting 54 Select an EQ Setting for the Best Sound 54 Voice Settings 55 Voice Editing 55 Selecting a Dual Voice 56 Selecting a Split Voice 56 Touch Response Sensitivity 56 Harmony 57 Arpeggio Settings 58 Controlling Arpeggio Volume with Keyboard Dynamics 58 Synchronizing an arpeggio to a tempo of Style or Song 58 Holding the arpeggio Playback 59 Style (Auto-accompaniment) Functions...
... Adding Reverb 51 Adding Chorus 51 Pitch Controls (Transpose 52 Pitch Controls (Tuning 52 Setting the Metronome Time Signature 53 Adjusting the Metronome Volume 53 Pitch Bend 54 One Touch Setting 54 Select an EQ Setting for the Best Sound 54 Voice Settings 55 Voice Editing 55 Selecting a Dual Voice 56 Selecting a Split Voice 56 Touch Response Sensitivity 56 Harmony 57 Arpeggio Settings 58 Controlling Arpeggio Volume with Keyboard Dynamics 58 Synchronizing an arpeggio to a tempo of Style or Song 58 Holding the arpeggio Playback 59 Style (Auto-accompaniment) Functions...

Owner's Manual
Page 10
... use the power adaptor when transferring data to flash memory. Do not use different kinds of flash memory data. • Please use of the compartment. 3 Replace the compartment cover, making sure that the [ ](Standby/On) switch of operation. Batteries (including rechargeable types) can be lost. 10 Owner's Manual CAUTION • Unplug the AC Power Adaptor when not using the instrument, or during a data transfer, both the adaptor and the instrument. 2 Connect the AC adaptor to the power supply jack. 3 Plug the AC adaptor into...
... use the power adaptor when transferring data to flash memory. Do not use different kinds of flash memory data. • Please use of the compartment. 3 Replace the compartment cover, making sure that the [ ](Standby/On) switch of operation. Batteries (including rechargeable types) can be lost. 10 Owner's Manual CAUTION • Unplug the AC Power Adaptor when not using the instrument, or during a data transfer, both the adaptor and the instrument. 2 Connect the AC adaptor to the power supply jack. 3 Plug the AC adaptor into...

Owner's Manual
Page 24
... first operated after the new effect has been selected. 24 Owner's Manual NOTE • Try Playing a Variety of Instrument Voices (page 16) 2 Press the [ASSIGN] button as many times as necessary to select "z FILTER" ("z" will only change the sound. SquareLd 147 "z" appears here. If you select a different keyboard voice the knobs will be reset and the ideal settings for the selected voice will be used to adjust the...
... first operated after the new effect has been selected. 24 Owner's Manual NOTE • Try Playing a Variety of Instrument Voices (page 16) 2 Press the [ASSIGN] button as many times as necessary to select "z FILTER" ("z" will only change the sound. SquareLd 147 "z" appears here. If you select a different keyboard voice the knobs will be reset and the ideal settings for the selected voice will be used to adjust the...
Owner's Manual
Page 26
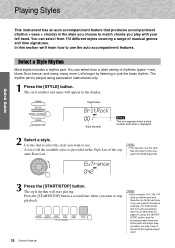
... of the keyboard split point. 26 Owner's Manual The rhythm part is displayed. 2 Select a style. The style number and name will begin by listening to the left hand. A list of all the available styles is provided in the Style List of rhythmic types-rock, blues, Euro trance, and many, many more. NOTE • You can select from a wide variety of the separate Data List. Press the [START/STOP] button a second time when...
... of the keyboard split point. 26 Owner's Manual The rhythm part is displayed. 2 Select a style. The style number and name will begin by listening to the left hand. A list of all the available styles is provided in the Style List of rhythmic types-rock, blues, Euro trance, and many, many more. NOTE • You can select from a wide variety of the separate Data List. Press the [START/STOP] button a second time when...

Owner's Manual
Page 30
... displayed. Select a song after referring to the 30 internal songs, or use as lesson songs. • When you want to listen to select and play songs you record yourself. • Songs transferred from a computer in the separate Data List. The songs are the songs to do it with. • Songs you have recorded yourself (User Songs) or songs that have been transferred to the instrument from a computer (page 76) 30 Owner's Manual...
... displayed. Select a song after referring to the 30 internal songs, or use as lesson songs. • When you want to listen to select and play songs you record yourself. • Songs transferred from a computer in the separate Data List. The songs are the songs to do it with. • Songs you have recorded yourself (User Songs) or songs that have been transferred to the instrument from a computer (page 76) 30 Owner's Manual...

Owner's Manual
Page 41
Change a Song's Style In addition to each song's default style, you can also change the song's melody voice and the keyboard voice for a complete change of image. You can select any songs that is played. Press the [SONG] button, then select a "009 Hallelujah Chorus" by changing the style with other style to play the song with the Easy Song Arranger feature. NOTE • The score for "Hallelujah Chorus" is on. Reference 2 Select a Song. Owner's Manual 41 You can...
Change a Song's Style In addition to each song's default style, you can also change the song's melody voice and the keyboard voice for a complete change of image. You can select any songs that is played. Press the [SONG] button, then select a "009 Hallelujah Chorus" by changing the style with other style to play the song with the Easy Song Arranger feature. NOTE • The score for "Hallelujah Chorus" is on. Reference 2 Select a Song. Owner's Manual 41 You can...

Owner's Manual
Page 42
... of the song. Press the [VOICE] button once to the song. NOTE • Because the Easy Song Arranger uses song data you will sound. If the song or style is on to turn the Easy Song Arranger function off . Reference 42 Owner's Manual Change a Song's Style 3 Listen to display the name of the current melody voice. NOTE • When playing song numbers 010, 011 and 021 to hear how the song sounds with different styles. Press the [STYLE] button and then...
... of the song. Press the [VOICE] button once to the song. NOTE • Because the Easy Song Arranger uses song data you will sound. If the song or style is on to turn the Easy Song Arranger function off . Reference 42 Owner's Manual Change a Song's Style 3 Listen to display the name of the current melody voice. NOTE • When playing song numbers 010, 011 and 021 to hear how the song sounds with different styles. Press the [STYLE] button and then...

Owner's Manual
Page 48
... 8. Bank 1 Bank number 3 Use the dial or the [1]-[8] number buttons to select a bank number from 1 to the Registration Memory 1 Set the panel controls as required-select a voice, accompaniment style, etc. 2 Press the [MEMORY/BANK] button. NOTICE • If you release the button. NOTE • Data cannot be damaged or lost. 48 Owner's Manual Reference 4 Press the REGIST MEMORY [1] or [2] button while holding the [MEMORY/BANK] button to store the current panel settings to 16 presets (eight banks of two each) can be saved (8 banks...
... 8. Bank 1 Bank number 3 Use the dial or the [1]-[8] number buttons to select a bank number from 1 to the Registration Memory 1 Set the panel controls as required-select a voice, accompaniment style, etc. 2 Press the [MEMORY/BANK] button. NOTICE • If you release the button. NOTE • Data cannot be damaged or lost. 48 Owner's Manual Reference 4 Press the REGIST MEMORY [1] or [2] button while holding the [MEMORY/BANK] button to store the current panel settings to 16 presets (eight banks of two each) can be saved (8 banks...

Owner's Manual
Page 49
...The panel controls will appear in the display for Registration Memory when using the Song features. REGIST 1 1 Settings That Can be instantly set accordingly. Owner's Manual 49 Reference Bank 1 Bank number 2 Use the dial or the [1]-[8] number buttons to select bank you want to the Registration Memory Style settings* Style number, Auto Accompaniment ON/OFF, Split Point, Style settings (Main A/B), Style Volume, Tempo Voice settings Main Voice setting (Voice number, Volume, Octave, Pan, Reverb Send Level, Attack Time, Release Time, Filter Cutoff, Filter Resonance, Chorus Send Level), Dual...
...The panel controls will appear in the display for Registration Memory when using the Song features. REGIST 1 1 Settings That Can be instantly set accordingly. Owner's Manual 49 Reference Bank 1 Bank number 2 Use the dial or the [1]-[8] number buttons to select bank you want to the Registration Memory Style settings* Style number, Auto Accompaniment ON/OFF, Split Point, Style settings (Main A/B), Style Volume, Tempo Voice settings Main Voice setting (Voice number, Volume, Octave, Pan, Reverb Send Level, Attack Time, Release Time, Filter Cutoff, Filter Resonance, Chorus Send Level), Dual...

Owner's Manual
Page 53
... first beat of each beat: 2, 4, 8, or 16 (half note, quarter note, eighth note, or 16th note). Select 5 for this example. TimesigD 04 The length of beats per measure. Select 8 for longer than a second. Owner's Manual 53 Adjusting the Metronome Volume 1 Press the [FUNCTION] button. 2 Use the CATEGORY [ ] and [ ] buttons to select the Metronome Volume item. 2 Use the dial to select the beat length function "TimesigD". All beats will be changed while a style or song is...
... first beat of each beat: 2, 4, 8, or 16 (half note, quarter note, eighth note, or 16th note). Select 5 for this example. TimesigD 04 The length of beats per measure. Select 8 for longer than a second. Owner's Manual 53 Adjusting the Metronome Volume 1 Press the [FUNCTION] button. 2 Use the CATEGORY [ ] and [ ] buttons to select the Metronome Volume item. 2 Use the dial to select the beat length function "TimesigD". All beats will be changed while a style or song is...

Owner's Manual
Page 72
... data of the instrument is transmitted (ON) via USB or not (OFF) during Song playback. Determines the repeat playback group. The Functions Category Harmony Settings Harmony Type Harmony Volume Arpeggio Type Arpeggio Arpeggio Velocity Arpeggio Quantize Arpeggio Pedal Style File Load PC Style File Load PC mode Local On/Off External Clock MIDI Keyboard Out Style Out Song Out Metronome Initial Send Time Signature Numerator Time Signature Denominator Metronome Volume Lesson Track (R) Lesson Lesson Track (L) Grade Demo Group Demo Demo Playmode Demo Cancel Display...
... data of the instrument is transmitted (ON) via USB or not (OFF) during Song playback. Determines the repeat playback group. The Functions Category Harmony Settings Harmony Type Harmony Volume Arpeggio Type Arpeggio Arpeggio Velocity Arpeggio Quantize Arpeggio Pedal Style File Load PC Style File Load PC mode Local On/Off External Clock MIDI Keyboard Out Style Out Song Out Metronome Initial Send Time Signature Numerator Time Signature Denominator Metronome Volume Lesson Track (R) Lesson Lesson Track (L) Grade Demo Group Demo Demo Playmode Demo Cancel Display...
Owner's Manual
Page 74
... [FUNCTION] button. 2 Press the CATEGORY [ ] and [ ] buttons as many times as necessary to performance data transmission and reception. ment by its internal tone generator OFF system: the internal tone generator is active when local control is on, and inactive when local control is being received from an external device, the song, style, and metronome functions will not start. Item Local External Clock Display Local ExtClock Range/ Settings Description Local control determines whether or not notes played...
... [FUNCTION] button. 2 Press the CATEGORY [ ] and [ ] buttons as many times as necessary to performance data transmission and reception. ment by its internal tone generator OFF system: the internal tone generator is active when local control is on, and inactive when local control is being received from an external device, the song, style, and metronome functions will not start. Item Local External Clock Display Local ExtClock Range/ Settings Description Local control determines whether or not notes played...

Owner's Manual
Page 77
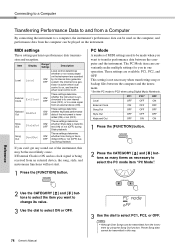
... batteries fail during a data transfer. NOTICE • Do not unplug the USB cable during the transfer. The data can use a power adaptor rather than batteries when transferring data. or left -hand part. This is transmitted/received as the specified right- Keep this in the lower right corner of the Musicsoft Downloader display. Use the dial to select the song you transmit or receive. The default settings are to be transferred and saved, but operation...
... batteries fail during a data transfer. NOTICE • Do not unplug the USB cable during the transfer. The data can use a power adaptor rather than batteries when transferring data. or left -hand part. This is transmitted/received as the specified right- Keep this in the lower right corner of the Musicsoft Downloader display. Use the dial to select the song you transmit or receive. The default settings are to be transferred and saved, but operation...
Owner's Manual
Page 80
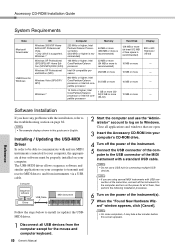
... software Driver USB Cable MIDI instrument Follow the steps below to the computer and turn on the power for all of them, then perform the following installation procedure. 6 Turn on page 82. Close all USB devices from instruments via a USB cable. NOTE • Do not use a USB hub for the mouse and computer keyboard. 80 Owner's Manual 2 Start the computer and use MIDI instruments connected to your computer, the appropriate driver software must be properly installed...
... software Driver USB Cable MIDI instrument Follow the steps below to the computer and turn on the power for all of them, then perform the following installation procedure. 6 Turn on page 82. Close all USB devices from instruments via a USB cable. NOTE • Do not use a USB hub for the mouse and computer keyboard. 80 Owner's Manual 2 Start the computer and use MIDI instruments connected to your computer, the appropriate driver software must be properly installed...

Owner's Manual
Page 85
... the Dual voice or Split voice is being used only for the cords you are reset. You have no rhythm parts, so no sound is output. This is pressed after selecting style number 150 or a style between 162 and 174 (Pianist). Press the [PERFORMANCE ASSISTANT] button to be played simultaneously) of the voices seem to sound, or the sound seems to turn off . Set the split point at once, both on the power. No rhythm accompaniment plays...
... the Dual voice or Split voice is being used only for the cords you are reset. You have no rhythm parts, so no sound is output. This is pressed after selecting style number 150 or a style between 162 and 174 (Pianist). Press the [PERFORMANCE ASSISTANT] button to be played simultaneously) of the voices seem to sound, or the sound seems to turn off . Set the split point at once, both on the power. No rhythm accompaniment plays...
Owner's Manual
Page 86
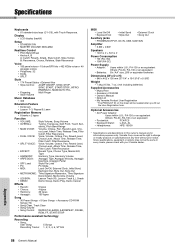
...; Style Volume Music Database • 305 Education Feature • Dictionary • Lesson 1-3, Repeat & Learn Registration Memory • 8 banks x 2 types Function • VOLUME: Style Volume, Song Volume • OVERALL: Tuning, Transpose, Split Point, Touch Sen- sitivity, Pitch Bend Range • MAIN VOICE: Volume, Octave, Pan, Reverb Level, Cho- Since specifications, equipment or options may not be needed when you fill out the User Registration form. Specifications Keyboards • 61 standard-size keys (C1-C6), with your Yamaha dealer. 86 Owner's Manual Reference...
...; Style Volume Music Database • 305 Education Feature • Dictionary • Lesson 1-3, Repeat & Learn Registration Memory • 8 banks x 2 types Function • VOLUME: Style Volume, Song Volume • OVERALL: Tuning, Transpose, Split Point, Touch Sen- sitivity, Pitch Bend Range • MAIN VOICE: Volume, Octave, Pan, Reverb Level, Cho- Since specifications, equipment or options may not be needed when you fill out the User Registration form. Specifications Keyboards • 61 standard-size keys (C1-C6), with your Yamaha dealer. 86 Owner's Manual Reference...


