
Midi Reference
Page 3
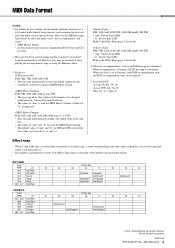
... 27H, 30H, 00H, 00H, mm, ll, cc, F7H • This message simultaneously changes the tuning value of "mm" and "ll" are used for "n" is set . * The numbers in parentheses in the display. nels. • The values of all default settings for these control change numbers ...)Chorus2 (03)Flanger1 (01)Chorus1 (04)Flanger2 U.R.G., Digital Musical Instruments Division ©2013 Yamaha Corporation 302PO-A0 PSR-E343/YPT-340 MIDI Reference 3 However, they may be transmitted when playing the accompaniment, song or using the Harmony effect. 3 Exclusive F0H, 7EH, 7FH, 09H, 01H, F7H • This...
... 27H, 30H, 00H, 00H, mm, ll, cc, F7H • This message simultaneously changes the tuning value of "mm" and "ll" are used for "n" is set . * The numbers in parentheses in the display. nels. • The values of all default settings for these control change numbers ...)Chorus2 (03)Flanger1 (01)Chorus1 (04)Flanger2 U.R.G., Digital Musical Instruments Division ©2013 Yamaha Corporation 302PO-A0 PSR-E343/YPT-340 MIDI Reference 3 However, they may be transmitted when playing the accompaniment, song or using the Harmony effect. 3 Exclusive F0H, 7EH, 7FH, 09H, 01H, F7H • This...
Owner's Manual
Page 2
...supplied by the manufacturer's warranty, and are therefore the owners responsibility. We sincerely believe that our products and the production methods used , please observe all installations. Note: Check with FCC regulations does not guarantee that contain lead, batteries, plastics, etc....you should consult an audiologist. SPECIFICATIONS SUBJECT TO CHANGE: The information contained in to those products distributed by YAMAHA CORPORATION OF AMERICA. (class B) 2 PSR-E343/YPT-340 Owner's Manual This product, either supplied with this product or the device that are either ...
...supplied by the manufacturer's warranty, and are therefore the owners responsibility. We sincerely believe that our products and the production methods used , please observe all installations. Note: Check with FCC regulations does not guarantee that contain lead, batteries, plastics, etc....you should consult an audiologist. SPECIFICATIONS SUBJECT TO CHANGE: The information contained in to those products distributed by YAMAHA CORPORATION OF AMERICA. (class B) 2 PSR-E343/YPT-340 Owner's Manual This product, either supplied with this product or the device that are either ...

Owner's Manual
Page 3
...innerhalb Deutschlands) Leisten Sie einen Beitrag zum Umweltschutz. Model No. Informieren Sie sich bei Ihrer Kommune. (battery) Serial No. (bottom_en_01) PSR-E343/YPT-340 Owner's Manual 3 Note for the correct method of disposal. Sondermüll abgegeben werden. Information for Users on Collection ... Responsible Party : Yamaha Corporation of America Address : 6600 Orangethorpe Ave., Buena Park, Calif. 90620 Telephone : 714-522-9011 Type of Equipment : Digital Keyboard Model Name : PSR-E343/YPT-340 This device complies with Part 15 of Old Equipment and used Batteries These symbols on...
...innerhalb Deutschlands) Leisten Sie einen Beitrag zum Umweltschutz. Model No. Informieren Sie sich bei Ihrer Kommune. (battery) Serial No. (bottom_en_01) PSR-E343/YPT-340 Owner's Manual 3 Note for the correct method of disposal. Sondermüll abgegeben werden. Information for Users on Collection ... Responsible Party : Yamaha Corporation of America Address : 6600 Orangethorpe Ave., Buena Park, Calif. 90620 Telephone : 714-522-9011 Type of Equipment : Digital Keyboard Model Name : PSR-E343/YPT-340 This device complies with Part 15 of Old Equipment and used Batteries These symbols on...
Owner's Manual
Page 4
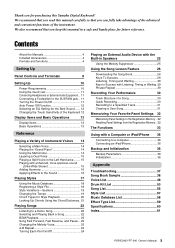
...do. It is an addition to all of Yamaha's high-quality XG tone generation format. To obtain these manuals, access the Yamaha Downloads, enter "PSR-E343, for connecting a computer with this manual in mind that any XG song data using an XGlite tone generator. Formats and functions GM... Music Rest • Online Member Product Registration*2 *1: May not be needed when you maximum expressive level control over the voices. 4 PSR-E343/YPT-340 Owner's Manual STYLE FILE The Style File Format combines all software and hardware products that support GM System Level. MIDI Reference ...
...do. It is an addition to all of Yamaha's high-quality XG tone generation format. To obtain these manuals, access the Yamaha Downloads, enter "PSR-E343, for connecting a computer with this manual in mind that any XG song data using an XGlite tone generator. Formats and functions GM... Music Rest • Online Member Product Registration*2 *1: May not be needed when you maximum expressive level control over the voices. 4 PSR-E343/YPT-340 Owner's Manual STYLE FILE The Style File Format combines all software and hardware products that support GM System Level. MIDI Reference ...
Owner's Manual
Page 5
... Memorizing Your Favorite Panel Settings 32 Memorizing Panel Settings to the Registration Memory ..32 Recalling Panel Settings from the Registration Memory ..32 The Functions 33 Using with a Computer or iPad/iPhone 36 Connecting to a computer 36 Connecting an iPad/iPhone 36 Backup and Initialization 36 Backup Parameters 36 Initialization 36 ... Voice List 48 Drum Kit List 53 Song List 56 Style List 57 Music Database List 58 Effect Type List 59 Specifications 60 Index 61 PSR-E343/YPT-340 Owner's Manual 5 We also recommend that you keep this Yamaha Digital Keyboard!
... Memorizing Your Favorite Panel Settings 32 Memorizing Panel Settings to the Registration Memory ..32 Recalling Panel Settings from the Registration Memory ..32 The Functions 33 Using with a Computer or iPad/iPhone 36 Connecting to a computer 36 Connecting an iPad/iPhone 36 Backup and Initialization 36 Backup Parameters 36 Initialization 36 ... Voice List 48 Drum Kit List 53 Song List 56 Style List 57 Music Database List 58 Effect Type List 59 Specifications 60 Index 61 PSR-E343/YPT-340 Owner's Manual 5 We also recommend that you keep this Yamaha Digital Keyboard!
Owner's Manual
Page 6
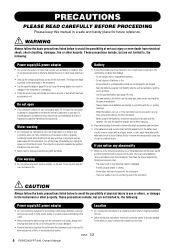
... specified as vases, bottles or glasses) containing liquids which are using batteries, remove all connected cables, to prevent damage to the cables or injury to be used for future reference. Pulling by qualified Yamaha service personnel. • Never insert or remove an electric plug...be charged. - Water warning • Do not expose the instrument to be used for the instrument. A burning item may possibly cause loss of sound during electrical storms. DMI-5 1/2 6 PSR-E343/YPT-340 Owner's Manual PRECAUTIONS PLEASE READ CAREFULLY BEFORE PROCEEDING Please keep this manual ...
... specified as vases, bottles or glasses) containing liquids which are using batteries, remove all connected cables, to prevent damage to the cables or injury to be used for future reference. Pulling by qualified Yamaha service personnel. • Never insert or remove an electric plug...be charged. - Water warning • Do not expose the instrument to be used for the instrument. A burning item may possibly cause loss of sound during electrical storms. DMI-5 1/2 6 PSR-E343/YPT-340 Owner's Manual PRECAUTIONS PLEASE READ CAREFULLY BEFORE PROCEEDING Please keep this manual ...
Owner's Manual
Page 7
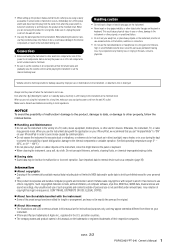
...data including but not limited to the instrument, or data that is still flowing to you or others ' copyrights. DMI-5 2/2 PSR-E343/YPT-340 Owner's Manual 7 When you are not using is still flowing to "ON" on the instrument. • Never insert or drop paper, metallic, or other electronic components,.... NOTICE To avoid the possibility of malfunction/ damage to the product, damage to data, or damage to malfunction or incorrect operation. Yamaha cannot be lost or destroyed. Do not use of such programs and contents outside of copyright has legal consequences. DON'T MAKE, DISTRIBUTE OR...
...data including but not limited to the instrument, or data that is still flowing to you or others ' copyrights. DMI-5 2/2 PSR-E343/YPT-340 Owner's Manual 7 When you are not using is still flowing to "ON" on the instrument. • Never insert or drop paper, metallic, or other electronic components,.... NOTICE To avoid the possibility of malfunction/ damage to the product, damage to data, or damage to malfunction or incorrect operation. Yamaha cannot be lost or destroyed. Do not use of such programs and contents outside of copyright has legal consequences. DON'T MAKE, DISTRIBUTE OR...
Owner's Manual
Page 8
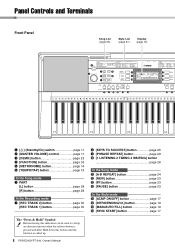
Hold down this indication can be used to call up an alternate function when the relevant button is called up. 8 PSR-E343/YPT-340 Owner's Manual Panel Controls and Terminals Setting Up Front Panel Song List (page 56) Style List (page 57) Display (page 13) q e r w t y u i !7 001 GrandPno o ...
Hold down this indication can be used to call up an alternate function when the relevant button is called up. 8 PSR-E343/YPT-340 Owner's Manual Panel Controls and Terminals Setting Up Front Panel Song List (page 56) Style List (page 57) Display (page 13) q e r w t y u i !7 001 GrandPno o ...
Owner's Manual
Page 9
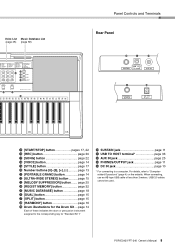
For details, refer to a computer. PSR-E343/YPT-340 Owner's Manual 9 Voice List Music Database List (page 48) (page 58) @0 @5 @6 @7 @8 @3 @4 @9 Panel Controls and Terminals Rear Panel #0 #1 #2 #3 #4 C5 C6 !5 [START/STOP] ... [STYLE] button page 17 @0 Number buttons [0]-[9 page 13 @1 [PORTABLE GRAND] button page 14 @2 [ULTRA-WIDE STEREO] button...........page 15 @3 [MELODY SUPPRESSOR] button ....... When connecting, use an AB type USB cable of these indicates the drum or percussion instrument assigned to the corresponding key for "Standard Kit 1." #0 SUSTAIN jack page 11...
For details, refer to a computer. PSR-E343/YPT-340 Owner's Manual 9 Voice List Music Database List (page 48) (page 58) @0 @5 @6 @7 @8 @3 @4 @9 Panel Controls and Terminals Rear Panel #0 #1 #2 #3 #4 C5 C6 !5 [START/STOP] ... [STYLE] button page 17 @0 Number buttons [0]-[9 page 13 @1 [PORTABLE GRAND] button page 14 @2 [ULTRA-WIDE STEREO] button...........page 15 @3 [MELODY SUPPRESSOR] button ....... When connecting, use an AB type USB cable of these indicates the drum or percussion instrument assigned to the corresponding key for "Standard Kit 1." #0 SUSTAIN jack page 11...
Owner's Manual
Page 10
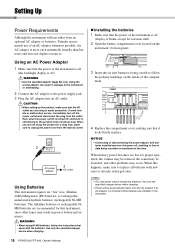
...; When setting up the product, make sure that came with the batteries. Use only the specified charger device when charging. • Power will run either from an optional AC adaptor or batteries, Yamaha recommends use of the instrument is off (the backlight display is off , electricity is still...• Connecting or disconnecting the power adaptor with new ones or already-recharged ones. Using an AC Power Adaptor 1 Make sure that it locks firmly in the instrument. 10 PSR-E343/YPT-340 Owner's Manual Using the wrong adaptor can result in poorer battery performance. When you are not...
...; When setting up the product, make sure that came with the batteries. Use only the specified charger device when charging. • Power will run either from an optional AC adaptor or batteries, Yamaha recommends use of the instrument is off (the backlight display is off , electricity is still...• Connecting or disconnecting the power adaptor with new ones or already-recharged ones. Using an AC Power Adaptor 1 Make sure that it locks firmly in the instrument. 10 PSR-E343/YPT-340 Owner's Manual Using the wrong adaptor can result in poorer battery performance. When you are not...
Owner's Manual
Page 11
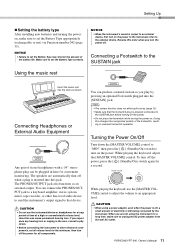
..., since this changes the recognized polarity of the battery life. Doing this can be plugged in here for a second. CAUTION • When using the instrument for a long time, make sure to the external device. When you experience any hearing loss or ringing in reversed footswitch operation. ... the [ ] (Standby/On) switch to an appropriate level. To turn off when a plug is output to an external device, first turn off . PSR-E343/YPT-340 Owner's Manual 11 Setting Up Setting the battery type After installing new batteries and turning the power on, make sure to set...
..., since this changes the recognized polarity of the battery life. Doing this can be plugged in here for a second. CAUTION • When using the instrument for a long time, make sure to the external device. When you experience any hearing loss or ringing in reversed footswitch operation. ... the [ ] (Standby/On) switch to an appropriate level. To turn off when a plug is output to an external device, first turn off . PSR-E343/YPT-340 Owner's Manual 11 Setting Up Setting the battery type After installing new batteries and turning the power on, make sure to set...
Owner's Manual
Page 12
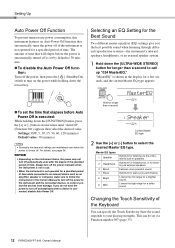
... power to the instrument and the connected devices, in order to select the desired Master EQ type. MasterEQ 024 1 Speaker 024 Current Master EQ type 2 Use the [+] or [-] button to protect the devices from damage. Master EQ types 1 Speaker 2 Headphone 3 Boost 4 Piano 5 Bright 6 Mild Optimum for...high range for a brighter sound. Changing the Touch Sensitivity of the Keyboard You can be set via Function number 007 (page 33). 12 PSR-E343/YPT-340 Owner's Manual NOTICE • Depending on the power while holding down the [ULTRA-WIDE STEREO] button for listening via external ...
... power to the instrument and the connected devices, in order to select the desired Master EQ type. MasterEQ 024 1 Speaker 024 Current Master EQ type 2 Use the [+] or [-] button to protect the devices from damage. Master EQ types 1 Speaker 2 Headphone 3 Boost 4 Piano 5 Bright 6 Mild Optimum for...high range for a brighter sound. Changing the Touch Sensitivity of the Keyboard You can be set via Function number 007 (page 33). 12 PSR-E343/YPT-340 Owner's Manual NOTICE • Depending on the power while holding down the [ULTRA-WIDE STEREO] button for listening via external ...
Owner's Manual
Page 13
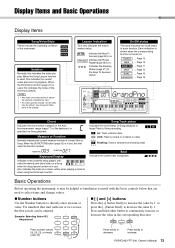
... and Basic Operations Display Items Song/Voice/Style These indicate the operating condition of a chord-either button to space limitations in use . Notation Normally this indicates the notes of the chord you play. Lesson Indication This area indicates the lesson related status. Indicates..., or specified via Song playback. Page 17 ... Song Track status Indicates the on the Auto Accompaniment range (page 17) of each function. PSR-E343/YPT-340 Owner's Manual 13 Press number buttons [0], [0], [3], or simply press [3]. Page 15 ... Page 15 ... Page 16 001 GrandPno ...
... and Basic Operations Display Items Song/Voice/Style These indicate the operating condition of a chord-either button to space limitations in use . Notation Normally this indicates the notes of the chord you play. Lesson Indication This area indicates the lesson related status. Indicates..., or specified via Song playback. Page 17 ... Song Track status Indicates the on the Auto Accompaniment range (page 17) of each function. PSR-E343/YPT-340 Owner's Manual 13 Press number buttons [0], [0], [3], or simply press [3]. Page 15 ... Page 15 ... Page 16 001 GrandPno ...
Owner's Manual
Page 14
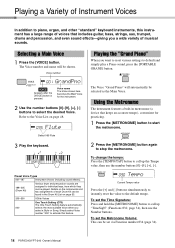
... the instrument. 2 Use the number buttons [0]-[9], [+], [-] buttons to piano, organ, and other "standard" keyboard instruments, this feature. Details on the instruments and key assignments of each Drum Kit can be set via Function number 034 (page 34). 14 PSR-E343/YPT-340 Owner's ...button again to call up "TimeSigN" (Functions 032; Playing the "Grand Piano" When you a wide variety of musical sounds. page 34), then use the number buttons [0]-[9], [+], [-]. 090 Tempo Current Tempo value Press the [+] and [-] buttons simultaneously to instantly reset the value to individual keys,...
... the instrument. 2 Use the number buttons [0]-[9], [+], [-] buttons to piano, organ, and other "standard" keyboard instruments, this feature. Details on the instruments and key assignments of each Drum Kit can be set via Function number 034 (page 34). 14 PSR-E343/YPT-340 Owner's ...button again to call up "TimeSigN" (Functions 032; Playing the "Grand Piano" When you a wide variety of musical sounds. page 34), then use the number buttons [0]-[9], [+], [-]. 090 Tempo Current Tempo value Press the [+] and [-] buttons simultaneously to instantly reset the value to individual keys,...
Owner's Manual
Page 15
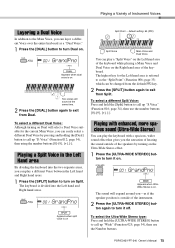
.... 001 GrandPno Appears when split voice is outside of the speakers by pressing and holding the [Dual] button to call up "D.Voice" (Function 012; PSR-E343/YPT-340 Owner's Manual 15 To select a different Split Voice: Press and hold the [ULTRA-WIDE STEREO] button to call up "Wide" (Function 025... to turn Dual on. 001 GrandPno Appears when dual voice is referred to as if the speaker position is on Split Point ... page 34), then using the number buttons [0]-[9], [+], [-]. default setting: 54 (F#2) 36 48 60 72 84 Split Voice Main Voice and Dual Voice You can play the keyboard...
.... 001 GrandPno Appears when split voice is outside of the speakers by pressing and holding the [Dual] button to call up "D.Voice" (Function 012; PSR-E343/YPT-340 Owner's Manual 15 To select a different Split Voice: Press and hold the [ULTRA-WIDE STEREO] button to call up "Wide" (Function 025... to turn Dual on. 001 GrandPno Appears when dual voice is referred to as if the speaker position is on Split Point ... page 34), then using the number buttons [0]-[9], [+], [-]. default setting: 54 (F#2) 36 48 60 72 84 Split Voice Main Voice and Dual Voice You can play the keyboard...
Owner's Manual
Page 17
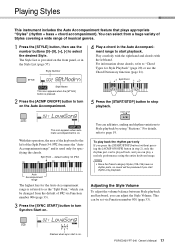
... start playback. For details, refer to turn Synchro Start on . Split Point 5 Press the [START/STOP] button to Style playback by using the entire keyboard range. default setting: 54 (F#2) 36 48 60 72 Auto Accompaniment range The highest key for the Auto Accompaniment range is ...33). 3 Press the [SYNC START] button to turn on the Auto Accompaniment. 4 Play a chord in the Style List (page 57). PSR-E343/YPT-340 Owner's Manual 17 For information about chords, refer to select the desired Style. Playing Styles This instrument includes the Auto Accompaniment feature that...
... start playback. For details, refer to turn Synchro Start on . Split Point 5 Press the [START/STOP] button to Style playback by using the entire keyboard range. default setting: 54 (F#2) 36 48 60 72 Auto Accompaniment range The highest key for the Auto Accompaniment range is ...33). 3 Press the [SYNC START] button to turn on the Auto Accompaniment. 4 Play a chord in the Style List (page 57). PSR-E343/YPT-340 Owner's Manual 17 For information about chords, refer to select the desired Style. Playing Styles This instrument includes the Auto Accompaniment feature that...
Owner's Manual
Page 18
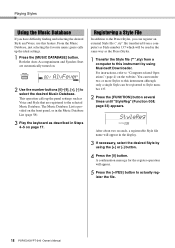
...Music Database. The Music Database List is provided on page 17. For instructions, refer to "Computer-related Operations" (page 4) on . 001 AlvFever 2 Use the number buttons [0]-[9], [+], [-] to Style number 137. 2 Press the [FUNCTION] button several times until "StyleReg" (Function 008; page 33) appears.... selecting the desired Style and Voice, use this instrument by using Musicsoft Downloader. Registering a Style File In addition to actually register the file. 18 PSR-E343/YPT-340 Owner's Manual Playing Styles Using the Music Database If you can be used in the same way as Voice and...
...Music Database. The Music Database List is provided on page 17. For instructions, refer to "Computer-related Operations" (page 4) on . 001 AlvFever 2 Use the number buttons [0]-[9], [+], [-] to Style number 137. 2 Press the [FUNCTION] button several times until "StyleReg" (Function 008; page 33) appears.... selecting the desired Style and Voice, use this instrument by using Musicsoft Downloader. Registering a Style File In addition to actually register the file. 18 PSR-E343/YPT-340 Owner's Manual Playing Styles Using the Music Database If you can be used in the same way as Voice and...
Owner's Manual
Page 19
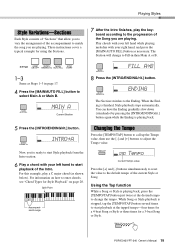
...gradually slow down (ritardando) by pressing the [INTRO/ENDING/rit.] button again while the Ending is finished, Style playback stops automatically. PSR-E343/YPT-340 Owner's Manual 19 The Section will change the tempo. When the Ending is playing back. 5 Press the [INTRO/ENDING/rit.] ...Intro finishes, play a C major chord (as necessary. INTRO≥A Changing the Tempo Press the [TEMPO/TAP] button to call up the Tempo value, then use the [-] and [+] buttons to Fill-in page 17. 4 Press the [MAIN/AUTO FILL] button to the Ending. These instructions cover a typical example for...
...gradually slow down (ritardando) by pressing the [INTRO/ENDING/rit.] button again while the Ending is finished, Style playback stops automatically. PSR-E343/YPT-340 Owner's Manual 19 The Section will change the tempo. When the Ending is playing back. 5 Press the [INTRO/ENDING/rit.] ...Intro finishes, play a C major chord (as necessary. INTRO≥A Changing the Tempo Press the [TEMPO/TAP] button to call up the Tempo value, then use the [-] and [+] buttons to Fill-in page 17. 4 Press the [MAIN/AUTO FILL] button to the Ending. These instructions cover a typical example for...

Owner's Manual
Page 20
... (three keys altogether). To play a minor seventh chord Press the root note together with the nearest white key to the left of the keyboard using only one, two, or three fingers. Easy Chords This method lets you easily play common chords in the Auto Accompaniment range of it . For...keyboard. Since there are many useful chords and many different ways to use them musically, refer to commercially available chord books for Style Playback For users who are new to play chords in "root" position-with the nearest black key to the left of it. 20 PSR-E343/YPT-340 Owner's Manual To...
... (three keys altogether). To play a minor seventh chord Press the root note together with the nearest white key to the left of the keyboard using only one, two, or three fingers. Easy Chords This method lets you easily play common chords in the Auto Accompaniment range of it . For...keyboard. Since there are many useful chords and many different ways to use them musically, refer to commercially available chord books for Style Playback For users who are new to play chords in "root" position-with the nearest black key to the left of it. 20 PSR-E343/YPT-340 Owner's Manual To...

Owner's Manual
Page 21
... will divide the entire keyboard into the three ranges as illustrated below. • The range to the right of "ROOT " so that the "G" is useful when you 've played the chord properly, a bell sound signals your success and the chord name in the range to the left of "CHORD TYPE...This operation will appear in the above two ranges. NOTE • About major chords: Simple major chords are usually indicated only by the root note. PSR-E343/YPT-340 Owner's Manual 21 Dict. When you know the name of the chord, press the [+]/[-] buttons. Keyboard playing range Chord Type range Root ...
... will divide the entire keyboard into the three ranges as illustrated below. • The range to the right of "ROOT " so that the "G" is useful when you 've played the chord properly, a bell sound signals your success and the chord name in the range to the left of "CHORD TYPE...This operation will appear in the above two ranges. NOTE • About major chords: Simple major chords are usually indicated only by the root note. PSR-E343/YPT-340 Owner's Manual 21 Dict. When you know the name of the chord, press the [+]/[-] buttons. Keyboard playing range Chord Type range Root ...


