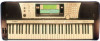
Owner's Manual
Page 6
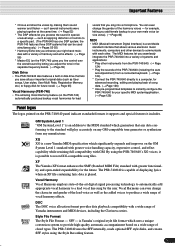
... and Right Hands 28 Functions of the Keyboard 29 Transpose 30 Pitch Bend Wheel 30 Modulation Wheel (PSR-740 30 Sustain 31 Keyboard Percussion 31 Organ Flutes (PSR-740) 32 Organ Flutes Editing 33 Auto Accompaniment 34 Using Auto Accompaniment (rhythm track only) .... 34 Using...Up 12 Power supply connections 12 Connecting a footswitch 12 Audio equipment connections 13 Connecting a microphone (PSR-740 13 Connecting external MIDI devices 14 Music stand 14 Demo Song Playback 15 Panel Display Indications 16 Basic Operation 17 Calling up the Operation Displays 17 Help -
... and Right Hands 28 Functions of the Keyboard 29 Transpose 30 Pitch Bend Wheel 30 Modulation Wheel (PSR-740 30 Sustain 31 Keyboard Percussion 31 Organ Flutes (PSR-740) 32 Organ Flutes Editing 33 Auto Accompaniment 34 Using Auto Accompaniment (rhythm track only) .... 34 Using...Up 12 Power supply connections 12 Connecting a footswitch 12 Audio equipment connections 13 Connecting a microphone (PSR-740 13 Connecting external MIDI devices 14 Music stand 14 Demo Song Playback 15 Panel Display Indications 16 Basic Operation 17 Calling up the Operation Displays 17 Help -

Owner's Manual
Page 7
...Sample Disk 67 Format 68 Save 68 Load 70 Song Copy 72 Delete 75 Disk Song Playback 76 Song Playback 76 Song Track Muting 78 Song Volume Control 78 Playing from a Specified Measure 79 Repeat Play 80 Song Transpose 81 Vocal Harmony (PSR-740) 82 Setting up 82 Using the Vocal Harmony ...effect 83 Changing the harmony settings 84 Talk Setting 86 Part Settings 88 Voice Change 89 Mixer 90 Parameter Edit 91 Song Recording 92 Quick Recording 94 Multi...
...Sample Disk 67 Format 68 Save 68 Load 70 Song Copy 72 Delete 75 Disk Song Playback 76 Song Playback 76 Song Track Muting 78 Song Volume Control 78 Playing from a Specified Measure 79 Repeat Play 80 Song Transpose 81 Vocal Harmony (PSR-740) 82 Setting up 82 Using the Vocal Harmony ...effect 83 Changing the harmony settings 84 Talk Setting 86 Part Settings 88 Voice Change 89 Mixer 90 Parameter Edit 91 Song Recording 92 Quick Recording 94 Multi...

Owner's Manual
Page 8
...Echo, and (on a traditional organ, by recording them floppy disk as a User song. Each User song lets you record up to your performance. (→ Page 48) Playing the PSR-740/640 • The PSR-740/640 keyboard has 61 keys with full touch-response capability that automatically appear in the... to one of 128 Registration Memory settings, and then instantly recall all your fingertips, with the PSR-740/640's comprehensive song editing functions. (→ Pages 98-105) Organ Flutes (PSR-740) • This special function not only gives you a full set of professional-sounding digital effects...
...Echo, and (on a traditional organ, by recording them floppy disk as a User song. Each User song lets you record up to your performance. (→ Page 48) Playing the PSR-740/640 • The PSR-740/640 keyboard has 61 keys with full touch-response capability that automatically appear in the... to one of 128 Registration Memory settings, and then instantly recall all your fingertips, with the PSR-740/640's comprehensive song editing functions. (→ Pages 98-105) Organ Flutes (PSR-740) • This special function not only gives you a full set of professional-sounding digital effects...
Owner's Manual
Page 9
... compatibility with each other. such as User songs, User styles, User Multi Pads, Registration Memory, etc.) to floppy disk for future recall. (→ Page 65) Vocal Harmony (PSR-740) • The amazing Vocal Harmony feature (on any manufacturer. for advanced recording, editing and playing back of Yamaha instruments and MIDI devices, including the Clavinova...
... compatibility with each other. such as User songs, User styles, User Multi Pads, Registration Memory, etc.) to floppy disk for future recall. (→ Page 65) Vocal Harmony (PSR-740) • The amazing Vocal Harmony feature (on any manufacturer. for advanced recording, editing and playing back of Yamaha instruments and MIDI devices, including the Clavinova...

Owner's Manual
Page 10
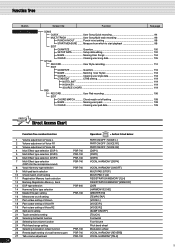
Panel Controls and Terminals PSR-740 $6 $7 !3 !2 t BACK NEXT yr !7 EXIT !8 #0 #1 q e u w #4 #5 SYNC STOP SYNC START START/STOP COUNT INTRO INTRO SONG A ACMP $1 i o 1 2 3 4 5 6 7 8 9 10 11 12 13 14 15 16 !0 !1 !4 !5 #6 #7 #8 1 ACMP ON/OFF FINGERING ...!6 #6 #7 ACMP ON/OFF FINGERING 1 2 3 4 5 6 7 8 9 10 11 12 13 14 15 16 SONG $0 PART ON/OFF VOICE L VOICE R1 VOICE R2 SONG ACMP START/STOP $1 INTRO MAIN/AUTO FILL ENDING A B C D $2 MEMORY $3 REGISTRATION MEMORY 1 2 3 4 ... 89 G5 M 90 O 91 A5 92 93 $8 PSR-740/640 %1 %2 %3 %4 %5 %6 %7 10 8
Panel Controls and Terminals PSR-740 $6 $7 !3 !2 t BACK NEXT yr !7 EXIT !8 #0 #1 q e u w #4 #5 SYNC STOP SYNC START START/STOP COUNT INTRO INTRO SONG A ACMP $1 i o 1 2 3 4 5 6 7 8 9 10 11 12 13 14 15 16 !0 !1 !4 !5 #6 #7 #8 1 ACMP ON/OFF FINGERING ...!6 #6 #7 ACMP ON/OFF FINGERING 1 2 3 4 5 6 7 8 9 10 11 12 13 14 15 16 SONG $0 PART ON/OFF VOICE L VOICE R1 VOICE R2 SONG ACMP START/STOP $1 INTRO MAIN/AUTO FILL ENDING A B C D $2 MEMORY $3 REGISTRATION MEMORY 1 2 3 4 ... 89 G5 M 90 O 91 A5 92 93 $8 PSR-740/640 %1 %2 %3 %4 %5 %6 %7 10 8

Owner's Manual
Page 11
... !6 TRACK 1 - 16 buttons 39, 78 !7 EXIT button 17 !8 ORGAN FLUTES button (PSR-740 32 !9 GROOVE button (PSR-740 45 @0 MULTI EFFECT button (PSR-740 54 @1 VOCAL HARMONY button (PSR-740) ....... 82 @2 VOICE L button 28 @3 VOICE R1 button 26 @4 VOICE R2 button 27 @5 FUNCTION button 17, 91, 134 @6 SONG button 17, 25, 76 @7 STYLE button 17, 25, 34 @8 TEMPO/TAP...
... !6 TRACK 1 - 16 buttons 39, 78 !7 EXIT button 17 !8 ORGAN FLUTES button (PSR-740 32 !9 GROOVE button (PSR-740 45 @0 MULTI EFFECT button (PSR-740 54 @1 VOCAL HARMONY button (PSR-740) ....... 82 @2 VOICE L button 28 @3 VOICE R1 button 26 @4 VOICE R2 button 27 @5 FUNCTION button 17, 91, 134 @6 SONG button 17, 25, 76 @7 STYLE button 17, 25, 34 @8 TEMPO/TAP...
Owner's Manual
Page 12
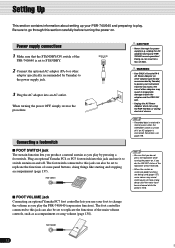
...page 137). Setting Up This section contains information about setting up your PSR-740/640 and preparing to play the PSR-740/640 (expression function). Power supply connections 1 Make sure that you produce a natural sustain as accompaniment or song volume (page 138). • Recorded data is retained in irreparable ... from the AC mains. If you play by pressing a footswitch. CAUTION • Never interrupt the power supply (e.g. Plug an optional Yamaha FC4 or FC5 footswitch into an AC outlet. Doing so can also be set to this section carefully before turning the power on. ...
...page 137). Setting Up This section contains information about setting up your PSR-740/640 and preparing to play the PSR-740/640 (expression function). Power supply connections 1 Make sure that you produce a natural sustain as accompaniment or song volume (page 138). • Recorded data is retained in irreparable ... from the AC mains. If you play by pressing a footswitch. CAUTION • Never interrupt the power supply (e.g. Plug an optional Yamaha FC4 or FC5 footswitch into an AC outlet. Doing so can also be set to this section carefully before turning the power on. ...

Owner's Manual
Page 15
...button to stop the demo song. 15 13 When you are provided. 1 Turn the power ON by pressing the [STANDBY/ON] switch. A total of 10 demo songs (8 demo songs for PSR-640) are not using the PSR-740/ 640 for a long time, make sure you 've set up your PSR-740/640, try listening to ...the pre-programmed demonstration songs. SONG ACMP START/STOP COUNT INTRO INTRO 5 Set a volume level with the...
...button to stop the demo song. 15 13 When you are provided. 1 Turn the power ON by pressing the [STANDBY/ON] switch. A total of 10 demo songs (8 demo songs for PSR-640) are not using the PSR-740/ 640 for a long time, make sure you 've set up your PSR-740/640, try listening to ...the pre-programmed demonstration songs. SONG ACMP START/STOP COUNT INTRO INTRO 5 Set a volume level with the...

Owner's Manual
Page 16
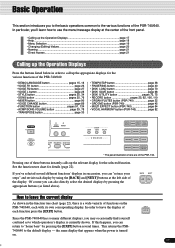
... status. 14 r Tempo Shows the current tempo of all tracks indicate the on the menu/message display. Panel Display Indications The PSR-740/640 features a large multi-function display that shows all important settings for the current operation. w Chord Displays the current chord name during ... messages for the instrument. e Transpose r Tempo t Measure q Menu/message display w Chord y Beat indicators 1 2 3 4 5 6 7 8 9 10 11 12 13 14 15 16 u Song tracks / Accompaniment tracks q Menu/message display This shows the menu for each function of the PSR-740/ 640.
... status. 14 r Tempo Shows the current tempo of all tracks indicate the on the menu/message display. Panel Display Indications The PSR-740/640 features a large multi-function display that shows all important settings for the current operation. w Chord Displays the current chord name during ... messages for the instrument. e Transpose r Tempo t Measure q Menu/message display w Chord y Beat indicators 1 2 3 4 5 6 7 8 9 10 11 12 13 14 15 16 u Song tracks / Accompaniment tracks q Menu/message display This shows the menu for each function of the PSR-740/ 640.
Owner's Manual
Page 17
...VOICE R1 button page 26 • VOICE R2 button page 27 • VOICE L button page 28 • STYLE button pages 25, 34 • SONG button pages 25, 76 • MIXER button page 90 • VOICE CHANGE button page 89 • FUNCTION button pages 91, 134 • ACMP..., 75 • RECORD button pages 25, 92, 106, 110 • ORGAN FLUTES button (PSR-740 page 32 • GROOVE button (PSR-740 page 45 • MULTI EFFECT button (PSR-740 page 54 • VOCAL HARMONY button (PSR-740 page 82 N/OFF FINGERING GROOVE ON LOAD DISK SAVE UTILITY DISK IN USE * The panel illustrations ...
...VOICE R1 button page 26 • VOICE R2 button page 27 • VOICE L button page 28 • STYLE button pages 25, 34 • SONG button pages 25, 76 • MIXER button page 90 • VOICE CHANGE button page 89 • FUNCTION button pages 91, 134 • ACMP..., 75 • RECORD button pages 25, 92, 106, 110 • ORGAN FLUTES button (PSR-740 page 32 • GROOVE button (PSR-740 page 45 • MULTI EFFECT button (PSR-740 page 54 • VOCAL HARMONY button (PSR-740 page 82 N/OFF FINGERING GROOVE ON LOAD DISK SAVE UTILITY DISK IN USE * The panel illustrations ...
Owner's Manual
Page 19
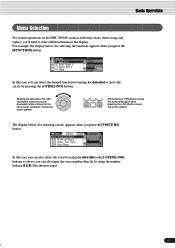
... desired function by turning the data dial or move the cursor by using the data dial or the [+/YES]/[-/NO] buttons as selecting voices, demo songs and styles), you press the [VOICE R1] button. In this case you press the [FUNCTION] button. For example, the display below (for selecting the function... can also select the voice by using the number buttons [1]-[0] (See the next page). 19 17 Basic Operation Menu Selection For certain operations on the PSR-740/640 (such as above;
... desired function by turning the data dial or move the cursor by using the data dial or the [+/YES]/[-/NO] buttons as selecting voices, demo songs and styles), you press the [VOICE R1] button. In this case you press the [FUNCTION] button. For example, the display below (for selecting the function... can also select the voice by using the number buttons [1]-[0] (See the next page). 19 17 Basic Operation Menu Selection For certain operations on the PSR-740/640 (such as above;

Owner's Manual
Page 20
... value part of other voices. To select voice number 106, for a few seconds, and then disappear when the selected number has been recognized by the PSR-740/ 640. • On some occasions, "- - -" may appear in sequence. • One- To select number "12," for voices and styles. •... display will return the setting to directly enter the number of three digits, such as voice number, song/style number and various parameters. Number buttons [1]-[0] described below the number on the PSR-740/640, such as those for example, simply press the [1] button and then the [2] button. This...
... value part of other voices. To select voice number 106, for a few seconds, and then disappear when the selected number has been recognized by the PSR-740/ 640. • On some occasions, "- - -" may appear in sequence. • One- To select number "12," for voices and styles. •... display will return the setting to directly enter the number of three digits, such as voice number, song/style number and various parameters. Number buttons [1]-[0] described below the number on the PSR-740/640, such as those for example, simply press the [1] button and then the [2] button. This...

Owner's Manual
Page 21
...corresponding keys. The Delete key (C6) deletes the character at the cursor position. • Lowercase letters cannot be named. • Disk files (User songs, etc pages 69, 73, 74, 104 • User Styles page 118 • User Pad banks page 108 • Registration Memory banks page 64... The example display below appears when naming a song on the keyboard enters a different character, as songs, styles and registration memory settings. The following data types can be used for disk file names. The A#5 and B5 ...
...corresponding keys. The Delete key (C6) deletes the character at the cursor position. • Lowercase letters cannot be named. • Disk files (User songs, etc pages 69, 73, 74, 104 • User Styles page 118 • User Pad banks page 108 • Registration Memory banks page 64... The example display below appears when naming a song on the keyboard enters a different character, as songs, styles and registration memory settings. The following data types can be used for disk file names. The A#5 and B5 ...

Owner's Manual
Page 22
... L selection 28 STYLE Accompaniment Style selection 34 STYLE GROUP Accompaniment Style group selection 34 SONG Song selection 76 SONG UTILITY SONG PLAY MODE Song play method selection 77 SONG START MEASURE ...... Song track setting (PSR-740 85 ACMP VOLUME Accompaniment Volume setting 39 SONG VOLUME Song Volume setting 78 TRANSPOSE Transpose setting 30 TEMPO Tempo setting 38 FINGERING Fingering selection 40...
... L selection 28 STYLE Accompaniment Style selection 34 STYLE GROUP Accompaniment Style group selection 34 SONG Song selection 76 SONG UTILITY SONG PLAY MODE Song play method selection 77 SONG START MEASURE ...... Song track setting (PSR-740 85 ACMP VOLUME Accompaniment Volume setting 39 SONG VOLUME Song Volume setting 78 TRANSPOSE Transpose setting 30 TEMPO Tempo setting 38 FINGERING Fingering selection 40...
Owner's Manual
Page 23
... 24 139 MODULATION WHEEL .......... Reverb depth setting of accompaniment track 91 REVERB DEPTH SONG ....... Overall sound (not MIC.) volume adjustment (PSR-740 86 DSP TYPE Vocal harmony DSP type selection (PSR-740 86 VOCAL HARMONY TYPE ...... Reverb return level setting 51 CHORUS TYPE Chorus type ...depth setting of accompaniment track (PSR-640 91 DSP DEPTH SONG DSP depth setting of vocal harmony part (PSR-740 91 REVERB DEPTH R1/R2/L .... Pan setting of song track (PSR-640 91 F7 TALK SETTING TALK VOLUME Talk volume adjustment (PSR-740 27 86 TOTAL VOLUME ATTENUATER .....
... 24 139 MODULATION WHEEL .......... Reverb depth setting of accompaniment track 91 REVERB DEPTH SONG ....... Overall sound (not MIC.) volume adjustment (PSR-740 86 DSP TYPE Vocal harmony DSP type selection (PSR-740 86 VOCAL HARMONY TYPE ...... Reverb return level setting 51 CHORUS TYPE Chorus type ...depth setting of accompaniment track (PSR-640 91 DSP DEPTH SONG DSP depth setting of vocal harmony part (PSR-740 91 REVERB DEPTH R1/R2/L .... Pan setting of song track (PSR-640 91 F7 TALK SETTING TALK VOLUME Talk volume adjustment (PSR-740 27 86 TOTAL VOLUME ATTENUATER .....
Owner's Manual
Page 24
...which to start playback 98 EDIT QUANTIZE Quantize 100 SETUP DATA Setup data editing 102 NAME Naming User Songs 104 CLEAR Clearing user song data 105 STYLE RECORD User Style recording 112 EDIT QUANTIZE Quantize 116 NAME Namimg User Styles 118 CLEAR ... adjustment of Voice R2 4 Multi Effect type selection (DSP1) PSR-740 5 Multi Effect type selection (DSP2) PSR-740 6 Multi Effect type selection (DSP3) PSR-740 7 Multi Effect type selection (DSP4 for the microphone sound) PSR-740 8 Vocal Harmony type selection PSR-740 9 Multi pad bank selection 10 Chord match on/off setting...
...which to start playback 98 EDIT QUANTIZE Quantize 100 SETUP DATA Setup data editing 102 NAME Naming User Songs 104 CLEAR Clearing user song data 105 STYLE RECORD User Style recording 112 EDIT QUANTIZE Quantize 116 NAME Namimg User Styles 118 CLEAR ... adjustment of Voice R2 4 Multi Effect type selection (DSP1) PSR-740 5 Multi Effect type selection (DSP2) PSR-740 6 Multi Effect type selection (DSP3) PSR-740 7 Multi Effect type selection (DSP4 for the microphone sound) PSR-740 8 Vocal Harmony type selection PSR-740 9 Multi pad bank selection 10 Chord match on/off setting...

Owner's Manual
Page 25
...65). In the Record mode you can be canceled (the beat indicator dots will go out) and the PSR-740/640 will be executed (except for playing back the songs. SONG ACMP START/STOP COUNT INTRO INTRO Styles are the rhythm/accompaniment pattterns which are played by pressing the [LOAD.... Each of operation). page 76 SONG ACMP START/STOP COUNT INTRO INTRO Record Mode Select this mode by pressing the [STYLE] button. (This is the default mode when the power is turned on.) The Style mode is used , the PSR-740/640 has several fundamentally different conditions ...
...65). In the Record mode you can be canceled (the beat indicator dots will go out) and the PSR-740/640 will be executed (except for playing back the songs. SONG ACMP START/STOP COUNT INTRO INTRO Styles are the rhythm/accompaniment pattterns which are played by pressing the [LOAD.... Each of operation). page 76 SONG ACMP START/STOP COUNT INTRO INTRO Record Mode Select this mode by pressing the [STYLE] button. (This is the default mode when the power is turned on.) The Style mode is used , the PSR-740/640 has several fundamentally different conditions ...

Owner's Manual
Page 29
... ON/OFF VOICE L VOICE R1 VOICE R2 PART ON/OFF VOICE L VOICE R1 VOICE R2 Voice L Voice R1 + R2 In addition, the keyboard of the PSR-740/640 can also be used to C6 (See below ). B2 C3 - Refer to on a floppy disk, User Styles, User Pad banks and Registration Memory banks... voice L becomes the range for example, the lowest (farthest left ) key on the keyboard corresponds to C1 and the highest (farthest right) key to name song files on (page 35), the key range of playing voices. C#1 D#1 F#1 G#1 A#1 C1 D1 E1 F1 G1 A1 B1 C1 - B3 C4 - Split Point (F#2/G2) • ...
... ON/OFF VOICE L VOICE R1 VOICE R2 PART ON/OFF VOICE L VOICE R1 VOICE R2 Voice L Voice R1 + R2 In addition, the keyboard of the PSR-740/640 can also be used to C6 (See below ). B2 C3 - Refer to on a floppy disk, User Styles, User Pad banks and Registration Memory banks... voice L becomes the range for example, the lowest (farthest left ) key on the keyboard corresponds to C1 and the highest (farthest right) key to name song files on (page 35), the key range of playing voices. C#1 D#1 F#1 G#1 A#1 C1 D1 E1 F1 G1 A1 B1 C1 - B3 C4 - Split Point (F#2/G2) • ...

Owner's Manual
Page 34
The PSR-740/640 features a total of 160 styles or accompaniment patterns (style numbers 1 - 160) in a variety of the different styles (page 150) and play with the auto ... accompaniment functions related to do is play the chords with the backing of an entire band or orchestra. Try selecting some of different musical genres. SONG ACMP START/STOP COUNT INTRO INTRO 4 Press the [START/STOP] button again to match the auto accompaniment style • One Touch Setting page 44 Using...
The PSR-740/640 features a total of 160 styles or accompaniment patterns (style numbers 1 - 160) in a variety of the different styles (page 150) and play with the auto ... accompaniment functions related to do is play the chords with the backing of an entire band or orchestra. Try selecting some of different musical genres. SONG ACMP START/STOP COUNT INTRO INTRO 4 Press the [START/STOP] button again to match the auto accompaniment style • One Touch Setting page 44 Using...

Owner's Manual
Page 36
Auto Accompaniment Accompaniment Sections There are various types of Auto Accompaniment sections that of the song. PSR-740 COUNT INTRO INTRO MAIN/AUTO FILL SIMPLE ENDING ENDING A B C D PSR-640 INTRO MAIN/AUTO FILL ENDING A B C D q INTRO Section This is used for the ending of [SYNCHRONIZED START]. ... them as you are 4 variations on the selected style. D and the auto accompaniment changes harmonically based on the selected style. The PSR-740 also features two endings: ENDING and SIMPLE ENDING . 1 Press the [STYLE] button (page 34). 2 Select a style (page 34).
Auto Accompaniment Accompaniment Sections There are various types of Auto Accompaniment sections that of the song. PSR-740 COUNT INTRO INTRO MAIN/AUTO FILL SIMPLE ENDING ENDING A B C D PSR-640 INTRO MAIN/AUTO FILL ENDING A B C D q INTRO Section This is used for the ending of [SYNCHRONIZED START]. ... them as you are 4 variations on the selected style. D and the auto accompaniment changes harmonically based on the selected style. The PSR-740 also features two endings: ENDING and SIMPLE ENDING . 1 Press the [STYLE] button (page 34). 2 Select a style (page 34).


