Owners Manual
Page 5
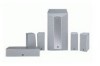
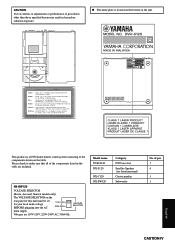
... SELECTOR Model name DVR-S120 NX-S120 NX-C120 NX-SW120 Category DVD receiver Satellite Speaker (for your local main voltage BEFORE plugging into the AC main supply. 110V-120V 220V-240V Voltages are included. G The name plate is a DVD home theater sound system consisting of this unit must be... set for front/surround) Center speaker Subwoofer No. NX-SW120 VOLTAGE SELECTOR (Korea, Asia and General models only) The VOLTAGE SELECTOR on the rear...
... SELECTOR Model name DVR-S120 NX-S120 NX-C120 NX-SW120 Category DVD receiver Satellite Speaker (for your local main voltage BEFORE plugging into the AC main supply. 110V-120V 220V-240V Voltages are included. G The name plate is a DVD home theater sound system consisting of this unit must be... set for front/surround) Center speaker Subwoofer No. NX-SW120 VOLTAGE SELECTOR (Korea, Asia and General models only) The VOLTAGE SELECTOR on the rear...

Owners Manual
Page 6
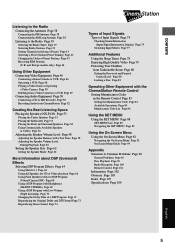
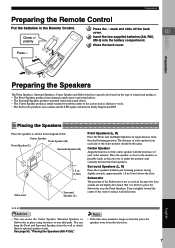
...sound field • Sound fields to match the movie you play video games. • Listen to CinemaStation couldn't be easier. • Connecting the Speaker Cables with DSP Programs when you are viewing and experience the feeling of DVD will open up. Double and triple your favorite place on , let... with one touch colored connectors. In a few simple connections, and that's all there is to it. • Connecting Speakers and TV to and record CD-R and MiniDisc media. • View and dub video media. 2 Come on the sofa and let the show begin. Settle into a home theater in 3 steps.
...sound field • Sound fields to match the movie you play video games. • Listen to CinemaStation couldn't be easier. • Connecting the Speaker Cables with DSP Programs when you are viewing and experience the feeling of DVD will open up. Double and triple your favorite place on , let... with one touch colored connectors. In a few simple connections, and that's all there is to it. • Connecting Speakers and TV to and record CD-R and MiniDisc media. • View and dub video media. 2 Come on the sofa and let the show begin. Settle into a home theater in 3 steps.

Owners Manual
Page 7
... it be the excitement of a nightclub or the acoustics of the room. • The Matrix 6.1 Decoder provides virtual surround back speakers for FM channels. It's time to TAKE YOUR LISTENING EXPERIENCE UP A NOTCH! ➡Page 53, "Creating the Best Listening Space" • ... various controls including Auto Preset for experiencing a remarkable acoustic presence. • SILENT CINEMA provides an incredible listening presence with headphones. 3 Connect Speakers Play a disc Select a sound field • Enjoy playing all types of discs including audio and video CDs and MP3 music recorded on...
... it be the excitement of a nightclub or the acoustics of the room. • The Matrix 6.1 Decoder provides virtual surround back speakers for FM channels. It's time to TAKE YOUR LISTENING EXPERIENCE UP A NOTCH! ➡Page 53, "Creating the Best Listening Space" • ... various controls including Auto Preset for experiencing a remarkable acoustic presence. • SILENT CINEMA provides an incredible listening presence with headphones. 3 Connect Speakers Play a disc Select a sound field • Enjoy playing all types of discs including audio and video CDs and MP3 music recorded on...

Owners Manual
Page 8
CONTENTS Basic Playing back a DVD Advanced Preparation Introduction Page 6 About this Manual Page 6 Supplied Accessories Page 6 Preparing the Remote Control Page 7 Preparing the Speakers Page 7 Placing the Speakers Page 7 Connecting the Speakers and TV Page 8 Basic Operations Viewing a DVD Page 10 Useful Features Page 13 Selecting the Audio Language Page 13 Selecting the Subtitle...
CONTENTS Basic Playing back a DVD Advanced Preparation Introduction Page 6 About this Manual Page 6 Supplied Accessories Page 6 Preparing the Remote Control Page 7 Preparing the Speakers Page 7 Placing the Speakers Page 7 Connecting the Speakers and TV Page 8 Basic Operations Viewing a DVD Page 10 Useful Features Page 13 Selecting the Audio Language Page 13 Selecting the Subtitle...
Owners Manual
Page 9
...Best Listening Space Placing the Speakers (NX-P120) Page 53 Placing the Center Speaker Page 53 Placing the Subwoofer Page 53 Placing the Front and Surround Speakers Page 54 Using Commercially Available Speakers or Cables Page 56 Adjusting the Speaker Volume Level Page 58 Adjusting the Speaker Balance with a Test ...More Information about DSP (Surround) Effects Selecting DSP Program Effects Page 64 Using Matrix 6.1 Page 64 Using All Speakers for CD or Video playback Page 66 Using Front Speakers Only for DSP Program (Virtual Cinema DSP) Page 68 Using a DSP Program with Headphones (SILENT CINEMA) ...
...Best Listening Space Placing the Speakers (NX-P120) Page 53 Placing the Center Speaker Page 53 Placing the Subwoofer Page 53 Placing the Front and Surround Speakers Page 54 Using Commercially Available Speakers or Cables Page 56 Adjusting the Speaker Volume Level Page 58 Adjusting the Speaker Balance with a Test ...More Information about DSP (Surround) Effects Selecting DSP Program Effects Page 64 Using Matrix 6.1 Page 64 Using All Speakers for CD or Video playback Page 66 Using Front Speakers Only for DSP Program (Virtual Cinema DSP) Page 68 Using a DSP Program with Headphones (SILENT CINEMA) ...
Owners Manual
Page 10
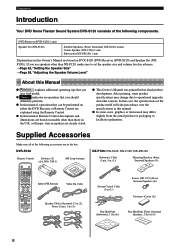
Preparation Introduction Your DVD Home Theater Sound System DVX-S120 consists of the following components. indicates an operation that you use speakers other than those in this Manual G Advice explains... AM Loop Antenna Indoor FM Antenna Video Pin Cable Speaker Cables (Surround: 15 m (2), Front, Center: 5 m (3)) NX-P120: NX-S120, NX-C120, NX-SW120 Subwoofer Cable (1 pin, 5 m, (1)) Mounting Brackets (Front, Surround Speakers (4)) System Control Cable (5 m (1)) Screws (M4 ✕ 10) (Front, Surround Speakers (4)) Fasteners (Center (2)) Non-Skid Pads (Subwoofer, ...
Preparation Introduction Your DVD Home Theater Sound System DVX-S120 consists of the following components. indicates an operation that you use speakers other than those in this Manual G Advice explains... AM Loop Antenna Indoor FM Antenna Video Pin Cable Speaker Cables (Surround: 15 m (2), Front, Center: 5 m (3)) NX-P120: NX-S120, NX-C120, NX-SW120 Subwoofer Cable (1 pin, 5 m, (1)) Mounting Brackets (Front, Surround Speakers (4)) System Control Cable (5 m (1)) Screws (M4 ✕ 10) (Front, Surround Speakers (4)) Fasteners (Center (2)) Non-Skid Pads (Subwoofer, ...
Owners Manual
Page 11
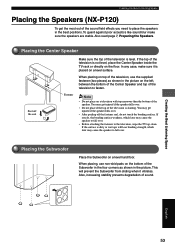
... them to reduce wall reflections. You can secure the Center Speaker, Surround Speakers or Subwoofer in Dolby Digital and DTS. See page 53, "Placing the Speakers (NX-P120)". The distance of the room to optional speaker stands. Center Speaker Align the front face of the center speaker with the front face of the screen such as shown in...
... them to reduce wall reflections. You can secure the Center Speaker, Surround Speakers or Subwoofer in Dolby Digital and DTS. See page 53, "Placing the Speakers (NX-P120)". The distance of the room to optional speaker stands. Center Speaker Align the front face of the center speaker with the front face of the screen such as shown in...

Owners Manual
Page 12
...Color band 1 Lever 1 Press the lever down. 2 Insert the speaker cable core into place. Insert it firmly. Red Green Tab White Blue Gray Tab Speaker Cable (Gray) Surround Right Speaker PPlleeaassee ... • Do not allow the speaker cable cores to touch each other. • Do not use ...the same color. Gray, blue: Face the tab downwards and insert. Preparation Connecting the Speakers and TV Please ... Connect the power cord after connecting the speakers and TV. Front Right Speaker Speaker Cable (Red) Connect the plug to the + connector. Be careful, if you reverse ...
...Color band 1 Lever 1 Press the lever down. 2 Insert the speaker cable core into place. Insert it firmly. Red Green Tab White Blue Gray Tab Speaker Cable (Gray) Surround Right Speaker PPlleeaassee ... • Do not allow the speaker cable cores to touch each other. • Do not use ...the same color. Gray, blue: Face the tab downwards and insert. Preparation Connecting the Speakers and TV Please ... Connect the power cord after connecting the speakers and TV. Front Right Speaker Speaker Cable (Red) Connect the plug to the + connector. Be careful, if you reverse ...

Owners Manual
Page 13
...) AUDIO 75 UNBAL COMPONENT VIDEO VIDEO MONITOR VCR OUT OUT VIDEO VCR IN IN System Control Subwoofer Cable Cable AV MONITOR OUT (DVD ONLY) DIGITAL AUDIO IN OUT OPTICAL Surround Left Speaker Connect the power cord after making all other connections. See page 95 when the ...screen does not appear properly. and Europe models only) SYSTEM CONNECTOR Subwoofer If your TV's S-video input. 9 English Useful tip...
...) AUDIO 75 UNBAL COMPONENT VIDEO VIDEO MONITOR VCR OUT OUT VIDEO VCR IN IN System Control Subwoofer Cable Cable AV MONITOR OUT (DVD ONLY) DIGITAL AUDIO IN OUT OPTICAL Surround Left Speaker Connect the power cord after making all other connections. See page 95 when the ...screen does not appear properly. and Europe models only) SYSTEM CONNECTOR Subwoofer If your TV's S-video input. 9 English Useful tip...

Owners Manual
Page 23
... on the Remote Control to select Tuner mode. Set them again if those settings are erased after a week. • Volume • Subwoofer, Center and Surround L/R Speakers output levels (See page 58.) • SET MENU options (See page 88.) • Sleep Timer settings (See page 78.) • Preset radio stations (See page...
... on the Remote Control to select Tuner mode. Set them again if those settings are erased after a week. • Volume • Subwoofer, Center and Surround L/R Speakers output levels (See page 58.) • SET MENU options (See page 88.) • Sleep Timer settings (See page 78.) • Preset radio stations (See page...

Owners Manual
Page 26
... Selection buttons Selects a source to set the manufacturer code for some disc types, you like. 22 DSP Program buttons Selects one of the Surround Speakers. SURR +/-: Adjusts the volume of four DSP Programs: MOVIE, MUSIC, SPORTS or GAME. (See pages 16 and 17.) The MOVIE and MUSIC...sound field programs. Press the button repeatedly and select the effect you may have to operate with no sound field effect from the Front L/R Speakers. Advice • The purple color on the Remote Control indicates Amp mode. DVR-S120 WB56650 POWER POWER TV AUDIO ANGLE SUBTITLE /DTS SELECT...
... Selection buttons Selects a source to set the manufacturer code for some disc types, you like. 22 DSP Program buttons Selects one of the Surround Speakers. SURR +/-: Adjusts the volume of four DSP Programs: MOVIE, MUSIC, SPORTS or GAME. (See pages 16 and 17.) The MOVIE and MUSIC...sound field programs. Press the button repeatedly and select the effect you may have to operate with no sound field effect from the Front L/R Speakers. Advice • The purple color on the Remote Control indicates Amp mode. DVR-S120 WB56650 POWER POWER TV AUDIO ANGLE SUBTITLE /DTS SELECT...

Owners Manual
Page 31
... Complete the steps on the Remote Control. Selecting the Media Device Making the connections Complete the steps on pages 8 and 9, "Connecting the Speakers and TV". To play a video disc, perform steps 1 to 10 on pages 10 to CinemaStation. See page 46, "Connecting Video Equipment...". DVD/CD DVD/CD VCR VIDEO TUNER MOVIE MUSIC SPORTS GAME CINEMA Complete the steps on pages 8 and 9, "Connecting the Speakers and TV". To tune in your favorite channel, see page 39, "Listening to CinemaStation. Then connect a VCR to the Radio". Then connect...
... Complete the steps on the Remote Control. Selecting the Media Device Making the connections Complete the steps on pages 8 and 9, "Connecting the Speakers and TV". To play a video disc, perform steps 1 to 10 on pages 10 to CinemaStation. See page 46, "Connecting Video Equipment...". DVD/CD DVD/CD VCR VIDEO TUNER MOVIE MUSIC SPORTS GAME CINEMA Complete the steps on pages 8 and 9, "Connecting the Speakers and TV". To tune in your favorite channel, see page 39, "Listening to CinemaStation. Then connect a VCR to the Radio". Then connect...

Owners Manual
Page 33
...✕ or 0.5✕). Playing Video and Music Discs English Advice • You can use Fast Forward/Reverse while playing a Dolby Digital or DTS disc, the Speakers do not output any sound. • Slow Reverse is not available for a video CD. 29 See pages 94 and 95, "On Screen Menu Guide". e DVR...
...✕ or 0.5✕). Playing Video and Music Discs English Advice • You can use Fast Forward/Reverse while playing a Dolby Digital or DTS disc, the Speakers do not output any sound. • Slow Reverse is not available for a video CD. 29 See pages 94 and 95, "On Screen Menu Guide". e DVR...
Owners Manual
Page 57
... sliding when it is level. When placing, use the supplied fastener (two pieces) as shown in the picture on a television with top narrower than the bottom of the speaker. Creating the Best Listening Space Placing the Speakers (NX-P120) To get the most out of the sound field effects you do not ...touch the bonding surface. Note • Do not place on the left, between the bottom of the Center Speaker and top of the television...
... sliding when it is level. When placing, use the supplied fastener (two pieces) as shown in the picture on a television with top narrower than the bottom of the speaker. Creating the Best Listening Space Placing the Speakers (NX-P120) To get the most out of the sound field effects you do not ...touch the bonding surface. Note • Do not place on the left, between the bottom of the Center Speaker and top of the television...

Owners Manual
Page 58
...that the tapping screw enters the narrow part of the hole and the speaker is made of plaster, decorative veneer sheeting or other material that is fixed securely in the four corners. YAMAHA will bear no responsibility for accidents caused by improperly placed equipment or faulty ...installation methods. 54 Hang the speakers on the screws using the two holes on commercially available speaker stands. Note • One speaker weighs about 1.1 kg (2.43 lb...
...that the tapping screw enters the narrow part of the hole and the speaker is made of plaster, decorative veneer sheeting or other material that is fixed securely in the four corners. YAMAHA will bear no responsibility for accidents caused by improperly placed equipment or faulty ...installation methods. 54 Hang the speakers on the screws using the two holes on commercially available speaker stands. Note • One speaker weighs about 1.1 kg (2.43 lb...

Owners Manual
Page 59
... and bracket Mounting bracket (supplied) Use the supplied screw to attach the mounting bracket to the bottom of the bracket enters the groove at the speaker base. 60 mm (23/8Љ) Screw (supplied) Use the bracket holes (60 mm (23/8Љ) spacing) to fasten the mounting bracket to... attach the supplied mounting brackets. The jutting part of the speaker. Creating the Best Listening Space English 55 Use the screws (4 mm (5/32Љ) dia.), spring washers and washers. Advice • When attaching to...
... and bracket Mounting bracket (supplied) Use the supplied screw to attach the mounting bracket to the bottom of the bracket enters the groove at the speaker base. 60 mm (23/8Љ) Screw (supplied) Use the bracket holes (60 mm (23/8Љ) spacing) to fasten the mounting bracket to... attach the supplied mounting brackets. The jutting part of the speaker. Creating the Best Listening Space English 55 Use the screws (4 mm (5/32Љ) dia.), spring washers and washers. Advice • When attaching to...

Owners Manual
Page 60
Creating the Best Listening Space Yamaha Speaker Stand SPS-80 (Option) With the SPS-80 Speaker Stands, you use commercially available speaker cables instead of a moving person may not be available in certain regions. If a speaker with less than 6-ohm impedance is the same thickness as the supplied cable. If these speakers still create interference with 6-ohm...
Creating the Best Listening Space Yamaha Speaker Stand SPS-80 (Option) With the SPS-80 Speaker Stands, you use commercially available speaker cables instead of a moving person may not be available in certain regions. If a speaker with less than 6-ohm impedance is the same thickness as the supplied cable. If these speakers still create interference with 6-ohm...

Owners Manual
Page 61
... Listening Space English 57 Not twisting firmly can cause a short. Keep pushing up the release button and pull out the supplied speaker cable from the connector. Match the speaker cable polarity (+/-) with the polarity indicator (+/-) of the connector. Polarity indicator ם Release your finger from the ...; Release button Peel away about 10 mm (13/32Љ) of covering from the release button to fasten the cable. Changing the speaker cables Creating the Best Listening Space Push up the release button and insert the cable cores of the commercially available cable.
... Listening Space English 57 Not twisting firmly can cause a short. Keep pushing up the release button and pull out the supplied speaker cable from the connector. Match the speaker cable polarity (+/-) with the polarity indicator (+/-) of the connector. Polarity indicator ם Release your finger from the ...; Release button Peel away about 10 mm (13/32Љ) of covering from the release button to fasten the cable. Changing the speaker cables Creating the Best Listening Space Push up the release button and insert the cable cores of the commercially available cable.

Owners Manual
Page 62
...SPORTS GAME TEST VOLUME + / - Press AMP. However, depending on room conditions or listening position, you may need to adjust the speaker volume level for some sources. This adjustment is the same for most conditions. To adjust, disconnect your listening position. Creating the Best ...important because it brings out the maximum effect of the DSP Program, and faithfully reproduces the acoustic personalities of the Speakers are suitable for each speaker from your listening position. Note • You cannot adjust the volume level while connected to headphones. CINEMA 58 ...
...SPORTS GAME TEST VOLUME + / - Press AMP. However, depending on room conditions or listening position, you may need to adjust the speaker volume level for some sources. This adjustment is the same for most conditions. To adjust, disconnect your listening position. Creating the Best ...important because it brings out the maximum effect of the DSP Program, and faithfully reproduces the acoustic personalities of the Speakers are suitable for each speaker from your listening position. Note • You cannot adjust the volume level while connected to headphones. CINEMA 58 ...

Owners Manual
Page 63
...RIGHT SUBWOOFER CENTER L SUR. The picture on the left shows the test tone order: LEFT (Front L Speaker) → CENTER (Center Speaker) → RIGHT (Front R Speaker) → R SUR. (Surround R Speaker) → L SUR. (Surround L Speaker) → SUBWOOFER (Subwoofer). When adjustment is distributed to the same volume level as the standard. In this... case, you want to adjust, press q or w and tune it to the Front L/R Speakers at the same volume level and output. Level" in the SET MENU is set to adjust the volume level of the Surround...
...RIGHT SUBWOOFER CENTER L SUR. The picture on the left shows the test tone order: LEFT (Front L Speaker) → CENTER (Center Speaker) → RIGHT (Front R Speaker) → R SUR. (Surround R Speaker) → L SUR. (Surround L Speaker) → SUBWOOFER (Subwoofer). When adjustment is distributed to the same volume level as the standard. In this... case, you want to adjust, press q or w and tune it to the Front L/R Speakers at the same volume level and output. Level" in the SET MENU is set to adjust the volume level of the Surround...


