
Owners Manual
Page 2
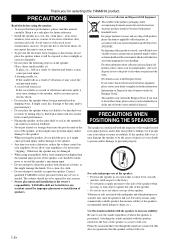
...cause personal injury. If the candle falls as this manual carefully. YAMAHA shall not be taken never to exceed the speaker's maximum input. • Do not attempt to discard these products correctly, you wish to clean the speaker with a rated output power higher than the nominal input power ...control on Disposal in other phenomena or activities may damage the speaker or be the cause of where the speaker is liable to the side of the speaker when moving the speaker, do not hold the port, as this YAMAHA product. Please be cautioned that even though the stands are ...
...cause personal injury. If the candle falls as this manual carefully. YAMAHA shall not be taken never to exceed the speaker's maximum input. • Do not attempt to discard these products correctly, you wish to clean the speaker with a rated output power higher than the nominal input power ...control on Disposal in other phenomena or activities may damage the speaker or be the cause of where the speaker is liable to the side of the speaker when moving the speaker, do not hold the port, as this YAMAHA product. Please be cautioned that even though the stands are ...
Owners Manual
Page 3
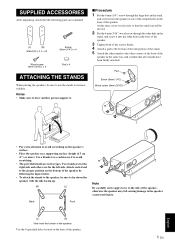
...(L) (R) Stand (R × 2, L × 2) Screw (6mm (1/4")) × 4 Wood screw (4mm (3/16")) × 4 Pad × 4 ATTACHING THE STANDS When placing the speakers, be sure to lay down the speaker with the side facing up. (R) (L) Back Front Note Be carefully not to apply force to the side of the...to have another person support it. ■ Procedure 1 Put the 6 mm (1/4") screw through the other corners of the base of the speaker. SUPPLIED ACCESSORIES After unpacking, check that all 4 stands have been firmly attached. Notes • Make sure to increase stability. Two stands ...
...(L) (R) Stand (R × 2, L × 2) Screw (6mm (1/4")) × 4 Wood screw (4mm (3/16")) × 4 Pad × 4 ATTACHING THE STANDS When placing the speakers, be sure to lay down the speaker with the side facing up. (R) (L) Back Front Note Be carefully not to apply force to the side of the...to have another person support it. ■ Procedure 1 Put the 6 mm (1/4") screw through the other corners of the base of the speaker. SUPPLIED ACCESSORIES After unpacking, check that all 4 stands have been firmly attached. Notes • Make sure to increase stability. Two stands ...
Owners Manual
Page 4
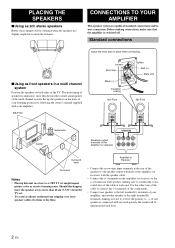
... accidents resulting from tripping over loose speaker cables, fix them to the floor. If one speaker to the (+) terminal of each end. NS-F700 Loosen Short bar Black (-) Insulation coating NS-F700 Tighten Red (+) Bare wire NS-F700 Subwoofer Center Speakers output terminals of the cable at the rear of the speakers to the speaker output terminals of the amplifier (or...
... accidents resulting from tripping over loose speaker cables, fix them to the floor. If one speaker to the (+) terminal of each end. NS-F700 Loosen Short bar Black (-) Insulation coating NS-F700 Tighten Red (+) Bare wire NS-F700 Subwoofer Center Speakers output terminals of the cable at the rear of the speakers to the speaker output terminals of the amplifier (or...
Owners Manual
Page 5
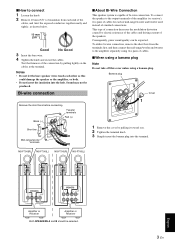
... Simply insert the banana plug into the hole. Consequently, purer sound quality can be selected. 3 En English To connect the speaker to the amplifier separately using a banana plug. Tweeter terminals Red (+) Black (-) Short bar Mid-range/woofer terminals 1 Remove...decreases the modulation distortion caused by electric resistance of the cables and driving current of standard connections. NS-F700(R) NS-F700(L) NS-F700(R) NS-F700(L) SPEAKERS R L +- -+ SPEAKERS R +- Banana plug Cover Remove the short bars before connecting. To utilize bi-wire connection, remove...
... Simply insert the banana plug into the hole. Consequently, purer sound quality can be selected. 3 En English To connect the speaker to the amplifier separately using a banana plug. Tweeter terminals Red (+) Black (-) Short bar Mid-range/woofer terminals 1 Remove...decreases the modulation distortion caused by electric resistance of the cables and driving current of standard connections. NS-F700(R) NS-F700(L) NS-F700(R) NS-F700(L) SPEAKERS R L +- -+ SPEAKERS R +- Banana plug Cover Remove the short bars before connecting. To utilize bi-wire connection, remove...
Owners Manual
Page 6
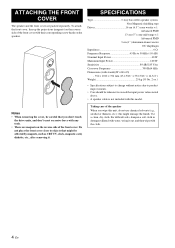
...cloth in detergent diluted with water, wring it . Do not place the front cover close to exceed the input power values noted above. • A speaker cable is not included with any tools. • There are packed separately. Use a clean, dry cloth. SPECIFICATIONS Type 3-way bass reflex... taken not to objects that you wipe this unit, do not use chemical solvents (e.g., alcohol or thinners, etc.): this model. Taking care of the speaker When you don't touch the drive units, and don't exert excessive force with this might be careful that might damage the finish. Notes •...
...cloth in detergent diluted with water, wring it . Do not place the front cover close to exceed the input power values noted above. • A speaker cable is not included with any tools. • There are packed separately. Use a clean, dry cloth. SPECIFICATIONS Type 3-way bass reflex... taken not to objects that you wipe this unit, do not use chemical solvents (e.g., alcohol or thinners, etc.): this model. Taking care of the speaker When you don't touch the drive units, and don't exert excessive force with this might be careful that might damage the finish. Notes •...


