

Owner's Manual
Page 1
MULTITRACK CASSETTE RECORDER Owner's Manual 1 INSERT I/O MIC/LINE INPUT 2 INSERT I/O 3 STEREO INPUT 4 5L 6R 7L 8R AUX SEND 1 2 GAIN LINE HIGH -12 MID -12 LOW -12 AUX 1 0 AUX 2 0 MIX 1 GAIN ...
MULTITRACK CASSETTE RECORDER Owner's Manual 1 INSERT I/O MIC/LINE INPUT 2 INSERT I/O 3 STEREO INPUT 4 5L 6R 7L 8R AUX SEND 1 2 GAIN LINE HIGH -12 MID -12 LOW -12 AUX 1 0 AUX 2 0 MIX 1 GAIN ...

Owner's Manual
Page 2
... the AC adapter from the AC outlet. 1 Important Read the Following Before Operating MT400 Warnings • Do not locate MT400 in a place subject to excessive heat or in this Owner's Manual may cause interference on a patent license from the AC outlet. This could be ...based on radios and televisions placed close to clean MT400. Cautions • Turn off immediately. Refer to MT400. Using MT400 in direct sunlight. If interference does occur, relocate the affected equipment. Copyright © 1998 Yamaha Corporation. No part of Carillon Electronics Corporation. Trademarks...
... the AC adapter from the AC outlet. 1 Important Read the Following Before Operating MT400 Warnings • Do not locate MT400 in a place subject to excessive heat or in this Owner's Manual may cause interference on a patent license from the AC outlet. This could be ...based on radios and televisions placed close to clean MT400. Cautions • Turn off immediately. Refer to MT400. Using MT400 in direct sunlight. If interference does occur, relocate the affected equipment. Copyright © 1998 Yamaha Corporation. No part of Carillon Electronics Corporation. Trademarks...
Owner's Manual
Page 3
... Panel 12 Rear Panel 12 The First Session 13 Preparation 13 Quick-Start System 13 Turning On the MT400 14 Loading a Cassette Tape 14 Recording the First Track 14 Preparation Before Recording 14 The First Take ...MT400 to a MIDI System... 38 Recording a SYNC Signal on the Tape......... 40 Synchronized Recording 41 Synchronized Mixdown 43 Appendix 44 Troubleshooting 44 Maintaining the MT400 45 Cleaning the Record-Play Head, Erase Head, Capstan, and Pinch Roller 45 Demagnetizing the Record-Play Head ......... 45 Specifications 46 Dimensions 47 Block Diagram 48 -Owner's Manual
... Panel 12 Rear Panel 12 The First Session 13 Preparation 13 Quick-Start System 13 Turning On the MT400 14 Loading a Cassette Tape 14 Recording the First Track 14 Preparation Before Recording 14 The First Take ...MT400 to a MIDI System... 38 Recording a SYNC Signal on the Tape......... 40 Synchronized Recording 41 Synchronized Mixdown 43 Appendix 44 Troubleshooting 44 Maintaining the MT400 45 Cleaning the Record-Play Head, Erase Head, Capstan, and Pinch Roller 45 Demagnetizing the Record-Play Head ......... 45 Specifications 46 Dimensions 47 Block Diagram 48 -Owner's Manual
Owner's Manual
Page 4
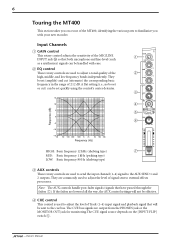
...other line-level instruments that have stereo outputs. Mixer • Continuously variable GAIN controls on Input Channels 1 through 4 allow the MT400 to handle any type of input source with ease, including microphone and line-level signals such as a normal cassette recorder, doubling the...cm/second is 9.5 cm/second for Track 4, ensuring reliable synchronization. • Tape speed is switchable between -10% and +10%. -Owner's Manual The MT400 standard tape speed is the same speed as synthesizers. • Musical three-band EQ on each input channel, and INSERT I/O jacks on the ...
...other line-level instruments that have stereo outputs. Mixer • Continuously variable GAIN controls on Input Channels 1 through 4 allow the MT400 to handle any type of input source with ease, including microphone and line-level signals such as a normal cassette recorder, doubling the...cm/second is 9.5 cm/second for Track 4, ensuring reliable synchronization. • Tape speed is switchable between -10% and +10%. -Owner's Manual The MT400 standard tape speed is the same speed as synthesizers. • Musical three-band EQ on each input channel, and INSERT I/O jacks on the ...
Owner's Manual
Page 5
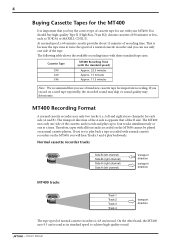
...at a time. If you try to achieve high-quality sound. -Owner's Manual The following table shows the available recording times with three standard tape sizes: Cassette Tape C90 C60 C46 MT400 Recording Time (with the standard speed) Approx. 22.5 minutes Approx. 15 ...Side A (right channel) Side A (left and right stereo channels) for each side (A and B). MT400 Recording Format A normal cassette recorder uses only two tracks (i.e., left channel) transport direction transport direction MT400 tracks Track 1 Track 2 Track 3 Track 4 transport direction The tape speed of the tape. 4 ...
...at a time. If you try to achieve high-quality sound. -Owner's Manual The following table shows the available recording times with three standard tape sizes: Cassette Tape C90 C60 C46 MT400 Recording Time (with the standard speed) Approx. 22.5 minutes Approx. 15 ...Side A (right channel) Side A (left and right stereo channels) for each side (A and B). MT400 Recording Format A normal cassette recorder uses only two tracks (i.e., left channel) transport direction transport direction MT400 tracks Track 1 Track 2 Track 3 Track 4 transport direction The tape speed of the tape. 4 ...
Owner's Manual
Page 6
... s Mixdown Mixdown is used depending on the four sections of a cassette tape. You should always use up tracks by mixing one signal. The MT400 can record four individual sound sources simultaneously on the purpose. This bus is a technique used to free up to four tracks (Tracks 1-4). Cue ...audio signals are used to create a monaural signal for monitoring, which is recommended that the tape is called "tracking down". -Owner's Manual This bus is used to send out signals to connected effects processors from the STEREO OUT L/R jacks. 5 About dbx Noise Reduction The...
... s Mixdown Mixdown is used depending on the four sections of a cassette tape. You should always use up tracks by mixing one signal. The MT400 can record four individual sound sources simultaneously on the purpose. This bus is a technique used to free up to four tracks (Tracks 1-4). Cue ...audio signals are used to create a monaural signal for monitoring, which is recommended that the tape is called "tracking down". -Owner's Manual This bus is used to send out signals to connected effects processors from the STEREO OUT L/R jacks. 5 About dbx Noise Reduction The...
Owner's Manual
Page 7
... level of Track (1-4) input signal and playback signal that will not be effective. If the faders are commonly used to adjust a tonal quality of the MT400, identifying the various parts to L TAPE TAPE MIC/ LINE INPUT-FLIP PAN L R 10 9 8 7 6 5 4 3 2 1 0 C AUX controls These ...3 4 5 6 7 -12 AUX 1 0 AUX 2 0 MIX +12 10 10 CUE 0 10 MIC/LINE to familiarize you on the [INPUT-FLIP] switch 5. -Owner's Manual D CUE control This control is used to send the input channel (1-4) signal to external effects processors. Note: The AUX controls handle post-fader signals (signals...
... level of Track (1-4) input signal and playback signal that will not be effective. If the faders are commonly used to adjust a tonal quality of the MT400, identifying the various parts to L TAPE TAPE MIC/ LINE INPUT-FLIP PAN L R 10 9 8 7 6 5 4 3 2 1 0 C AUX controls These ...3 4 5 6 7 -12 AUX 1 0 AUX 2 0 MIX +12 10 10 CUE 0 10 MIC/LINE to familiarize you on the [INPUT-FLIP] switch 5. -Owner's Manual D CUE control This control is used to send the input channel (1-4) signal to external effects processors. Note: The AUX controls handle post-fader signals (signals...

Owner's Manual
Page 8
... input channel signal that will be sent to the Stereo bus. Musical instrument signal input from MIC/LINE INPUT jack MT400 tape signal Musical instrument signal input from MIC/LINE INPUT jack MT400 tape signal GAIN LINE MIC HIGH -12 +12 MID -12 +12 LOW -12 +12 MIX CUE To ST bus... in the TAPE position ( ), the MIC/LINE input 1, 3 (2, 4) signal is fed to the ST L (ST R) bus and the tape signal is fed to optimum. -Owner's Manual 7 E INPUT-FLIP switch This switch is used to adjust the stereo position (left to assign the signal to odd tracks (1, 3), and all the way to...
... input channel signal that will be sent to the Stereo bus. Musical instrument signal input from MIC/LINE INPUT jack MT400 tape signal Musical instrument signal input from MIC/LINE INPUT jack MT400 tape signal GAIN LINE MIC HIGH -12 +12 MID -12 +12 LOW -12 +12 MIX CUE To ST bus... in the TAPE position ( ), the MIC/LINE input 1, 3 (2, 4) signal is fed to the ST L (ST R) bus and the tape signal is fed to optimum. -Owner's Manual 7 E INPUT-FLIP switch This switch is used to adjust the stereo position (left to assign the signal to odd tracks (1, 3), and all the way to...

Owner's Manual
Page 9
... obtained when the fader is positioned about the 7-8 mark. Unity gain: See 7 Fader. 9 J K LEVEL MIN MONITOR/PHONES STEREO ST+CUE CUE MAX STEREO 10 9 8 7 6 5 4 3 2 1 0 -Owner's Manual These signals are input at the STEREO INPUT jacks 5 and 6 or 7 and 8. K STEREO fader Use this fader to adjust the level of the monitor signal...
... obtained when the fader is positioned about the 7-8 mark. Unity gain: See 7 Fader. 9 J K LEVEL MIN MONITOR/PHONES STEREO ST+CUE CUE MAX STEREO 10 9 8 7 6 5 4 3 2 1 0 -Owner's Manual These signals are input at the STEREO INPUT jacks 5 and 6 or 7 and 8. K STEREO fader Use this fader to adjust the level of the monitor signal...
Owner's Manual
Page 10
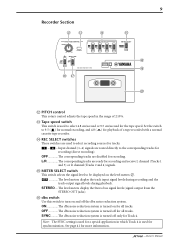
... tracks. ON The dbx noise reduction system is turned off only for Track 4. Set the switch to 9.5 ( ) for normal recording, and 4.8 ( ) for more information. -Owner's Manual SYNC .........The dbx noise reduction system is turned on for all tracks. Note: The SYNC setting is used for a special application in the range of...
... tracks. ON The dbx noise reduction system is turned off only for Track 4. Set the switch to 9.5 ( ) for normal recording, and 4.8 ( ) for more information. -Owner's Manual SYNC .........The dbx noise reduction system is turned on for all tracks. Note: The SYNC setting is used for a special application in the range of...
Owner's Manual
Page 11
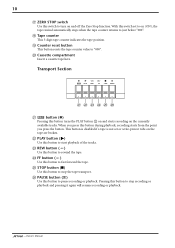
... to fast forward the tape. X FF button ( ) Use this button to stop recording or playback and pressing it again will resume recording or playback. -Owner's Manual V PLAY button (®) Use this button to stop the tape transport. Y STOP button (s) Use this button to "000". S Counter reset button This button resets the...
... to fast forward the tape. X FF button ( ) Use this button to stop recording or playback and pressing it again will resume recording or playback. -Owner's Manual V PLAY button (®) Use this button to stop the tape transport. Y STOP button (s) Use this button to "000". S Counter reset button This button resets the...

Owner's Manual
Page 12
... to return the processed stereo signals from external effects processors, such as effect sends by connecting to the MT400. Typically, signal processors, such as a synthesizer to the effects processors' inputs. (See page 29) -Owner's Manual When the METER SELECT switch is set to the unit. Input/Output Section e 1 INSERT I/O MIC/LINE INPUT...
... to return the processed stereo signals from external effects processors, such as effect sends by connecting to the MT400. Typically, signal processors, such as a synthesizer to the effects processors' inputs. (See page 29) -Owner's Manual When the METER SELECT switch is set to the unit. Input/Output Section e 1 INSERT I/O MIC/LINE INPUT...

Owner's Manual
Page 13
... STEREO OUT R L R L jk l mn j POWER ON/OFF switch Use this phono jack to individually output FSK and SMPTE synchronization signals recorded on and off the MT400. Connect them to send the monitor signals. 12 Front Panel h PHONES A pair of at least 650 mA. Connect your master recorder's stereo inputs for mixdown...
... STEREO OUT R L R L jk l mn j POWER ON/OFF switch Use this phono jack to individually output FSK and SMPTE synchronization signals recorded on and off the MT400. Connect them to send the monitor signals. 12 Front Panel h PHONES A pair of at least 650 mA. Connect your master recorder's stereo inputs for mixdown...
Owner's Manual
Page 14
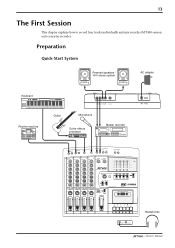
...9 8 8 8 8 7 7 7 7 6 6 6 6 5 5 5 5 4 4 4 4 3 3 3 3 2 2 2 2 1 1 1 1 0 0 0 0 STEREO 10 9 8 7 6 5 4 3 2 1 0 NOISE REDUCTION SYSTEM REC PLAY REW FF STOP PAUSE Headphones PHONES PUNCH I/O -Owner's Manual Preparation Quick-Start System Keyboard Powered speakers / Hi-fi stereo system YAMAHA YAMAHA AC adapter ON/ OFF R L R L POWER DC 12V SYNC OUT MONITOR OUT STEREO OUT Rhythm machine Guitar Microphone Guitar effects processor...10 MIC/LINE to record four tracks individually and mix your first MT400 session onto a master recorder.
...9 8 8 8 8 7 7 7 7 6 6 6 6 5 5 5 5 4 4 4 4 3 3 3 3 2 2 2 2 1 1 1 1 0 0 0 0 STEREO 10 9 8 7 6 5 4 3 2 1 0 NOISE REDUCTION SYSTEM REC PLAY REW FF STOP PAUSE Headphones PHONES PUNCH I/O -Owner's Manual Preparation Quick-Start System Keyboard Powered speakers / Hi-fi stereo system YAMAHA YAMAHA AC adapter ON/ OFF R L R L POWER DC 12V SYNC OUT MONITOR OUT STEREO OUT Rhythm machine Guitar Microphone Guitar effects processor...10 MIC/LINE to record four tracks individually and mix your first MT400 session onto a master recorder.

Owner's Manual
Page 15
...the cassette compartment cover. 2. Close the cassette compartment cover. Recording the First Track The MT400 allows signals input at a time. Press the POWER switch on the tape. 1. The... 8 8 8 8 7 7 7 7 6 6 6 6 5 5 5 5 4 4 4 4 3 3 3 3 2 2 2 2 1 1 1 1 0 0 0 0 STEREO 10 9 8 7 6 5 4 3 2 1 0 NOISE REDUCTION SYSTEM REC PLAY REW FF STOP PAUSE 9 3 4 -Owner's Manual B0 6 5 If they are not broken. Preparation Before Recording 1 7 C A 2 8 1 INSERT I/O MIC/LINE INPUT 2 INSERT I/O 3 STEREO INPUT 4 5L 6R 7L 8R AUX SEND 1 2 GAIN LINE HIGH...
...the cassette compartment cover. 2. Close the cassette compartment cover. Recording the First Track The MT400 allows signals input at a time. Press the POWER switch on the tape. 1. The... 8 8 8 8 7 7 7 7 6 6 6 6 5 5 5 5 4 4 4 4 3 3 3 3 2 2 2 2 1 1 1 1 0 0 0 0 STEREO 10 9 8 7 6 5 4 3 2 1 0 NOISE REDUCTION SYSTEM REC PLAY REW FF STOP PAUSE 9 3 4 -Owner's Manual B0 6 5 If they are not broken. Preparation Before Recording 1 7 C A 2 8 1 INSERT I/O MIC/LINE INPUT 2 INSERT I/O 3 STEREO INPUT 4 5L 6R 7L 8R AUX SEND 1 2 GAIN LINE HIGH...

Owner's Manual
Page 16
.... 3 Set Track 1 [REC SELECT] switch to the connected audio system or headphones for the recording level again, if necessary. -Owner's Manual A Set the CUE control on Input Channel 1 up continuously, and the MT400 enters recording pause mode. The "CUE" setting sends the CUE bus signal (monaural) to " 1 ". 15 Selecting a recording track 1 Connect...
.... 3 Set Track 1 [REC SELECT] switch to the connected audio system or headphones for the recording level again, if necessary. -Owner's Manual A Set the CUE control on Input Channel 1 up continuously, and the MT400 enters recording pause mode. The "CUE" setting sends the CUE bus signal (monaural) to " 1 ". 15 Selecting a recording track 1 Connect...

Owner's Manual
Page 17
... Input Channel 1 is set to start playback. If the [INPUT-FLIP] switch on Track 1 to stop recording. The Track 1 REC SELECT indicator turns off. -Owner's Manual If the [ZERO STOP] switch is set to ON, the tape rewinds until the tape counter shows "000" and stops automatically. 5 Press the [PLAY] button...
... Input Channel 1 is set to start playback. If the [INPUT-FLIP] switch on Track 1 to stop recording. The Track 1 REC SELECT indicator turns off. -Owner's Manual If the [ZERO STOP] switch is set to ON, the tape rewinds until the tape counter shows "000" and stops automatically. 5 Press the [PLAY] button...
Owner's Manual
Page 18
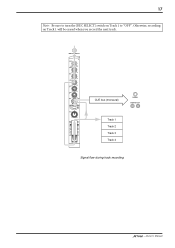
17 Note: Be sure to turn the [REC SELECT] switch on Track 1 will be erased when you record the next track. Otherwise, recording on Track 1 to L TAPE TAPE MIC/ LINE INPUT-FLIP PAN L R 10 9 8 7 6 5 4 3 2 1 0 CUE bus (monaural) PHONES MONITOR OUT Track 1 Track 2 Track 3 Track 4 Signal flow during track recording -Owner's Manual MIC/LINE INPUT 1 1 GAIN LINE MIC HIGH -12 +12 MID -12 +12 LOW -12 AUX 1 0 AUX 2 0 MIX +12 10 10 CUE 0 10 MIC/LINE to "OFF".
17 Note: Be sure to turn the [REC SELECT] switch on Track 1 will be erased when you record the next track. Otherwise, recording on Track 1 to L TAPE TAPE MIC/ LINE INPUT-FLIP PAN L R 10 9 8 7 6 5 4 3 2 1 0 CUE bus (monaural) PHONES MONITOR OUT Track 1 Track 2 Track 3 Track 4 Signal flow during track recording -Owner's Manual MIC/LINE INPUT 1 1 GAIN LINE MIC HIGH -12 +12 MID -12 +12 LOW -12 AUX 1 0 AUX 2 0 MIX +12 10 10 CUE 0 10 MIC/LINE to "OFF".

Owner's Manual
Page 19
... the sound recorded on Input Channel 2. Adjust to a desired level while listening to "MIC/LINE ( )". The basic procedure for overdubbing is ready for monitoring. -Owner's Manual Leave the [INPUT-FLIP] switch on Input Channel 2 to the sound through headphones or monitor speakers.
... the sound recorded on Input Channel 2. Adjust to a desired level while listening to "MIC/LINE ( )". The basic procedure for overdubbing is ready for monitoring. -Owner's Manual Leave the [INPUT-FLIP] switch on Input Channel 2 to the sound through headphones or monitor speakers.

Owner's Manual
Page 20
... to R TAPE TAPE MIC/ LINE INPUT-FLIP PAN L R 10 9 8 7 6 5 4 3 2 1 0 CUE bus (monaural) Track 1 Track 2 Track 3 Track 4 PHONES MONITOR OUT Signal flow during overdubbing -Owner's Manual Press the [STOP] button to start recording. Listening to the recording 8 Press the [REW] button to rewind the tape to the beginning and press the...
... to R TAPE TAPE MIC/ LINE INPUT-FLIP PAN L R 10 9 8 7 6 5 4 3 2 1 0 CUE bus (monaural) Track 1 Track 2 Track 3 Track 4 PHONES MONITOR OUT Signal flow during overdubbing -Owner's Manual Press the [STOP] button to start recording. Listening to the recording 8 Press the [REW] button to rewind the tape to the beginning and press the...


