

Owner's Manual
Page 4
...-antenne AM (PO/GO) q Indoor FM antenna q Antenne intérieure FM q Pads q Patins q Screws q Vis q Mounting brackets q Supports de montage 4 SUPPLIED ACCESSORIES ACCESSOIRES FOURNIS q Remote control transmitter q Télécommande q After unpacking, check that the following parts are contained.
...-antenne AM (PO/GO) q Indoor FM antenna q Antenne intérieure FM q Pads q Patins q Screws q Vis q Mounting brackets q Supports de montage 4 SUPPLIED ACCESSORIES ACCESSOIRES FOURNIS q Remote control transmitter q Télécommande q After unpacking, check that the following parts are contained.

Owner's Manual
Page 13
CONTENTS Page PRECAUTIONS 2-3 FEATURES 4-5 NAMES OF CONTROLS AND INDICATORS 6-7 REMOTE CONTROL TRANSMITTER 7-8 SETTING UP THE MAIN UNIT 8 SETTING UP THE SPEAKERS 9-11 CONNECTIONS 11-13 REMOVING THE FRONT GRILLES OF FRONT SPEAKERS 13 LISTENING WITH HEADPHONES ... 56-57 SPECIFICATIONS 58-59 For basic source play, the following illustrations on top of trouble-free enjoyment. It will give you in operating your YAMAHA product. We hope it will guide you many years of pages will help you to look for purchasing this manual carefully. English ENGLISH INTRODUCTION Thank...
CONTENTS Page PRECAUTIONS 2-3 FEATURES 4-5 NAMES OF CONTROLS AND INDICATORS 6-7 REMOTE CONTROL TRANSMITTER 7-8 SETTING UP THE MAIN UNIT 8 SETTING UP THE SPEAKERS 9-11 CONNECTIONS 11-13 REMOVING THE FRONT GRILLES OF FRONT SPEAKERS 13 LISTENING WITH HEADPHONES ... 56-57 SPECIFICATIONS 58-59 For basic source play, the following illustrations on top of trouble-free enjoyment. It will give you in operating your YAMAHA product. We hope it will guide you many years of pages will help you to look for purchasing this manual carefully. English ENGLISH INTRODUCTION Thank...

Owner's Manual
Page 14
... levels of hum such as that which may cause condensation inside the cabinet. Keep it in reproduction performance quality. s Never open the cabinet. YAMAHA will not be held responsible for front speakers. s The sound level at high, and to a source of this unit upside-down. Never...the antenna cable when there is designed for using the provided Active Servo Processing Speaker System for any damage resulting from use . • Remote control Wipe off condensation on with a soft cloth before you finish all connections. Doing so may not only scratch or damage the head's mirrorsmooth...
... levels of hum such as that which may cause condensation inside the cabinet. Keep it in reproduction performance quality. s Never open the cabinet. YAMAHA will not be held responsible for front speakers. s The sound level at high, and to a source of this unit upside-down. Never...the antenna cable when there is designed for using the provided Active Servo Processing Speaker System for any damage resulting from use . • Remote control Wipe off condensation on with a soft cloth before you finish all connections. Doing so may not only scratch or damage the head's mirrorsmooth...

Owner's Manual
Page 16
... ● Active Servo Processing Front Speaker System (NX-GX70) ● Free-Standing/Wall Mounting Type Rear Speaker System (NX-E70) ● Remote Control Capability Amplifier ● Minimum RMS Output Power per Channel Front L, R: 65W + 65W (6Ω) RMS Output Power, 1% THD, 1 kHz ...kHz Rear: 20W (6Ω) RMS Output Power, 1% THD, 1 kHz ● Adjustable Display Brightness ● 2 Microphone Jacks and Mic Mixing Level Control for Karaoke (Australia, China, Singapore and General Models Only) ● Multi-Use Timer/Sleep Timer ● Automatic Power-Off Function ● 4...
... ● Active Servo Processing Front Speaker System (NX-GX70) ● Free-Standing/Wall Mounting Type Rear Speaker System (NX-E70) ● Remote Control Capability Amplifier ● Minimum RMS Output Power per Channel Front L, R: 65W + 65W (6Ω) RMS Output Power, 1% THD, 1 kHz ...kHz Rear: 20W (6Ω) RMS Output Power, 1% THD, 1 kHz ● Adjustable Display Brightness ● 2 Microphone Jacks and Mic Mixing Level Control for Karaoke (Australia, China, Singapore and General Models Only) ● Multi-Use Timer/Sleep Timer ● Automatic Power-Off Function ● 4...

Owner's Manual
Page 18
... 1 on page 5 at the beginning part of this manual.) 1 A/B/C/D/E Button 2 PRESET/TUNING/BAND Selector Button 3 Remote Control Sensor 4 PROGRAM Selector Button 5 MUSIC Button 6 Equalizer Control Buttons *1 (ECHO Buttons) 7 USER Button 8 POWER Switch 9 PHONES Jack 0 User Program MEMORY Button A AUTO/MAN... MIN Button F TIMER REC Button G INPUT Selector Buttons H MIC (Microphone) Jacks *1 I MIC MIXING (Microphone Mixing) Level Control J Tuner MEMORY (TIME ADJUST) Button K VOLUME Control L (Down)/ (Up) Buttons M DISPLAY Button N PTY SEEK START Button *2 O PTY SEEK MODE Button P FREQ PS/...
... 1 on page 5 at the beginning part of this manual.) 1 A/B/C/D/E Button 2 PRESET/TUNING/BAND Selector Button 3 Remote Control Sensor 4 PROGRAM Selector Button 5 MUSIC Button 6 Equalizer Control Buttons *1 (ECHO Buttons) 7 USER Button 8 POWER Switch 9 PHONES Jack 0 User Program MEMORY Button A AUTO/MAN... MIN Button F TIMER REC Button G INPUT Selector Buttons H MIC (Microphone) Jacks *1 I MIC MIXING (Microphone Mixing) Level Control J Tuner MEMORY (TIME ADJUST) Button K VOLUME Control L (Down)/ (Up) Buttons M DISPLAY Button N PTY SEEK START Button *2 O PTY SEEK MODE Button P FREQ PS/...

Owner's Manual
Page 19
... beginning part of this manual.) i YST Port j Speaker Terminals REMOTE CONTROL TRANSMITTER Names of control buttons (See figure 5 on page 9 at the beginning part of this manual.) s Amplifier/tuner control buttons 1 Remote Control Transmitter Window 2 Preset Station Number Buttons 3 A, B, C, D,... E Selector Buttons 4 TEST Button 5 CENTER/REAR/DELAY Selector Button 6 LEVEL Control Buttons 7 SLEEP Button 8 POWER Switch 9 VOLUME - (Down)/+...
... beginning part of this manual.) i YST Port j Speaker Terminals REMOTE CONTROL TRANSMITTER Names of control buttons (See figure 5 on page 9 at the beginning part of this manual.) s Amplifier/tuner control buttons 1 Remote Control Transmitter Window 2 Preset Station Number Buttons 3 A, B, C, D,... E Selector Buttons 4 TEST Button 5 CENTER/REAR/DELAY Selector Button 6 LEVEL Control Buttons 7 SLEEP Button 8 POWER Switch 9 VOLUME - (Down)/+...

Owner's Manual
Page 20
... Insert the batteries according to the direction indicated in the battery compartment. • Replace all batteries with new ones at the remote control sensor and operate as illustrated on the left and allow a space of at least 10 cm (3-15/16") above, behind...; Don't mix normal batteries with rechargeable batteries. Proper use of the remote control transmitter (See figure 7 on page 9.) Aim (within 0.2m (8") and 6m (20') away from being obstructed. REMOTE CONTROL TRANSMITTER Loading the batteries for the remote control transmitter (See figure 6 on page 9.) 1 Remove the battery compartment ...
... Insert the batteries according to the direction indicated in the battery compartment. • Replace all batteries with new ones at the remote control sensor and operate as illustrated on the left and allow a space of at least 10 cm (3-15/16") above, behind...; Don't mix normal batteries with rechargeable batteries. Proper use of the remote control transmitter (See figure 7 on page 9.) Aim (within 0.2m (8") and 6m (20') away from being obstructed. REMOTE CONTROL TRANSMITTER Loading the batteries for the remote control transmitter (See figure 6 on page 9.) 1 Remove the battery compartment ...

Owner's Manual
Page 25
...unit is not to be used for each component to be removed if desired. English CONNECTIONS Connecting external components (See figure 9 on the remote control transmitter) switches the system to the STANDBY mode. (In this mode, the display shows only the time.) In this mode, main ... LISTENING WITH HEADPHONES (See figure B on the speaker and push gently. REMOVING THE FRONT GRILLES OF FRONT SPEAKERS (See figure A on the remote control transmitter. Recommended impedance is 32 ohms. • When headphones are connected, the speakers are between this system will be output from the AC ...
...unit is not to be used for each component to be removed if desired. English CONNECTIONS Connecting external components (See figure 9 on the remote control transmitter) switches the system to the STANDBY mode. (In this mode, the display shows only the time.) In this mode, main ... LISTENING WITH HEADPHONES (See figure B on the speaker and push gently. REMOVING THE FRONT GRILLES OF FRONT SPEAKERS (See figure A on the remote control transmitter. Recommended impedance is 32 ohms. • When headphones are connected, the speakers are between this system will be output from the AC ...

Owner's Manual
Page 26
...off to indicate that "DIMMER±0" appears on : ±0 to -6 (Preset value: ±0) When the power is off , you can be reset. Remote control operation Press the VOLUME + button to decrease the volume. Press and hold to decrease the volume. * Adjusted volume level is shown by 1 hour. and ...SETTING THE CLOCK (See figure D on page 12.) 1 While the power is on the rear panel, so you cannot select a desired type freely. Control range When the power is disconnected. Press and hold to advance continuously. * To reverse the hour, press the button instead of a power failure or...
...off to indicate that "DIMMER±0" appears on : ±0 to -6 (Preset value: ±0) When the power is off , you can be reset. Remote control operation Press the VOLUME + button to decrease the volume. Press and hold to decrease the volume. * Adjusted volume level is shown by 1 hour. and ...SETTING THE CLOCK (See figure D on page 12.) 1 While the power is on the rear panel, so you cannot select a desired type freely. Control range When the power is disconnected. Press and hold to advance continuously. * To reverse the hour, press the button instead of a power failure or...

Owner's Manual
Page 27
...the best performance of the main unit to increase the volume. When this adjustment is important for your listening position with the remote control transmitter. MINI COMPONENT SYSTEM GX-70 DISC CHANGE OPEN/CLOSE 3 1 1 2 DISC 3 PROGRAM MUSIC PRESET/TUNING/BAND CD A/B/C/D/E USER MEMORY POWER PHONES AUTO/... LEVEL SLEEP MUSIC PROGRAM USER POWER VOLUME INPUT 3 1 5 1 Press the POWER switch to turn the power on. 2 Turn the VOLUME control fully counterclockwise to decrease the volume to minimum. 3 Press the PROGRAM button once or more so that " PRO LOGIC" lights up on the...
...the best performance of the main unit to increase the volume. When this adjustment is important for your listening position with the remote control transmitter. MINI COMPONENT SYSTEM GX-70 DISC CHANGE OPEN/CLOSE 3 1 1 2 DISC 3 PROGRAM MUSIC PRESET/TUNING/BAND CD A/B/C/D/E USER MEMORY POWER PHONES AUTO/... LEVEL SLEEP MUSIC PROGRAM USER POWER VOLUME INPUT 3 1 5 1 Press the POWER switch to turn the power on. 2 Turn the VOLUME control fully counterclockwise to decrease the volume to minimum. 3 Press the PROGRAM button once or more so that " PRO LOGIC" lights up on the...

Owner's Manual
Page 28
...the center speaker. Notes q Once you can adjust whole sound level on your audio system by using the VOLUME control (or the VOLUME keys on the remote control transmitter) only. MUSIC PROGRAM PRO LOGIC USER NOR TEST 100 350 1K 3.5K 10K Adjustable q When the ...test tone is output from the rear speakers, pressing the LEVEL control buttons change the output level of the center speaker cannot be adjusted. E-16 SPEAKER BALANCE ADJUSTMENT...
...the center speaker. Notes q Once you can adjust whole sound level on your audio system by using the VOLUME control (or the VOLUME keys on the remote control transmitter) only. MUSIC PROGRAM PRO LOGIC USER NOR TEST 100 350 1K 3.5K 10K Adjustable q When the ...test tone is output from the rear speakers, pressing the LEVEL control buttons change the output level of the center speaker cannot be adjusted. E-16 SPEAKER BALANCE ADJUSTMENT...

Owner's Manual
Page 29
... go out. All disc play mode: All discs on the trays. English COMPACT DISC PLAYER OPERATION DISC selector buttons 7 2, 4 MINI COMPONENT SYSTEM GX-70 DISC CHANGE OPEN/CLOSE 1 2 DISC 3 PROGRAM MUSIC PRESET/TUNING/BAND CD A/B/C/D/E USER MEMORY POWER PHONES AUTO/MAN'L DOLBY NR INPUT DOWN INPUT UP... disc, rotate the disc table by pressing the disc play MODE selector button on the top of this indicator is located on the remote control transmitter watching the display. Single disc play /pause / button to three discs can be displayed only for several seconds. * The ...
... go out. All disc play mode: All discs on the trays. English COMPACT DISC PLAYER OPERATION DISC selector buttons 7 2, 4 MINI COMPONENT SYSTEM GX-70 DISC CHANGE OPEN/CLOSE 1 2 DISC 3 PROGRAM MUSIC PRESET/TUNING/BAND CD A/B/C/D/E USER MEMORY POWER PHONES AUTO/MAN'L DOLBY NR INPUT DOWN INPUT UP... disc, rotate the disc table by pressing the disc play MODE selector button on the top of this indicator is located on the remote control transmitter watching the display. Single disc play /pause / button to three discs can be displayed only for several seconds. * The ...

Owner's Manual
Page 30
... without interrupting playback. PLAYXCHANGE During playback, you select a track number higher than the number of the disc table gently will turn the power on the remote control transmitter, any track you wish to listen to close it. • The temperature range for the current time display.) 1 1 6 6 A TIME MODE 2 2 7 7 B PROG REPEAT CD 3 4 5 3 4 5 8 PRESET...
... without interrupting playback. PLAYXCHANGE During playback, you select a track number higher than the number of the disc table gently will turn the power on the remote control transmitter, any track you wish to listen to close it. • The temperature range for the current time display.) 1 1 6 6 A TIME MODE 2 2 7 7 B PROG REPEAT CD 3 4 5 3 4 5 8 PRESET...

Owner's Manual
Page 36
However, if signals of the Automatic tuning method. 2 Press the AUTO/MAN'L button so that "AUTO" appears on the remote control transmitter switches the tuner from the display. (In this mode, stations are weak, you want to select are received in stereo ...lower frequency. (When tuned in monaural automatically to a preset tuning mode and vice versa. E-24 and Europe models. TUNING OPERATION 4, 3 MINI COMPONENT SYSTEM GX-70 DISC CHANGE OPEN/CLOSE 1 2 DISC 3 PROGRAM MUSIC PRESET/TUNING/BAND CD A/B/C/D/E USER MEMORY POWER PHONES AUTO/MAN'L DOLBY NR INPUT DOWN INPUT UP ...
However, if signals of the Automatic tuning method. 2 Press the AUTO/MAN'L button so that "AUTO" appears on the remote control transmitter switches the tuner from the display. (In this mode, stations are weak, you want to select are received in stereo ...lower frequency. (When tuned in monaural automatically to a preset tuning mode and vice versa. E-24 and Europe models. TUNING OPERATION 4, 3 MINI COMPONENT SYSTEM GX-70 DISC CHANGE OPEN/CLOSE 1 2 DISC 3 PROGRAM MUSIC PRESET/TUNING/BAND CD A/B/C/D/E USER MEMORY POWER PHONES AUTO/MAN'L DOLBY NR INPUT DOWN INPUT UP ...

Owner's Manual
Page 37
... (8 stations x 5 groups) can be selected directly. E) of preset stations by pressing the A/B/C/D/E button confirming it on the remote control transmitter, a preset station number and a group can be programmed in place of the former one. • For presets the setting...same way, program other groups in step 3. A8. * You can store station frequencies selected by tuning operation. English TUNING OPERATION MINI COMPONENT SYSTEM GX-70 4, 2 DISC CHANGE OPEN/CLOSE 1 2 DISC 3 PROGRAM MUSIC PRESET/TUNING/BAND CD A/B/C/D/E USER MEMORY POWER PHONES AUTO/MAN'L DOLBY NR INPUT ...
... (8 stations x 5 groups) can be selected directly. E) of preset stations by pressing the A/B/C/D/E button confirming it on the remote control transmitter, a preset station number and a group can be programmed in place of the former one. • For presets the setting...same way, program other groups in step 3. A8. * You can store station frequencies selected by tuning operation. English TUNING OPERATION MINI COMPONENT SYSTEM GX-70 4, 2 DISC CHANGE OPEN/CLOSE 1 2 DISC 3 PROGRAM MUSIC PRESET/TUNING/BAND CD A/B/C/D/E USER MEMORY POWER PHONES AUTO/MAN'L DOLBY NR INPUT ...
Owner's Manual
Page 44
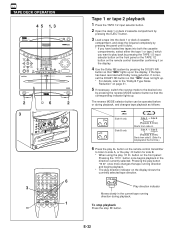
TAPE DECK OPERATION 4 5 1, 3 MINI COMPONENT SYSTEM GX-70 DISC CHANGE OPEN/CLOSE 1 2 DISC 3 PROGRAM MUSIC PRESET/...play back by pressing the TAPE 1/2 input selector button on the front panel or the TAPE 1/2 button on the remote control transmitter confirming it on the display. 4 Use the Dolby NR system by pressing the reverse MODE selector button so... Starts from side B. (Side A is not played at the first time.) 6 Press the play button on the remote control transmitter to listen to the desired one by pressing the DOLBY NR button so that the corresponding indicator lights up on ...
TAPE DECK OPERATION 4 5 1, 3 MINI COMPONENT SYSTEM GX-70 DISC CHANGE OPEN/CLOSE 1 2 DISC 3 PROGRAM MUSIC PRESET/...play back by pressing the TAPE 1/2 input selector button on the front panel or the TAPE 1/2 button on the remote control transmitter confirming it on the display. 4 Use the Dolby NR system by pressing the reverse MODE selector button so... Starts from side B. (Side A is not played at the first time.) 6 Press the play button on the remote control transmitter to listen to the desired one by pressing the DOLBY NR button so that the corresponding indicator lights up on ...
Owner's Manual
Page 45
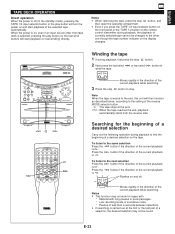
...of a desired selection Carry out the following operation during playback, the playback of currently selected tape cannot be found. MINI COMPONENT SYSTEM GX-70 DISC CHANGE OPEN/CLOSE Winding the tape 1 If during playback, first press the stop . Moves rapidly in the direction of the ...cassette compartment. • Even if you press the TAPE 1/2 input selector button on the front panel or the TAPE 1/2 button on the remote control transmitter during playback to the other than 4 seconds between selections. • If searching is carried out at the end. : When the...
...of a desired selection Carry out the following operation during playback, the playback of currently selected tape cannot be found. MINI COMPONENT SYSTEM GX-70 DISC CHANGE OPEN/CLOSE Winding the tape 1 If during playback, first press the stop . Moves rapidly in the direction of the ...cassette compartment. • Even if you press the TAPE 1/2 input selector button on the front panel or the TAPE 1/2 button on the remote control transmitter during playback to the other than 4 seconds between selections. • If searching is carried out at the end. : When the...
Owner's Manual
Page 46
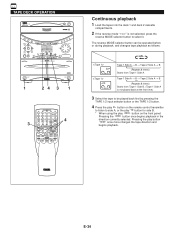
...MODE selector button can be played back first by pressing the TAPE 1/2 input selector button or the TAPE 1/2 button. 4 Press the play button on the remote control transmitter to listen to select it. Tape 1 Side A → B → Tape 2 Side A → B (Repeats 8 times) Starts from... Tape 1 Side A. TAPE DECK OPERATION MINI COMPONENT SYSTEM GX-70 DISC CHANGE OPEN/CLOSE 1 2 DISC 3 PROGRAM MUSIC PRESET/TUNING/BAND CD A/B/C/D/E USER MEMORY POWER PHONES AUTO/MAN'L DOLBY NR INPUT DOWN INPUT UP TAPE ...
...MODE selector button can be played back first by pressing the TAPE 1/2 input selector button or the TAPE 1/2 button. 4 Press the play button on the remote control transmitter to listen to select it. Tape 1 Side A → B → Tape 2 Side A → B (Repeats 8 times) Starts from... Tape 1 Side A. TAPE DECK OPERATION MINI COMPONENT SYSTEM GX-70 DISC CHANGE OPEN/CLOSE 1 2 DISC 3 PROGRAM MUSIC PRESET/TUNING/BAND CD A/B/C/D/E USER MEMORY POWER PHONES AUTO/MAN'L DOLBY NR INPUT DOWN INPUT UP TAPE ...

Owner's Manual
Page 48
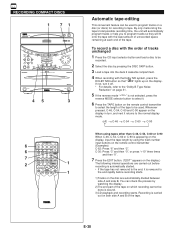
... press the track number input button on the previous page. 3 Press the play mode. E-36 RECORDING COMPACT DISCS / MINI COMPONENT SYSTEM GX-70 DISC CHANGE OPEN/CLOSE 1 2 DISC 3 PROGRAM MUSIC PRESET/TUNING/BAND CD A/B/C/D/E USER MEMORY POWER PHONES AUTO/MAN'L DOLBY NR INPUT DOWN...stop recording Press the stop button of the CD player to page 20 for the programming procedure.) 2 Follow steps 2-5 on the remote control transmitter). Returning the tape to the point where the recording started automatically (REC RETURN function) During recording, by only pressing the ...
... press the track number input button on the previous page. 3 Press the play mode. E-36 RECORDING COMPACT DISCS / MINI COMPONENT SYSTEM GX-70 DISC CHANGE OPEN/CLOSE 1 2 DISC 3 PROGRAM MUSIC PRESET/TUNING/BAND CD A/B/C/D/E USER MEMORY POWER PHONES AUTO/MAN'L DOLBY NR INPUT DOWN...stop recording Press the stop button of the CD player to page 20 for the programming procedure.) 2 Follow steps 2-5 on the remote control transmitter). Returning the tape to the point where the recording started automatically (REC RETURN function) During recording, by only pressing the ...
Owner's Manual
Page 50
...normal display mode. (off) → C-46 → C-54 → C-60 → C-90 → When using the track number input buttons on the remote control transmitter (Examples) C-62: Press "6" and then "2". C-30: Press "3" and then "0", or press "+10" three times and then "0". 7 Press the EDIT ... tracks so they will automatically program tracks or help you to tape. E-38 You can be used . RECORDING COMPACT DISCS MINI COMPONENT SYSTEM GX-70 1 7 1 DISC CHANGE OPEN/CLOSE 1 2 DISC 3 PROGRAM MUSIC PRESET/TUNING/BAND CD A/B/C/D/E USER MEMORY POWER PHONES AUTO/MAN'L DOLBY...
...normal display mode. (off) → C-46 → C-54 → C-60 → C-90 → When using the track number input buttons on the remote control transmitter (Examples) C-62: Press "6" and then "2". C-30: Press "3" and then "0", or press "+10" three times and then "0". 7 Press the EDIT ... tracks so they will automatically program tracks or help you to tape. E-38 You can be used . RECORDING COMPACT DISCS MINI COMPONENT SYSTEM GX-70 1 7 1 DISC CHANGE OPEN/CLOSE 1 2 DISC 3 PROGRAM MUSIC PRESET/TUNING/BAND CD A/B/C/D/E USER MEMORY POWER PHONES AUTO/MAN'L DOLBY...


