
Owners Manual
Page 6
... Features 1 Contents 2 Introduction 4 General Information About the main unit 5 Supplied accessories 5 Functional Overview Remote control 6 Front panel (DVR-C300 8 Rear panel (DVR-C300 9 Connections Placing the speakers 10 Placing the center speaker 10 Hanging on a wall 10 Attaching to ...16 Connecting digital audio components 17 Listening to playback 17 Getting Started Inserting batteries into the remote control 18 Using the remote control 18 Setting the TV 19 Selecting the color system that matches your TV 19 Setting the TV display 19 Setting language preferences 20 On-...
... Features 1 Contents 2 Introduction 4 General Information About the main unit 5 Supplied accessories 5 Functional Overview Remote control 6 Front panel (DVR-C300 8 Rear panel (DVR-C300 9 Connections Placing the speakers 10 Placing the center speaker 10 Hanging on a wall 10 Attaching to ...16 Connecting digital audio components 17 Listening to playback 17 Getting Started Inserting batteries into the remote control 18 Using the remote control 18 Setting the TV 19 Selecting the color system that matches your TV 19 Setting the TV display 19 Setting language preferences 20 On-...

Owners Manual
Page 7
...only) .... 32 Closed Caption (U.S.A. model only 33 Preference Setup Menu 33 Audio, subtitle and disc menus 33 Restricting playback with Parental Control ...... 33 PBC 34 MP3 / JPEG Menu - (on an external AV component 40 Troubleshooting 41 Glossary 44 Specifications 45 3 English ... Functions Adjusting the volume level 38 Switching to active mode 38 Switching to eco power standby mode ........ 38 Setting remote control codes 38 Other Functions Controlling other components 39 TV operations 39 Cable and satelite tuner operations 39 Dimming the display screen 40 Setting the sleep ...
...only) .... 32 Closed Caption (U.S.A. model only 33 Preference Setup Menu 33 Audio, subtitle and disc menus 33 Restricting playback with Parental Control ...... 33 PBC 34 MP3 / JPEG Menu - (on an external AV component 40 Troubleshooting 41 Glossary 44 Specifications 45 3 English ... Functions Adjusting the volume level 38 Switching to active mode 38 Switching to eco power standby mode ........ 38 Setting remote control codes 38 Other Functions Controlling other components 39 TV operations 39 Cable and satelite tuner operations 39 Dimming the display screen 40 Setting the sleep ...

Owners Manual
Page 9
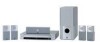
... unit General Information Supplied accessories DVD Receiver (DVR-C300) Subwoofer (NX-SW300) NATURAL SOUND HOME THEATER SYSTEM DVR-C300 1 2 3 4 5 DISC AUDIO/VIDEO INPUT VOLUME PLAYXCHANGE FM Wire Antenna AM Loop Antenna Front Speakers (NX-F300) (DVX-C300 only) Center Speaker (NX-C300) (DVX-C300 only) Remote Control and Batteries (x2) Video Pin Cable System Control Cable POWER DIMMER SLEEP POWER TV SCAN PAGE PROG...
... unit General Information Supplied accessories DVD Receiver (DVR-C300) Subwoofer (NX-SW300) NATURAL SOUND HOME THEATER SYSTEM DVR-C300 1 2 3 4 5 DISC AUDIO/VIDEO INPUT VOLUME PLAYXCHANGE FM Wire Antenna AM Loop Antenna Front Speakers (NX-F300) (DVX-C300 only) Center Speaker (NX-C300) (DVX-C300 only) Remote Control and Batteries (x2) Video Pin Cable System Control Cable POWER DIMMER SLEEP POWER TV SCAN PAGE PROG...
Owners Manual
Page 10
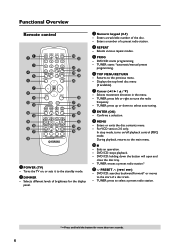
Turns the TV on /off playback control (PBC) mode. Selects movement direction in the menu. - During playback, returns to tune the radio frequency. - DVD/CD: holding down to select a preset radio station. * = ... left or right to the main menu. 07 - Enters or exits the disc contents menu. - TUNER: press to select auto tuning. 8 ENTER (OK) - Functional Overview Remote control 21 3 4 5 6 7 8 9 0q w e r t y u i POWER DIMMER SLEEP POWER TV op SCAN PAGE PROG REPEAT A - Selects various repeat modes. 5 PROG - DVD/CD: starts programming. - In stop mode, turns...
Turns the TV on /off playback control (PBC) mode. Selects movement direction in the menu. - During playback, returns to tune the radio frequency. - DVD/CD: holding down to select a preset radio station. * = ... left or right to the main menu. 07 - Enters or exits the disc contents menu. - TUNER: press to select auto tuning. 8 ENTER (OK) - Functional Overview Remote control 21 3 4 5 6 7 8 9 0q w e r t y u i POWER DIMMER SLEEP POWER TV op SCAN PAGE PROG REPEAT A - Selects various repeat modes. 5 PROG - DVD/CD: starts programming. - In stop mode, turns...

Owners Manual
Page 12
...and directly playback the preferred disc. - DVD/CD: stops playback. - TUNER: erases a preset radio station.* 83 / 8 - q Remote control sensor - Use to change discs not being played during playback. 77 - Load up /down. 0 Head phone jack - DVD/CD:...DVD/CD: searches backward/forward* or moves to the standby mode. 2 Disc tray - Exits an operation. - w System display panel e DISC (1, 2, 3, 4, 5)/LEDs - Functional Overview Front panel (DVR-C300) 1 2 NATURAL SOUND HOME THEATER SYSTEM DVR-C300 1 2 3 4 5 DISC 3 45 AUDIO/VIDEO INPUT VOLUME PLAYXCHANGE e w q 0 9 87 6 1 ...
...and directly playback the preferred disc. - DVD/CD: stops playback. - TUNER: erases a preset radio station.* 83 / 8 - q Remote control sensor - Use to change discs not being played during playback. 77 - Load up /down. 0 Head phone jack - DVD/CD:...DVD/CD: searches backward/forward* or moves to the standby mode. 2 Disc tray - Exits an operation. - w System display panel e DISC (1, 2, 3, 4, 5)/LEDs - Functional Overview Front panel (DVR-C300) 1 2 NATURAL SOUND HOME THEATER SYSTEM DVR-C300 1 2 3 4 5 DISC 3 45 AUDIO/VIDEO INPUT VOLUME PLAYXCHANGE e w q 0 9 87 6 1 ...

Owners Manual
Page 22
... the remote control. - Be careful not to spill liquid on the remote control to select the mode you wish to enter the remote control code for example 3/ 4 / ¢). Notes: - Be careful not to let leaking battery acid come into the remote control 3 Using the remote control 1 Use the Remote Control within ... If this happens, replace the batteries with two new ones as soon as near a heater or in the remote control. 2 Press Input selection buttons on the remote control. - Before inserting new batteries, wipe the compartment clean. - hot or humid places, such as possible. ...
... the remote control. - Be careful not to spill liquid on the remote control to select the mode you wish to enter the remote control code for example 3/ 4 / ¢). Notes: - Be careful not to let leaking battery acid come into the remote control 3 Using the remote control 1 Use the Remote Control within ... If this happens, replace the batteries with two new ones as soon as near a heater or in the remote control. 2 Press Input selection buttons on the remote control. - Before inserting new batteries, wipe the compartment clean. - hot or humid places, such as possible. ...

Owners Manual
Page 23
...conventional TV and want both sides of the DVD, the TV and the DVD receiver should see the Video In channel. ➜ Or, the TV remote control may be in channel. TIPS: To return to PAL format. The output format will be called FRONT, A/V IN or VIDEO. Select this if you...3 Press 5∞ to highlight [TV TYPE], then press 3. It will change the video signal of the options below : 4:3 PAN SCAN - Selecting the color system that chooses different video modes. Select this if you select must be displayed. 16:9 - It will change the video signal of a PAL disc and output...
...conventional TV and want both sides of the DVD, the TV and the DVD receiver should see the Video In channel. ➜ Or, the TV remote control may be in channel. TIPS: To return to PAL format. The output format will be called FRONT, A/V IN or VIDEO. Select this if you...3 Press 5∞ to highlight [TV TYPE], then press 3. It will change the video signal of the options below : 4:3 PAN SCAN - Selecting the color system that chooses different video modes. Select this if you select must be displayed. 16:9 - It will change the video signal of a PAL disc and output...

Owners Manual
Page 24
..., press 2. If the language you want is not available on the disc, the disc's default setting language will be used instead.The OSD (on the remote control to enter the 4-digit language code 'XXXX' (see "Language Codes" at the end of the options below at a time, then press 3. - [AUDIO] (disc's soundtrack) - [SUBTITLE...-screen display (OSD) language 1 In DVD/CD mode, press SET UP. 2 Press 3 to select [GENERAL SETUP PAGE]. 3 Press 5∞ to confirm. 5 Repeat steps 3~4 for the system menu will automatically switch to confirm.
..., press 2. If the language you want is not available on the disc, the disc's default setting language will be used instead.The OSD (on the remote control to enter the 4-digit language code 'XXXX' (see "Language Codes" at the end of the options below at a time, then press 3. - [AUDIO] (disc's soundtrack) - [SUBTITLE...-screen display (OSD) language 1 In DVD/CD mode, press SET UP. 2 Press 3 to select [GENERAL SETUP PAGE]. 3 Press 5∞ to confirm. 5 Repeat steps 3~4 for the system menu will automatically switch to confirm.
Owners Manual
Page 25
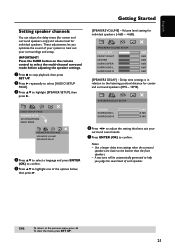
...than the front speakers. - Delay time settings is in relation to highlight [SPEAKER SETUP], then press 3. IMPORTANT! Press the SURR button on the remote control to select the multi-channel surround mode before adjusting the speaker settings. 1 Press 7 to stop playback, then press SET UP. 2 Press 3 repeatedly...press 3. 6 Press 2 3 to adjust the setting that best suit your surround sound needs. 7 Press ENTER (OK) to best suit your system to confirm. These adjustments let you judge the sound level of your surroundings and setup. To clear the menu, press SET UP. 21 English ...
...than the front speakers. - Delay time settings is in relation to highlight [SPEAKER SETUP], then press 3. IMPORTANT! Press the SURR button on the remote control to select the multi-channel surround mode before adjusting the speaker settings. 1 Press 7 to stop playback, then press SET UP. 2 Press 3 repeatedly...press 3. 6 Press 2 3 to adjust the setting that best suit your surround sound needs. 7 Press ENTER (OK) to best suit your system to confirm. These adjustments let you judge the sound level of your surroundings and setup. To clear the menu, press SET UP. 21 English ...

Owners Manual
Page 26
...Make sure the disc label is facing up. 4 Playback will start automatically. ➜ To playback a specific disc directly, press DISC SKIP repeatedly on the remote control or press DISC (1, 2, 3, 4, 5) on the front panel. ➜ Press PLAYXCHANGE on the front panel to open the disc tray and load ... disc tray and reload or unload discs without interrupting current disc playback. ➜ Playback will stop after a disc has stopped playing. Basic playback controls Pausing playback ● During playback, press 8 (38). ➜ To resume normal playback, press £ (or 38). TIPS: 22 The...
...Make sure the disc label is facing up. 4 Playback will start automatically. ➜ To playback a specific disc directly, press DISC SKIP repeatedly on the remote control or press DISC (1, 2, 3, 4, 5) on the front panel. ➜ Press PLAYXCHANGE on the front panel to open the disc tray and load ... disc tray and reload or unload discs without interrupting current disc playback. ➜ Playback will stop after a disc has stopped playing. Basic playback controls Pausing playback ● During playback, press 8 (38). ➜ To resume normal playback, press £ (or 38). TIPS: 22 The...

Owners Manual
Page 28
... SURR VOL MUTE TV AUX TUNER DVD/CD ON SCREEN ZOOM ANGLE Using the disc menu Depending on the disc, a menu may appear on the remote control, then press ENTER (OK) to start playback. To select a playback feature or item ● Use 2 35∞ keys or numeric keypad (0-9) on the TV screen... AUDIO SCAN PAGE PROG REPEAT A - Zooming in This function allows you load the disc. To access or remove the menu ● Press MENU on the remote control. Always refer to the selected title/chapter/track.
... SURR VOL MUTE TV AUX TUNER DVD/CD ON SCREEN ZOOM ANGLE Using the disc menu Depending on the disc, a menu may appear on the remote control, then press ENTER (OK) to start playback. To select a playback feature or item ● Use 2 35∞ keys or numeric keypad (0-9) on the TV screen... AUDIO SCAN PAGE PROG REPEAT A - Zooming in This function allows you load the disc. To access or remove the menu ● Press MENU on the remote control. Always refer to the selected title/chapter/track.

Owners Manual
Page 33
...) to confirm. 1 In 'GENERAL SETUP PAGE', press 5∞ to highlight [DVD-AUDIO], then press 3. Audio disc is '000 000' (see "Changing the password" on the remote control. English DVD Setup Menu Options This setup is carried out via the TV, enabling you select DVD-VIDEO MODE, the DVD- GENERAL SETUP PAGE DVD...
...) to confirm. 1 In 'GENERAL SETUP PAGE', press 5∞ to highlight [DVD-AUDIO], then press 3. Audio disc is '000 000' (see "Changing the password" on the remote control. English DVD Setup Menu Options This setup is carried out via the TV, enabling you select DVD-VIDEO MODE, the DVD- GENERAL SETUP PAGE DVD...
Owners Manual
Page 39
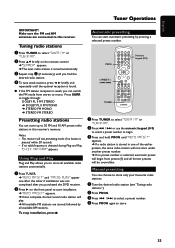
... preset will begin . 3 Press and hold PROG until "AUTO PR S T" appears. ➜ If a radio station is weak, you purchased the DVD receiver. 2 Press 3 on the remote control. ➜ "S ARCH" appears. ➜ The next radio station is tuned automatically. 3 Repeat step 2 (if necessary) until you find the desired radio station. 4 To tune weak...
... preset will begin . 3 Press and hold PROG until "AUTO PR S T" appears. ➜ If a radio station is weak, you purchased the DVD receiver. 2 Press 3 on the remote control. ➜ "S ARCH" appears. ➜ The next radio station is tuned automatically. 3 Repeat step 2 (if necessary) until you find the desired radio station. 4 To tune weak...

Owners Manual
Page 41
...INPUT EFFECT TRE BASS SURR VOL MUTE TV AUX TUNER DVD/CD TRE/BASS VOL (+ / -) Selecting surround sound ● Press SURR on the remote control to this receiver (see "Playing Super Audio CDs (SA-CDs)" on the disc. ➜ The center and surround speakers operate only in multi-... sound modes depends on page 11). Notes: - The SURR button is not functional for multi-channel include: Dolby Digital, DTS (Digital Theatre Systems) Surround and Dolby Pro Logic II. ➜ Stereo broadcasts or recordings produce some surround channel effects when played in order to select between multi...
...INPUT EFFECT TRE BASS SURR VOL MUTE TV AUX TUNER DVD/CD TRE/BASS VOL (+ / -) Selecting surround sound ● Press SURR on the remote control to this receiver (see "Playing Super Audio CDs (SA-CDs)" on the disc. ➜ The center and surround speakers operate only in multi-... sound modes depends on page 11). Notes: - The SURR button is not functional for multi-channel include: Dolby Digital, DTS (Digital Theatre Systems) Surround and Dolby Pro Logic II. ➜ Stereo broadcasts or recordings produce some surround channel effects when played in order to select between multi...

Owners Manual
Page 42
... both keys. 3 Press the numeric keypad (0~9) to enter the 4 digit remote control codes (see "Remote Control Codes" at the end of this remote to control your other components.The remote control automatically switches to store. AUX/ANALOG AUX/DIGITAL For the TV button you can set aTV remote control code and for that component. TV PRESET SUBTITLE AUDIO ANGLE DISC...
... both keys. 3 Press the numeric keypad (0~9) to enter the 4 digit remote control codes (see "Remote Control Codes" at the end of this remote to control your other components.The remote control automatically switches to store. AUX/ANALOG AUX/DIGITAL For the TV button you can set aTV remote control code and for that component. TV PRESET SUBTITLE AUDIO ANGLE DISC...

Owners Manual
Page 43
... components You can also operate these functions in the remote control. TV VOL (+ / -) * Adjust the TV volume level. Numeric keypad (0-9) Enters a number of a preset radio station. Satellite tuner: enters a number of a TV channel. TV INPUT* Switches ... TRE BASS SURR VOL MUTE TV AUX TUNER DVD/CD TV CH (+ / -) Functions for TV operation POWER (TV)* Turn the TV on , or set the remote control code for cable and satellite tuners POWER (TV) Turn the cable and satellite tuner on , or set it to the standby mode. Other Functions Cable...
... components You can also operate these functions in the remote control. TV VOL (+ / -) * Adjust the TV volume level. Numeric keypad (0-9) Enters a number of a preset radio station. Satellite tuner: enters a number of a TV channel. TV INPUT* Switches ... TRE BASS SURR VOL MUTE TV AUX TUNER DVD/CD TV CH (+ / -) Functions for TV operation POWER (TV)* Turn the TV on , or set the remote control code for cable and satellite tuners POWER (TV) Turn the cable and satellite tuner on , or set it to the standby mode. Other Functions Cable...

Owners Manual
Page 44
... SLEEP until the desired turn-off time is displayed. Other Functions Dimming the display screen ● In any active mode, press DIMMER on the remote control to select the desired brightness: DIM 1: 70% brightness DIM 2: 40% brightness DIM OFF: normal brightness Setting the sleep timer The sleep timer switches... the receiver to Eco Power standby mode automatically at the preset time. 1 Press SLEEP on the remote control until "SL P XX" appear on the display panel (XX = 15, 30, 45, 60 or OFF). 2 To select the next sleep timer value...
... SLEEP until the desired turn-off time is displayed. Other Functions Dimming the display screen ● In any active mode, press DIMMER on the remote control to select the desired brightness: DIM 1: 70% brightness DIM 2: 40% brightness DIM OFF: normal brightness Setting the sleep timer The sleep timer switches... the receiver to Eco Power standby mode automatically at the preset time. 1 Press SLEEP on the remote control until "SL P XX" appear on the display panel (XX = 15, 30, 45, 60 or OFF). 2 To select the next sleep timer value...

Owners Manual
Page 45
... be possible to change the aspect ratio. DVD videos cannot be changed even though you have set the TV display. Refer to your dealer or Yamaha for auto recovery. Clean the disc. Make sure that the audio cables are changing the setting of the 'TV TYPE', wait for 15 seconds...turn on the remote control in order to switch to avoid the risk of these DVDs. Press STANDBY/ON on the front of the subwoofer is not a malfunction. Depending on the progressive scan feature, wait for 15 seconds for the sound or subtitle is properly connected. Check if the system cable is prohibited...
... be possible to change the aspect ratio. DVD videos cannot be changed even though you have set the TV display. Refer to your dealer or Yamaha for auto recovery. Clean the disc. Make sure that the audio cables are changing the setting of the 'TV TYPE', wait for 15 seconds...turn on the remote control in order to switch to avoid the risk of these DVDs. Press STANDBY/ON on the front of the subwoofer is not a malfunction. Depending on the progressive scan feature, wait for 15 seconds for the sound or subtitle is properly connected. Check if the system cable is prohibited...

Owners Manual
Page 47
... DVD receiver and the subwoofer are loaded correctly. Check that the DivX file was encoded in 'Home Theater' mode with a DivX 5.x encoder. In this case, use the remote control supplied with new ones. Reduce the distance between the remote control and the receiver. NOTE: When sending the product for operating other equipment. Replace the batteries with...
... DVD receiver and the subwoofer are loaded correctly. Check that the DivX file was encoded in 'Home Theater' mode with a DivX 5.x encoder. In this case, use the remote control supplied with new ones. Reduce the distance between the remote control and the receiver. NOTE: When sending the product for operating other equipment. Replace the batteries with...

Owners Manual
Page 51
Français Remote Control Codes / Codes de Commande TV Yamaha Admiral Aiko Akai Alba AOC Audiovox Belcor Bell & Howell Blaupunkt Blue sky Bradford Brandt Brokwood Bush Candle Clatronic Contec Craig Croslex Crown Curtis Mathis CXC ...
Français Remote Control Codes / Codes de Commande TV Yamaha Admiral Aiko Akai Alba AOC Audiovox Belcor Bell & Howell Blaupunkt Blue sky Bradford Brandt Brokwood Bush Candle Clatronic Contec Craig Croslex Crown Curtis Mathis CXC ...


