Owner's Manual
Page 1
UC DVD HOME THEATER SYSTEM SYSTEME HOME CINEMA AVEC LECTUER DVD DVX-700 (DVR-700 + NS-PSW700 + NS-P700) OWNER'S MANUAL MODE D'EMPLOI
UC DVD HOME THEATER SYSTEM SYSTEME HOME CINEMA AVEC LECTUER DVD DVX-700 (DVR-700 + NS-PSW700 + NS-P700) OWNER'S MANUAL MODE D'EMPLOI

Owner's Manual
Page 4
LASER SAFETY This unit employs a laser. LASER Type Wave length Output Power Beam divergence Semiconductor laser ALGaInP 655nm (DVD) 790nm (VCD/CD) 5/7mW (DVD/VCD,CD) 20degrees CAUTION Use of controls or adjustments or performance of the disc loader and other than those specified herein may result in hazardous ...
LASER SAFETY This unit employs a laser. LASER Type Wave length Output Power Beam divergence Semiconductor laser ALGaInP 655nm (DVD) 790nm (VCD/CD) 5/7mW (DVD/VCD,CD) 20degrees CAUTION Use of controls or adjustments or performance of the disc loader and other than those specified herein may result in hazardous ...

Owner's Manual
Page 5
...the front panel display....... 64 Setting the sleep timer 65 System menu 65 Setting the preset code 66 8. DVD SETUP MENU DVD SETUP MENU OPTIONS 36 Menu overview 36 VIDEO ADJUST MENU 37 INITIAL SETTINGS MENU 38 Video Output 38 2 ... preferences 25 4. CONTENTS 1 1. INTRODUCTION INTRODUCTION 2 Main unit 4 Supplied accessories 4 FUNCTIONAL OVERVIEW 5 Front panel (DVR-700 5 Rear panel (DVR-700 6 Front panel display (DVR-700 7 Rear panel (NS-PSW700 8 Remote control 9 2. ADDITIONAL INFORMATION TROUBLESHOOTING 67 GLOSSARY 74 SPECIFICATIONS 76 INDEX 77 APPENDIX ...
...the front panel display....... 64 Setting the sleep timer 65 System menu 65 Setting the preset code 66 8. DVD SETUP MENU DVD SETUP MENU OPTIONS 36 Menu overview 36 VIDEO ADJUST MENU 37 INITIAL SETTINGS MENU 38 Video Output 38 2 ... preferences 25 4. CONTENTS 1 1. INTRODUCTION INTRODUCTION 2 Main unit 4 Supplied accessories 4 FUNCTIONAL OVERVIEW 5 Front panel (DVR-700 5 Rear panel (DVR-700 6 Front panel display (DVR-700 7 Rear panel (NS-PSW700 8 Remote control 9 2. ADDITIONAL INFORMATION TROUBLESHOOTING 67 GLOSSARY 74 SPECIFICATIONS 76 INDEX 77 APPENDIX ...

Owner's Manual
Page 6
... Owner's Manual explains the basic operation of DivX® media files and the DivX® Media Format. Discs recorded on CD-R/RW, DVD-R/-RW, DVD+R/+RW and USB device. This controller can play a disc. FUJICOLOR CD - KODAK Picture CD Movie file (except files saved on page ... unless finalized. - This unit is designed for use a solution containing alcohol, spirits, ammonia, or abrasives. DivX® Ultra - Do not wipe in DVD-Video compatible format. - Leave the controller in VR format (compatible with a cleaning cloth. do not touch the surface. Lens care - Cabinet care -...
... Owner's Manual explains the basic operation of DivX® media files and the DivX® Media Format. Discs recorded on CD-R/RW, DVD-R/-RW, DVD+R/+RW and USB device. This controller can play a disc. FUJICOLOR CD - KODAK Picture CD Movie file (except files saved on page ... unless finalized. - This unit is designed for use a solution containing alcohol, spirits, ammonia, or abrasives. DivX® Ultra - Do not wipe in DVD-Video compatible format. - Leave the controller in VR format (compatible with a cleaning cloth. do not touch the surface. Lens care - Cabinet care -...

Owner's Manual
Page 8
... cable x 2 (4 m) Cover (For NS-PSW700) Screw x 6 (for cover 3 x 6 mm) Stand x 2 (For NS-P700) Screw x 2 (for stand 4 x 10 mm) Owner's Manual U DVD HOME THEATER SYSTEM SYSTEME HOME CINEMA AVEC LECTUER DVD DVX-700 (DVR-700 + NS-PSW700 + NS-P700) OWNER'S MANUAL MODE D'EMPLOI MODE AUDIO DELAY ZOOM ON SCREEN ON BLUETOOTH OFF AUDIO SUBTITLE ANGLE PLAY...
... cable x 2 (4 m) Cover (For NS-PSW700) Screw x 6 (for cover 3 x 6 mm) Stand x 2 (For NS-P700) Screw x 2 (for stand 4 x 10 mm) Owner's Manual U DVD HOME THEATER SYSTEM SYSTEME HOME CINEMA AVEC LECTUER DVD DVX-700 (DVR-700 + NS-PSW700 + NS-P700) OWNER'S MANUAL MODE D'EMPLOI MODE AUDIO DELAY ZOOM ON SCREEN ON BLUETOOTH OFF AUDIO SUBTITLE ANGLE PLAY...

Owner's Manual
Page 9
B USB terminal Connect to be played. 3 EJECT Ejects a disc in the DVD controller. 4s Stops playback. 5e Pauses playback. 6h Starts playback. FUNCTIONAL OVERVIEW 1 ■ Front panel (DVR-700) INTRODUCTION 1 2 3 4567 8 STANDBY / ON EJECT INPUT USB 9 0 1 STANDBY/ON Turns on . A Front panel display Shows information about the operational status of your USB device...
B USB terminal Connect to be played. 3 EJECT Ejects a disc in the DVD controller. 4s Stops playback. 5e Pauses playback. 6h Starts playback. FUNCTIONAL OVERVIEW 1 ■ Front panel (DVR-700) INTRODUCTION 1 2 3 4567 8 STANDBY / ON EJECT INPUT USB 9 0 1 STANDBY/ON Turns on . A Front panel display Shows information about the operational status of your USB device...

Owner's Manual
Page 12
...-11, sold separately) or Yamaha Bluetooth wireless audio receiver (such as YBA-10, sold separately) (Page 20). 6 SIRIUS terminal Connect to a SiriusConnect tuner (sold separately). 7 XM terminal Connect to an XM Mini-Tuner and XM Mini-Tuner Home Dock (sold separately). 8 SYSTEM CONNECTOR terminal Connect to the DVD controller. 9 SPEAKER terminals Connect...
...-11, sold separately) or Yamaha Bluetooth wireless audio receiver (such as YBA-10, sold separately) (Page 20). 6 SIRIUS terminal Connect to a SiriusConnect tuner (sold separately). 7 XM terminal Connect to an XM Mini-Tuner and XM Mini-Tuner Home Dock (sold separately). 8 SYSTEM CONNECTOR terminal Connect to the DVD controller. 9 SPEAKER terminals Connect...
Owner's Manual
Page 13
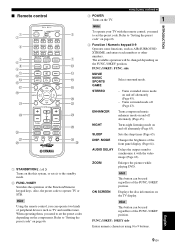
... the FUNC./10KEY position. STEREO - Turns extended stereo mode on the TV display. ZOOM Enlarges the pictures while playing DVD. Hint This button can be used regardless of peripheral devices such as AIR SURROUND XTREME, and enters track numbers or ...Displays the disc information on and off alternately (Page 63). English 9 En ■ Remote control 1 2 4 5 6 8 9 A B D E G I K M P Q R DVX-700 WP87010 STANDBY/ON TV STB POWER FUNC. 10KEY MOVIE MUSIC SPORTS GAME STEREO ENHANCER NIGHT SLEEP DISP. FUNCTIONAL OVERVIEW 1 INTRODUCTION Note To operate your TV...
... the FUNC./10KEY position. STEREO - Turns extended stereo mode on the TV display. ZOOM Enlarges the pictures while playing DVD. Hint This button can be used regardless of peripheral devices such as AIR SURROUND XTREME, and enters track numbers or ...Displays the disc information on and off alternately (Page 63). English 9 En ■ Remote control 1 2 4 5 6 8 9 A B D E G I K M P Q R DVX-700 WP87010 STANDBY/ON TV STB POWER FUNC. 10KEY MOVIE MUSIC SPORTS GAME STEREO ENHANCER NIGHT SLEEP DISP. FUNCTIONAL OVERVIEW 1 INTRODUCTION Note To operate your TV...

Owner's Manual
Page 14
...the input source depending on page 66. FM: selects auto/manual tuning (Page 46). Changing the settings. Adjusts the volume level of DVX-700. R AREA Sets the distance between speakers for the virtual speaker and subwoofer (Page 64). S SOUND Adjusts the volume balance for the.... FM: registers the radio frequency. I Cursors ( / / / ) Selects items or changes values in sequence. O MUTE Mutes the volume of DVX-700. P Input selection buttons DVD/USB Switches the input source to the Dock terminal. FUNCTIONAL OVERVIEW 5 AUDIO Selects an audio language for the...
...the input source depending on page 66. FM: selects auto/manual tuning (Page 46). Changing the settings. Adjusts the volume level of DVX-700. R AREA Sets the distance between speakers for the virtual speaker and subwoofer (Page 64). S SOUND Adjusts the volume balance for the.... FM: registers the radio frequency. I Cursors ( / / / ) Selects items or changes values in sequence. O MUTE Mutes the volume of DVX-700. P Input selection buttons DVD/USB Switches the input source to the Dock terminal. FUNCTIONAL OVERVIEW 5 AUDIO Selects an audio language for the...

Owner's Manual
Page 15
...interference, do not position the speakers too close to the listening position. - You can install the speakers on a rack using the Yamaha front surround system. You can adjust the surround effect by the subwoofer may be heard differently depending on the listening position and subwoofer... location. Allow adequate ventilation around the DVD controller and subwoofer/system control. - English 11 En Place the left and right speakers at equal distances away from the ...
...interference, do not position the speakers too close to the listening position. - You can install the speakers on a rack using the Yamaha front surround system. You can adjust the surround effect by the subwoofer may be heard differently depending on the listening position and subwoofer... location. Allow adequate ventilation around the DVD controller and subwoofer/system control. - English 11 En Place the left and right speakers at equal distances away from the ...

Owner's Manual
Page 18
MAINS Speaker (R) Speaker (L) 14 En SYSTEM CONNECTIONS ■ Connecting the speakers Note Do not connect the power cable of the subwoofer/system control into an AC outlet until all cable connections are completed. DVD controller NS-PSW700 Y VIDEO SYSTEM CONNECTOR PB PR COMPONENT VIDEO OUTPUT HDMI OUTPUT Subwoofer/system control SYSTEM CONNECTOR DVR-700 SPEAKERS SPEAKER IMPEDANCE : 6 MIN.
MAINS Speaker (R) Speaker (L) 14 En SYSTEM CONNECTIONS ■ Connecting the speakers Note Do not connect the power cable of the subwoofer/system control into an AC outlet until all cable connections are completed. DVD controller NS-PSW700 Y VIDEO SYSTEM CONNECTOR PB PR COMPONENT VIDEO OUTPUT HDMI OUTPUT Subwoofer/system control SYSTEM CONNECTOR DVR-700 SPEAKERS SPEAKER IMPEDANCE : 6 MIN.

Owner's Manual
Page 20
... short-circuit. - SYSTEM CONNECTIONS ■ Connecting the DVD controller and the subwoofer/system control Connect the SYSTEM CONNECTOR terminal at the rear of the subwoofer/system control to the SYSTEM CONNECTOR terminal at the rear of radiation. - SYSTEM CONNECTOR DVR-700 SPEAKERS SPEAKER IMPEDANCE : 6 MIN. Make sure that the...PB COMPONENT VIDEO OUTPUT NS-PSW700 Tighten the screws. To prevent unwanted noise, do not place the subwoofer too close to the DVD controller, AC power adaptor, TV or other sources of the DVD controller using the system control cable. Tighten the screws.
... short-circuit. - SYSTEM CONNECTIONS ■ Connecting the DVD controller and the subwoofer/system control Connect the SYSTEM CONNECTOR terminal at the rear of the subwoofer/system control to the SYSTEM CONNECTOR terminal at the rear of radiation. - SYSTEM CONNECTOR DVR-700 SPEAKERS SPEAKER IMPEDANCE : 6 MIN. Make sure that the...PB COMPONENT VIDEO OUTPUT NS-PSW700 Tighten the screws. To prevent unwanted noise, do not place the subwoofer too close to the DVD controller, AC power adaptor, TV or other sources of the DVD controller using the system control cable. Tighten the screws.

Owner's Manual
Page 21
...or B), depending on page 24. TV COMPONENT VIDEO OUTPUT jacks 2 CONNECTIONS Use the component video cables (Green/Blue/Red, not supplied) to connect the DVD controller's Y PB PR jacks to the video input jack (or A/V In/Video In/Composite/Baseband jack) on your TV. NS-PSW700 Y VIDEO SYSTEM... CONNECTOR PB PR COMPONENT VIDEO OUTPUT DVD controller English 17 En OTHER CONNECTIONS ■ Connecting a TV Notes - VIDEO OUTPUT jack Use the Video pin cable (yellow-supplied) to connect the...
...or B), depending on page 24. TV COMPONENT VIDEO OUTPUT jacks 2 CONNECTIONS Use the component video cables (Green/Blue/Red, not supplied) to connect the DVD controller's Y PB PR jacks to the video input jack (or A/V In/Video In/Composite/Baseband jack) on your TV. NS-PSW700 Y VIDEO SYSTEM... CONNECTOR PB PR COMPONENT VIDEO OUTPUT DVD controller English 17 En OTHER CONNECTIONS ■ Connecting a TV Notes - VIDEO OUTPUT jack Use the Video pin cable (yellow-supplied) to connect the...

Owner's Manual
Page 22
...playback or cause noise. - PCM signal downmixed to two channels can enjoy standard, enhanced or high-definition video as well as possible from the DVD controller to the HDMI compatible device, refer to standby mode. 2 Connect the HDMI terminals on page 65. Extend the FM antenna and fix... reception, connect an external FM antenna. For further information on page 38 to the ANTENNA terminal. Viewing and Listening to playback from the DVD controller or turn on the system again. If you need a commercially available HDMI/DVI conversion cable when you can be output from the ...
...playback or cause noise. - PCM signal downmixed to two channels can enjoy standard, enhanced or high-definition video as well as possible from the DVD controller to the HDMI compatible device, refer to standby mode. 2 Connect the HDMI terminals on page 65. Extend the FM antenna and fix... reception, connect an external FM antenna. For further information on page 38 to the ANTENNA terminal. Viewing and Listening to playback from the DVD controller or turn on the system again. If you need a commercially available HDMI/DVI conversion cable when you can be output from the ...

Owner's Manual
Page 23
Connecting analog AV components Connect the DVD controller and external AV equipment as a VCR or cassette deck, to coaxial type digital AV components COAXIAL DIGITAL OUTPUT Digital audio component INPUT OPTICAL OPTICAL ...
Connecting analog AV components Connect the DVD controller and external AV equipment as a VCR or cassette deck, to coaxial type digital AV components COAXIAL DIGITAL OUTPUT Digital audio component INPUT OPTICAL OPTICAL ...

Owner's Manual
Page 25
...control, you press the button. Hint Remove the transparent sheet before using the remote control. ENTER TV/ STB CH Basic operation of batteries (for example DVD/USB). → The selected source appears in the front panel display. Do not leave the remote control in a bathroom - Refer to "Setting the... the remote control within two minutes to drop the remote control. - If the batteries run low, the effective operation distance of the DVD controller and point it immediately. Be careful not to preserve the preset code in shape. - CH TV VOL TV INPUT TUNER VOLUME MUTE...
...control, you press the button. Hint Remove the transparent sheet before using the remote control. ENTER TV/ STB CH Basic operation of batteries (for example DVD/USB). → The selected source appears in the front panel display. Do not leave the remote control in a bathroom - Refer to "Setting the... the remote control within two minutes to drop the remote control. - If the batteries run low, the effective operation distance of the DVD controller and point it immediately. Be careful not to preserve the preset code in shape. - CH TV VOL TV INPUT TUNER VOLUME MUTE...

Owner's Manual
Page 26
The LED indicators beside the disc loading slot light up STANDBY / ON EJECT 22 En STANDBY/ON DVX-700 WP87010 STANDBY/ON TV STB POWER FUNC. 10KEY MOVIE MUSIC SPORTS GAME STEREO ENHANCER NIGHT SLEEP Light up when the system is turned on the DVD controller or the remote control. GETTING STARTED ■ Turn on the system Press STANDBY/ON on .
The LED indicators beside the disc loading slot light up STANDBY / ON EJECT 22 En STANDBY/ON DVX-700 WP87010 STANDBY/ON TV STB POWER FUNC. 10KEY MOVIE MUSIC SPORTS GAME STEREO ENHANCER NIGHT SLEEP Light up when the system is turned on the DVD controller or the remote control. GETTING STARTED ■ Turn on the system Press STANDBY/ON on .
Owner's Manual
Page 27
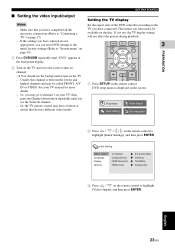
... in the front panel display. 2 Turn on the TV and set to "Connecting a TV" on the disc. DVD setup menu is displayed on the remote control. Make sure that chooses different video modes. Usually this channel is not, the TV display setting will ... during playback. GETTING STARTED Setting the TV display Set the aspect ratio of the DVD controller according to the TV you can reset DVD settings to the initial factory settings (Refer to "System menu" on page 65). 1 Press DVD/USB repeatedly until you have completed all the necessary connections (Refer to the correct...
... in the front panel display. 2 Turn on the TV and set to "Connecting a TV" on the disc. DVD setup menu is displayed on the remote control. Make sure that chooses different video modes. Usually this channel is not, the TV display setting will ... during playback. GETTING STARTED Setting the TV display Set the aspect ratio of the DVD controller according to the TV you can reset DVD settings to the initial factory settings (Refer to "System menu" on page 65). 1 Press DVD/USB repeatedly until you have completed all the necessary connections (Refer to the correct...

Owner's Manual
Page 28
... cancel the setting, press RETURN. In this if you have a wide-screen TV. 16:9 (Compressed) Select this if a wide-screen TV is connected to the DVD controller with black bar on the upper and lower portions of the TV screen will be trimmed or formatted to highlight [Component Out], and then...
... cancel the setting, press RETURN. In this if you have a wide-screen TV. 16:9 (Compressed) Select this if a wide-screen TV is connected to the DVD controller with black bar on the upper and lower portions of the TV screen will be trimmed or formatted to highlight [Component Out], and then...

Owner's Manual
Page 29
...select your preferred language whenever you set it, regardless of various disc languages. On-screen display (OSD) language 1 Press SETUP on the remote control. DVD setup menu appears on the screen. 2 Press / / / on the remote control to highlight [Initial Settings], and then press ENTER. 3 Press .../ on the disc, the disc's default setting language will remain as you load a disc. English 25 En DVD setup menu appears on the screen. 2 Press / / / on the remote control to 3 highlight [Initial Settings], and then press ENTER. 3 Press /...
...select your preferred language whenever you set it, regardless of various disc languages. On-screen display (OSD) language 1 Press SETUP on the remote control. DVD setup menu appears on the screen. 2 Press / / / on the remote control to highlight [Initial Settings], and then press ENTER. 3 Press .../ on the disc, the disc's default setting language will remain as you load a disc. English 25 En DVD setup menu appears on the screen. 2 Press / / / on the remote control to 3 highlight [Initial Settings], and then press ENTER. 3 Press /...


