

Owner's Manual
Page 2
...The above statements apply ONLY to those products distributed by Yamaha Corporation of assurance that benches are therefore the owners responsibility. Model Serial No. Utilize power outlets that our products and the production methods used batteries promptly and as designed) are both the adaptor and...filter/s. The serial number is intended for some reason its subsidiaries. * This applies only to products distributed by Yamaha) to power your FCC authorization to use an extension cord, the minimum wire size for Class "B" digital devices. If the antenna lead-in this ...
...The above statements apply ONLY to those products distributed by Yamaha Corporation of assurance that benches are therefore the owners responsibility. Model Serial No. Utilize power outlets that our products and the production methods used batteries promptly and as designed) are both the adaptor and...filter/s. The serial number is intended for some reason its subsidiaries. * This applies only to products distributed by Yamaha) to power your FCC authorization to use an extension cord, the minimum wire size for Class "B" digital devices. If the antenna lead-in this ...

Owner's Manual
Page 3
...not connect the instrument to be sure to set the desired listening level. (3)-7 Maintenance • When cleaning the instrument, use immediately and have qualified Yamaha service personnel replace the backup battery. If it . Water warning • Do not expose the instrument to avoid the ...or other electronic components, turn off the power for a long period of the instrument. • Use the specified adaptor (PA-3C or an equivalent recommended by qualified Yamaha service personnel. PRECAUTIONS PLEASE READ CAREFULLY BEFORE PROCEEDING * Please keep this manual in a safe place ...
...not connect the instrument to be sure to set the desired listening level. (3)-7 Maintenance • When cleaning the instrument, use immediately and have qualified Yamaha service personnel replace the backup battery. If it . Water warning • Do not expose the instrument to avoid the ...or other electronic components, turn off the power for a long period of the instrument. • Use the specified adaptor (PA-3C or an equivalent recommended by qualified Yamaha service personnel. PRECAUTIONS PLEASE READ CAREFULLY BEFORE PROCEEDING * Please keep this manual in a safe place ...

Owner's Manual
Page 4
...page where further information can be included depending on the display. Please check with [ ]. (brackets). The DTXPLORER is indicated with your instrument. About the descriptions This manual describes buttons and explanations using the following items. After opening the package, please check and makes sure that includes a wealth of the...To get the most out of rich, high-quality drum voices, a multi-function metronome, and song play function. The button on your Yamaha dealer. 4 NOTE The illustrations and LCD screens as shown in a safe place for purchasing the Yamaha DTXPLORER.
...page where further information can be included depending on the display. Please check with [ ]. (brackets). The DTXPLORER is indicated with your instrument. About the descriptions This manual describes buttons and explanations using the following items. After opening the package, please check and makes sure that includes a wealth of the...To get the most out of rich, high-quality drum voices, a multi-function metronome, and song play function. The button on your Yamaha dealer. 4 NOTE The illustrations and LCD screens as shown in a safe place for purchasing the Yamaha DTXPLORER.

Owner's Manual
Page 5
... tone generator with 32 voice polyphony. • Voices include 192 drum and percussion voices. Two functions that make the DTXPLORER great for use. You can also be used in a variety of situations such as highly realistic acoustic sounds, unique electronic percussion sounds, effect sounds, and much more ... your consistency in dynamics (output level). ible tone generators. ■ High Performance Metronome • The sound for user memory in Yamaha's MU series of genres from an external tone generator or synchronize the metronome with an external sequencer. • An AUX IN (...
... tone generator with 32 voice polyphony. • Voices include 192 drum and percussion voices. Two functions that make the DTXPLORER great for use. You can also be used in a variety of situations such as highly realistic acoustic sounds, unique electronic percussion sounds, effect sounds, and much more ... your consistency in dynamics (output level). ible tone generators. ■ High Performance Metronome • The sound for user memory in Yamaha's MU series of genres from an external tone generator or synchronize the metronome with an external sequencer. • An AUX IN (...

Owner's Manual
Page 6
CONTENTS Nomenclature 7 Top Panel 7 Rear Panel 8 Connections 9 Connecting the DTXPLORER's pads to the main unit 9 Using the DTXPLORER with an Acoustic Drum Kit 9 ■ Connecting to Speakers or Headphones 10 ■ Connecting the Power Supply 11 Time to Play 12 Adjusting the Hi-...Hat 13 Play Along With The Metronome 14 Click Out Select 16 Play Along With a Song 17 Tap Tempo Function 18 Using the Groove...
CONTENTS Nomenclature 7 Top Panel 7 Rear Panel 8 Connections 9 Connecting the DTXPLORER's pads to the main unit 9 Using the DTXPLORER with an Acoustic Drum Kit 9 ■ Connecting to Speakers or Headphones 10 ■ Connecting the Power Supply 11 Time to Play 12 Adjusting the Hi-...Hat 13 Play Along With The Metronome 14 Click Out Select 16 Play Along With a Song 17 Tap Tempo Function 18 Using the Groove...

Owner's Manual
Page 7
...to the right (clockwise) to increase the value, and to the left to operate the DTXPLORER. i LCD Display Shows information or data that allows editing is open. t Select Buttons () • These buttons are used to edit when a page that is needed to decrease. Nomenclature Top Panel STANDBY ON DC...), or save data. • Hold the [SHIFT] button and press the [SAVE/ENT] button to enter the Utility Mode, which is used to make overall settings for operating the DTXPLORER. • In the Song display, this button to start /stop song playback. r Shift Button (SHIFT) Hold this button is...
...to the right (clockwise) to increase the value, and to the left to operate the DTXPLORER. i LCD Display Shows information or data that allows editing is open. t Select Buttons () • These buttons are used to edit when a page that is needed to decrease. Nomenclature Top Panel STANDBY ON DC...), or save data. • Hold the [SHIFT] button and press the [SAVE/ENT] button to enter the Utility Mode, which is used to make overall settings for operating the DTXPLORER. • In the Song display, this button to start /stop song playback. r Shift Button (SHIFT) Hold this button is...

Owner's Manual
Page 8
...and counter-clockwise to decrease. !9 Power Supply Jack (DC IN 12V) Connect an AC adaptor to the main unit. For monaural playback use the DTXPLORER as snare, tom, etc., according to the indication below ) when connecting a Hi-hat controller. With this jack. Double Insulator !6...playback with the playback of an external sequencer. (P. 11) !2 Trigger Input Jacks (1 SNARE thru 7 HI HAT) These jacks are used to connect the DTXPLORER to connect a hi-hat controller. (P. 9) * Use a cable with a stereo plug (shown below each input. (P. 9) 3-zone jack 1 SNARE jack Stereo (w/switch) jacks 5 RIDE...
...and counter-clockwise to decrease. !9 Power Supply Jack (DC IN 12V) Connect an AC adaptor to the main unit. For monaural playback use the DTXPLORER as snare, tom, etc., according to the indication below ) when connecting a Hi-hat controller. With this jack. Double Insulator !6...playback with the playback of an external sequencer. (P. 11) !2 Trigger Input Jacks (1 SNARE thru 7 HI HAT) These jacks are used to connect the DTXPLORER to connect a hi-hat controller. (P. 9) * Use a cable with a stereo plug (shown below each input. (P. 9) 3-zone jack 1 SNARE jack Stereo (w/switch) jacks 5 RIDE...

Owner's Manual
Page 9
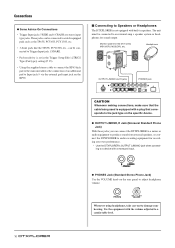
..., etc.) so make sure each Trigger Input jack on the rear panel of Yamaha DX20 Drum Triggers and the triggers are properly adjusted. 9 Using the DTXPLORER with an Acoustic Drum Kit The DTXPLORER can be expanded with an optional set of the DTXPLORER. Connections CAUTION To prevent electric shock and damage to the devices, make...
..., etc.) so make sure each Trigger Input jack on the rear panel of Yamaha DX20 Drum Triggers and the triggers are properly adjusted. 9 Using the DTXPLORER with an Acoustic Drum Kit The DTXPLORER can be expanded with an optional set of the DTXPLORER. Connections CAUTION To prevent electric shock and damage to the devices, make...
Owner's Manual
Page 10
..., take care not to damage your own performance. * Use the DTXPLORER's OUTPUT L/MONO jack when connecting to a device with a monaural input. ● PHONES Jack (Standard Stereo Phone Jack) Use the VOLUME knob on the rear panel to adjust headphone volume. These jacks can be connected... jacks PHONES jack CAUTION Whenever making connections, make sure that the cable being used is equipped with a plug that corresponds to the jack type on the KP65. ■ Connecting to Speakers or Headphones The DTXPLORER is set in speakers. Connections ● Some Advice On Connections • Trigger...
..., take care not to damage your own performance. * Use the DTXPLORER's OUTPUT L/MONO jack when connecting to a device with a monaural input. ● PHONES Jack (Standard Stereo Phone Jack) Use the VOLUME knob on the rear panel to adjust headphone volume. These jacks can be connected... jacks PHONES jack CAUTION Whenever making connections, make sure that the cable being used is equipped with a plug that corresponds to the jack type on the KP65. ■ Connecting to Speakers or Headphones The DTXPLORER is set in speakers. Connections ● Some Advice On Connections • Trigger...

Owner's Manual
Page 11
... a situation can be sent on an external tone generator with the DTXPLORER's pads, or synchronize the DTXPLORER's song or metronome playback with the signal from the DTXPLORER. Also, when the DTXPLORER is not to be used when you play along with a favorite tune or perform with friends....adaptor specifically recommended by Yamaha). The combined audio can be used for a long period of different makers and types to communicate. Use the volume control on the external device (CD player, etc.) to adjust the volume balance. ● MIDI OUT Jack The DTXPLORER's MIDI function lets you...
... a situation can be sent on an external tone generator with the DTXPLORER's pads, or synchronize the DTXPLORER's song or metronome playback with the signal from the DTXPLORER. Also, when the DTXPLORER is not to be used when you play along with a favorite tune or perform with friends....adaptor specifically recommended by Yamaha). The combined audio can be used for a long period of different makers and types to communicate. Use the volume control on the external device (CD player, etc.) to adjust the volume balance. ● MIDI OUT Jack The DTXPLORER's MIDI function lets you...

Owner's Manual
Page 12
..., switch the power off and then on again, and the total number times the pads have been specially programmed by Yamaha sound designers. The "OutSel=" value is flashing. Play the DTXPLORER While hitting on the pads, rotate the volume knob on Audio Devices and the Mixer or Amplifier. 2. Page 1 .... * Press the [DRUM KIT] button if another display is shown. UTIL2 Click -OutSel=mix , Press the [>] button twice to go to use. 4. After purchasing the DTXPLORER, the following message will appear in the display the first time you 'd like to page 2 in the Utility Mode. Rotating the knob to the...
..., switch the power off and then on again, and the total number times the pads have been specially programmed by Yamaha sound designers. The "OutSel=" value is flashing. Play the DTXPLORER While hitting on the pads, rotate the volume knob on Audio Devices and the Mixer or Amplifier. 2. Page 1 .... * Press the [DRUM KIT] button if another display is shown. UTIL2 Click -OutSel=mix , Press the [>] button twice to go to use. 4. After purchasing the DTXPLORER, the following message will appear in the display the first time you 'd like to page 2 in the Utility Mode. Rotating the knob to the...
Owner's Manual
Page 13
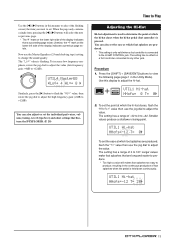
...down continuously. Larger values make foot splashes that a succeeding page exists. Use the [] buttons in this display to adjust the hi-hat. Likewise, the "-" mark on a foot controller connected to any other settings that finetune the DTXPLORER. (P. 20) Time to Play Adjusting the Hi-Hat Hi-hat adjustment... is used to determine the point at which foot splashes are produced. * This setting is only valid when a foot...
...down continuously. Larger values make foot splashes that a succeeding page exists. Use the [] buttons in this display to adjust the hi-hat. Likewise, the "-" mark on a foot controller connected to any other settings that finetune the DTXPLORER. (P. 20) Time to Play Adjusting the Hi-Hat Hi-hat adjustment... is used to determine the point at which foot splashes are produced. * This setting is only valid when a foot...
Owner's Manual
Page 14
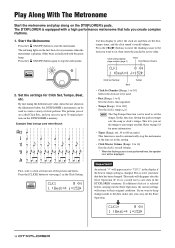
...[ ON/OFF] button to page 18 for Click Set, Tempo, Beat, etc. Other beats are shown in the illustration below, the DTXPLORER's metronome can be used to view page 1 in tempo sets the song or click's tempo. Press the [] buttons to move the flashing cursor to the item... to set is playing. CLK1 fl '¬ 1 :Beat=4 ƒ=152, An asterisk "*" will be used . • Beat [Range: 1 to 9] Sets the click's time signature. • Tempo [Range: 30 to 30 original patterns in the DTXPLORER's memory. If a different click set the tempo. CLK1* fl '¬ 1 :Beat=4 ƒ=152,...
...[ ON/OFF] button to page 18 for Click Set, Tempo, Beat, etc. Other beats are shown in the illustration below, the DTXPLORER's metronome can be used to view page 1 in tempo sets the song or click's tempo. Press the [] buttons to move the flashing cursor to the item... to set is playing. CLK1 fl '¬ 1 :Beat=4 ƒ=152, An asterisk "*" will be used . • Beat [Range: 1 to 9] Sets the click's time signature. • Tempo [Range: 30 to 30 original patterns in the DTXPLORER's memory. If a different click set the tempo. CLK1* fl '¬ 1 :Beat=4 ƒ=152,...

Owner's Manual
Page 15
... puts a muted "break" for the number of measures decided with the "Brk" setting (off " is set to 9) after the metronome has played for CLK4 is used to assign the 5 different click sounds that are changed as a group. The sounds are produced by the "Meas" setting (1 to 9). * If the setting "Brk...if the setting for the number of the display and set the tuning (-24 to 0 to create your own original click set to "0", "NoAssign" is used , the metronome will be produced. Create Your Own Original Click Set Press the [>] button to view the [Click Measure Break] section on page 6 in...
... puts a muted "break" for the number of measures decided with the "Brk" setting (off " is set to 9) after the metronome has played for CLK4 is used to assign the 5 different click sounds that are changed as a group. The sounds are produced by the "Meas" setting (1 to 9). * If the setting "Brk...if the setting for the number of the display and set the tuning (-24 to 0 to create your own original click set to "0", "NoAssign" is used , the metronome will be produced. Create Your Own Original Click Set Press the [>] button to view the [Click Measure Break] section on page 6 in...

Owner's Manual
Page 16
...click set, save it was set is selected before carrying out the store operation. 8-1. Store Destination 8-4. appears in the DTXPLORER's memory using the Store Operation described below . However, please proceed with caution because carrying out this section would then be routed to store...SAVE/ENT] button. Completed! Procedure 1. Rotate the jog dial to select the output from the factory. (P. 23) Click Out Select The DTXPLORER lets you want to separate outputs. mix: This is delivered from which output jack the metronome's signal is delivered in this operation will appear...
...click set, save it was set is selected before carrying out the store operation. 8-1. Store Destination 8-4. appears in the DTXPLORER's memory using the Store Operation described below . However, please proceed with caution because carrying out this section would then be routed to store...SAVE/ENT] button. Completed! Procedure 1. Rotate the jog dial to select the output from the factory. (P. 23) Click Out Select The DTXPLORER lets you want to separate outputs. mix: This is delivered from which output jack the metronome's signal is delivered in this operation will appear...
Owner's Manual
Page 17
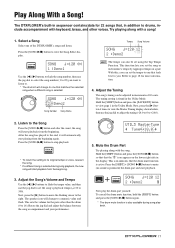
...the lower right side in the Utility Mode. Next, press the [>] button 6 times to view the Master Tuning display shown below, then use the jog dial to set using the Tap Tempo Function. After the song has played to its original tempo or voice, reselect the song. * If a different song is..., the new song will automatically start playback from the beginning. 3. Select a Song Select one that the drum mute function is found in increments of the DTXPLORER's songs and listen. This function lets you . Hold the [SHIFT] button and press the [SAVE/ENT] button to you set the tempo to one...
...the lower right side in the Utility Mode. Next, press the [>] button 6 times to view the Master Tuning display shown below, then use the jog dial to set using the Tap Tempo Function. After the song has played to its original tempo or voice, reselect the song. * If a different song is..., the new song will automatically start playback from the beginning. 3. Select a Song Select one that the drum mute function is found in increments of the DTXPLORER's songs and listen. This function lets you . Hold the [SHIFT] button and press the [SAVE/ENT] button to you set the tempo to one...

Owner's Manual
Page 18
...Hi-hat HHofs= 0 T= 0, Next, press the [>] button three times to play in tempo along with the drum mute or bass solo functions, try using the metronome in the display. * Any pad will immediately change when a different song is playing, the tempo will do. * The jog dial can even... Solo" function, you have the metronome play along with the bass instrument. Procedure 1. The Tap Tempo Setting display shown below will be used during playback. If you can set the tempo to one that is given in combination with the song to have difficulty keeping the tempo when...
...Hi-hat HHofs= 0 T= 0, Next, press the [>] button three times to play in tempo along with the drum mute or bass solo functions, try using the metronome in the display. * Any pad will immediately change when a different song is playing, the tempo will do. * The jog dial can even... Solo" function, you have the metronome play along with the bass instrument. Procedure 1. The Tap Tempo Setting display shown below will be used during playback. If you can set the tempo to one that is given in combination with the song to have difficulty keeping the tempo when...
Owner's Manual
Page 19
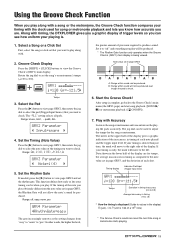
...) main display is being viewed. Range: snare, tom1, ... Range: A", «(4), †(8), ©(16), Œ GRV3 Parameter - Play with timing, the DTXPLORER gives you a graphic display of trigger levels so you can be produced. B: Range within sound can see how uniform your playing is struck. pad9, ALL... the song or click set in page GRV3 B AB AB A B A: Range within sound will not allow the note's sound be produced. Using the Groove Check Function When you play along with. 2. GRV1 120 Gr=-1œ1.5, the greater amount of the display are . The meter in the...
...) main display is being viewed. Range: snare, tom1, ... Range: A", «(4), †(8), ©(16), Œ GRV3 Parameter - Play with timing, the DTXPLORER gives you a graphic display of trigger levels so you can be produced. B: Range within sound can see how uniform your playing is struck. pad9, ALL... the song or click set in page GRV3 B AB AB A B A: Range within sound will not allow the note's sound be produced. Using the Groove Check Function When you play along with. 2. GRV1 120 Gr=-1œ1.5, the greater amount of the display are . The meter in the...

Owner's Manual
Page 20
...assigning drum voices to 9 of the pad. Create Your Own Original Drum Kit The DTXPLORER lets you create your original drum kit. KIT1 _________ 1 :Acoustic , Rotate the jog dial to select the drum kit you 'd like to use as a starting point for editing as well. 2. To select the pad you want... controller for Trigger Input Jack 7. •kick Pad input for Trigger Input Jack 8. ªpad9 Pad input for each input source of the DTXPLORER. We recommend that is used , one input jack. Step on the kick pedal or press the [SHIFT] + [] buttons and select "•kick". To select the pad (...
...assigning drum voices to 9 of the pad. Create Your Own Original Drum Kit The DTXPLORER lets you create your original drum kit. KIT1 _________ 1 :Acoustic , Rotate the jog dial to select the drum kit you 'd like to use as a starting point for editing as well. 2. To select the pad you want... controller for Trigger Input Jack 7. •kick Pad input for Trigger Input Jack 8. ªpad9 Pad input for each input source of the DTXPLORER. We recommend that is used , one input jack. Step on the kick pedal or press the [SHIFT] + [] buttons and select "•kick". To select the pad (...

Owner's Manual
Page 21
... (Pitch) Try changing the drum voice's tuning (pitch). The range is changed . An asterisk "*" will disappear after the Store Operation (P. 23) is as those used as the base for the metronome's click voice. ● Voice Category K: Kick S: Snare T: Tom C: Cymbal H: Hi-hat P: Percussion E: Effect Here, select... Drum voice categories are the same as - This mark will appear next to "KIT" in the DTXPLORER's memory. Use the [>] button to view page KIT6, then rotate the jog dial to select "K". Use the [>] button to view page KIT5, then rotate the jog dial to the data, make sure ...
... (Pitch) Try changing the drum voice's tuning (pitch). The range is changed . An asterisk "*" will disappear after the Store Operation (P. 23) is as those used as the base for the metronome's click voice. ● Voice Category K: Kick S: Snare T: Tom C: Cymbal H: Hi-hat P: Percussion E: Effect Here, select... Drum voice categories are the same as - This mark will appear next to "KIT" in the DTXPLORER's memory. Use the [>] button to view page KIT6, then rotate the jog dial to select "K". Use the [>] button to view page KIT5, then rotate the jog dial to the data, make sure ...

