

Owner's Manual
Page 5
... in dynamics (output level). This lets you simply choose the system that is a great training aid that can be muted. • The DTXPLORER also features a "Tap" function that are compatible with the song's bass part only-and the Drum Mute Function-which you can freely mix,... match and edit a variety of drum/percussion voices to trigger pad compatibility, the unit can also be used with devices such as Yamaha's DT20 Drum Triggers, etc. • Setup data such as live performance, personal practice, and much more . ■ Drum Trigger Function • Built into a compact design....
... in dynamics (output level). This lets you simply choose the system that is a great training aid that can be muted. • The DTXPLORER also features a "Tap" function that are compatible with the song's bass part only-and the Drum Mute Function-which you can freely mix,... match and edit a variety of drum/percussion voices to trigger pad compatibility, the unit can also be used with devices such as Yamaha's DT20 Drum Triggers, etc. • Setup data such as live performance, personal practice, and much more . ■ Drum Trigger Function • Built into a compact design....

Owner's Manual
Page 6
CONTENTS Nomenclature 7 Top Panel 7 Rear Panel 8 Connections 9 Connecting the DTXPLORER's pads to the main unit 9 Using the DTXPLORER with an Acoustic Drum Kit 9 ■ Connecting to Speakers or Headphones 10 ■ Connecting the Power Supply 11 Time to Play 12 Adjusting ...Tempo Function 18 Using the Groove Check Function 19 Create Your Own Original Drum Kit 20 Factory Set 23 Trigger Setup Edit 24 Selecting the Trigger Setup 24 Editing the Trigger Setup 24 Error Messages 28 Trouble Shooting 28 Specifications 30 MIDI Data Format 31 MIDI Transmit Note Number 31 Display ...
CONTENTS Nomenclature 7 Top Panel 7 Rear Panel 8 Connections 9 Connecting the DTXPLORER's pads to the main unit 9 Using the DTXPLORER with an Acoustic Drum Kit 9 ■ Connecting to Speakers or Headphones 10 ■ Connecting the Power Supply 11 Time to Play 12 Adjusting ...Tempo Function 18 Using the Groove Check Function 19 Create Your Own Original Drum Kit 20 Factory Set 23 Trigger Setup Edit 24 Selecting the Trigger Setup 24 Editing the Trigger Setup 24 Error Messages 28 Trouble Shooting 28 Specifications 30 MIDI Data Format 31 MIDI Transmit Note Number 31 Display ...

Owner's Manual
Page 7
...enter the Drum Kit Select display. (P. 12) • Hold the [SHIFT] button and press the [DRUM KIT] button to enter the Trigger Setup Select display (P. 24) • Stops production of every measure when the metronome or a song is playing. i LCD Display Shows information or data... L/MONO 8 KICK/9 7HIHAT 6CRASH 5 RIDE R 4 TOM3 3TOM2 2TOM1 1 SNARE MIDI OUT q DRUM KIT TRIGGER SONG / DRUM MUTE e w CLICK GRV.CHECK SHIFT r i * DTXPLORER * * Welcome! * BEAT o CLICK !0 DRUM TRIGGER MODULE t ON/OFF TAP y SAVE/ENT UTILITY u q Drum Kit Button (DRUM KIT) • This button is used to...
...enter the Drum Kit Select display. (P. 12) • Hold the [SHIFT] button and press the [DRUM KIT] button to enter the Trigger Setup Select display (P. 24) • Stops production of every measure when the metronome or a song is playing. i LCD Display Shows information or data... L/MONO 8 KICK/9 7HIHAT 6CRASH 5 RIDE R 4 TOM3 3TOM2 2TOM1 1 SNARE MIDI OUT q DRUM KIT TRIGGER SONG / DRUM MUTE e w CLICK GRV.CHECK SHIFT r i * DTXPLORER * * Welcome! * BEAT o CLICK !0 DRUM TRIGGER MODULE t ON/OFF TAP y SAVE/ENT UTILITY u q Drum Kit Button (DRUM KIT) • This button is used to...

Owner's Manual
Page 9
...damage to the devices, make sure each Trigger Input jack on the rear panel of Yamaha DX20 Drum Triggers and the triggers are connected to the DTXPLORER's input jacks. * After making connections, make sure settings in the "Trigger Setup Edit" section (P. 24) should be played from an acoustic drum kit if the kit...however, if other pads or drum triggers that have different operating characteristics are connected to the jacks, settings for sensitivity, etc., as described in the DTXPLORER's trigger setup (P. 24) are labeled (1 SNARE, etc.) so make sure the power is switched OFF on the KP65.
...damage to the devices, make sure each Trigger Input jack on the rear panel of Yamaha DX20 Drum Triggers and the triggers are connected to the DTXPLORER's input jacks. * After making connections, make sure settings in the "Trigger Setup Edit" section (P. 24) should be played from an acoustic drum kit if the kit...however, if other pads or drum triggers that have different operating characteristics are connected to the jacks, settings for sensitivity, etc., as described in the DTXPLORER's trigger setup (P. 24) are labeled (1 SNARE, etc.) so make sure the power is switched OFF on the KP65.
Owner's Manual
Page 10
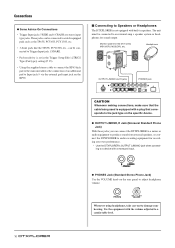
... a monaural input. ● PHONES Jack (Standard Stereo Phone Jack) Use the VOLUME knob on the KP65. ■ Connecting to Speakers or Headphones The DTXPLORER is equipped with a plug that corresponds to the jack type on the specific device. ● OUTPUT L/MONO, R Jack (Monaural Standard Phone Jack) With...these jacks you can be connected to a comfortable level. 10 Monitor system for recording your hearing. Use the equipment with built-in the Trigger Setup Edit's [TRIG2 Type (Pad type)] setting (P. 25). • Using the supplied stereo cable to connect the KP65 kick pad to the ...
... a monaural input. ● PHONES Jack (Standard Stereo Phone Jack) Use the VOLUME knob on the KP65. ■ Connecting to Speakers or Headphones The DTXPLORER is equipped with a plug that corresponds to the jack type on the specific device. ● OUTPUT L/MONO, R Jack (Monaural Standard Phone Jack) With...these jacks you can be connected to a comfortable level. 10 Monitor system for recording your hearing. Use the equipment with built-in the Trigger Setup Edit's [TRIG2 Type (Pad type)] setting (P. 25). • Using the supplied stereo cable to connect the KP65 kick pad to the ...

Owner's Manual
Page 16
... carrying out the store operation. 8-1. Play Along With The Metronome 8. appears in this operation will rewrite the DTXPLORER's entire contents (all click sets, user trigger setup (No. 5), user drum kits 33 to their original factory condition. Click output and performance output can use ...This is delivered. Press the [SAVE/ENT] button again and the following display asking your own original click set is delivered in the DTXPLORER's memory using the Store Operation described below . Completed! Press the [SAVE/ENT] button to separate outputs. The settings in the ...
... carrying out the store operation. 8-1. Play Along With The Metronome 8. appears in this operation will rewrite the DTXPLORER's entire contents (all click sets, user trigger setup (No. 5), user drum kits 33 to their original factory condition. Click output and performance output can use ...This is delivered. Press the [SAVE/ENT] button again and the following display asking your own original click set is delivered in the DTXPLORER's memory using the Store Operation described below . Completed! Press the [SAVE/ENT] button to separate outputs. The settings in the ...
Owner's Manual
Page 19
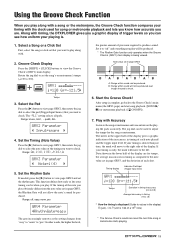
Using the Groove Check Function When you play along with timing, the DTXPLORER gives you a graphic display of each shot. Along with . 2. B: Range within sound can see how uniform your playing is 1/24 of the timing you want ... 6. Range: snare, tom1, ... This function defines how early or late your timing is complete, go back to view the Groove Check's (GRV1) main display. After setup is early, the mark will move to the right side of the note you play along with a song or the metronome, the Groove Check function...
Using the Groove Check Function When you play along with timing, the DTXPLORER gives you a graphic display of each shot. Along with . 2. B: Range within sound can see how uniform your playing is 1/24 of the timing you want ... 6. Range: snare, tom1, ... This function defines how early or late your timing is complete, go back to view the Groove Check's (GRV1) main display. After setup is early, the mark will move to the right side of the note you play along with a song or the metronome, the Groove Check function...
Owner's Manual
Page 24
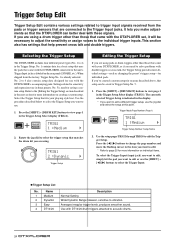
...drum trigger other than those that came with the DTXPLORER set, it will be saved to Trigger Setup No. 5. 1. Use the setup pages TRIG2 through TRIG8 to 4) in the Trigger Setup Select display (TRIG1). Trigger Setup Edit Trigger Setup Edit contains various settings related to trigger input ...signals received from the factory, Trigger Setup No. 1 is used for individual pads. Selecting the Trigger Setup The DTXPLORER includes four different preset types (No. 1 to edit the Trigger Setup. Settings related to view page 1 in the Trigger Setup. Press the [SHIFT] + [DRUM KIT...
...drum trigger other than those that came with the DTXPLORER set, it will be saved to Trigger Setup No. 5. 1. Use the setup pages TRIG2 through TRIG8 to 4) in the Trigger Setup Select display (TRIG1). Trigger Setup Edit Trigger Setup Edit contains various settings related to trigger input ...signals received from the factory, Trigger Setup No. 1 is used for individual pads. Selecting the Trigger Setup The DTXPLORER includes four different preset types (No. 1 to edit the Trigger Setup. Settings related to view page 1 in the Trigger Setup. Press the [SHIFT] + [DRUM KIT...
Owner's Manual
Page 25
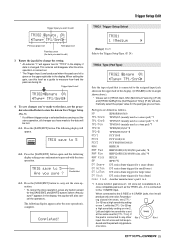
... has a high sensitivity setting on rim 1, while the [TP1/SnrB] has a high sensitivity setting on the upper right side in User Trigger Setup (No. 5). * If a different trigger setup is set in [TRIG3 Gain, MVl (Mininimum Velocity)] (P. 26) and [TRIG5 SelfRejTime (Self Rejection Time)] (P. 26) will be pro- TRIG...any button except for [TP1/Tom]. When setting the gain, use the procedure described below to store the data in the display. Trigger Setup Edit Trigger Input you want to edit TRIG2 ¡snare 0% -Type= TP1/SnrA, Previous page icon Next page icon Flashing cursor (the...
... has a high sensitivity setting on rim 1, while the [TP1/SnrB] has a high sensitivity setting on the upper right side in User Trigger Setup (No. 5). * If a different trigger setup is set in [TRIG3 Gain, MVl (Mininimum Velocity)] (P. 26) and [TRIG5 SelfRejTime (Self Rejection Time)] (P. 26) will be pro- TRIG...any button except for [TP1/Tom]. When setting the gain, use the procedure described below to store the data in the display. Trigger Setup Edit Trigger Input you want to edit TRIG2 ¡snare 0% -Type= TP1/SnrA, Previous page icon Next page icon Flashing cursor (the...

Owner's Manual
Page 26
... values will produce a high volume level even if the pad is set longer times. Larger values set in the upper half of the display. Trigger Setup Edit *2 Rim1 and rim2 sounds on [TP1/SnrA]. Some fine-tuning of the value will result in the upper half of the display. However, this...
... values will produce a high volume level even if the pad is set longer times. Larger values set in the upper half of the display. Trigger Setup Edit *2 Rim1 and rim2 sounds on [TP1/SnrA]. Some fine-tuning of the value will result in the upper half of the display. However, this...
Owner's Manual
Page 27
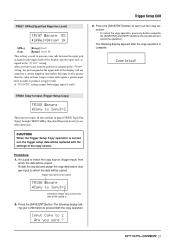
..., the pad assigned in pages [TRIG2 Type (Pad Type)] through [TRIG7 SPRej (Specified Rejection Level)] to another input jack. Trigger Setup Edit 3. TRIG8 Copy to Input (Trigger Setup Copy) TRIG8 ¡snare -Copy to Input=2 This function copies all data settings in the upper half of the display will not...except for a certain length of time unless the input level is greater than the value set here. CAUTION When the Trigger Setup Copy operation is carried out, the trigger setup data will also cancel the operation). Hit a pad to select the copy source (trigger input) from which the data ...
..., the pad assigned in pages [TRIG2 Type (Pad Type)] through [TRIG7 SPRej (Specified Rejection Level)] to another input jack. Trigger Setup Edit 3. TRIG8 Copy to Input (Trigger Setup Copy) TRIG8 ¡snare -Copy to Input=2 This function copies all data settings in the upper half of the display will not...except for a certain length of time unless the input level is greater than the value set here. CAUTION When the Trigger Setup Copy operation is carried out, the trigger setup data will also cancel the operation). Hit a pad to select the copy source (trigger input) from which the data ...

Owner's Manual
Page 28
...9679; Check the "Produces sound but the sensitivity is too low (volume is hit? (→ P. 25 [Trigger Setup Edit:TRIG2 to TRIG7 pages) ● Is the gain set too low? (→ P. 26 [TRIG3 Gain, ... Error Message below and make the appropriate corrections. Trouble Shooting The DTXPLORER does not produce sound, and does not recognize trigger inputs. ● Is the pad...9679; (If you are using trigger sensors) Are you are using trigger sensors made by a manufacturer other than Yamaha? It may be necessary to mute the head. ● Is the sensor attached close to "0"? ●...
...9679; Check the "Produces sound but the sensitivity is too low (volume is hit? (→ P. 25 [Trigger Setup Edit:TRIG2 to TRIG7 pages) ● Is the gain set too low? (→ P. 26 [TRIG3 Gain, ... Error Message below and make the appropriate corrections. Trouble Shooting The DTXPLORER does not produce sound, and does not recognize trigger inputs. ● Is the pad...9679; (If you are using trigger sensors) Are you are using trigger sensors made by a manufacturer other than Yamaha? It may be necessary to mute the head. ● Is the sensor attached close to "0"? ●...

Owner's Manual
Page 30
...be the same in this owner's manual are for information purposes only. Yamaha Corp. Specifications Tone Generator 16 bit AWM2 Maximum polyphony 32 Voices 192 drum, percussion voices Drum kits 32 Preset 10 User memory locations Trigger setups 4 Preset 1 User memory location Sequencer tracks 1 Other Sequencer Functions Mute...-3C AC power adaptor (included or optional depending on local) * Specifications and descriptions in every locale, please check with your Yamaha dealer. 30 reserves the right to change or modify products or specifications at any time without prior notice.
...be the same in this owner's manual are for information purposes only. Yamaha Corp. Specifications Tone Generator 16 bit AWM2 Maximum polyphony 32 Voices 192 drum, percussion voices Drum kits 32 Preset 10 User memory locations Trigger setups 4 Preset 1 User memory location Sequencer tracks 1 Other Sequencer Functions Mute...-3C AC power adaptor (included or optional depending on local) * Specifications and descriptions in every locale, please check with your Yamaha dealer. 30 reserves the right to change or modify products or specifications at any time without prior notice.

Owner's Manual
Page 33
Click Settings (→P. 14) (→P. 15) (→P. 15) (→P. 15) (→P. 15) (→P. 15) (→P. 16) Groove Check Function (→P. 19) (→P. 19) (→P. 19) (→P. 19) Display Over View Trigger Setup Edit (→P. 24) (→P. 25) (→P. 26) (→P. 26) (→P. 26) (→P. 26) (→P. 26) (→P. 27) (→P. 25) Tap Tempo Function (→P. 18) 33
Click Settings (→P. 14) (→P. 15) (→P. 15) (→P. 15) (→P. 15) (→P. 15) (→P. 16) Groove Check Function (→P. 19) (→P. 19) (→P. 19) (→P. 19) Display Over View Trigger Setup Edit (→P. 24) (→P. 25) (→P. 26) (→P. 26) (→P. 26) (→P. 26) (→P. 26) (→P. 27) (→P. 25) Tap Tempo Function (→P. 18) 33


