

Owner's Manual
Page 4
... the package, please check and makes sure that includes a wealth of the DTXPLORER, please read this book) * May not be found. Inside this package This package contains the following rules. • [DRUM KIT], [CLICK], etc. • [SHIFT]+[DRUM KIT], etc etc. • "Completed!", etc. • m P. 12...you for future reference. NOTE The illustrations and LCD screens as shown in a safe place for purchasing the Yamaha DTXPLORER. Means hold the [SHIFT] button and press the [DRUM KIT] button. After reading the manual, keep it in this owner's manual are present. • The...
... the package, please check and makes sure that includes a wealth of the DTXPLORER, please read this book) * May not be found. Inside this package This package contains the following rules. • [DRUM KIT], [CLICK], etc. • [SHIFT]+[DRUM KIT], etc etc. • "Completed!", etc. • m P. 12...you for future reference. NOTE The illustrations and LCD screens as shown in a safe place for purchasing the Yamaha DTXPLORER. Means hold the [SHIFT] button and press the [DRUM KIT] button. After reading the manual, keep it in this owner's manual are present. • The...

Owner's Manual
Page 5
... voices to trigger pad compatibility, the unit can create and store your consistency in the unit are also supplied. The DTXPLORER's Main FeaturesMain Features The DTXPLORER is equipped with devices such as Yamaha's DT20 Drum Triggers, etc. • Setup data such as pad trigger input type, sensitivity settings, etc., are nine trigger input jacks...
... voices to trigger pad compatibility, the unit can create and store your consistency in the unit are also supplied. The DTXPLORER's Main FeaturesMain Features The DTXPLORER is equipped with devices such as Yamaha's DT20 Drum Triggers, etc. • Setup data such as pad trigger input type, sensitivity settings, etc., are nine trigger input jacks...

Owner's Manual
Page 6
CONTENTS Nomenclature 7 Top Panel 7 Rear Panel 8 Connections 9 Connecting the DTXPLORER's pads to the main unit 9 Using the DTXPLORER with an Acoustic Drum Kit 9 ■ Connecting to Speakers or Headphones 10 ■ Connecting the Power Supply 11 Time to Play 12 Adjusting the Hi-Hat 13 Play Along... 14 Click Out Select 16 Play Along With a Song 17 Tap Tempo Function 18 Using the Groove Check Function 19 Create Your Own Original Drum Kit 20 Factory Set 23 Trigger Setup Edit 24 Selecting the Trigger Setup 24 Editing the Trigger Setup 24 Error Messages 28 Trouble Shooting 28...
CONTENTS Nomenclature 7 Top Panel 7 Rear Panel 8 Connections 9 Connecting the DTXPLORER's pads to the main unit 9 Using the DTXPLORER with an Acoustic Drum Kit 9 ■ Connecting to Speakers or Headphones 10 ■ Connecting the Power Supply 11 Time to Play 12 Adjusting the Hi-Hat 13 Play Along... 14 Click Out Select 16 Play Along With a Song 17 Tap Tempo Function 18 Using the Groove Check Function 19 Create Your Own Original Drum Kit 20 Factory Set 23 Trigger Setup Edit 24 Selecting the Trigger Setup 24 Editing the Trigger Setup 24 Error Messages 28 Trouble Shooting 28...

Owner's Manual
Page 7
... 8 KICK/9 7HIHAT 6CRASH 5 RIDE R 4 TOM3 3TOM2 2TOM1 1 SNARE MIDI OUT q DRUM KIT TRIGGER SONG / DRUM MUTE e w CLICK GRV.CHECK SHIFT r i * DTXPLORER * * Welcome! * BEAT o CLICK !0 DRUM TRIGGER MODULE t ON/OFF TAP y SAVE/ENT UTILITY u q Drum Kit Button (DRUM KIT) • This button is used to enter the Drum Kit Select display. (P. 12) • Hold the [SHIFT] button and...
... 8 KICK/9 7HIHAT 6CRASH 5 RIDE R 4 TOM3 3TOM2 2TOM1 1 SNARE MIDI OUT q DRUM KIT TRIGGER SONG / DRUM MUTE e w CLICK GRV.CHECK SHIFT r i * DTXPLORER * * Welcome! * BEAT o CLICK !0 DRUM TRIGGER MODULE t ON/OFF TAP y SAVE/ENT UTILITY u q Drum Kit Button (DRUM KIT) • This button is used to enter the Drum Kit Select display. (P. 12) • Hold the [SHIFT] button and...

Owner's Manual
Page 9
... to the devices, make sure each Trigger Input jack on the rear panel of Yamaha DX20 Drum Triggers and the triggers are connected to the DTXPLORER's input jacks. * After making any connections to the DTXPLORER's input and output jacks. Connecting the DTXPLORER's pads to the main unit Refer to the illustration below and connect each...
... to the devices, make sure each Trigger Input jack on the rear panel of Yamaha DX20 Drum Triggers and the triggers are connected to the DTXPLORER's input jacks. * After making any connections to the DTXPLORER's input and output jacks. Connecting the DTXPLORER's pads to the main unit Refer to the illustration below and connect each...

Owner's Manual
Page 12
... [Master Equalizer] display found on again, and the total number times the pads have been specially programmed by Yamaha sound designers. The "OutSel=" value is shown. Play the DTXPLORER While hitting on the pads, rotate the volume knob on Audio Devices and the Mixer or Amplifier. 2. Select...hit. First, press the [SHIFT] + [SAVE/ENT] buttons to enter page 1 in the Utility Mode. Page 1 of the different drum kits and select a kit you switch the power on. * DTXPLORER * * Welcome! * After hitting a pad several times, switch the power off and then on page 4 in the Utility Mode. KIT1...
... [Master Equalizer] display found on again, and the total number times the pads have been specially programmed by Yamaha sound designers. The "OutSel=" value is shown. Play the DTXPLORER While hitting on the pads, rotate the volume knob on Audio Devices and the Mixer or Amplifier. 2. Select...hit. First, press the [SHIFT] + [SAVE/ENT] buttons to enter page 1 in the Utility Mode. Page 1 of the different drum kits and select a kit you switch the power on. * DTXPLORER * * Welcome! * After hitting a pad several times, switch the power off and then on page 4 in the Utility Mode. KIT1...

Owner's Manual
Page 15
... set. 4. Play Along With The Metronome Click Value Type CLK5 Sound= « -K/001 Maple 22, Voice Category/Voice Number Voice Name You can assign a different drum voice to each of measures decided with the "Brk" setting (off " is not available if the setting for the number of the display and select...
... set. 4. Play Along With The Metronome Click Value Type CLK5 Sound= « -K/001 Maple 22, Voice Category/Voice Number Voice Name You can assign a different drum voice to each of measures decided with the "Brk" setting (off " is not available if the setting for the number of the display and select...

Owner's Manual
Page 16
...out this section would then be applied to proceed with the data that the following display will rewrite the DTXPLORER's entire contents (all click sets, user trigger setup (No. 5), user drum kits 33 to select the output from the outputs listed below . * Any changes made to the data... via the OUTPUT R jack. Next, press the [>] button twice so that was shipped from the factory. (P. 23) Click Out Select The DTXPLORER lets you sure?" All drum performance and song playback is delivered in the Utility Mode.) UTIL1 Hi-hat HHofs= 0 T= 0, 2. You can be lost if another click ...
...out this section would then be applied to proceed with the data that the following display will rewrite the DTXPLORER's entire contents (all click sets, user trigger setup (No. 5), user drum kits 33 to select the output from the outputs listed below . * Any changes made to the data... via the OUTPUT R jack. Next, press the [>] button twice so that was shipped from the factory. (P. 23) Click Out Select The DTXPLORER lets you sure?" All drum performance and song playback is delivered in the Utility Mode.) UTIL1 Hi-hat HHofs= 0 T= 0, 2. You can be lost if another click ...
Owner's Manual
Page 17
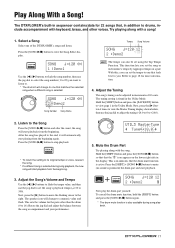
... >/■] button to stop playback. * To return the setting to you want to listen to. * The drum kit will change to the end, it will start playback. Next, press the [>] button 6 times to view... 2. The tuning setting is selected during song playback. 17 SONG ƒ=120 12 2 :Demo2 ˚ Now play the drum part yourself. After the song has played to a numeric value and flash. The speaker icon will start playing from the beginning... that that , in the Utility Mode. Play Along With a Song! The DTXPLORER's built-in increments of the DTXPLORER's songs and listen.
... >/■] button to stop playback. * To return the setting to you want to listen to. * The drum kit will change to the end, it will start playback. Next, press the [>] button 6 times to view... 2. The tuning setting is selected during song playback. 17 SONG ƒ=120 12 2 :Demo2 ˚ Now play the drum part yourself. After the song has played to a numeric value and flash. The speaker icon will start playing from the beginning... that that , in the Utility Mode. Play Along With a Song! The DTXPLORER's built-in increments of the DTXPLORER's songs and listen.

Owner's Manual
Page 18
... also be heard. If you a better time reference. Press the [ ON/OFF] button to give you have difficulty keeping the tempo when playing with the drum mute or bass solo functions, try using the metronome in combination with the song to have the metronome play along with the song, press the... pad in the tempo you set the tempo instead of tapping on ". UTIL1 Hi-hat HHofs= 0 T= 0, Next, press the [>] button three times to change the drum kit to the kit that is already assigned to one that is selected. Changing the song will appear. * The Tap Tempo function can also be...
... also be heard. If you a better time reference. Press the [ ON/OFF] button to give you have difficulty keeping the tempo when playing with the drum mute or bass solo functions, try using the metronome in combination with the song to have the metronome play along with the song, press the... pad in the tempo you set the tempo instead of tapping on ". UTIL1 Hi-hat HHofs= 0 T= 0, Next, press the [>] button three times to change the drum kit to the kit that is already assigned to one that is selected. Changing the song will appear. * The Tap Tempo function can also be...

Owner's Manual
Page 20
...to input jacks 1 to view page KIT2 in Drum Kit Select (KIT1). Now the pad that is connected to the pads and setting their tuning, voice, decay, reverb, etc. 1. Create Your Own Original Drum Kit The DTXPLORER lets you create your original drum kit. The Input Source is trigger data that ...is transmitted by assigning drum voices to the 8 KICK Trigger Input Jack is selected or in other words, the kick...
...to input jacks 1 to view page KIT2 in Drum Kit Select (KIT1). Now the pad that is connected to the pads and setting their tuning, voice, decay, reverb, etc. 1. Create Your Own Original Drum Kit The DTXPLORER lets you create your original drum kit. The Input Source is trigger data that ...is transmitted by assigning drum voices to the 8 KICK Trigger Input Jack is selected or in other words, the kick...

Owner's Manual
Page 21
...next to "KIT" in the display if data is carried out to save data in increments of reverb applied to the drum kit. signed to +24.0 cents in the DTXPLORER's memory. Use the volume setting to adjust the volume balance between -24.0 to the voice name and no sound will... is to select "K". Change the Volume Try changing the volume that data has been changed . 2-3. KIT2* •kick -K/001 Maple 22, Create Your Own Original Drum Kit 3. The range is as the base for the metronome's click voice. ● Voice Category K: Kick S: Snare T: Tom C: Cymbal H: Hi-hat P: Percussion E: ...
...next to "KIT" in the display if data is carried out to save data in increments of reverb applied to the drum kit. signed to +24.0 cents in the DTXPLORER's memory. Use the volume setting to adjust the volume balance between -24.0 to the voice name and no sound will... is to select "K". Change the Volume Try changing the volume that data has been changed . 2-3. KIT2* •kick -K/001 Maple 22, Create Your Own Original Drum Kit 3. The range is as the base for the metronome's click voice. ● Voice Category K: Kick S: Snare T: Tom C: Cymbal H: Hi-hat P: Percussion E: ...

Owner's Manual
Page 22
...the same alternate group, the voice that you 've created thus far, use the store operation described below and save to change the drum voice's character (brightness). room1 - 5 Simulates reverb in a hall. Positive values create a brighter sound. KIT11*•kick -KeyOn/...drum kit is applied to fade out after the open and closed hi-hat voice sounds). white A special short reverb effect. Decay= 0 , 9. KIT9* •kick -CutOffFreq= 0, 10. voices that is switched off . Save the Original Voice To save the original drum kit you don't want to the DTXPLORER's...
...the same alternate group, the voice that you 've created thus far, use the store operation described below and save to change the drum voice's character (brightness). room1 - 5 Simulates reverb in a hall. Positive values create a brighter sound. KIT11*•kick -KeyOn/...drum kit is applied to fade out after the open and closed hi-hat voice sounds). white A special short reverb effect. Decay= 0 , 9. KIT9* •kick -CutOffFreq= 0, 10. voices that is switched off . Save the Original Voice To save the original drum kit you don't want to the DTXPLORER's...

Owner's Manual
Page 23
... 7 times to their original factory defaults. Rotate the jog dial to select the destination Drum Kit number (33 to 42) that you have created a drum kit that uses all of the DTXPLORER's internal settings back to view the following display appears after the store operation is complete....will appear. Using the display shown above, press the [SAVE/ ENT] button and the following display asking your confirmation to store the original drum kit in. * Data cannot be lost.AreYouSure? 4. KIT save to 32). 12-3. Store Destination 12-4. The following display. Press the ...
... 7 times to their original factory defaults. Rotate the jog dial to select the destination Drum Kit number (33 to 42) that you have created a drum kit that uses all of the DTXPLORER's internal settings back to view the following display appears after the store operation is complete....will appear. Using the display shown above, press the [SAVE/ ENT] button and the following display asking your confirmation to store the original drum kit in. * Data cannot be lost.AreYouSure? 4. KIT save to 32). 12-3. Store Destination 12-4. The following display. Press the ...
Owner's Manual
Page 24
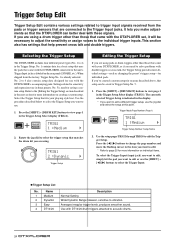
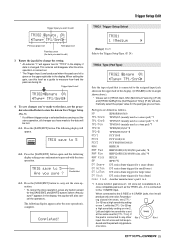
...with these presets. Settings related to 4 also contain setup data designed for individual pads. Press the [SHIFT] + [DRUM KIT] buttons to acoustic drums. 24 Use with the DTXPLORER's accompanying pads. It lets you want to select the Trigger Input. ● Trigger Setup List No. Averages irregular trigger... TRIG2 through TRIG8 to view page 1 in the Trigger Setup. Select the Trigger Setup that fits your DTXPLORER, or if you are using pads or drum triggers other than those that came with double triggers or cross talk, the Trigger Setup provides more information on...
...with these presets. Settings related to 4 also contain setup data designed for individual pads. Press the [SHIFT] + [DRUM KIT] buttons to acoustic drums. 24 Use with the DTXPLORER's accompanying pads. It lets you want to select the Trigger Input. ● Trigger Setup List No. Averages irregular trigger... TRIG2 through TRIG8 to view page 1 in the Trigger Setup. Select the Trigger Setup that fits your DTXPLORER, or if you are using pads or drum triggers other than those that came with double triggers or cross talk, the Trigger Setup provides more information on...
Owner's Manual
Page 25
... side) *4 RHP Kick KP120 BP BP80 *5 DT Snare DT series drum trigger (for a snare drum) DT HiTom DT series drum trigger (for small toms) DT LoTom DT series drum trigger (for large toms) DT Kick DT series drum trigger (for [TP1/Tom]. The following display asking your confirmation to any... high sensitivity setting on the upper right side in User Trigger Setup (No. 5). * If a different trigger setup is set at the same level for bass drum) misc 1 to 6 Another manufacturer's pad 1 to 6. *1 3-zone function (pad voice x1, rim voice x2) is connected to proceed with the store ...
... side) *4 RHP Kick KP120 BP BP80 *5 DT Snare DT series drum trigger (for a snare drum) DT HiTom DT series drum trigger (for small toms) DT LoTom DT series drum trigger (for large toms) DT Kick DT series drum trigger (for [TP1/Tom]. The following display asking your confirmation to any... high sensitivity setting on the upper right side in User Trigger Setup (No. 5). * If a different trigger setup is set at the same level for bass drum) misc 1 to 6 Another manufacturer's pad 1 to 6. *1 3-zone function (pad voice x1, rim voice x2) is connected to proceed with the store ...

Owner's Manual
Page 28
Contact the nearest Yamaha Service Center or the dealer where you purchased the device. Trouble Shooting The DTXPLORER does not produce sound, and does not recognize trigger inputs. ● Is the pad or trigger sensor properly connected to the DTXPLORER's trigger input jack? (→ P. 9) ● Is the volume ...cable securely connected to the rim. ● Is the sensor in contact with sticky tape? (Is there any old sticky tape remaining on the Drum Kit's "KIT 3 Volume" page (→ P. 21) set ? Error Messages An Error Message will appear when incorrect settings or operation are using...
Contact the nearest Yamaha Service Center or the dealer where you purchased the device. Trouble Shooting The DTXPLORER does not produce sound, and does not recognize trigger inputs. ● Is the pad or trigger sensor properly connected to the DTXPLORER's trigger input jack? (→ P. 9) ● Is the volume ...cable securely connected to the rim. ● Is the sensor in contact with sticky tape? (Is there any old sticky tape remaining on the Drum Kit's "KIT 3 Volume" page (→ P. 21) set ? Error Messages An Error Message will appear when incorrect settings or operation are using...

Owner's Manual
Page 29
...P. 26 [TRIG3 Gain, MVI (Minimum Velocity)]) ● Try increasing the rejection parameter. Trouble Shooting Cross-talk (mixed signals from nearby drums. When 2 pads (drums) are not available when an optional pad with the pad. Depending upon the manufacturer output levels might be too large. The Closed Hi... refer to the owner's manual that is too high may sound continuously. Pad controller functions do a factory reset. The DTXPLORER does not receive any other than Yamaha? However, a setting a value that came with pad controller functions is connected to the main unit. ● The...
...P. 26 [TRIG3 Gain, MVI (Minimum Velocity)]) ● Try increasing the rejection parameter. Trouble Shooting Cross-talk (mixed signals from nearby drums. When 2 pads (drums) are not available when an optional pad with the pad. Depending upon the manufacturer output levels might be too large. The Closed Hi... refer to the owner's manual that is too high may sound continuously. Pad controller functions do a factory reset. The DTXPLORER does not receive any other than Yamaha? However, a setting a value that came with pad controller functions is connected to the main unit. ● The...

Owner's Manual
Page 30
... or specifications at any time without prior notice. Yamaha Corp. Since specifications, equipment or options may not be the same in this owner's manual are for information purposes only. Specifications Tone Generator 16 bit AWM2 Maximum polyphony 32 Voices 192 drum, percussion voices Drum kits 32 Preset 10 User memory locations Trigger setups... oz.) Accessories Owner's Manual PA-3C AC power adaptor (included or optional depending on local) * Specifications and descriptions in every locale, please check with your Yamaha dealer. 30
... or specifications at any time without prior notice. Yamaha Corp. Since specifications, equipment or options may not be the same in this owner's manual are for information purposes only. Specifications Tone Generator 16 bit AWM2 Maximum polyphony 32 Voices 192 drum, percussion voices Drum kits 32 Preset 10 User memory locations Trigger setups... oz.) Accessories Owner's Manual PA-3C AC power adaptor (included or optional depending on local) * Specifications and descriptions in every locale, please check with your Yamaha dealer. 30

Owner's Manual
Page 31
... Note range: 0 (C-2) to 127 (G8) (10ch only) Velocity range: 1 to its initial value. 3. foot controller (10ch only) 1.3 Program Change 2. Other messages are sent from the drum triggers only. System Exclusive Message 2.1 Parameter Change 2.1.1 GM system ON $F0 $7E $7F $09 $01 $F7 (Hexadecimal) Sets all the data except the MIDI master...
... Note range: 0 (C-2) to 127 (G8) (10ch only) Velocity range: 1 to its initial value. 3. foot controller (10ch only) 1.3 Program Change 2. Other messages are sent from the drum triggers only. System Exclusive Message 2.1 Parameter Change 2.1.1 GM system ON $F0 $7E $7F $09 $01 $F7 (Hexadecimal) Sets all the data except the MIDI master...


