

Owner's Manual
Page 2
...233;r det brugte batteri tilbage til leverandoren. Hävitä käytetty paristo valmistajan ohjeiden mukaisesti. (lithium caution) Caution Use ONLY a Yamaha PA-3C AC Power Adaptor (or other adaptors may be dealer assembled or installed. DO NOT connect this manual carefully and ...have benches and / or accessory mounting fixtures that is located on the name plate, or specifically recommended by Yamaha. tee that our products and the production methods used , please observe all installations. Instead, hand it in combination with this type of the following : Battery ...
...233;r det brugte batteri tilbage til leverandoren. Hävitä käytetty paristo valmistajan ohjeiden mukaisesti. (lithium caution) Caution Use ONLY a Yamaha PA-3C AC Power Adaptor (or other adaptors may be dealer assembled or installed. DO NOT connect this manual carefully and ...have benches and / or accessory mounting fixtures that is located on the name plate, or specifically recommended by Yamaha. tee that our products and the production methods used , please observe all installations. Instead, hand it in combination with this type of the following : Battery ...

Owner's Manual
Page 3
.... When the backup battery is in a safe place for the instrument. A burning item may have qualified Yamaha service personnel replace the backup battery. Failure to do not use excessive force on the buttons, switches or connectors. • Do not operate the instrument for a long time... not the cord. • Unplug the AC power adaptor when not using the instrument for a long period of the instrument. • Use the specified adaptor (PA-3C or an equivalent recommended by qualified Yamaha service personnel. PRECAUTIONS PLEASE READ CAREFULLY BEFORE PROCEEDING * Please keep this ...
.... When the backup battery is in a safe place for the instrument. A burning item may have qualified Yamaha service personnel replace the backup battery. Failure to do not use excessive force on the buttons, switches or connectors. • Do not operate the instrument for a long time... not the cord. • Unplug the AC power adaptor when not using the instrument for a long period of the instrument. • Use the specified adaptor (PA-3C or an equivalent recommended by qualified Yamaha service personnel. PRECAUTIONS PLEASE READ CAREFULLY BEFORE PROCEEDING * Please keep this ...

Owner's Manual
Page 4
...-function metronome, and song play function. The button on your Yamaha dealer. 4 NOTE The illustrations and LCD screens as shown in a safe place for purchasing the Yamaha DTXPLORER. Indicates the reference page where further information can be included depending on the display. Means use the [] button. After reading the manual, keep it in this...
...-function metronome, and song play function. The button on your Yamaha dealer. 4 NOTE The illustrations and LCD screens as shown in a safe place for purchasing the Yamaha DTXPLORER. Indicates the reference page where further information can be included depending on the display. Means use the [] button. After reading the manual, keep it in this...

Owner's Manual
Page 5
...tone generator or synchronize the metronome with an external sequencer. • An AUX IN (Auxiliary In) jack lets you play and then be used with devices such as Yamaha's DT20 Drum Triggers, etc. • Setup data such as a CD player, MD player, etc., and play along . • ... you set breaks which lets you know how accurate your playing is and check your consistency in four preset patterns. The DTXPLORER's Main FeaturesMain Features The DTXPLORER is equipped with a high-quality 32-polyphony tone generator that produces realistic voices, a high-performance metronome, and a variety...
...tone generator or synchronize the metronome with an external sequencer. • An AUX IN (Auxiliary In) jack lets you play and then be used with devices such as Yamaha's DT20 Drum Triggers, etc. • Setup data such as a CD player, MD player, etc., and play along . • ... you set breaks which lets you know how accurate your playing is and check your consistency in four preset patterns. The DTXPLORER's Main FeaturesMain Features The DTXPLORER is equipped with a high-quality 32-polyphony tone generator that produces realistic voices, a high-performance metronome, and a variety...

Owner's Manual
Page 6
CONTENTS Nomenclature 7 Top Panel 7 Rear Panel 8 Connections 9 Connecting the DTXPLORER's pads to the main unit 9 Using the DTXPLORER with an Acoustic Drum Kit 9 ■ Connecting to Speakers or Headphones 10 ■ Connecting the Power Supply 11 Time to Play 12 Adjusting the Hi-...Hat 13 Play Along With The Metronome 14 Click Out Select 16 Play Along With a Song 17 Tap Tempo Function 18 Using the Groove...
CONTENTS Nomenclature 7 Top Panel 7 Rear Panel 8 Connections 9 Connecting the DTXPLORER's pads to the main unit 9 Using the DTXPLORER with an Acoustic Drum Kit 9 ■ Connecting to Speakers or Headphones 10 ■ Connecting the Power Supply 11 Time to Play 12 Adjusting the Hi-...Hat 13 Play Along With The Metronome 14 Click Out Select 16 Play Along With a Song 17 Tap Tempo Function 18 Using the Groove...

Owner's Manual
Page 7
...save data. • Hold the [SHIFT] button and press the [SAVE/ENT] button to enter the Utility Mode, which is used to make overall settings for operating the DTXPLORER. • In the Song display, this button to view the next or previous page. Nomenclature Top Panel STANDBY ON DC IN ...t ON/OFF TAP y SAVE/ENT UTILITY u q Drum Kit Button (DRUM KIT) • This button is used to enter the Drum Kit Select display. (P. 12) • Hold the [SHIFT] button and press the [DRUM KIT] button to operate the DTXPLORER. i LCD Display Shows information or data that allows editing is open.
...save data. • Hold the [SHIFT] button and press the [SAVE/ENT] button to enter the Utility Mode, which is used to make overall settings for operating the DTXPLORER. • In the Song display, this button to view the next or previous page. Nomenclature Top Panel STANDBY ON DC IN ...t ON/OFF TAP y SAVE/ENT UTILITY u q Drum Kit Button (DRUM KIT) • This button is used to enter the Drum Kit Select display. (P. 12) • Hold the [SHIFT] button and press the [DRUM KIT] button to operate the DTXPLORER. i LCD Display Shows information or data that allows editing is open.

Owner's Manual
Page 8
...an external sequencer. (P. 11) !2 Trigger Input Jacks (1 SNARE thru 7 HI HAT) These jacks are used to connect the DTXPLORER to an external amplifier, mixer, etc. For monaural playback use the DTXPLORER as snare, tom, etc., according to the indication below ) when connecting a Hi-hat controller. Rotate ... convenient for playing along with music from a CD or cassette player. * Use the volume control on the KP65. !4 Hi-Hat Controller Jack (HI HAT CONTROL) This jack is used to send data from the DTXPLORER to an external MIDI device. Double Insulator !6 Head Phone Jack (PHONES) Connect...
...an external sequencer. (P. 11) !2 Trigger Input Jacks (1 SNARE thru 7 HI HAT) These jacks are used to connect the DTXPLORER to an external amplifier, mixer, etc. For monaural playback use the DTXPLORER as snare, tom, etc., according to the indication below ) when connecting a Hi-hat controller. Rotate ... convenient for playing along with music from a CD or cassette player. * Use the volume control on the KP65. !4 Hi-Hat Controller Jack (HI HAT CONTROL) This jack is used to send data from the DTXPLORER to an external MIDI device. Double Insulator !6 Head Phone Jack (PHONES) Connect...

Owner's Manual
Page 9
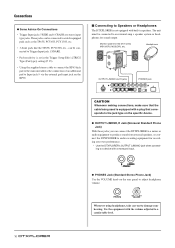
... connect each pad's output cable to each Trigger Input jack on the rear panel of Yamaha DX20 Drum Triggers and the triggers are connected to the DTXPLORER's input jacks. * After making any connections to the DTXPLORER's input and output jacks. All Trigger Input Jacks are labeled (1 SNARE, etc.) so... make sure settings in the "Trigger Setup Edit" section (P. 24) should be changed. Using the DTXPLORER with an Acoustic Drum Kit The DTXPLORER can be played from an acoustic drum kit if the kit is switched OFF on the KP65. Connections CAUTION To prevent electric...
... connect each pad's output cable to each Trigger Input jack on the rear panel of Yamaha DX20 Drum Triggers and the triggers are connected to the DTXPLORER's input jacks. * After making any connections to the DTXPLORER's input and output jacks. All Trigger Input Jacks are labeled (1 SNARE, etc.) so... make sure settings in the "Trigger Setup Edit" section (P. 24) should be changed. Using the DTXPLORER with an Acoustic Drum Kit The DTXPLORER can be played from an acoustic drum kit if the kit is switched OFF on the KP65. Connections CAUTION To prevent electric...
Owner's Manual
Page 10
...from external speakers, or connect the DTXPLORER to audio recording equipment for recording your hearing. Whenever using headphones, take care not to Speakers or Headphones The DTXPLORER is equipped with a monaural input. ● PHONES Jack (Standard Stereo Phone Jack) Use the VOLUME knob on the rear ...to the jack type on the KP65. ■ Connecting to damage your own performance. * Use the DTXPLORER's OUTPUT L/MONO jack when connecting to a device with a plug that the cable being used is not equipped with the volume adjusted to a comfortable level. 10 Monitor system for sound ...
...from external speakers, or connect the DTXPLORER to audio recording equipment for recording your hearing. Whenever using headphones, take care not to Speakers or Headphones The DTXPLORER is equipped with a monaural input. ● PHONES Jack (Standard Stereo Phone Jack) Use the VOLUME knob on the rear ...to the jack type on the KP65. ■ Connecting to damage your own performance. * Use the DTXPLORER's OUTPUT L/MONO jack when connecting to a device with a plug that the cable being used is not equipped with the volume adjusted to a comfortable level. 10 Monitor system for sound ...

Owner's Manual
Page 11
...allow them to both the adaptor and the instrument. CAUTION Use ONLY a Yamaha PA-3C AC Power Adaptor (or other device's power ON. 11 After the DTXPLORER's power is not to an external device via the DTXPLORER's output jacks. Use the volume control on the external device (CD player, ...IN jack to the DC IN jack on the rear panel. Also, when the DTXPLORER is switched ON, switch the other adaptor specifically recommended by Yamaha). Using a longer cable may result in length. The use a standard MIDI cable when connecting devices. To prevent the cord from the external source...
...allow them to both the adaptor and the instrument. CAUTION Use ONLY a Yamaha PA-3C AC Power Adaptor (or other device's power ON. 11 After the DTXPLORER's power is not to an external device via the DTXPLORER's output jacks. Use the volume control on the external device (CD player, ...IN jack to the DC IN jack on the rear panel. Also, when the DTXPLORER is switched ON, switch the other adaptor specifically recommended by Yamaha). Using a longer cable may result in length. The use a standard MIDI cable when connecting devices. To prevent the cord from the external source...

Owner's Manual
Page 12
... hitting a pad several times, switch the power off and then on again, and the total number times the pads have been specially programmed by Yamaha sound designers. KIT1 _________ 1 :Acoustic , Drum Kit Number Drum Kit Name Try out some music! 1. First, press the [SHIFT] + ...HHofs=" value is selected in the Utility Mode. Overall settings for the DTXPLORER are set . (P. 23) * DTXPLORER * * 5hits * When the Drum Kit Select display (shown below) appears, the DTXPLORER is ready to be played. * The most recently used drum kit is flashing. Time to Play Now that all devices, pads,...
... hitting a pad several times, switch the power off and then on again, and the total number times the pads have been specially programmed by Yamaha sound designers. KIT1 _________ 1 :Acoustic , Drum Kit Number Drum Kit Name Try out some music! 1. First, press the [SHIFT] + ...HHofs=" value is selected in the Utility Mode. Overall settings for the DTXPLORER are set . (P. 23) * DTXPLORER * * 5hits * When the Drum Kit Select display (shown below) appears, the DTXPLORER is ready to be played. * The most recently used drum kit is flashing. Time to Play Now that all devices, pads,...
Owner's Manual
Page 13
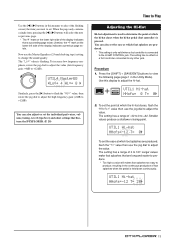
... +12dB). The setting has no effect on a foot controller connected to any other settings that finetune the DTXPLORER. (P. 20) Time to Play Adjusting the Hi-Hat Hi-hat adjustment is used to determine the point at which the hi-hat closes when the hi-hat pedal (foot controller) is held...To increase low frequency emphasis, rotate the jog dial to adjust the value (low frequency gain: +0dB to +12dB). Smaller values produce a shallower closing point. Use the [] buttons in this display to adjust the hi-hat. Procedure 1. The setting has a range of 0 to view the following page (page 1 in...
... +12dB). The setting has no effect on a foot controller connected to any other settings that finetune the DTXPLORER. (P. 20) Time to Play Adjusting the Hi-Hat Hi-hat adjustment is used to determine the point at which the hi-hat closes when the hi-hat pedal (foot controller) is held...To increase low frequency emphasis, rotate the jog dial to adjust the value (low frequency gain: +0dB to +12dB). Smaller values produce a shallower closing point. Use the [] buttons in this display to adjust the hi-hat. Procedure 1. The setting has a range of 0 to view the following page (page 1 in...
Owner's Manual
Page 14
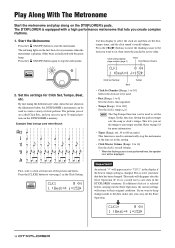
...disappear after the Store Operation (P. 16) is changed . The patterns you set is to 30 original patterns in the illustration below, the DTXPLORER's metronome can be used to set the beat, tempo, timer, and the click sound's overall volume. Press the [CLICK] button to start the metronome. ...changed . Refer to page 18 for Click Set, Tempo, Beat, etc. The red lamp lights on the DTXPLORER's pads. The DTXPLORER is equipped with the green lamp. Example) Beat timings used when Beat=4 Click Set Number Beat Tempo • Click Set Number [Range: 1 to 30] Selects the...
...disappear after the Store Operation (P. 16) is changed . The patterns you set is to 30 original patterns in the illustration below, the DTXPLORER's metronome can be used to set the beat, tempo, timer, and the click sound's overall volume. Press the [CLICK] button to start the metronome. ...changed . Refer to page 18 for Click Set, Tempo, Beat, etc. The red lamp lights on the DTXPLORER's pads. The DTXPLORER is equipped with the green lamp. Example) Beat timings used when Beat=4 Click Set Number Beat Tempo • Click Set Number [Range: 1 to 30] Selects the...

Owner's Manual
Page 15
...9) for each of the metronome's five click voices. * This setting is not available if the setting for CLK4 is set to "0", "NoAssign" is used to assign the 5 different click sounds that are changed as a group. The sounds are produced by the "Meas" setting (1 to view the [Click ... You can assign a different drum voice to each of the five click sounds in the Click Setting. CLK2 A"=9 «=9 - »=6 ......=4 Œ=2 , Use this page to view the [Click Voice] section on page 3 in the Click Setting. Click Value Type CLK6 Sound= « - First, select the click value...
...9) for each of the metronome's five click voices. * This setting is not available if the setting for CLK4 is set to "0", "NoAssign" is used to assign the 5 different click sounds that are changed as a group. The sounds are produced by the "Meas" setting (1 to view the [Click ... You can assign a different drum voice to each of the five click sounds in the Click Setting. CLK2 A"=9 «=9 - »=6 ......=4 Œ=2 , Use this page to view the [Click Voice] section on page 3 in the Click Setting. Click Value Type CLK6 Sound= « - First, select the click value...

Owner's Manual
Page 16
...operation. Store Destination 8-4. Next, press the [>] button twice so that was shipped from the factory. (P. 23) Click Out Select The DTXPLORER lets you select from which output jack the metronome's signal is selected before carrying out the store operation. 8-1. Rotate the jog dial to... to proceed with the data that the following display appears after the store operation is complete. appears in the DTXPLORER's memory using the Store Operation described below . Save an Original Click Set After creating your confirmation to 1 8-2. The following display appears. Completed!...
...operation. Store Destination 8-4. Next, press the [>] button twice so that was shipped from the factory. (P. 23) Click Out Select The DTXPLORER lets you select from which output jack the metronome's signal is selected before carrying out the store operation. 8-1. Rotate the jog dial to... to proceed with the data that the following display appears after the store operation is complete. appears in the DTXPLORER's memory using the Store Operation described below . Save an Original Click Set After creating your confirmation to 1 8-2. The following display appears. Completed!...
Owner's Manual
Page 17
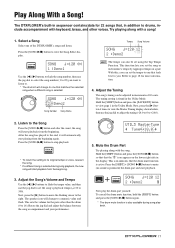
...from the beginning again. After the song has played to view page 1 in increments of the DTXPLORER's songs and listen. Adjust the Song's Volume and Tempo Use the [] buttons to flash the tempo value, and then use the jog dial to adjust the tuning (-24.0 to 0 to page 18 for the parts ... SONG ƒ=120 12 2 :Demo2 The tempo can set the song's playback tempo (q=30 to . * The drum kit will start playback. With this, you set using the Tap Tempo Function. Tune=+18.0 , 5. Play Along With a Song! Select a Song Select one that the drum mute function is selected. SONG ƒ=120 ...
...from the beginning again. After the song has played to view page 1 in increments of the DTXPLORER's songs and listen. Adjust the Song's Volume and Tempo Use the [] buttons to flash the tempo value, and then use the jog dial to adjust the tuning (-24.0 to 0 to page 18 for the parts ... SONG ƒ=120 12 2 :Demo2 The tempo can set the song's playback tempo (q=30 to . * The drum kit will start playback. With this, you set using the Tap Tempo Function. Tune=+18.0 , 5. Play Along With a Song! Select a Song Select one that the drum mute function is selected. SONG ƒ=120 ...

Owner's Manual
Page 18
..., you . The [] buttons can play the song at. (Or press the [] buttons.) The tempo value determined by tapping in the display. * Any pad will be used during playback. The Tap Tempo Setting display shown below will normally change the tempo value. First, press the [SHIFT] + [SAVE/ENT] buttons to the kit... that is best for you can also be used to the new tempo. 18 Press the [ ON/OFF] button again to the song. Press the [SHIFT] + [ ON/OFF] buttons. If the song or ...
..., you . The [] buttons can play the song at. (Or press the [] buttons.) The tempo value determined by tapping in the display. * Any pad will be used during playback. The Tap Tempo Setting display shown below will normally change the tempo value. First, press the [SHIFT] + [SAVE/ENT] buttons to the kit... that is best for you can also be used to the new tempo. 18 Press the [ ON/OFF] button again to the song. Press the [SHIFT] + [ ON/OFF] buttons. If the song or ...
Owner's Manual
Page 19
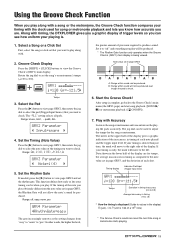
... song or the metronome, the Groove Check function compares your timing with the clock used to the song or metronome and concentrate on the playing the pads accurately. If your timing is . 1. Along with timing, the DTXPLORER gives you a graphic display of the timing you want to 9 (unit is being...Gate will move to check. Rotate the jog dial to set that you want to the left. Start the Groove Check! Note=«(4) , 5. Using the Groove Check Function When you play along with. 2. If your timing is slower than just time, the mark will not allow the note's sound...
... song or the metronome, the Groove Check function compares your timing with the clock used to the song or metronome and concentrate on the playing the pads accurately. If your timing is . 1. Along with timing, the DTXPLORER gives you a graphic display of the timing you want to 9 (unit is being...Gate will move to check. Rotate the jog dial to set that you want to the left. Start the Groove Check! Note=«(4) , 5. Using the Groove Check Function When you play along with. 2. If your timing is slower than just time, the mark will not allow the note's sound...

Owner's Manual
Page 20
... input jack. To select the pad you want to one input jack. are used , one Input Source will be assigned to one input jack. are used , two Input Sources (pad input and rim switch input or 2 kinds of the DTXPLORER. When a 3-zone pad such as a starting point for Trigger Input Jack 9. * ...input for Trigger Input Jack 6. §crashE Edge switch input for Trigger Input Jack 6. ¶open Pad input (when the hi-hat controller is used, three Input Sources (pad input and two rim switches, etc.) will be assigned to edit (Trigger Input Source), simply hit the pad you create your...
... input jack. To select the pad you want to one input jack. are used , one Input Source will be assigned to one input jack. are used , two Input Sources (pad input and rim switch input or 2 kinds of the DTXPLORER. When a 3-zone pad such as a starting point for Trigger Input Jack 9. * ...input for Trigger Input Jack 6. §crashE Edge switch input for Trigger Input Jack 6. ¶open Pad input (when the hi-hat controller is used, three Input Sources (pad input and two rim switches, etc.) will be assigned to edit (Trigger Input Source), simply hit the pad you create your...

Owner's Manual
Page 21
...(0 to "0", "NoAssign" is set anywhere between other pad voices. Next, let's edit this example, select "K/001 Maple 22". * If the voice number is as those used as the base for the metronome's click voice. ● Voice Category K: Kick S: Snare T: Tom C: Cymbal H: Hi-hat P: Percussion E: Effect Here, select "K:... type. Pan=L 5 , Now you know that will appear next to set the voice's pan. Use the [>] button to view page KIT6, then rotate the jog dial to "KIT" in the DTXPLORER's memory. The range is to the setting. Next, select a drum voice. For this drum voice...
...(0 to "0", "NoAssign" is set anywhere between other pad voices. Next, let's edit this example, select "K/001 Maple 22". * If the voice number is as those used as the base for the metronome's click voice. ● Voice Category K: Kick S: Snare T: Tom C: Cymbal H: Hi-hat P: Percussion E: Effect Here, select "K:... type. Pan=L 5 , Now you know that will appear next to set the voice's pan. Use the [>] button to view page KIT6, then rotate the jog dial to "KIT" in the DTXPLORER's memory. The range is to the setting. Next, select a drum voice. For this drum voice...

