
Owner's Manual
Page 2
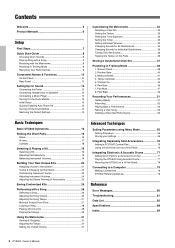
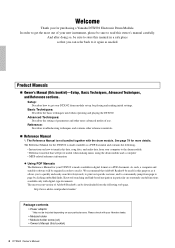
... Ready 51 Recording 52 Playing Back a Performance 52 Naming a User Song 53 Deleting a Recorded Performance 54 Basic Techniques Basic DTX502 Operations 15 Striking the Drum Pads 16 Snare 16 Hi-hats 17 Cymbals 18 Selecting & Playing a Kit 19 Selecting a ...20 Assigning Voices to a Computer 79 Making Connections 79 DTX502 Reference Manual 79 Reference Error Messages 80 Troubleshooting 81 Data List 83 Specifications 88 Index 89 2 DTX502 Owner's Manual Measure Break 41 4. Groove Check 38 2. Contents Welcome 6 Product Manuals 6 Setup First Steps 7 Quick Start Guide 8 ...
... Ready 51 Recording 52 Playing Back a Performance 52 Naming a User Song 53 Deleting a Recorded Performance 54 Basic Techniques Basic DTX502 Operations 15 Striking the Drum Pads 16 Snare 16 Hi-hats 17 Cymbals 18 Selecting & Playing a Kit 19 Selecting a ...20 Assigning Voices to a Computer 79 Making Connections 79 DTX502 Reference Manual 79 Reference Error Messages 80 Troubleshooting 81 Data List 83 Specifications 88 Index 89 2 DTX502 Owner's Manual Measure Break 41 4. Groove Check 38 2. Contents Welcome 6 Product Manuals 6 Setup First Steps 7 Quick Start Guide 8 ...
Owner's Manual
Page 3
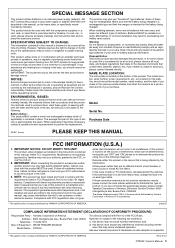
...to how a function or effect works (when the unit is located on the name plate, or specifically recommended by YAMAHA CORPORATION OF AMERICA. (FCC DoC) DTX502 Owner's Manual 3 DO NOT operate for long periods of time at a high volume level or at the time of knowledge ... or; SPECIAL MESSAGE SECTION This product utilizes batteries or an external power supply (adapter). Make sure that the battery being affected by Yamaha Corporation of your area for some reason its subsidiaries. * This applies only to use the product. 2. Compliance with any interference received...
...to how a function or effect works (when the unit is located on the name plate, or specifically recommended by YAMAHA CORPORATION OF AMERICA. (FCC DoC) DTX502 Owner's Manual 3 DO NOT operate for long periods of time at a high volume level or at the time of knowledge ... or; SPECIAL MESSAGE SECTION This product utilizes batteries or an external power supply (adapter). Make sure that the battery being affected by Yamaha Corporation of your area for some reason its subsidiaries. * This applies only to use the product. 2. Compliance with any interference received...
Owner's Manual
Page 4
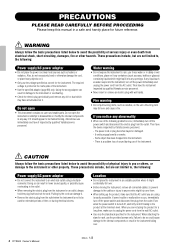
... or dust which may have it any containers (such as vases, bottles or glasses) containing liquids which might accidentally fall over . 4 DTX502 Owner's Manual DMI-5 1/2 Some object has been dropped into the instrument, turn off the power switch and disconnect the plug from the AC outlet.... correct for the instrument. Fire warning • Do not put burning items, such as water seeps into the instrument. - Pulling by qualified Yamaha service personnel. Also, do so could cause damage to avoid the possibility of the instrument. • Use the specified adaptor (page 88) ...
... or dust which may have it any containers (such as vases, bottles or glasses) containing liquids which might accidentally fall over . 4 DTX502 Owner's Manual DMI-5 1/2 Some object has been dropped into the instrument, turn off the power switch and disconnect the plug from the AC outlet.... correct for the instrument. Fire warning • Do not put burning items, such as water seeps into the instrument. - Pulling by qualified Yamaha service personnel. Also, do so could cause damage to avoid the possibility of the instrument. • Use the specified adaptor (page 88) ...
Owner's Manual
Page 5
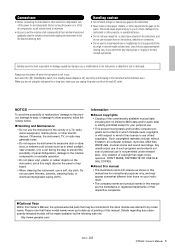
... and Maintenance • Do not use the instrument in use of such programs and contents outside of this manual. Please note that is not permitted under relevant laws. Always turn off ), electricity is not in the ...wiping cloths. Otherwise, the instrument, TV, or radio may appear somewhat different from the wall AC outlet. Yamaha cannot be made available via the following web site. Connections • Before connecting the instrument to other objects..., WAVE data, musical scores and sound recordings. http://www.yamaha.com/ DMI-5 2/2 DTX502 Owner's Manual 5
... and Maintenance • Do not use the instrument in use of such programs and contents outside of this manual. Please note that is not permitted under relevant laws. Always turn off ), electricity is not in the ...wiping cloths. Otherwise, the instrument, TV, or radio may appear somewhat different from the wall AC outlet. Yamaha cannot be made available via the following web site. Connections • Before connecting the instrument to other objects..., WAVE data, musical scores and sound recordings. http://www.yamaha.com/ DMI-5 2/2 DTX502 Owner's Manual 5
Owner's Manual
Page 6
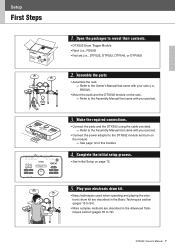
.... • Module holder • Module-holder screw (x2) • Owner's Manual (this booklet)-Setup, Basic Techniques, Advanced Techniques, and Reference sections. Reference: Describes troubleshooting techniques and contains other more details. See page 79 for purchasing a Yamaha DTX502 Electronic Drum Module. In order to read this purpose as it . As such, a computer and suitable...
.... • Module holder • Module-holder screw (x2) • Owner's Manual (this booklet)-Setup, Basic Techniques, Advanced Techniques, and Reference sections. Reference: Describes troubleshooting techniques and contains other more details. See page 79 for purchasing a Yamaha DTX502 Electronic Drum Module. In order to read this purpose as it . As such, a computer and suitable...
Owner's Manual
Page 7
...• Connect the pads and the DTX502 using the cable provided. Refer to the DTX502 module and turn on the module. See page 12 of this booklet. 4. Assemble the parts • Assemble the rack. Refer to the Owner's Manual that came with your rack (i.e., RS502...). • Mount the pads and the DTX502 module on page 13. 5. DTX502 Owner's Manual 7 Setup First Steps Setup 120 Select your electronic drum kit. • Basic techniques used...
...• Connect the pads and the DTX502 using the cable provided. Refer to the DTX502 module and turn on the module. See page 12 of this booklet. 4. Assemble the parts • Assemble the rack. Refer to the Owner's Manual that came with your rack (i.e., RS502...). • Mount the pads and the DTX502 module on page 13. 5. DTX502 Owner's Manual 7 Setup First Steps Setup 120 Select your electronic drum kit. • Basic techniques used...
Owner's Manual
Page 8
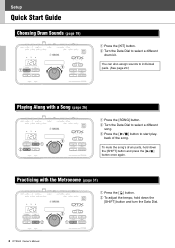
..., hold down the [SHIFT] button and press the [ ] button once again. w To adjust the tempo, hold down the [SHIFT] button and turn the Data Dial. 8 DTX502 Owner's Manual You can also assign sounds to select a different drum kit. Setup Quick Start Guide Choosing Drum Sounds (page 19) 120 w q q Press the [KIT] button.
..., hold down the [SHIFT] button and press the [ ] button once again. w To adjust the tempo, hold down the [SHIFT] button and turn the Data Dial. 8 DTX502 Owner's Manual You can also assign sounds to select a different drum kit. Setup Quick Start Guide Choosing Drum Sounds (page 19) 120 w q q Press the [KIT] button.
Owner's Manual
Page 9
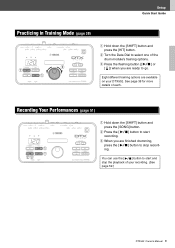
... down the [SHIFT] button and press the [KIT] button. Eight different training options are finished drumming, press the [ ] button to stop the playback of your DTX502. w Press the [ ] button to select one of each. w Turn the Data Dial to start and stop record- ing. Setup Quick Start Guide Practicing in Training... [ ] button to go. e When you are ready to start recording. e Press the flashing button ([ ] or [ ]) when you are available on your recording. (See page 52.) DTX502 Owner's Manual 9
... down the [SHIFT] button and press the [KIT] button. Eight different training options are finished drumming, press the [ ] button to stop the playback of your DTX502. w Press the [ ] button to select one of each. w Turn the Data Dial to start and stop record- ing. Setup Quick Start Guide Practicing in Training... [ ] button to go. e When you are ready to start recording. e Press the flashing button ([ ] or [ ]) when you are available on your recording. (See page 52.) DTX502 Owner's Manual 9
Owner's Manual
Page 10
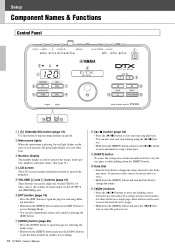
... on -screen items. If a setting area has more parame- t VOLUME [+] and [-] buttons (page 15) These buttons are used to adjust the overall DTX502 volume-that is used to move the flashing cursor between the area's pages. • Hold down the [SHIFT] button. !0 Data Dial • Turn...start and stop training using the [ ] but- y [KIT] button (page 19) • Press the [KIT] button to open the page for recording. 10 DTX502 Owner's Manual i[ ] button (page 26) • Press the [ ] button to start and stop song playback. • You can be set. Setup Component Names & ...
... on -screen items. If a setting area has more parame- t VOLUME [+] and [-] buttons (page 15) These buttons are used to adjust the overall DTX502 volume-that is used to move the flashing cursor between the area's pages. • Hold down the [SHIFT] button. !0 Data Dial • Turn...start and stop training using the [ ] but- y [KIT] button (page 19) • Press the [KIT] button to open the page for recording. 10 DTX502 Owner's Manual i[ ] button (page 26) • Press the [ ] button to start and stop song playback. • You can be set. Setup Component Names & ...
Owner's Manual
Page 11
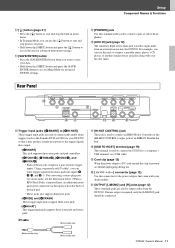
...@1 OUTPUT [L/MONO] and [R] jacks (page 12) These standard jacks are used to connect pads and/or drum triggers (such as the Yamaha DT10 or DT20) to your DTX502 so that it may produce sounds in response to connect a portable music player, a CD player, or another similar device and play along with...jack (page 12) The Auxiliary Input stereo mini-jack is required, only the [L/MONO] jack should be connected. Stereo audio plug Mono audio jack DTX502 Owner's Manual 11 Rear Panel !6 !8 !7 !9 @0 @1 !6 Trigger input jacks ([qSNARE] to [oHI-HAT]) These trigger input jacks are used to connect the...
...@1 OUTPUT [L/MONO] and [R] jacks (page 12) These standard jacks are used to connect pads and/or drum triggers (such as the Yamaha DT10 or DT20) to your DTX502 so that it may produce sounds in response to connect a portable music player, a CD player, or another similar device and play along with...jack (page 12) The Auxiliary Input stereo mini-jack is required, only the [L/MONO] jack should be connected. Stereo audio plug Mono audio jack DTX502 Owner's Manual 11 Rear Panel !6 !8 !7 !9 @0 @1 !6 Trigger input jacks ([qSNARE] to [oHI-HAT]) These trigger input jacks are used to connect the...

Owner's Manual
Page 12
... to your favorite tunes. The use have plugs that the power cord is visible on the rear panel. 3. Connecting Headphones or Speakers Your DTX502 does not feature built-in irreparable damage to the OUTPUT [L/MONO] and [R] jacks (for standard stereo audio). Connecting speakers Connect... to play along with that your speakers to both the adaptor and the instrument. Standard 1/4" mono-audio jack Powered speakers 12 DTX502 Owner's Manual WARNING Use only the specified adaptor. CAUTION Even when the power of this instrument is in the Standby status, electricity is still...
... to your favorite tunes. The use have plugs that the power cord is visible on the rear panel. 3. Connecting Headphones or Speakers Your DTX502 does not feature built-in irreparable damage to the OUTPUT [L/MONO] and [R] jacks (for standard stereo audio). Connecting speakers Connect... to play along with that your speakers to both the adaptor and the instrument. Standard 1/4" mono-audio jack Powered speakers 12 DTX502 Owner's Manual WARNING Use only the specified adaptor. CAUTION Even when the power of this instrument is in the Standby status, electricity is still...

Owner's Manual
Page 13
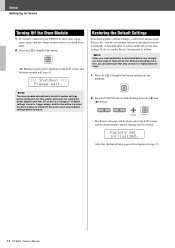
...details, see the description of the Trigger Setup page from Menu Mode (page 75). Press the [ ] (Standby/On) button. 2. Identify your DTX502 for the Auto Power-Off function do not represent exact times and there may be displayed. Alternatively, you expect your kit DtX562K Settings off (i.e., ...module to other audio devices such as powered speakers, ensure that the volume on the other equipment fully down the [ ] button. DTX502 Owner's Manual 13 NOTE • Settings for the first time, the Initial Setup page will not turn the volume on those devices is set time...
...details, see the description of the Trigger Setup page from Menu Mode (page 75). Press the [ ] (Standby/On) button. 2. Identify your DTX502 for the Auto Power-Off function do not represent exact times and there may be displayed. Alternatively, you expect your kit DtX562K Settings off (i.e., ...module to other audio devices such as powered speakers, ensure that the volume on the other equipment fully down the [ ] button. DTX502 Owner's Manual 13 NOTE • Settings for the first time, the Initial Setup page will not turn the volume on those devices is set time...
Owner's Manual
Page 14
ment, ensure that the volume on the LCD screen, and the drum module will be displayed on those devices is turned down fully. 2. Press the [ ] (Standby/On) button. Setup Setting Up for Sound Turning Off the Drum Module 1. The Shutdown page will turn off. >>> Shutdown If you have connected your DTX502 to other audio equip-
ment, ensure that the volume on the LCD screen, and the drum module will be displayed on those devices is turned down fully. 2. Press the [ ] (Standby/On) button. Setup Setting Up for Sound Turning Off the Drum Module 1. The Shutdown page will turn off. >>> Shutdown If you have connected your DTX502 to other audio equip-

Owner's Manual
Page 15
...page. NOTE To adjust the tempo, hold down the [SHIFT] button and turn the Data Dial to change its value. Decrease values Increase values DTX502 Owner's Manual 15 NOTE • To adjust the song volume, hold down the [SONG] button and press the VOLUME [+] or [-] button accordingly (page ...cursor to the parameter you can move left of the screen indicates that you want to increase values and vice-versa. Basic Techniques Basic DTX502 Operations Basic Techniques 120 >Pad1 " Splash= 30 , For adjusting the volume For changing values For selecting the parameter to set Use ...
...page. NOTE To adjust the tempo, hold down the [SHIFT] button and turn the Data Dial to change its value. Decrease values Increase values DTX502 Owner's Manual 15 NOTE • To adjust the song volume, hold down the [SONG] button and press the VOLUME [+] or [-] button accordingly (page ...cursor to the parameter you can move left of the screen indicates that you want to increase values and vice-versa. Basic Techniques Basic DTX502 Operations Basic Techniques 120 >Pad1 " Splash= 30 , For adjusting the volume For changing values For selecting the parameter to set Use ...
Owner's Manual
Page 16
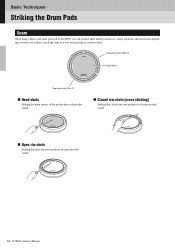
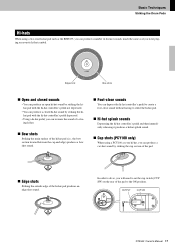
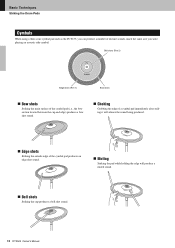
... sounds (i.e., head, open rim, and closed rim-shot sound. Open rim shots Striking the open-rim zone produces an open rim-shot sound. 16 DTX502 Owner's Manual Basic Techniques Striking the Drum Pads Snare When using a three-zone snare pad such as if you were playing an acoustic snare.
... sounds (i.e., head, open rim, and closed rim-shot sound. Open rim shots Striking the open-rim zone produces an open rim-shot sound. 16 DTX502 Owner's Manual Basic Techniques Striking the Drum Pads Snare When using a three-zone snare pad such as if you were playing an acoustic snare.
Owner's Manual
Page 17
... not depressed. • You can depress the hi-hat controller's pedal to create a foot-close sound without having to the ON position. OUTPUT CUP SW DTX502 Owner's Manual 17
... not depressed. • You can depress the hi-hat controller's pedal to create a foot-close sound without having to the ON position. OUTPUT CUP SW DTX502 Owner's Manual 17
Owner's Manual
Page 18
.... Muting Striking the pad while holding the edge will produce a muted sound. Bell shots Striking the cup produces a bell shot sound. 18 DTX502 Owner's Manual Bell shots (Rim 2) Edge shots (Rim 1) Bow shots Bow shots Striking the main surface of the cymbal pad (i.e., the bow section located between the...
.... Muting Striking the pad while holding the edge will produce a muted sound. Bell shots Striking the cup produces a bell shot sound. 18 DTX502 Owner's Manual Bell shots (Rim 2) Edge shots (Rim 1) Bow shots Bow shots Striking the main surface of the cymbal pad (i.e., the bow section located between the...
Owner's Manual
Page 19
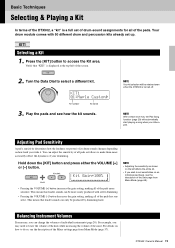
...for all pads as shown on the left of the screen. 2. KIT1 Selecting a Kit 1. Press the [KIT] button to select a different kit. DTX502 Owner's Manual 19 Hold down the [KIT] button and press either the VOLUME [+] or [-] button. This means that louder sounds can only be retained even when the... DTX502 is displayed at the top-left affects the entire kit. • If you wish to set up. Play the pads and see...
...for all pads as shown on the left of the screen. 2. KIT1 Selecting a Kit 1. Press the [KIT] button to select a different kit. DTX502 Owner's Manual 19 Hold down the [KIT] button and press either the VOLUME [+] or [-] button. This means that louder sounds can only be retained even when the... DTX502 is displayed at the top-left affects the entire kit. • If you wish to set up. Play the pads and see...
Owner's Manual
Page 20
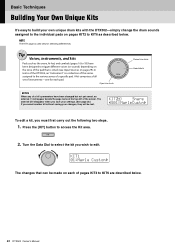
... without saving your changes, they will disappear when you save your own unique drum kits with the DTX502-simply change the drum sounds assigned to the individual pads on page 29). In terms of the DTX502, an "instrument" is used only for each of the pad that can be lost. Press the... page is a collection of the voices assigned to the various zones of the screen. Tip Voices, instruments, and kits Pads such as described below . 20 DTX502 Owner's Manual Turn the Data Dial to select the kit you wish to access the Kit area. 2.
... without saving your changes, they will disappear when you save your own unique drum kits with the DTX502-simply change the drum sounds assigned to the individual pads on page 29). In terms of the DTX502, an "instrument" is used only for each of the pad that can be lost. Press the... page is a collection of the voices assigned to the various zones of the screen. Tip Voices, instruments, and kits Pads such as described below . 20 DTX502 Owner's Manual Turn the Data Dial to select the kit you wish to access the Kit area. 2.
Owner's Manual
Page 21
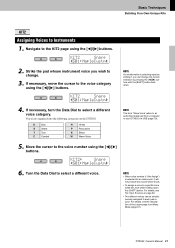
... down . 4. For details, see the description of the Layers page from a computer to the KIT2 page using the [] buttons. Navigate to your DTX502 via USB (page 79). 5. Voices are organized into the following categories on page 29. • Two different voices can change . 3. If necessary...NOTE • When voice number 0 ("No Assign") is selected for an instrument, it , you wish to the voice number using the [] buttons. DTX502 Owner's Manual 21 Turn the Data Dial to the voice category using the [] buttons. For details, see Tip: Input Sources on the...
... down . 4. For details, see the description of the Layers page from a computer to the KIT2 page using the [] buttons. Navigate to your DTX502 via USB (page 79). 5. Voices are organized into the following categories on page 29. • Two different voices can change . 3. If necessary...NOTE • When voice number 0 ("No Assign") is selected for an instrument, it , you wish to the voice number using the [] buttons. DTX502 Owner's Manual 21 Turn the Data Dial to the voice category using the [] buttons. For details, see Tip: Input Sources on the...

