
Owner's Manual
Page 2
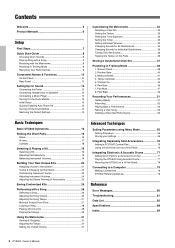
... Signature 33 Setting the Timer 33 Setting Individual Volumes 34 Changing Sounds for All Subdivisions 34 Changing Sounds for Individual Subdivisions 35 Tuning Click-Set Sounds 36 Tapping the Tempo on a Hi-Hat Stand 78 Connecting to a Computer 79 Making Connections 79 DTX502 Reference Manual 79 Reference Error Messages 80 Troubleshooting 81 Data List...
... Signature 33 Setting the Timer 33 Setting Individual Volumes 34 Changing Sounds for All Subdivisions 34 Changing Sounds for Individual Subdivisions 35 Tuning Click-Set Sounds 36 Tapping the Tempo on a Hi-Hat Stand 78 Connecting to a Computer 79 Making Connections 79 DTX502 Reference Manual 79 Reference Error Messages 80 Troubleshooting 81 Data List...
Owner's Manual
Page 3
... therefore the owners responsibility. If the antenna lead-in the ears, you , please contact Yamaha directly. DO NOT connect this type of the product. IMPORTANT: The louder the sound, the shorter the time period before requesting service. The average life span of knowledge relating to... any hearing loss or ringing in is located on the name plate, or specifically recommended by YAMAHA CORPORATION OF AMERICA. (FCC DoC) DTX502 Owner's Manual 3 Batteries...
... therefore the owners responsibility. If the antenna lead-in the ears, you , please contact Yamaha directly. DO NOT connect this type of the product. IMPORTANT: The louder the sound, the shorter the time period before requesting service. The average life span of knowledge relating to... any hearing loss or ringing in is located on the name plate, or specifically recommended by YAMAHA CORPORATION OF AMERICA. (FCC DoC) DTX502 Owner's Manual 3 Batteries...
Owner's Manual
Page 4
...all connected cables, to prevent damage to the cables or injury to avoid the possibility of sound during electrical storms. Location • Do not place the instrument in the outlet. •.... WARNING Always follow the basic precautions listed below to anyone who might accidentally fall over . 4 DTX502 Owner's Manual DMI-5 1/2 A burning item may have it . If some trouble or malfunction occurs...and disconnect the electric plug from the outlet. Then have the device inspected by qualified Yamaha service personnel. • Never insert or remove an electric plug with wet hands....
...all connected cables, to prevent damage to the cables or injury to avoid the possibility of sound during electrical storms. Location • Do not place the instrument in the outlet. •.... WARNING Always follow the basic precautions listed below to anyone who might accidentally fall over . 4 DTX502 Owner's Manual DMI-5 1/2 A burning item may have it . If some trouble or malfunction occurs...and disconnect the electric plug from the outlet. Then have the device inspected by qualified Yamaha service personnel. • Never insert or remove an electric plug with wet hands....
Owner's Manual
Page 5
...from the wall AC outlet. Details regarding any subsequently released models will be connected to set the desired listening level. http://www.yamaha.com/ DMI-5 2/2 DTX502 Owner's Manual 5 NOTICE To avoid the possibility of this might discolor the panel or keyboard. • When cleaning the instrument...of time at the minimum level. Any violation of all computer software, style files, MIDI files, WAVE data, musical scores and sound recordings. Otherwise, the instrument, TV, or radio may be made available via the following web site. This could cause physical injury...
...from the wall AC outlet. Details regarding any subsequently released models will be connected to set the desired listening level. http://www.yamaha.com/ DMI-5 2/2 DTX502 Owner's Manual 5 NOTICE To avoid the possibility of this might discolor the panel or keyboard. • When cleaning the instrument...of time at the minimum level. Any violation of all computer software, style files, MIDI files, WAVE data, musical scores and sound recordings. Otherwise, the instrument, TV, or radio may be made available via the following web site. This could cause physical injury...
Owner's Manual
Page 8
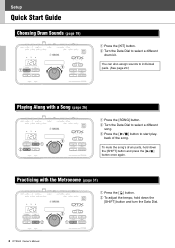
... w q e q Press the [SONG] button. Setup Quick Start Guide Choosing Drum Sounds (page 19) 120 w q q Press the [KIT] button. You can also assign sounds to select a different song. w To adjust the tempo, hold down the [SHIFT] button and turn the Data Dial. 8 DTX502 Owner's Manual w Turn the Data Dial to start play- back of...
... w q e q Press the [SONG] button. Setup Quick Start Guide Choosing Drum Sounds (page 19) 120 w q q Press the [KIT] button. You can also assign sounds to select a different song. w To adjust the tempo, hold down the [SHIFT] button and turn the Data Dial. 8 DTX502 Owner's Manual w Turn the Data Dial to start play- back of...
Owner's Manual
Page 10
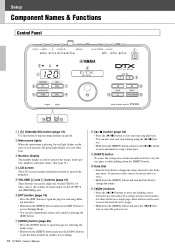
... down the [SHIFT] button and turn the drum module on standby for recording. 10 DTX502 Owner's Manual i[ ] button (page 26) • Press the [ ] button to start and stop song playback. • You can also start of sound output via the OUTPUT and [PHONES] jacks. u [SONG] button (page 26) ...• Press the [SONG] button to open the page for selecting different songs. • Hold down the [SHIFT] button and press the [ ] button to adjust the overall DTX502 volume-that is playing,...
... down the [SHIFT] button and turn the drum module on standby for recording. 10 DTX502 Owner's Manual i[ ] button (page 26) • Press the [ ] button to start and stop song playback. • You can also start of sound output via the OUTPUT and [PHONES] jacks. u [SONG] button (page 26) ...• Press the [SONG] button to open the page for selecting different songs. • Hold down the [SHIFT] button and press the [ ] button to adjust the overall DTX502 volume-that is playing,...
Owner's Manual
Page 11
.... @0 [ ] connector (page 12) Use this connector for the power adaptor that it may produce sounds in metronome. • In Training Mode, you can use the [ ] button to start and stop...to [oHI-HAT]) These trigger input jacks are used to connect pads and/or drum triggers (such as the Yamaha DT10 or DT20) to your drum module. @1 OUTPUT [L/MONO] and [R] jacks (page 12) These standard jacks... audio from mono pads into inputs i, !0, !1, and !2. (*: For converting a stereo plug into the DTX502. see the illustration below.) When a KP65 Kick Pad is used to input audio from an external source ...
.... @0 [ ] connector (page 12) Use this connector for the power adaptor that it may produce sounds in metronome. • In Training Mode, you can use the [ ] button to start and stop...to [oHI-HAT]) These trigger input jacks are used to connect pads and/or drum triggers (such as the Yamaha DT10 or DT20) to your drum module. @1 OUTPUT [L/MONO] and [R] jacks (page 12) These standard jacks... audio from mono pads into inputs i, !0, !1, and !2. (*: For converting a stereo plug into the DTX502. see the illustration below.) When a KP65 Kick Pad is used to input audio from an external source ...

Owner's Manual
Page 12
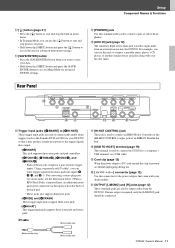
... of the drum module. Control panel Standard 1/4" stereo-audio jack 1/8" stereo-mini to the instrument at a high volume for Sound Connecting the Power 1. In order to hear it, therefore, you unplug the power adaptor from being accidentally pulled out. CAUTION Even when...headphones at the minimum level. NOTICE • Whenever connecting other adaptors may result in speakers. Standard 1/4" mono-audio jack Powered speakers 12 DTX502 Owner's Manual Insert the power adaptor's DC plug into a domestic wall socket. Hook the power adaptor's DC cord around the clip....
... of the drum module. Control panel Standard 1/4" stereo-audio jack 1/8" stereo-mini to the instrument at a high volume for Sound Connecting the Power 1. In order to hear it, therefore, you unplug the power adaptor from being accidentally pulled out. CAUTION Even when...headphones at the minimum level. NOTICE • Whenever connecting other adaptors may result in speakers. Standard 1/4" mono-audio jack Powered speakers 12 DTX502 Owner's Manual Insert the power adaptor's DC plug into a domestic wall socket. Hook the power adaptor's DC cord around the clip....

Owner's Manual
Page 13
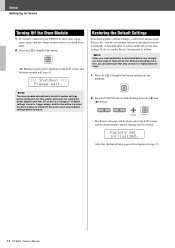
...your drum module to ensure that you turn on your pads. Auto Power-Off time The Auto Power-Off function automatically turns off the DTX502 after a certain period of operation, the Auto Power-Off function will not turn the volume on . Settings DTX522K, DTX532K, DTX542K, DTX562K, DTX500K,...by the Auto Power-Off function. Hold Auto power off automatically, and then press the [SAVE/ENTER] button. DTX502 Owner's Manual 13 Select your DTX502 to be inactive for Sound Turning On the Drum Module 1. If you expect your kit DtX562K Settings off the drum module when the set ...
...your drum module to ensure that you turn on your pads. Auto Power-Off time The Auto Power-Off function automatically turns off the DTX502 after a certain period of operation, the Auto Power-Off function will not turn the volume on . Settings DTX522K, DTX532K, DTX542K, DTX562K, DTX500K,...by the Auto Power-Off function. Hold Auto power off automatically, and then press the [SAVE/ENTER] button. DTX502 Owner's Manual 13 Select your DTX502 to be inactive for Sound Turning On the Drum Module 1. If you expect your kit DtX562K Settings off the drum module when the set ...
Owner's Manual
Page 14
Press the [ ] (Standby/On) button. ment, ensure that the volume on the LCD screen, and the drum module will be displayed on those devices is turned down fully. 2. The Shutdown page will turn off. >>> Shutdown Setup Setting Up for Sound Turning Off the Drum Module 1. If you have connected your DTX502 to other audio equip-
Press the [ ] (Standby/On) button. ment, ensure that the volume on the LCD screen, and the drum module will be displayed on those devices is turned down fully. 2. The Shutdown page will turn off. >>> Shutdown Setup Setting Up for Sound Turning Off the Drum Module 1. If you have connected your DTX502 to other audio equip-
Owner's Manual
Page 16
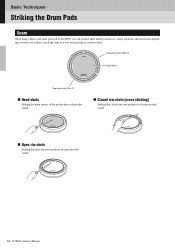
...rim shots (Rim 1) Head shots Striking the main surface of the pad produces a head shot sound. Closed rim shots (cross sticking) Striking the closed-rim zone produces a closed rim-shot sound. Open rim shots Striking the open-rim zone produces an open rim, and closed rim) ...depending on where you strike it, much the same as the XP80, you can produce three distinct sounds (i.e., head, open rim-shot sound. 16 DTX502 Owner's Manual Basic Techniques Striking the Drum Pads Snare When using a three-zone snare pad such as if you were playing an...
...rim shots (Rim 1) Head shots Striking the main surface of the pad produces a head shot sound. Closed rim shots (cross sticking) Striking the closed-rim zone produces a closed rim-shot sound. Open rim shots Striking the open-rim zone produces an open rim, and closed rim) ...depending on where you strike it, much the same as the XP80, you can produce three distinct sounds (i.e., head, open rim-shot sound. 16 DTX502 Owner's Manual Basic Techniques Striking the Drum Pads Snare When using a three-zone snare pad such as if you were playing an...
Owner's Manual
Page 17
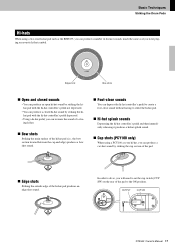
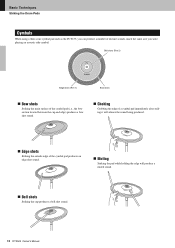
OUTPUT CUP SW DTX502 Owner's Manual 17 In order to the ON position. Basic Techniques Striking the Drum Pads Hi-hats When using a PCY100 as your hi-hat, you can produce a number of distinct sounds, much the same as the RHH135, you will need to set the cup switch (CUP SW) on the... rear of the pad to do so, you can produce a cut shot sound by striking the cup section of the pad. Edge shots Striking the outside edge of the hi-hat pad (i.e., the bow section located between...
OUTPUT CUP SW DTX502 Owner's Manual 17 In order to the ON position. Basic Techniques Striking the Drum Pads Hi-hats When using a PCY100 as your hi-hat, you can produce a number of distinct sounds, much the same as the RHH135, you will need to set the cup switch (CUP SW) on the... rear of the pad to do so, you can produce a cut shot sound by striking the cup section of the pad. Edge shots Striking the outside edge of the hi-hat pad (i.e., the bow section located between...
Owner's Manual
Page 18
... located between the cup and edge) produces a bow shot sound. Choking Grabbing the edge of a cymbal pad immediately after striking it will silence the sound being produced. Edge shots Striking the outside edge of distinct sounds, much the same as if you were playing an acoustic ... a three-zone cymbal pad such as the PCY135, you can produce a number of the cymbal pad produces an edge shot sound. Muting Striking the pad while holding the edge will produce a muted sound. Bell shots Striking the cup produces a bell shot sound. 18 DTX502 Owner's Manual
... located between the cup and edge) produces a bow shot sound. Choking Grabbing the edge of a cymbal pad immediately after striking it will silence the sound being produced. Edge shots Striking the outside edge of distinct sounds, much the same as if you were playing an acoustic ... a three-zone cymbal pad such as the PCY135, you can produce a number of the cymbal pad produces an edge shot sound. Muting Striking the pad while holding the edge will produce a muted sound. Bell shots Striking the cup produces a bell shot sound. 18 DTX502 Owner's Manual
Owner's Manual
Page 19
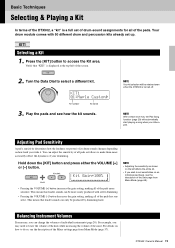
...description of the Gain page from Menu Mode (page 57). Basic Techniques Selecting & Playing a Kit In terms of the DTX502, a "kit" is a full set of drum-sound assignments for all of the pads more accurately reflect the dynamics of your drumming. Play the pads and see the description ...of individual instruments (page 20). Balancing Instrument Volumes If necessary, you strike a pad. This means that louder sounds can change the volumes of the Mixer settings page from Menu Mode (page 68). NOTE With certain drum kits, the Pad Song function (...
...description of the Gain page from Menu Mode (page 57). Basic Techniques Selecting & Playing a Kit In terms of the DTX502, a "kit" is a full set of drum-sound assignments for all of the pads more accurately reflect the dynamics of your drumming. Play the pads and see the description ...of individual instruments (page 20). Balancing Instrument Volumes If necessary, you strike a pad. This means that louder sounds can change the volumes of the Mixer settings page from Menu Mode (page 68). NOTE With certain drum kits, the Pad Song function (...
Owner's Manual
Page 20
... 16 to 18) have been changed but not yet saved, an asterisk (*) will disappear when you save your own unique drum kits with the DTX502-simply change the drum sounds assigned to the individual pads on each pad. Tip Voices, instruments, and kits Pads such as described below . 20...shots NOTICE When any of a kit's parameters have been designed to trigger different voices (or sounds) depending on page 29). A kit comprises a full set of the pad that can be lost. In terms of the DTX502, an "instrument" is struck (see Input Sources on the zone of instruments-one for ...
... 16 to 18) have been changed but not yet saved, an asterisk (*) will disappear when you save your own unique drum kits with the DTX502-simply change the drum sounds assigned to the individual pads on each pad. Tip Voices, instruments, and kits Pads such as described below . 20...shots NOTICE When any of a kit's parameters have been designed to trigger different voices (or sounds) depending on page 29). A kit comprises a full set of the pad that can be lost. In terms of the DTX502, an "instrument" is struck (see Input Sources on the zone of instruments-one for ...
Owner's Manual
Page 21
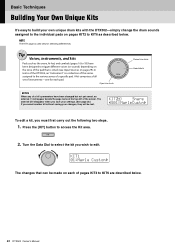
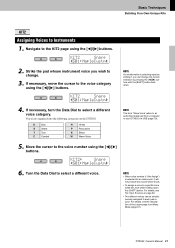
...As an alternative to selecting a pad by striking it will not produce any sound when struck. • To assign a voice to the voice category using the [] buttons. For details, see Tip: Input Sources on the DTX502. If necessary, move the cursor to a specific zone, strike the zone... while holding down . 4. DTX502 Owner's Manual 21 Basic Techniques Building Your Own Unique Kits KIT2 Assigning Voices to the KIT2 page...
...As an alternative to selecting a pad by striking it will not produce any sound when struck. • To assign a voice to the voice category using the [] buttons. For details, see Tip: Input Sources on the DTX502. If necessary, move the cursor to a specific zone, strike the zone... while holding down . 4. DTX502 Owner's Manual 21 Basic Techniques Building Your Own Unique Kits KIT2 Assigning Voices to the KIT2 page...
Owner's Manual
Page 23
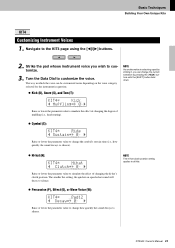
... be customized varies depending on the voice category selected for the instrument in which the voice can change the cymbal's sustain time (i.e., how quickly the sound decays to silence). Hi-hat (H): KIt4* Hihat " Clutch=+ 0 , Raise or lower the parameter value to customize. 3. KIt4* Kick " Muffling=+ 0 , Raise or lower the parameter... lower the parameter value to change the current selection by striking it, you wish to simulate the effect of changing the hi-hat's clutch position. DTX502 Owner's Manual 23
... be customized varies depending on the voice category selected for the instrument in which the voice can change the cymbal's sustain time (i.e., how quickly the sound decays to silence). Hi-hat (H): KIt4* Hihat " Clutch=+ 0 , Raise or lower the parameter value to customize. 3. KIt4* Kick " Muffling=+ 0 , Raise or lower the parameter... lower the parameter value to change the current selection by striking it, you wish to simulate the effect of changing the hi-hat's clutch position. DTX502 Owner's Manual 23
Owner's Manual
Page 29
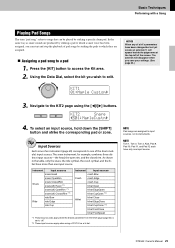
Press the [KIT] button to instruments. NOTICE When any of a kit's parameters have only one input source. DTX502 Owner's Manual 29 Basic Techniques Performing with a Song Playing Pad Songs The term "pad song" refers to songs that can start and stop the playback ... sources apply when the Snares parameter from the KitC6 page (page 62) is set to edit. Navigate to the KIT2 page using a PCY100 as snare sounds are produced by striking a pad to which a snare voice has been assigned, you can be played by striking the pads to which they are assigned...
Press the [KIT] button to instruments. NOTICE When any of a kit's parameters have only one input source. DTX502 Owner's Manual 29 Basic Techniques Performing with a Song Playing Pad Songs The term "pad song" refers to songs that can start and stop the playback ... sources apply when the Snares parameter from the KitC6 page (page 62) is set to edit. Navigate to the KIT2 page using a PCY100 as snare sounds are produced by striking a pad to which a snare voice has been assigned, you can be played by striking the pads to which they are assigned...

Owner's Manual
Page 34
... (silent) and "9" (loudest). The following shows the timing of the selected subdivision. Navigate to the CLK2 page using the [] buttons. CLK3* Sound " 1:Metronome , 34 DTX502 Owner's Manual The volume for each subdivision may adjust the volume for that subdivision. 4. Move the cursor to " A or " Π" ...so that you can change the sounds for All Subdivisions On the CLK3 page, you can set to access the Metronome area. 2....
... (silent) and "9" (loudest). The following shows the timing of the selected subdivision. Navigate to the CLK2 page using the [] buttons. CLK3* Sound " 1:Metronome , 34 DTX502 Owner's Manual The volume for each subdivision may adjust the volume for that subdivision. 4. Move the cursor to " A or " Π" ...so that you can change the sounds for All Subdivisions On the CLK3 page, you can set to access the Metronome area. 2....

Owner's Manual
Page 35
... set . Navigate to access the Metronome area. 2. Voices are available on the DTX502. NOTE When voice number 0 ("No Assign") is selected, the corresponding metronome subdivision will not produce any sound. Move the cursor to the subdivision symbol to select a different sound. Hold down the [SHIFT] button and press the [ ] button to the CLK4...
... set . Navigate to access the Metronome area. 2. Voices are available on the DTX502. NOTE When voice number 0 ("No Assign") is selected, the corresponding metronome subdivision will not produce any sound. Move the cursor to the subdivision symbol to select a different sound. Hold down the [SHIFT] button and press the [ ] button to the CLK4...


