
Owner's Manual
Page 4
... force on it, or place it in any liquid such as correct for the instrument. If it inspected by qualified Yamaha service personnel. • Never insert or remove an electric plug with wet hands. Before turning the power on , trip over,...• When setting up the product, make sure to set the volumes of sound during electrical storms. Location • Do not place the instrument in the ears, consult a physician. (7)-1 1/2 4 DTX500 Owner's Manual Then have the instrument inspected by qualified Yamaha service personnel. Pulling by Yamaha service personnel. ...
... force on it, or place it in any liquid such as correct for the instrument. If it inspected by qualified Yamaha service personnel. • Never insert or remove an electric plug with wet hands. Before turning the power on , trip over,...• When setting up the product, make sure to set the volumes of sound during electrical storms. Location • Do not place the instrument in the ears, consult a physician. (7)-1 1/2 4 DTX500 Owner's Manual Then have the instrument inspected by qualified Yamaha service personnel. Pulling by Yamaha service personnel. ...
Owner's Manual
Page 6
...that can be used in high-quality digital reverb for enhancing the sound. ■ High-performance Metronome • The DTX500 provides with a comprehensive, multi-function metronome, allowing various click settings for the song or click by trigger input from the pads. ■ Groove Check • The Groove Check ...signals depending on a pad to any tempo you a letter grade-and makes mastering the drums easier and more . The setup data such as Yamaha DT20. Also provided are an AUX IN jack, which lets you plug in the unit are the Drum Mute Function, which mutes a specifi...
...that can be used in high-quality digital reverb for enhancing the sound. ■ High-performance Metronome • The DTX500 provides with a comprehensive, multi-function metronome, allowing various click settings for the song or click by trigger input from the pads. ■ Groove Check • The Groove Check ...signals depending on a pad to any tempo you a letter grade-and makes mastering the drums easier and more . The setup data such as Yamaha DT20. Also provided are an AUX IN jack, which lets you plug in the unit are the Drum Mute Function, which mutes a specifi...
Owner's Manual
Page 7
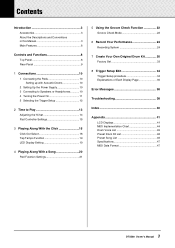
...Main Features 6 Controls and Functions 8 Top Panel 8 Rear Panel 9 1 Connections 10 1 Connecting the Pads 10 Setting up with Acoustic Drums 10 2 Setting Up the Power Supply 10 3 Connecting to Speakers or Headphones............10 4 Turning the Power On 11 5 Selecting ...Check Mode 22 6 Record Your Performance 24 Recording System 24 7 Create Your Own Original Drum Kit 26 Factory Set 33 8 Trigger Setup Edit 34 Trigger Setup procedure 34 Explanations of Each Display Page 35 Error Messages 38 ... Preset Song List 46 Specifications 47 MIDI Data Format 47 7 DTX500 Owner's Manual
...Main Features 6 Controls and Functions 8 Top Panel 8 Rear Panel 9 1 Connections 10 1 Connecting the Pads 10 Setting up with Acoustic Drums 10 2 Setting Up the Power Supply 10 3 Connecting to Speakers or Headphones............10 4 Turning the Power On 11 5 Selecting ...Check Mode 22 6 Record Your Performance 24 Recording System 24 7 Create Your Own Original Drum Kit 26 Factory Set 33 8 Trigger Setup Edit 34 Trigger Setup procedure 34 Explanations of Each Display Page 35 Error Messages 38 ... Preset Song List 46 Specifications 47 MIDI Data Format 47 7 DTX500 Owner's Manual

Owner's Manual
Page 8
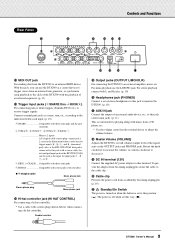
r Shift button (SHIFT) Holding this button to start/stop song playback or recording. Controls and Functions Top Panel i o 8.8.8. ~~~~~YAMAHA ~~~~ ~~~ DTX drums~~ !0 q w t e r !1 y u q Drum Kit button (DRUM KIT) • For entering the Drum Kit Select display. (p. 13) • Hold the [...] button to enter the Groove Check Setting display. (p. 22) e Song button (SONG >/■) • For entering the Song Select page. (p. 20) • Hold the [SHIFT] button and press the [SONG >/■] button to enable recording standby mode for the DTX500. • Press this button and ...
r Shift button (SHIFT) Holding this button to start/stop song playback or recording. Controls and Functions Top Panel i o 8.8.8. ~~~~~YAMAHA ~~~~ ~~~ DTX drums~~ !0 q w t e r !1 y u q Drum Kit button (DRUM KIT) • For entering the Drum Kit Select display. (p. 13) • Hold the [...] button to enter the Groove Check Setting display. (p. 22) e Song button (SONG >/■) • For entering the Song Select page. (p. 20) • Hold the [SHIFT] button and press the [SONG >/■] button to enable recording standby mode for the DTX500. • Press this button and ...
Owner's Manual
Page 9
... it. !9 DC IN terminal (12V) Connect the supplied AC power adaptor to an external MIDI device. Also, if the KP125W/125/65 kick pad is set to receive trigger signals. The power is convenient for input jacks 9, 0, !, or @. 5RIDE, 6CRASH ..... Connect external pads such as a snare, tom, etc.,... the click of an external sequencer. (p. 11) !3 Trigger Input jacks (1SNARE thru 8KICK/9) For connecting pads or drum triggers (Yamaha DT20, etc.) to this jack to monitor the DTX500. (p. 10) !7 AUX IN jack Connect the output of the signal sent via the OUTPUT jacks and PHONES jack). refer to ...
... it. !9 DC IN terminal (12V) Connect the supplied AC power adaptor to an external MIDI device. Also, if the KP125W/125/65 kick pad is set to receive trigger signals. The power is convenient for input jacks 9, 0, !, or @. 5RIDE, 6CRASH ..... Connect external pads such as a snare, tom, etc.,... the click of an external sequencer. (p. 11) !3 Trigger Input jacks (1SNARE thru 8KICK/9) For connecting pads or drum triggers (Yamaha DT20, etc.) to this jack to monitor the DTX500. (p. 10) !7 AUX IN jack Connect the output of the signal sent via the OUTPUT jacks and PHONES jack). refer to ...

Owner's Manual
Page 10
... the kit is fitted with an optional set of drum triggers (such as Yamaha DT20 Drum Triggers) and the triggers are properly connected to the input jacks of the DTX500. The required voltage is printed on the rear panel of the DTX500. IMPORTANT !! If the setting is set to the standby (?) position. 3 Connecting to Speakers...
... the kit is fitted with an optional set of drum triggers (such as Yamaha DT20 Drum Triggers) and the triggers are properly connected to the input jacks of the DTX500. The required voltage is printed on the rear panel of the DTX500. IMPORTANT !! If the setting is set to the standby (?) position. 3 Connecting to Speakers...
Owner's Manual
Page 11
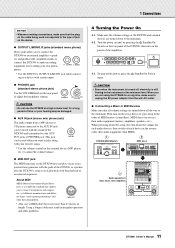
... by pressing the Standby/On Switch on the rear panel of the DTX500, then turn off each device in irregular operation and other data among them. * Also, use the DTX500 at the minimum level. Make sure the volume settings of the DTX500 and external devices are turned down the setup, first turn on... at a high volume level for a long period of time, or your hearing may result in the reverse order (first audio equipment, then MIDI). 1 DTX500 (MIDI Master) 2 MIDI slave 8.8.8. ~~~~~YAMAHA ~~~~ ~~~ DTX drums~~ 3 Audio equipment (first mixer, then amplifier) 11...
... by pressing the Standby/On Switch on the rear panel of the DTX500, then turn off each device in irregular operation and other data among them. * Also, use the DTX500 at the minimum level. Make sure the volume settings of the DTX500 and external devices are turned down the setup, first turn on... at a high volume level for a long period of time, or your hearing may result in the reverse order (first audio equipment, then MIDI). 1 DTX500 (MIDI Master) 2 MIDI slave 8.8.8. ~~~~~YAMAHA ~~~~ ~~~ DTX drums~~ 3 Audio equipment (first mixer, then amplifier) 11...

Owner's Manual
Page 12
...the operation "Trigger Setup Edit" on page 34 describes how to the DTX500's input jack 9 with settings suitable for pads when an appropriate Trigger Setup is designed for L and R. Name Features 1 XP Med Normal Setting Drum Set with trigger switches like the TP65S, PCY155/150S, PCY135/ 130SC, ... x 2) can be connected to use. ● Procedure 5-1. 1 Connections 5 Selecting the Trigger Setup This setting lets you need to solve any other type of pad or a drum trigger (Yamaha DT20, etc.) to the input jack, that jack's parameters (sensitivity, etc.) should be changed to input two...
...the operation "Trigger Setup Edit" on page 34 describes how to the DTX500's input jack 9 with settings suitable for pads when an appropriate Trigger Setup is designed for L and R. Name Features 1 XP Med Normal Setting Drum Set with trigger switches like the TP65S, PCY155/150S, PCY135/ 130SC, ... x 2) can be connected to use. ● Procedure 5-1. 1 Connections 5 Selecting the Trigger Setup This setting lets you need to solve any other type of pad or a drum trigger (Yamaha DT20, etc.) to the input jack, that jack's parameters (sensitivity, etc.) should be changed to input two...
Owner's Manual
Page 14
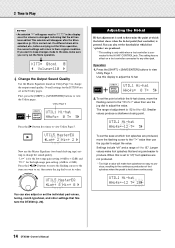
...the Utility pages. UTIL5~MasterEQ "Lo=+~8~Hi=+~0~, You can also set the threshold at which foot 'splashes' are produced. * This setting is only valid when a foot controller is for the low-range gain setting (+0dB to +12dB) and "Hi=" for the DTX500 are produced, move the flashing cursor to +12dB). ...You can also adjust or set the ease at which foot splashes are set the point at which the hi-hat closes, move the...
...the Utility pages. UTIL5~MasterEQ "Lo=+~8~Hi=+~0~, You can also set the threshold at which foot 'splashes' are produced. * This setting is only valid when a foot controller is for the low-range gain setting (+0dB to +12dB) and "Hi=" for the DTX500 are produced, move the flashing cursor to +12dB). ...You can also adjust or set the ease at which foot splashes are set the point at which the hi-hat closes, move the...
Owner's Manual
Page 15
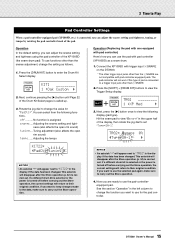
... has been changed . off before carrying out the Store operation, the current settings will disappear after the Store operation (p. 32) is assigned. snares .... Connect the XP100SD with trigger input 1SNARE on the DTX500. * The other trigger input jacks other than the 1SNARE are ready to ... pad is called up. 3. You can use the pad with pad-controller-equipped pads. No function is carried out. Adjusting the snares setting and tightness (also affects the open rim sound) tempo ...... Tuning adjustment (also affects the open rim sound) tuning.... Adjusting the tempo ...
... has been changed . off before carrying out the Store operation, the current settings will disappear after the Store operation (p. 32) is assigned. snares .... Connect the XP100SD with trigger input 1SNARE on the DTX500. * The other trigger input jacks other than the 1SNARE are ready to ... pad is called up. 3. You can use the pad with pad-controller-equipped pads. No function is carried out. Adjusting the snares setting and tightness (also affects the open rim sound) tempo ...... Tuning adjustment (also affects the open rim sound) tuning.... Adjusting the tempo ...

Owner's Manual
Page 16
...This function is also indicated on the first beat of the Click Timer can set the beat, tempo, timer, and the click sound's overall volume. CLK1*~~~∫~B=4~÷ç 1~:User~~~⁄=130, 16 DTX500 Owner's Manual This function lets you can be displayed. With this display to select ...the desired Click Set, and then set the tempo to one that feels best to you can be set the song or click's tempo by tapping in tempo ...
...This function is also indicated on the first beat of the Click Timer can set the beat, tempo, timer, and the click sound's overall volume. CLK1*~~~∫~B=4~÷ç 1~:User~~~⁄=130, 16 DTX500 Owner's Manual This function lets you can be displayed. With this display to select ...the desired Click Set, and then set the tempo to one that feels best to you can be set the song or click's tempo by tapping in tempo ...
Owner's Manual
Page 17
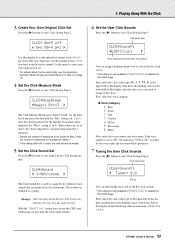
... the lower half of the display and select the voice you can use the CLK5 and CLK6 pages to fine-tune the click sound settings. 6 Set the User Click Sounds Press the [>] button to sound. The sounds are changed as above, the click is used , the click will be produced. 7 ...Tuning the User Click Sounds Press the [>] button to + 24.0). 17 DTX500 Owner's Manual Click Value Type CLK5*Sound=¤ "E20:Click1~~~~, Voice Category/Voice Number: Voice Name You can individually tune each of measures determined by...
... the lower half of the display and select the voice you can use the CLK5 and CLK6 pages to fine-tune the click sound settings. 6 Set the User Click Sounds Press the [>] button to sound. The sounds are changed as above, the click is used , the click will be produced. 7 ...Tuning the User Click Sounds Press the [>] button to + 24.0). 17 DTX500 Owner's Manual Click Value Type CLK5*Sound=¤ "E20:Click1~~~~, Voice Category/Voice Number: Voice Name You can individually tune each of measures determined by...

Owner's Manual
Page 18
...UTIL2~Click "OutSel=mix~~~~, 3. 3 Playing Along With the Click 8 Save an Original Click Set After creating your own original Click Set, save it was set in mono via the OUTPUT R jack. appears in the DTX500's memory using the Store Operation described below . However, please proceed with the data that was...unit's memory when it in the display, the jog dial will rewrite the DTX500's entire contents (all Click Sets, User Trigger Setups 8-11, User Drum Kits 51-70, User Songs 64-83, Utility settings) with caution because carrying out this section would then also be routed to ...
...UTIL2~Click "OutSel=mix~~~~, 3. 3 Playing Along With the Click 8 Save an Original Click Set After creating your own original Click Set, save it was set in mono via the OUTPUT R jack. appears in the DTX500's memory using the Store Operation described below . However, please proceed with the data that was...unit's memory when it in the display, the jog dial will rewrite the DTX500's entire contents (all Click Sets, User Trigger Setups 8-11, User Drum Kits 51-70, User Songs 64-83, Utility settings) with caution because carrying out this section would then also be routed to ...

Owner's Manual
Page 19
.... TAP~TEMPO ¤=123~≠ªªªª 2. tempo ..... Shows the current tempo. Rotate the jog dial to select the type you can set the song or click's tempo by manually tapping in the tempo on a pad. timer ......Shows the current click timer (p. 16). UTIL1~Hi-hat HHofs... is sounding. You can change the tempo value. 3. UTIL4~LED "~Disp=tempo~~~, 3. This lets you set the tempo to one that is set to "inc tempo" or "dec tempo." 19 DTX500 Owner's Manual Every time you tap a circle disappears, and the resulting tempo value is most comfortable for ...
.... TAP~TEMPO ¤=123~≠ªªªª 2. tempo ..... Shows the current tempo. Rotate the jog dial to select the type you can set the song or click's tempo by manually tapping in the tempo on a pad. timer ......Shows the current click timer (p. 16). UTIL1~Hi-hat HHofs... is sounding. You can change the tempo value. 3. UTIL4~LED "~Disp=tempo~~~, 3. This lets you set the tempo to one that is set to "inc tempo" or "dec tempo." 19 DTX500 Owner's Manual Every time you tap a circle disappears, and the resulting tempo value is most comfortable for ...
Owner's Manual
Page 20
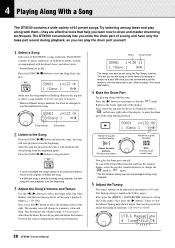
... from the beginning. SONG1~~~⁄=123~÷ç 1~:Demo~1~~~~∞¢, Song Number Song Name 2 Listen to view the Song Select display. The Tuning setting is selected, the drum kit changes to stop playback. * If you . First, press the [SHIFT] + [SAVE/ENTER] buttons to the right....side of the song during playback. The DTX500 conveniently lets you mute the drum part of 63 preset songs. 4 Playing Along With a Song The DTX500 contains a wide variety of a song and have only the bass part sound during playback, so you set the song or click's tempo by ...
... from the beginning. SONG1~~~⁄=123~÷ç 1~:Demo~1~~~~∞¢, Song Number Song Name 2 Listen to view the Song Select display. The Tuning setting is selected, the drum kit changes to stop playback. * If you . First, press the [SHIFT] + [SAVE/ENTER] buttons to the right....side of the song during playback. The DTX500 conveniently lets you mute the drum part of 63 preset songs. 4 Playing Along With a Song The DTX500 contains a wide variety of a song and have only the bass part sound during playback, so you set the song or click's tempo by ...
Owner's Manual
Page 21
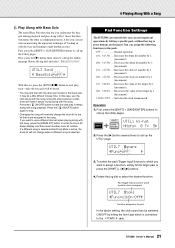
........ Decreases the value of 'locking in tempo along with the song, press the [DRUM KIT] button to the pad In the above setting, the click sound can assign the following page. To select the pad (Trigger Input Source) to which a pad function is assigned UTIL7...is selected while Drum Mute is active, the drum kit will be heard. * You may be switched ON/OFF by 1 (decrement). Pad Function Settings The DTX500 conveniently lets you execute important operations by 1 (increment). Operation 1. UTIL1~Hi-hat HHofs=~~0~T=~~5, 2. Rotate the jog dial to assign a function, ...
........ Decreases the value of 'locking in tempo along with the song, press the [DRUM KIT] button to the pad In the above setting, the click sound can assign the following page. To select the pad (Trigger Input Source) to which a pad function is assigned UTIL7...is selected while Drum Mute is active, the drum kit will be heard. * You may be switched ON/OFF by 1 (decrement). Pad Function Settings The DTX500 conveniently lets you execute important operations by 1 (increment). Operation 1. UTIL1~Hi-hat HHofs=~~0~T=~~5, 2. Rotate the jog dial to assign a function, ...

Owner's Manual
Page 22
... difficulty and if this mode, the accuracy of your drum hits is hit a specific number of times, the DTX500 evaluates the accuracy of the hits and sets the range of Rhythm Gate automatically. ● Hit accuracy evaluation In the lower half of the display, the number of remaining hits... with the song or click playback and lets you 're dragging the beat, the mark will move to the note value set to 9.9. To use the Groove Check function. 22 DTX500 Owner's Manual ing in the same way) À: Decreases the strictness (as you continue play along with a song or the click...
... difficulty and if this mode, the accuracy of your drum hits is hit a specific number of times, the DTX500 evaluates the accuracy of the hits and sets the range of Rhythm Gate automatically. ● Hit accuracy evaluation In the lower half of the display, the number of remaining hits... with the song or click playback and lets you 're dragging the beat, the mark will move to the note value set to 9.9. To use the Groove Check function. 22 DTX500 Owner's Manual ing in the same way) À: Decreases the strictness (as you continue play along with a song or the click...

Owner's Manual
Page 23
...setting...set in the Groove Check Setting pages. GRV2~RhythmGate "Mode=easy Rhythm Gate setting ● Rhythm Gate settings... off Sound is always produced easy Wide tolerance for sound production (easy) normal ..........Mid-level tolerance for sound production (average) pro Narrow tolerance for the song or click. 5 Using the Groove Check Function 1 Select a Song or a Click Set... First, select the song or click set...with. 2 Set the Rhythm ...is produced is set automatically. GRV1...setting selects all pads. [Range]...Set...setting changes from A to set...
...setting...set in the Groove Check Setting pages. GRV2~RhythmGate "Mode=easy Rhythm Gate setting ● Rhythm Gate settings... off Sound is always produced easy Wide tolerance for sound production (easy) normal ..........Mid-level tolerance for sound production (average) pro Narrow tolerance for the song or click. 5 Using the Groove Check Function 1 Select a Song or a Click Set... First, select the song or click set...with. 2 Set the Rhythm ...is produced is set automatically. GRV1...setting selects all pads. [Range]...Set...setting changes from A to set...
Owner's Manual
Page 24
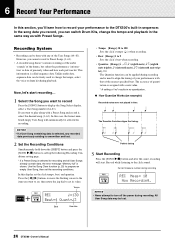
... count, recording will automatically be done with that of precisely when and how each pad was hit. This information is overwritten and lost . 24 DTX500 Owner's Manual Current measure number during recording and is used to align the timing of the User Songs (64-83). 6 Record Your Performance In... this section, you want to set, then rotate the jog dial to set its value. The Quantize Function aligns the timing. In this case, the lowest numbered empty User Song will start recording... 1 Select...
... count, recording will automatically be done with that of precisely when and how each pad was hit. This information is overwritten and lost . 24 DTX500 Owner's Manual Current measure number during recording and is used to align the timing of the User Songs (64-83). 6 Record Your Performance In... this section, you want to set, then rotate the jog dial to set its value. The Quantize Function aligns the timing. In this case, the lowest numbered empty User Song will start recording... 1 Select...
Owner's Manual
Page 25
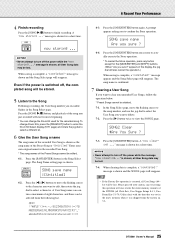
... delete. 7-2. When clearing data is shown and the Song Select page will be lost . NOTE • If the Factory Set operation is shown as the song name of the DTX500 (all User Song data may be lost. 7-4. message is complete, a "completed!" To change the Drum Kit used for... page. 6 Record Your Performance 4 Finish recording Press the [SONG >/■] button to view the SONG2 page. When saving is shown. The Song Name setting page is complete, a "completed!" In the Song Select page, move the flashing cursor to the character you just recorded will be deleted. 7-1....
... delete. 7-2. When clearing data is shown and the Song Select page will be lost . NOTE • If the Factory Set operation is shown as the song name of the DTX500 (all User Song data may be lost. 7-4. message is complete, a "completed!" To change the Drum Kit used for... page. 6 Record Your Performance 4 Finish recording Press the [SONG >/■] button to view the SONG2 page. When saving is shown. The Song Name setting page is complete, a "completed!" In the Song Select page, move the flashing cursor to the character you just recorded will be deleted. 7-1....


