
Owner's Manual
Page 4
... Rear Panel 15 Setting Up 16 Power Requirements 16 Connecting a Footswitch (SUSTAIN Jack 16 Connecting Headphones or External Audio Equipment (PHONES/OUTPUT Jack 17 Connecting a Pedal Unit (PEDAL UNIT jack 18 Connecting a Computer (USB TO HOST terminal)........19 Turning the Power On/Off 19 Setting the Volume 20 Auto Power Off Function 20 MAIN... Deleting files from a USB Flash Memory 77 Deleting User Data from the Instrument 77 Appendix Troubleshooting 78 Messages 79 Specifications 80 Index 82 Reference Appendix 4 DGX-650 Owner's Manual
... Rear Panel 15 Setting Up 16 Power Requirements 16 Connecting a Footswitch (SUSTAIN Jack 16 Connecting Headphones or External Audio Equipment (PHONES/OUTPUT Jack 17 Connecting a Pedal Unit (PEDAL UNIT jack 18 Connecting a Computer (USB TO HOST terminal)........19 Turning the Power On/Off 19 Setting the Volume 20 Auto Power Off Function 20 MAIN... Deleting files from a USB Flash Memory 77 Deleting User Data from the Instrument 77 Appendix Troubleshooting 78 Messages 79 Specifications 80 Index 82 Reference Appendix 4 DGX-650 Owner's Manual

Owner's Manual
Page 12
...orientation for the side boards. CAUTION • Be careful not to the next step. NOTE • If you have purchased an optional pedal unit, attach the pedal unit before proceeding to drop the back board or touch the sharp metal fittings. At least 10 cm 5 Put the keyboard on the side...between the keyboard and the stand parts. • Do not hold the keyboard in any position other than the position shown in the illustration. 12 DGX-650 Owner's Manual Attach the back board, using the screws t. Make sure the non-colored surface is facing down. Setting Up Keyboard Stand Assembly 4 t...
...orientation for the side boards. CAUTION • Be careful not to the next step. NOTE • If you have purchased an optional pedal unit, attach the pedal unit before proceeding to drop the back board or touch the sharp metal fittings. At least 10 cm 5 Put the keyboard on the side...between the keyboard and the stand parts. • Do not hold the keyboard in any position other than the position shown in the illustration. 12 DGX-650 Owner's Manual Attach the back board, using the screws t. Make sure the non-colored surface is facing down. Setting Up Keyboard Stand Assembly 4 t...

Owner's Manual
Page 15
DGX-650 Owner's Manual 15 Setting Up Panel Controls and Terminals Display (page 21) Voice category list Music Database category list !9 !6 !7 !8 @2 @3 @4 @5 @6 @0 #1 @1 !5 @7 @8 @9 #0 A-1 C0 C1 C2 C3 C4 C5 C6 C7 Rear Panel #3 #4 #5 #6 Rear Panel #3 CONTRAST knob page 21 #4 USB TO HOST terminal pages 19, 68 #5 SUSTAIN jack page 16 #6 PEDAL UNIT jack page 18 #7 AUX IN...
DGX-650 Owner's Manual 15 Setting Up Panel Controls and Terminals Display (page 21) Voice category list Music Database category list !9 !6 !7 !8 @2 @3 @4 @5 @6 @0 #1 @1 !5 @7 @8 @9 #0 A-1 C0 C1 C2 C3 C4 C5 C6 C7 Rear Panel #3 #4 #5 #6 Rear Panel #3 CONTRAST knob page 21 #4 USB TO HOST terminal pages 19, 68 #5 SUSTAIN jack page 16 #6 PEDAL UNIT jack page 18 #7 AUX IN...
Owner's Manual
Page 18
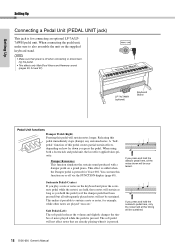
...as you hold the damper pedal here, all subsequently played notes will be sustained. 18 DGX-650 Owner's Manual Releasing this pedal will be sustained. NOTE • Make sure that are held at this timing will not be sustained. You can turn this pedal creates partial sustain effects, ... it is for Voice 001. LP-7A/7AWH (optional) Keyboard Stand Pedal Unit functions Damper Pedal (Right) Pressing this pedal immediately stops (damps) any sustained notes. If you press and hold the pedal (as if the damper pedal had been pressed) but all the notes shown will sustain notes longer...
...as you hold the damper pedal here, all subsequently played notes will be sustained. 18 DGX-650 Owner's Manual Releasing this pedal will be sustained. NOTE • Make sure that are held at this timing will not be sustained. You can turn this pedal creates partial sustain effects, ... it is for Voice 001. LP-7A/7AWH (optional) Keyboard Stand Pedal Unit functions Damper Pedal (Right) Pressing this pedal immediately stops (damps) any sustained notes. If you press and hold the pedal (as if the damper pedal had been pressed) but all the notes shown will sustain notes longer...
Owner's Manual
Page 81
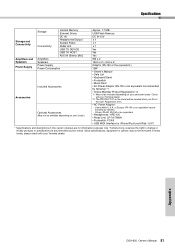
...check with your particular locale. Yamaha Corp. Check with your Yamaha dealer. Users within U.S.A. Specifications Storage and Connectivity Amplifiers and Speakers Power Supply Storage Internal Memory External Drives DC IN Headphones/Output Sustain Pedal Connectivity Pedal Unit USB TO DEVICE USB TO ... (PA-150 or an equivalent recommended by Yamaha - or Europe: PA-150 or an equivalent recommended by Yamaha) *1 • Online Member Product Registration *2 *1: May not be the same in this owner's manual are for information purposes only. Appendix DGX-650 Owner's Manual 81
...check with your particular locale. Yamaha Corp. Check with your Yamaha dealer. Users within U.S.A. Specifications Storage and Connectivity Amplifiers and Speakers Power Supply Storage Internal Memory External Drives DC IN Headphones/Output Sustain Pedal Connectivity Pedal Unit USB TO DEVICE USB TO ... (PA-150 or an equivalent recommended by Yamaha - or Europe: PA-150 or an equivalent recommended by Yamaha) *1 • Online Member Product Registration *2 *1: May not be the same in this owner's manual are for information purposes only. Appendix DGX-650 Owner's Manual 81

Owner's Manual
Page 82
... Music Database 29 Music Rest 9 Mute 36 N Number buttons 22 O Output Gain Level 55 Overview Demo 34 P Panel Settings 46 Panel Sustain 52 Pause 36 Pedal Unit 18 Piano Voice 23 Pitch 52, 53 PITCH BEND wheel 53 Power On/Off 19 Power Requirements 16 Practice 38 "Press & Hold 15 R Random Playback... 40 V Voice 23, 57 Volume (Audio 64 Volume (Main Voice, Dual Voice, Split Voice 67 Volume (Master 20 Volume (Song 64 Volume (Style 60 82 DGX-650 Owner's Manual Appendix
... Music Database 29 Music Rest 9 Mute 36 N Number buttons 22 O Output Gain Level 55 Overview Demo 34 P Panel Settings 46 Panel Sustain 52 Pause 36 Pedal Unit 18 Piano Voice 23 Pitch 52, 53 PITCH BEND wheel 53 Power On/Off 19 Power Requirements 16 Practice 38 "Press & Hold 15 R Random Playback... 40 V Voice 23, 57 Volume (Audio 64 Volume (Main Voice, Dual Voice, Split Voice 67 Volume (Master 20 Volume (Song 64 Volume (Style 60 82 DGX-650 Owner's Manual Appendix

