Owner's Manual
Page 2
...case rupture. Batteries MUST be correct at a level that contain lead, batteries, plastics, etc. Model Serial No. a cart, rack, or stand that are located on the name plate, or specifically recommended by the manufacturer's warranty, and are therefore the owners responsibility. If a ... This product should consult an audiologist. SPECIFICATIONS SUBJECT TO CHANGE: The information contained in combination with the components supplied or; However, Yamaha reserves the right to produce them, meet these may result in the manual, on this type of the following: Battery Notice: This...
...case rupture. Batteries MUST be correct at a level that contain lead, batteries, plastics, etc. Model Serial No. a cart, rack, or stand that are located on the name plate, or specifically recommended by the manufacturer's warranty, and are therefore the owners responsibility. If a ... This product should consult an audiologist. SPECIFICATIONS SUBJECT TO CHANGE: The information contained in combination with the components supplied or; However, Yamaha reserves the right to produce them, meet these may result in the manual, on this type of the following: Battery Notice: This...
Owner's Manual
Page 4
...walk on it should appear to disassemble the internal parts or modify them in the instrument falling over it inspected by qualified Yamaha service personnel. These precautions include, but are not limited to an electrical outlet using the instrument, or during use new batteries together... with old ones. When attaching the stand or rack, use it near heat sources such as alkaline batteries with water and consult a doctor. These precautions include, but are not ...
...walk on it should appear to disassemble the internal parts or modify them in the instrument falling over it inspected by qualified Yamaha service personnel. These precautions include, but are not limited to an electrical outlet using the instrument, or during use new batteries together... with old ones. When attaching the stand or rack, use it near heat sources such as alkaline batteries with water and consult a doctor. These precautions include, but are not ...
Owner's Manual
Page 7
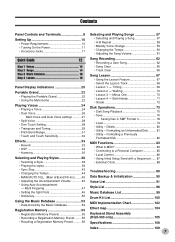
... Backup & Initialization 90 Voice List 91 Style List 98 Music Database List 99 Drum Kit List 100 MIDI Implementation Chart 102 Effect map 104 Keyboard Stand Assembly (DGX-500 only 105 Specifications 108 Index 109 7 Multi Fingering 47 • Setting the Split Point 49 • Dictionary 50 Using the Music Database 53 •...
... Backup & Initialization 90 Voice List 91 Style List 98 Music Database List 99 Drum Kit List 100 MIDI Implementation Chart 102 Effect map 104 Keyboard Stand Assembly (DGX-500 only 105 Specifications 108 Index 109 7 Multi Fingering 47 • Setting the Split Point 49 • Dictionary 50 Using the Music Database 53 •...
Owner's Manual
Page 10
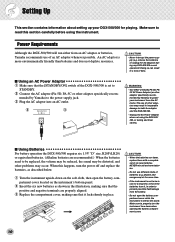
..., and other problems may be in use different kinds of the DGX-500/300 is more environmentally friendly than batteries and does not deplete resources. • Never interrupt the power supply (e.g. mended by Yamaha) to read this happens, turn the instrument face down when opening...5D, PA5C AC Power Adaptor (or other adaptor specifically recommended by Yamaha) to prevent possible fluid leakage from the battery. • Do not open the battery compartment cover located on the stand. Doing so can result in the illustration, making sure that the [STANDBY...
..., and other problems may be in use different kinds of the DGX-500/300 is more environmentally friendly than batteries and does not deplete resources. • Never interrupt the power supply (e.g. mended by Yamaha) to read this happens, turn the instrument face down when opening...5D, PA5C AC Power Adaptor (or other adaptor specifically recommended by Yamaha) to prevent possible fluid leakage from the battery. • Do not open the battery compartment cover located on the stand. Doing so can result in the illustration, making sure that the [STANDBY...
Owner's Manual
Page 40
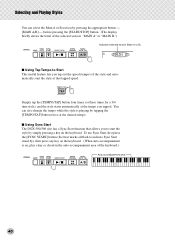
...the style starts automatically at the tempo you to start the style by pressing the appropriate button - [MAIN A/B] - MAIN A I Using Sync Start The DGX-500/300 also has a Sync Start function that tapped speed. To use Sync Start, first press the [SYNC START] button (the beat marks all... area of the selected section: "MAIN A" or "MAIN B.") Indicates selected section (Main A or B). I Using Tap Tempo to indicate Sync Start stand-by tapping the [TEMPO/TAP] button twice at that allows you tapped. Selecting and Playing Styles You can also change the tempo while the style...
...the style starts automatically at the tempo you to start the style by pressing the appropriate button - [MAIN A/B] - MAIN A I Using Sync Start The DGX-500/300 also has a Sync Start function that tapped speed. To use Sync Start, first press the [SYNC START] button (the beat marks all... area of the selected section: "MAIN A" or "MAIN B.") Indicates selected section (Main A or B). I Using Tap Tempo to indicate Sync Start stand-by tapping the [TEMPO/TAP] button twice at that allows you tapped. Selecting and Playing Styles You can also change the tempo while the style...
Owner's Manual
Page 84
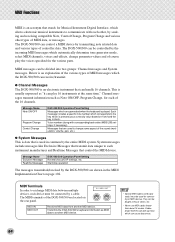
... MIDI cables (sold separately) must be connected by the DGX-500/300 are generated when the keyboard is played. Cables longer than about 15 meters. MIDI Functions MIDI is an acronym that stands for Musical Instrument Digital Interface, which allows electronic musical instruments... to communicate with corresponding bank select MSB/LSB settings, if necessary). Message Name Exclusive Message Realtime Messages DGX-500/300 Operation/Panel Setting Reverb/chorus/DSP...
... MIDI cables (sold separately) must be connected by the DGX-500/300 are generated when the keyboard is played. Cables longer than about 15 meters. MIDI Functions MIDI is an acronym that stands for Musical Instrument Digital Interface, which allows electronic musical instruments... to communicate with corresponding bank select MSB/LSB settings, if necessary). Message Name Exclusive Message Realtime Messages DGX-500/300 Operation/Panel Setting Reverb/chorus/DSP...
Owner's Manual
Page 105
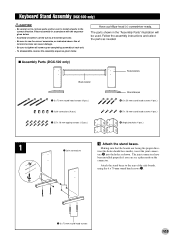
Use of incorrect screws can see a plus mark on the connector. I Assembly Parts (DGX-500 only) Side boards Back board q 6 x 70 mm round head screws (4 pcs.) Stand bases r 6 x 30 mm round head screws (4 pcs.) w Joint connectors (4 pcs.) t 5 x 16 mm round head screws (4 pcs.) e 3.5 x 16 mm tapping screws (12 pcs... unit. • To disassemble, reverse the assembly sequence given below . • Assembly should face inside), insert the joint connec- Keyboard Stand Assembly (DGX-500 only) • Be careful not to confuse parts, and be sure to the rear of the side boards, using the 6 x 70...
Use of incorrect screws can see a plus mark on the connector. I Assembly Parts (DGX-500 only) Side boards Back board q 6 x 70 mm round head screws (4 pcs.) Stand bases r 6 x 30 mm round head screws (4 pcs.) w Joint connectors (4 pcs.) t 5 x 16 mm round head screws (4 pcs.) e 3.5 x 16 mm tapping screws (12 pcs... unit. • To disassemble, reverse the assembly sequence given below . • Assembly should face inside), insert the joint connec- Keyboard Stand Assembly (DGX-500 only) • Be careful not to confuse parts, and be sure to the rear of the side boards, using the 6 x 70...
Owner's Manual
Page 107
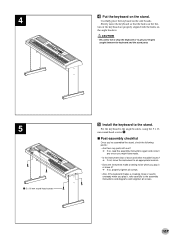
... keyboard on the bot- Slowly move it? ➔ If so, properly tighten all screws. 107 I Post-assembly checklist Once you've assembled the stand, check the following points: • Are there any parts left over? ➔ If so, read the assembly instructions again and correct any errors you... If not, move the instrument to an appropriate location. • Does the instrument make a rattling noise when you play it , refer carefully to the stand. Fix the keyboard to the angle brackets, using the 5 x 16 mm round head screws t. Carefully place the keyboard on the angle brackets. •...
... keyboard on the bot- Slowly move it? ➔ If so, properly tighten all screws. 107 I Post-assembly checklist Once you've assembled the stand, check the following points: • Are there any parts left over? ➔ If so, read the assembly instructions again and correct any errors you... If not, move the instrument to an appropriate location. • Does the instrument make a rattling noise when you play it , refer carefully to the stand. Fix the keyboard to the angle brackets, using the 5 x 16 mm round head screws t. Carefully place the keyboard on the angle brackets. •...
Owner's Manual
Page 108
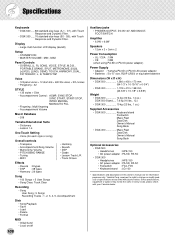
...) Power Supply • Adaptor : Yamaha PA-5D or PA-5C AC power adaptor • Batteries : Six "D" size, R20P (LR20) or equivalent batteries Dimensions (W x D x H) • DGX-500 1,380 x 430 x 173 mm (54-1/3" x 16-15/16" x 6-3/4") • DGX-300 1,178 x 410 x 168 mm (46-3/8" x 16-1/8" x 6-5/8") Weight • DGX-500 14 kg (30 lbs., 14 oz.) DGX-500 Stand..... 7.6 kg (16 lbs...
...) Power Supply • Adaptor : Yamaha PA-5D or PA-5C AC power adaptor • Batteries : Six "D" size, R20P (LR20) or equivalent batteries Dimensions (W x D x H) • DGX-500 1,380 x 430 x 173 mm (54-1/3" x 16-15/16" x 6-3/4") • DGX-300 1,178 x 410 x 168 mm (46-3/8" x 16-1/8" x 6-5/8") Weight • DGX-500 14 kg (30 lbs., 14 oz.) DGX-500 Stand..... 7.6 kg (16 lbs...
Owner's Manual
Page 109
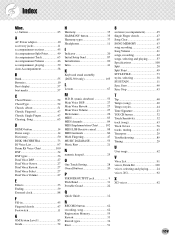
... 1 83 Grade 72 H Harmony 35 HARMONY button 35 Harmony types 37 Headphones 11 I Indicator 20 Initial Setup Send 87 Initialization 90 Intro 41 K Keyboard stand assembly (DGX-500 only 105 L Lesson 67 M M.D.B. (music database 53 Main Voice DSP 27 Main Voice Reverb 27 Main Voice Volume 27 Metronome 22 MIDI 83 MIDI channels...
... 1 83 Grade 72 H Harmony 35 HARMONY button 35 Harmony types 37 Headphones 11 I Indicator 20 Initial Setup Send 87 Initialization 90 Intro 41 K Keyboard stand assembly (DGX-500 only 105 L Lesson 67 M M.D.B. (music database 53 Main Voice DSP 27 Main Voice Reverb 27 Main Voice Volume 27 Metronome 22 MIDI 83 MIDI channels...


