
Owner's Manual
Page 4
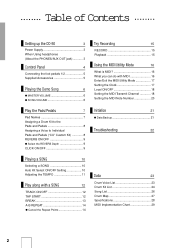
... the DD-50 3 Power Supply 3 When Using headphones (About the PHONES/AUX OUT jack 3 Control Panel 4 Connecting the foot pedals 1/2 5 Supplied Accessories 5 Playing the Demo Song 6 q MASTER VOLUME 6 q SONG VOLUME 6 Try Recording 15 RECORD 15 Playback 15 Using the MIDI/Utility Mode 16 What is MIDI 16... What you can do with MIDI 16 Enter/Exit the MIDI/Utility Mode 17 Setting the Clock 17 Local ON/OFF 18 Setting the...
... the DD-50 3 Power Supply 3 When Using headphones (About the PHONES/AUX OUT jack 3 Control Panel 4 Connecting the foot pedals 1/2 5 Supplied Accessories 5 Playing the Demo Song 6 q MASTER VOLUME 6 q SONG VOLUME 6 Try Recording 15 RECORD 15 Playback 15 Using the MIDI/Utility Mode 16 What is MIDI 16... What you can do with MIDI 16 Enter/Exit the MIDI/Utility Mode 17 Setting the Clock 17 Local ON/OFF 18 Setting the...
Owner's Manual
Page 7
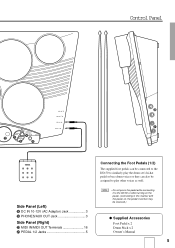
... (Left) * DC IN 10-12V (AC Adaptor) Jack 3 ( PHONES/AUX OUT Jack 3 Side Panel (Right) ) MIDI IN/MIDI OUT Terminals 16 q PEDAL 1/2 Jacks 5 Connecting the Foot Pedals (1/2) The supplied foot pedals can be connected to the DD-50 to similarly play the drum set's hi-hat pedal or bass drum voices or they can... also be assigned to play other voices as well. • Do not press the pedal while connecting it to the DD-50 or while turning on the power. (Connecting in this manner with the power on, the pedal's function may be reversed.) q Supplied Accessories Foot Pedal x 2 ...
... (Left) * DC IN 10-12V (AC Adaptor) Jack 3 ( PHONES/AUX OUT Jack 3 Side Panel (Right) ) MIDI IN/MIDI OUT Terminals 16 q PEDAL 1/2 Jacks 5 Connecting the Foot Pedals (1/2) The supplied foot pedals can be connected to the DD-50 to similarly play the drum set's hi-hat pedal or bass drum voices or they can... also be assigned to play other voices as well. • Do not press the pedal while connecting it to the DD-50 or while turning on the power. (Connecting in this manner with the power on, the pedal's function may be reversed.) q Supplied Accessories Foot Pedal x 2 ...
Owner's Manual
Page 11
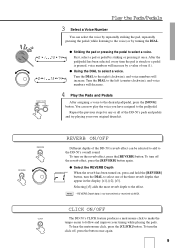
... pad/pedal has been selected, every time the pad is struck or a pedal is not transmitted or received via MIDI. REVERB REVERB REVERB ON/OFF Different depths of the DD-50's pads and pedals and try playing your timing while playing the pads. To turn the click off the reverb effect..., press the [REVERB] button again. CLICK ON/OFF CLICK The DD-50's CLICK feature produces a metronome click to make the tempo easier to the right (clockwise), and voice numbers will decrease. q Using the DIAL to select...
... pad/pedal has been selected, every time the pad is struck or a pedal is not transmitted or received via MIDI. REVERB REVERB REVERB ON/OFF Different depths of the DD-50's pads and pedals and try playing your timing while playing the pads. To turn the click off the reverb effect..., press the [REVERB] button again. CLICK ON/OFF CLICK The DD-50's CLICK feature produces a metronome click to make the tempo easier to the right (clockwise), and voice numbers will decrease. q Using the DIAL to select...
Owner's Manual
Page 12
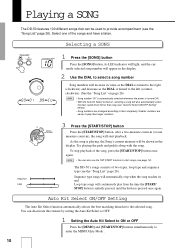
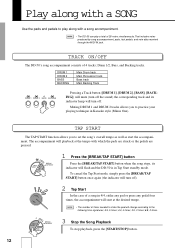
... TEMPO BEAT 10 00 01 . . .99 CU 1 Press the [SONG] button Press the [SONG] button, its end. The DD-50's songs consists of the songs and have a listen. You can deactivate this feature by setting the Auto Kit Select to OFF. 1 ...the [DEMO] and [START/STOP] buttons simultaneously to provide accompaniment (see the "Song List" page 26). Playing a SONG The DD-50 features 100 different songs that song (see "Auto Kit Select ON/OFF Setting" below). • Song numbers are easier to ...; With the Auto Kit Select turned on, selecting a song will be used to enter the MIDI/Utility Mode . 10
... TEMPO BEAT 10 00 01 . . .99 CU 1 Press the [SONG] button Press the [SONG] button, its end. The DD-50's songs consists of the songs and have a listen. You can deactivate this feature by setting the Auto Kit Select to OFF. 1 ...the [DEMO] and [START/STOP] buttons simultaneously to provide accompaniment (see the "Song List" page 26). Playing a SONG The DD-50 features 100 different songs that song (see "Auto Kit Select ON/OFF Setting" below). • Song numbers are easier to ...; With the Auto Kit Select turned on, selecting a song will be used to enter the MIDI/Utility Mode . 10

Owner's Manual
Page 13
...) to deactivate the Auto Kit Select (oF). 3 Exit the Auto Kit Select Press the [DEMO] and [START/STOP] buttons simultaneously once again to exit the MIDI/Utility Mode . • The Auto Kit Select is shown as two dots 40 41 7, 9, 8, 0, 2 Set the Tempo Use the DIAL to 280 beats per ...will become faster. q= 90 beats per minute. Turn the DIAL to the right (clockwise) to assist you in the display. PRESET TEMPO SONG TEMPO BEAT 50 1 Press the [TEMPO] button Press the [TEMPO] button, the current tempo value (40-280) appears in keeping the beat. BACKING Playing a SONG BEAT ...
...) to deactivate the Auto Kit Select (oF). 3 Exit the Auto Kit Select Press the [DEMO] and [START/STOP] buttons simultaneously once again to exit the MIDI/Utility Mode . • The Auto Kit Select is shown as two dots 40 41 7, 9, 8, 0, 2 Set the Tempo Use the DIAL to 280 beats per ...will become faster. q= 90 beats per minute. Turn the DIAL to the right (clockwise) to assist you in the display. PRESET TEMPO SONG TEMPO BEAT 50 1 Press the [TEMPO] button Press the [TEMPO] button, the current tempo value (40-280) appears in keeping the beat. BACKING Playing a SONG BEAT ...
Owner's Manual
Page 14
... 1 Press the [BREAK/TAP START] button Press the [BREAK/TAP START] button when the song stops, its indicator lamp will flash and the DD-50 is in 4/4, strike any pad or press any pedal four times, the accompaniment will start the accompaniment. START/ STOP A-B REPEAT BREAK/ TAPSTART ...mode. Drum 1/2, Bass, and Backing tracks. REC. That includes notes produced by song accompaniment, pads, foot pedals, and note data received through the MIDI IN jack. DRUM 1 DRUM 2 BASS BACKING Main Drum track Main Percussion track Bass track Main Backing Track DRUM 1 DRUM 2 BASS BACKING Pressing a...
... 1 Press the [BREAK/TAP START] button Press the [BREAK/TAP START] button when the song stops, its indicator lamp will flash and the DD-50 is in 4/4, strike any pad or press any pedal four times, the accompaniment will start the accompaniment. START/ STOP A-B REPEAT BREAK/ TAPSTART ...mode. Drum 1/2, Bass, and Backing tracks. REC. That includes notes produced by song accompaniment, pads, foot pedals, and note data received through the MIDI IN jack. DRUM 1 DRUM 2 BASS BACKING Main Drum track Main Percussion track Bass track Main Backing Track DRUM 1 DRUM 2 BASS BACKING Pressing a...

Owner's Manual
Page 17
... "99" (or prior to "00"). • The A-B REPEAT mode (see page 12). • Press the CLICK button to the memory. Try Recording The DD-50's Custom Song feature (song number "CU") allows you to Record Select the desired song, drum kit, tempo, track on/off setting, and reverb settings. REC... 14 page) cannot be used in the RECORD mode). • Song Volume setting. • Reverb ON/OFF setting. • Break ON/OFF setting. * MIDI data cannot be recorded during the 2 measure count-in. • Press the BREAK/TAP START button during recording. RECORD 1 Prepare to record and playback one...
... "99" (or prior to "00"). • The A-B REPEAT mode (see page 12). • Press the CLICK button to the memory. Try Recording The DD-50's Custom Song feature (song number "CU") allows you to Record Select the desired song, drum kit, tempo, track on/off setting, and reverb settings. REC... 14 page) cannot be used in the RECORD mode). • Song Volume setting. • Reverb ON/OFF setting. • Break ON/OFF setting. * MIDI data cannot be recorded during the 2 measure count-in. • Press the BREAK/TAP START button during recording. RECORD 1 Prepare to record and playback one...
Owner's Manual
Page 18
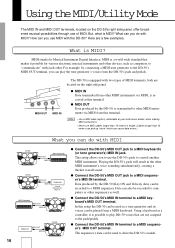
... with MIDI DD-50 MIDI OUT MIDI Keyboard's MIDI IN DD-50 MIDI OUT MIDI IN Sequencer Yamaha MIDI Data Filer MDF2 etc. q MIDI OUT Data produced by the DD-50 (Key ON and Velocity data) can be played from other MIDI instruments via MIDI, is MIDI? MIDI is a world wide standard that are not assigned to the pads/pedals. q Connect the DD-50's MIDI IN terminal to a MIDI keyboard's MIDI OUT terminal. q MIDI IN...
... with MIDI DD-50 MIDI OUT MIDI Keyboard's MIDI IN DD-50 MIDI OUT MIDI IN Sequencer Yamaha MIDI Data Filer MDF2 etc. q MIDI OUT Data produced by the DD-50 (Key ON and Velocity data) can be played from other MIDI instruments via MIDI, is MIDI? MIDI is a world wide standard that are not assigned to the pads/pedals. q Connect the DD-50's MIDI IN terminal to a MIDI keyboard's MIDI OUT terminal. q MIDI IN...
Owner's Manual
Page 19
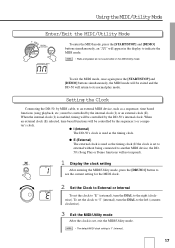
...If the clock is set the clock to "I" (internal), turn the DIAL to another MIDI device, the DD50's Song Play or Demo functions will not respond). Setting the Clock Connecting the DD-50, by the DD-50's internal clock. To set to external without being connected to the right (clockwise). q...not sound while in the display to see the current setting for the MIDI clock. q I (Internal) The DD-50's clock is "I ) is used as the timing clock. When an external clock (E) selected, time based functions will appear in the MIDI/Utility mode. DRUM 1 BEAT I ) or an external clock (E)....
...If the clock is set the clock to "I" (internal), turn the DIAL to another MIDI device, the DD50's Song Play or Demo functions will not respond). Setting the Clock Connecting the DD-50, by the DD-50's internal clock. To set to external without being connected to the right (clockwise). q...not sound while in the display to see the current setting for the MIDI clock. q I (Internal) The DD-50's clock is "I ) is used as the timing clock. When an external clock (E) selected, time based functions will appear in the MIDI/Utility mode. DRUM 1 BEAT I ) or an external clock (E)....
Owner's Manual
Page 20
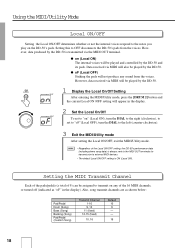
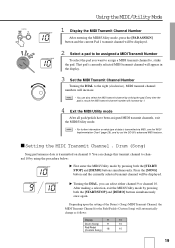
... right (clockwise), to set to "on After entering the MIDI/Utility mode, press the [DRUM 2] button and the current Local ON /OFF setting will be played by the DD-50 and its pads. However, data produced by the DD-50. Setting the MIDI Transmit Channel Each of the pads/pedals (a total of 9)... can be played by the DD-50 is always sent to the MIDI OUT terminals for transmission to the left (counter-clockwise)....
... right (clockwise), to set to "on After entering the MIDI/Utility mode, press the [DRUM 2] button and the current Local ON /OFF setting will be played by the DD-50 and its pads. However, data produced by the DD-50. Setting the MIDI Transmit Channel Each of the pads/pedals (a total of 9)... can be played by the DD-50 is always sent to the MIDI OUT terminals for transmission to the left (counter-clockwise)....
Owner's Manual
Page 21
... channel 9. BEAT 9 BEAT 10 > Turning the DIAL, you want to assign a MIDI transmit channel to be displayed. Depending upon the setting of data is transmitted via MIDI, see the "MIDI Implementation Chart" (page 29), and try out the DD-50's advanced MIDI features. That pad's currently selected MIDI transmit channel will appear in the display. 3 Set the...
... channel 9. BEAT 9 BEAT 10 > Turning the DIAL, you want to assign a MIDI transmit channel to be displayed. Depending upon the setting of data is transmitted via MIDI, see the "MIDI Implementation Chart" (page 29), and try out the DD-50's advanced MIDI features. That pad's currently selected MIDI transmit channel will appear in the display. 3 Set the...
Owner's Manual
Page 22
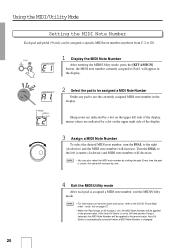
...a dot on the upper left (counter-clockwise) and MIDI note numbers will increase by one. 4 Exit the MIDI/Utility mode After each pad is assigned a MIDI note number, exit the MIDI/Utility mode. • For information on transmit notes and voices, refer to the DD-50 "Drum Map" (note - Turn the DIAL to the... left side of the display, minus values are indicated by striking the pad. Using the MIDI/Utility Mode Setting the MIDI Note Number Each pad and pedal (9 total) can also select ...
...a dot on the upper left (counter-clockwise) and MIDI note numbers will increase by one. 4 Exit the MIDI/Utility mode After each pad is assigned a MIDI note number, exit the MIDI/Utility mode. • For information on transmit notes and voices, refer to the DD-50 "Drum Map" (note - Turn the DIAL to the... left side of the display, minus values are indicated by striking the pad. Using the MIDI/Utility Mode Setting the MIDI Note Number Each pad and pedal (9 total) can also select ...

Owner's Manual
Page 23
... The DD-50's Custom Song, Custom Kit, and Panel Setting data are backed up so long as batteries are installed or an AC adaptor is connected, even if the power is turned off. * Custom Song * Custom Kit * Reverb Depth * Auto Kit Selection * MIDI Transmit Channel for the PAD * MIDI Note Number... for the PAD 21 To initialize the DD-50, follow the procedure below. POWER OFF ON DEMO BEAT Cr > While holding the [DEMO] button, turn the [POWER...
... The DD-50's Custom Song, Custom Kit, and Panel Setting data are backed up so long as batteries are installed or an AC adaptor is connected, even if the power is turned off. * Custom Song * Custom Kit * Reverb Depth * Auto Kit Selection * MIDI Transmit Channel for the PAD * MIDI Note Number... for the PAD 21 To initialize the DD-50, follow the procedure below. POWER OFF ON DEMO BEAT Cr > While holding the [DEMO] button, turn the [POWER...

Owner's Manual
Page 24
... occur. "Cr" appears in the MIDI/Utility mode. Change the MIDI clock setting to "I" (internal) (see page 30). If the suggested remedy is struck. The selected voice does not sound when the pad is ineffective, take the DD-50 to an authorized Yamaha dealer for proper diagnosis and repair. ...The custom pad voice assignments have disappeared or defaulted. The MIDI clock has been set too low. Cause/Solution This is a normal power surge...
... occur. "Cr" appears in the MIDI/Utility mode. Change the MIDI clock setting to "I" (internal) (see page 30). If the suggested remedy is struck. The selected voice does not sound when the pad is ineffective, take the DD-50 to an authorized Yamaha dealer for proper diagnosis and repair. ...The custom pad voice assignments have disappeared or defaulted. The MIDI clock has been set too low. Cause/Solution This is a normal power surge...
Owner's Manual
Page 30
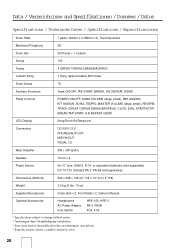
...CLICK, DIAL, START/STOP, BREAK/TAP START, A-B REPEAT, DEMO LED Display Song/Drum Kit/Tempo etc. Connectors DC IN10-12 V PHONES/AUX OUT MIDI IN/OUT PEDAL 1/2 Main Amplifier 3W + 3W (EIAJ) Speaker 10 cm x 2 Power Source Six "C" size, SUM-2, R-14, or equivalent batteries... (sold separately) DC 10-12V (Yamaha PA-3, PA-3B sold separately) Dimensions (WxDxH) 552 x 348 x 136 (21" 3/4 x 13" 2/3 x 5" 3/8) Weight 3.0 kg (6 Ibs. 10 oz) Supplied Accessories Drum ...
...CLICK, DIAL, START/STOP, BREAK/TAP START, A-B REPEAT, DEMO LED Display Song/Drum Kit/Tempo etc. Connectors DC IN10-12 V PHONES/AUX OUT MIDI IN/OUT PEDAL 1/2 Main Amplifier 3W + 3W (EIAJ) Speaker 10 cm x 2 Power Source Six "C" size, SUM-2, R-14, or equivalent batteries... (sold separately) DC 10-12V (Yamaha PA-3, PA-3B sold separately) Dimensions (WxDxH) 552 x 348 x 136 (21" 3/4 x 13" 2/3 x 5" 3/8) Weight 3.0 kg (6 Ibs. 10 oz) Supplied Accessories Drum ...
Owner's Manual
Page 31
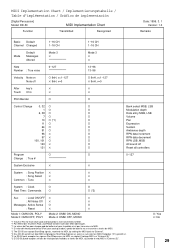
... de batería no se transmite a través de MIDI. *2 The DD-50 can accept Start/Stop signals, received via MIDI, by setting the MIDI clock to "External". *2 Das DD-50 spricht auf über MIDI empfangene Start/Stop-Signale an, wenn es auf externen MIDI-Taktgeber ("E") gestellt ist. *2 Le DD-50 peut accepter les signaux Start/Stop reçus...
... de batería no se transmite a través de MIDI. *2 The DD-50 can accept Start/Stop signals, received via MIDI, by setting the MIDI clock to "External". *2 Das DD-50 spricht auf über MIDI empfangene Start/Stop-Signale an, wenn es auf externen MIDI-Taktgeber ("E") gestellt ist. *2 Le DD-50 peut accepter les signaux Start/Stop reçus...


